4.1.1 LDAP
LDAP synchronization is used for downloading users and their changes (user name, user ID, card, PIN code, image, e-mail, phone number, password and login, license plate) from an external LDAP system. The behavior of the users deleted from external LDAP systems obeys the setting of the "Treated removed users" parameter. The behavior of the deactivated users in the Active Directory obeys the setting of the "Disable users when disabled in Active Directory" parameter.
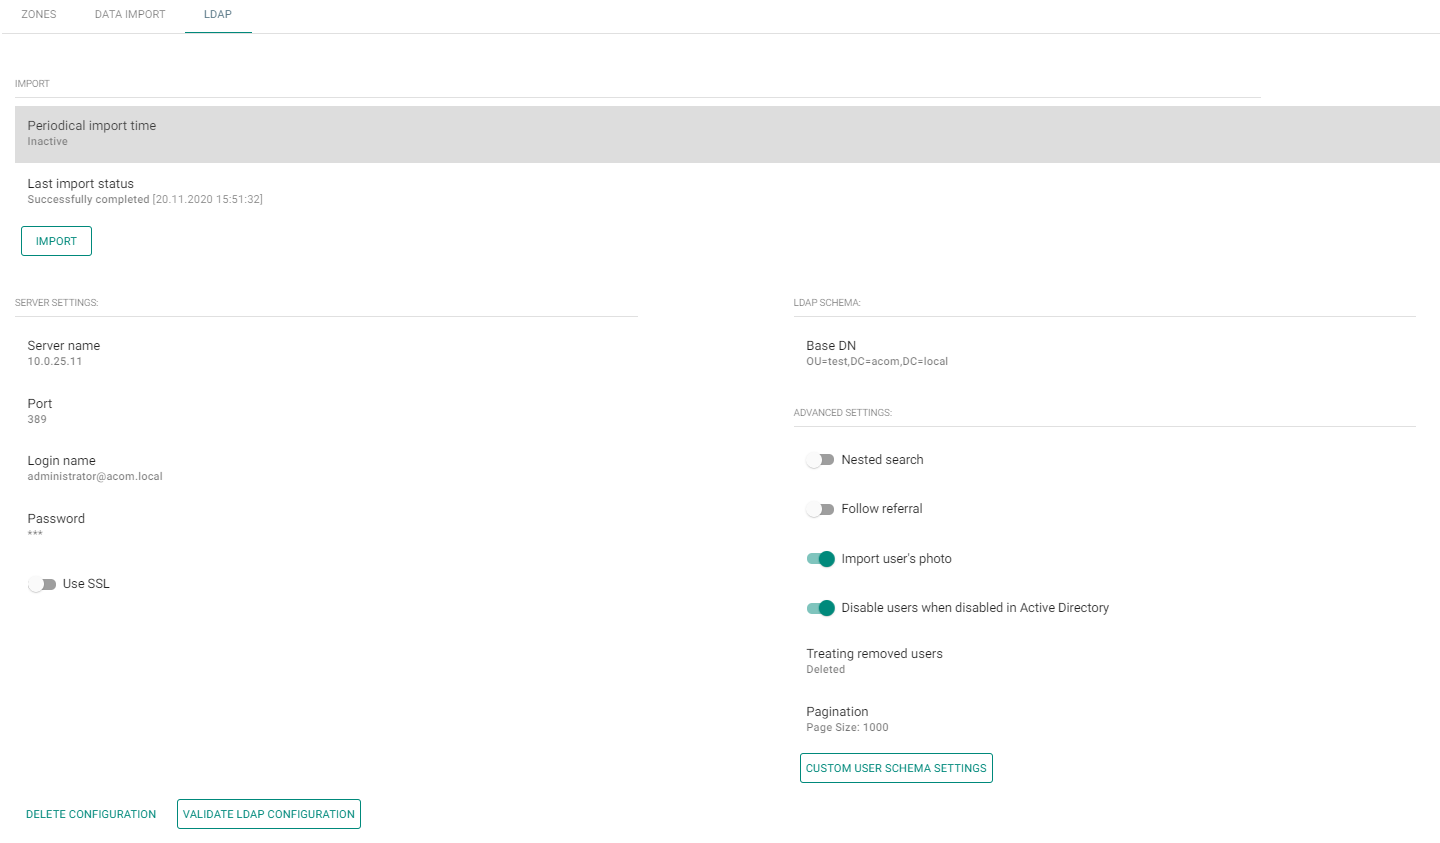 |
- Synchronization
- Scheduled synchronization time
- Define when 2N® Access Commander shall send a query to the LDAP server regarding user changes.
- Last synchronization state
- Display information on the last synchronization state. Whether it ended with an error or went successfully in accordance with the time of the action.
- Synchronize button
- Click the button to start synchronization immediately. The administrator thus need not wait for scheduled synchronization.
- Click the button to start synchronization immediately. The administrator thus need not wait for scheduled synchronization.
- Scheduled synchronization time
- Server settings
- Server name
- If DNS is set properly, enter the server name (WIN-9ABEB4AUOHD).
- If DNS is unset, fill in the IP address of the server on which LDAP is running.
- Port
- The LDAP port is 389 (without SSL) by default. If you want to use encrypted connection in your company, enter port number 636. The SSL support must be on the LDAP server side too.
- If set differently by the administrator, the port number must be changed in 2N® Access Commander too.
- Login name
- Login name of the user with appropriate rights to the root or the whole tree. Enter the login name as follows:administrator@domain.com
- Password
- LDAP server user password.
- Use SSL
- If SSL is disabled, it is unnecessary to rewrite the port number.
- If SSL is enabled, it is necessary to rewrite the port number to 636.
- Delete configuration button
- Click the button to delete all the settings. The earlier loaded users are not deleted.
- Test LDAP setting
- Verify the LDAP setting.
- Server name
- LDAP schema
- Base DN
- This is the root point from where the directory search starts. It can be an extension or a root, for example: CN=administrator,CN=users,DC=domain,DC=com
- Base DN
- Advanced Settings
- Nested search
- With nested search, not only the root, but the whole tree is searched.
- Follow referral – enable the LDAP Referral function.
- Import user's photo – import the user photo from the LDAP system.
- Disable users when disabled in Active Directory – deactivate the 2N® Access Commander users while synchronization, who were disabled in the Active Directory.
- Treating removed users – define how to treat the users removed from an external system.
- Pagination – pagination uses the Simple Paged Results Control LDAP extension, allowing results to be split into pages for synchronization with larger directories.
- Custom user schema settings – use the schema to define selected attributes set in the LDAP system.
- Nested search
Note
- Make sure that the 91379042 2N® Access Commander – Integration License has been purchased and added so that the LDAP company tab can be accessible.
Tip
- Refer to www.ldap.com for more LDAP details.