4.1 Companies
What Is a Company Used For?
Within one installation, divide the 2N® Access Commander settings into companies to prevent the managers of one company from seeing the users of the other company. This method also enables common building facilities to be shared by multiple companies (entrances, lifts, restaurants, meeting/conference rooms, etc.).
Company list
- Select the Company card.
- Select (Add button).
- Enter Company name and click Create.
Company details
- Company name – edit the company name.
- Default application language – set the default application language for all of the company users. A new user can change the default language in its profile (if login is created).
Holidays
- Holidays – set the company holidays for monthly balance computation. The hours worked on holidays are counted as hours worked on weekends (i.e. above the common working hours).
- Copy holidays – copy holidays from another company. Go to the company to which holidays are to be copied and select the company from which holidays are to be copied. Just click Save. Holidays are copied including dates and names. You can copy holidays repeatedly, but if the holiday to be copied is already listed, only the holiday name is rewritten. If unlisted, the holiday is added.
Attendance Mode
- Working days – workday selection.
- Common working hours – set the common working hours (from – to) for company user Attendance balance computation. If you set from 8 a.m. to 4,30 p.m., the working hours include 8 hours plus a 30-minute lunch break. If a user works less than 8 hours and 30 minutes per day, its account will show a negative balance for that day.
Visitors
- Default groups for new visitor – set the groups that will be automatically assigned to a new visitor when this company has been selected.
- Company colors
- Backround color – select the header background color for the e-mail to be sent.
- Foreground text color – select the header foreground color for the e-mail to be sent.
Tip
- The e-mail header preview shows the final appearance of the e-mail to be sent.
- Restore default – restore the default header apperance.
- E-mail templates – display the list of available e-mail templates. Use a template to set the e-mail subject, header, salutation, complememtary text and signature. The e-mail preview shows the final appearance of the e-mail to be sent. You can send a test e-mail to the set e-mail address to check the e-mail appearance.
- Visitor PIN code
- Visitor QR code
- User PIN code
- User PIN code
Bluetooth
- Paring time – set the pairing time.
- 2N device for initial pairing with smartphone – make sure that at least one device equipped with a Bluetooth module is added to 2N® Access Commander. And that the device is added to the zone assigned to the user company.
The pairing time starts running when you press Generate on the user and the PIN is displayed. In this window, you can enable the use of the USB dongle for pairing. Having set all the parameters, click OK. You will be redirected to the user list for user selection. Refer to 4.2.1 Bluetooth.
Zones
- Company zones – assign zones to a company to define the set of facilities to be used by the company users (e.g.the Common space and 4th floor zones, which include the reception entrance door and all 4th floor entrances). One zone can be assigned to multiple companies and one company can be assigned more zones.
Data Import
- User import from device – import users from a selected device.
- User import from CSV file – import users and groups from a CSV file.
- Download CSV template file – download a CSV template file for user import.
User import from device
- Importing users who have been assigned Bluetooth credentials requires replacing any existing keys in Access Commander. This means the Bluetooth credentials of existing users in Access Commander will stop functioning and those users must go through Bluetooth pairing again.
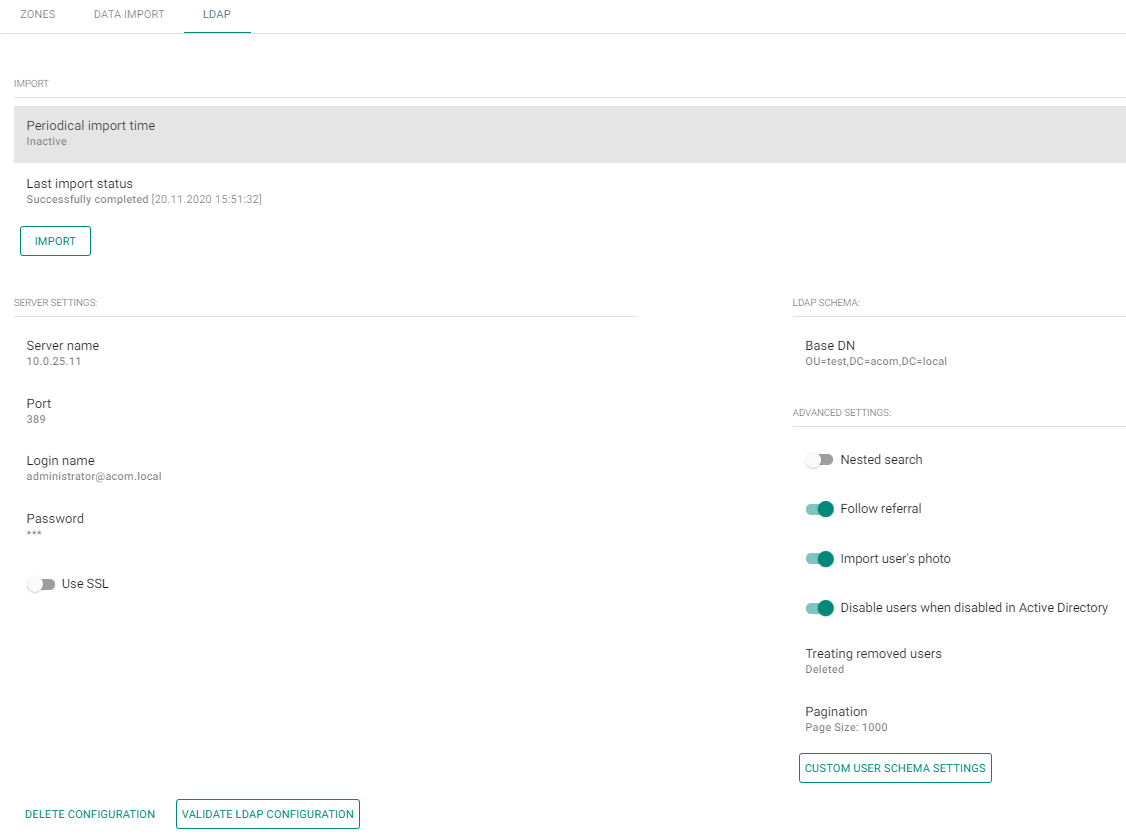
LDAP
LDAP is used for downloading users from the external Active Directory.


