Static IP address - How to set up static IP address on 2N® LiftIP
Info
This FAQ describes how to set DHCP/Static IP for lift communicator 2N® LiftIP. There are two ways how to configure this. The first option is via voice menu of 2N® LiftIP communicator. However this option will only allow you to switch between DHCP and static IP address. Second option is 2N® LiftIP Service tool. This toll wil allow you to switch between both modes and in case of static IP address it will allow you to edit it and other network settings.
Switch between DHCP/Static IP address via voice menu
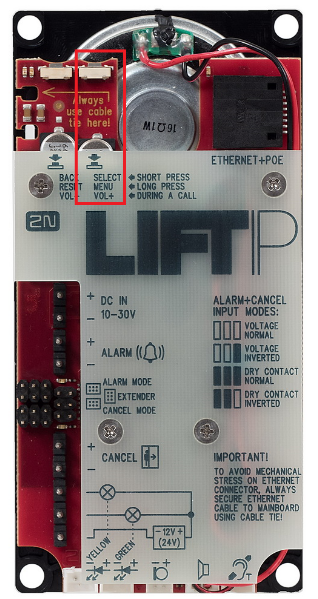
Hold the button for apx. for 3s MENU/SELECT to start voice configuration menu. Device will start annoucement „Voice system menu. To leave the menu press the BACK button." If error is detected, error number will be announced. Annoucement continues with IP address, DHCP and restore of factory default. Where you can find button MENU/SELECT is showed in the picture below.
Menu will announce informations:
- If error is detected: „Attention, the device is not working properly! Error code ..."
- „IP address je x.x.x.x"
- „DHCP client ON/OFF, to change the DHCP settings press the SELECT button now." (if the SELECT button is not pressed, menu continues to next setting).
- „To perform the factory reset press the SELECT button now." (if button is not pressed, voice menu ends)
For further information about voice menu please read chapter 2.6 of user manual.
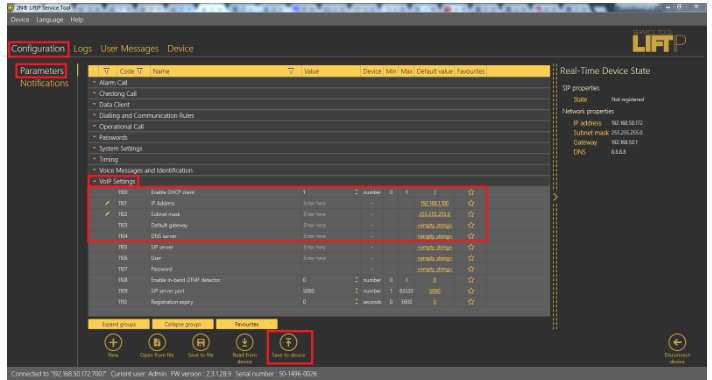
Switch between DHCP/Static IP address and it's configuration via service tool
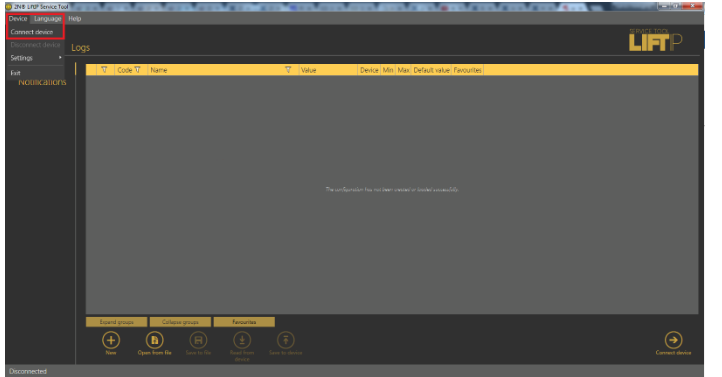
First it's necessary to connect to the device. Open 2N® LiftIP Service tool and on the toolbar on the top choose Device->Connect device.
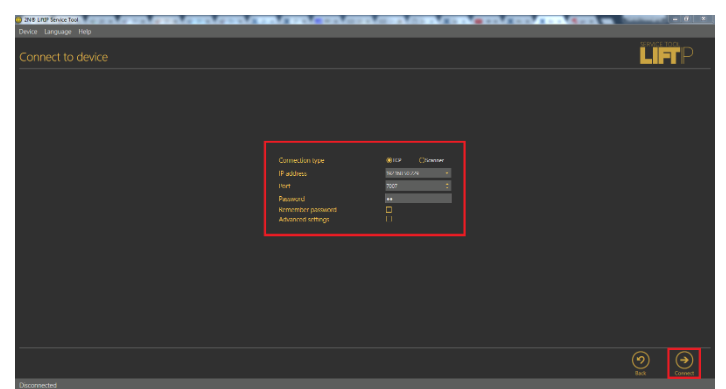
Now connect to the device, if you don't know IP address, then use FAQ How to get IP address of lift communicator 2N® LiftIP. Fill in IP address of the device, password (default is 2n) and click on connect.
Now go to section Configuration->Parameters->VoIP Settings. Here you can enable or disable DHCP client (0 disabled, 1 enabled). If DHCP client is disabled, then you can edit IP address, gateway, mask and VoIP settings. Once you will finish configuration, click on Save to device.