2N IP Intercoms - How to upload a configuration with HTTP API
The HTTP API was designed for controling selected 2N IP Intercom functions via the HTTP protocol. It enables 2N IP Intercoms to be integrated easily with third party products, such as home automation, security and monitoring systems.
Below is an example how you can change configuration parameters of the 2N IP Intercom (video framerate/resolution) and upload them into the 2N IP Intercom via HTTP API.
You can find a complete manual on this page: 2N IP Intercom HTTP API manual
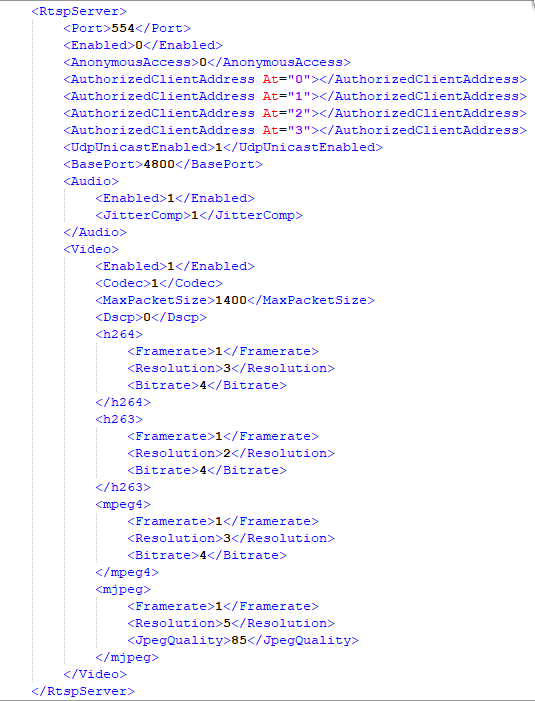
Once you download the config backup from the intercom, you can open it in Notepad++ or any other text editor. Here is an example with RTSP parameters:
In the picture you can see the section for RTSP. For the H.264 codec, you can see <Framerate> - 2; <Resolution> - 2; and <Bitrate> - 4
These numbers correspond with the settings on 2N IP Intercoms — the number means always the position of the parameter, as shown on this screenshot:
For H.264 those parameters here:
- Video Framerate: 30 fps - (number 1 in the config file)
- Video Resolution: CIF - (number 2 in the config file)
- Video Bitrate: 512 kbps - (number 3 in the config file)
The logic for those parameters is always the same - they start from 0.
The /api/config function helps you upload or download the device configuration. The function is part of the System section and the user must be assigned the System Control privilege for authentication if required. The function is available with the Enhanced Integration licence (up to v2.35) or included in the basic installation (v2.35 onwards).
Use the PUT method for configuration upload. The reply is in the application/json format and includes no other parameters.
Example:
PUT /api/config{ "success" : true}
The put request can look like this https://192.168.50.163/api/config where the 192.168.50.163 is the IP address of the intercom.
You can try this by using the HTTP API test tool available on https://2N_IP_Intercom_address/apitest.html
The example is in the attached picture, you need to upload the xml file with the configuration.


