2N® Student Monitoring System
Info
This FAQ describes, how you can configure 2N® VoiceBlue Next gateway (You can also use 2N® VoiceBlue Max, 2N® BRI Lite/Enterprise or 2N® StarGate and 2N® BlueTower as the configuration is basically the same) together with 2N IP intercoms and 2N® Access Unit for the school scenario. You can configure the intercom to send SMS message through the gateway as a confirmation that a student has arrived to school. Once student will swipe the card to open the door, SMS to a parent cellphone is sent. Below you can find a step by step configuration for both devices. FW version of 2N IP Intercom has to be v2.16 or higher and for 2N® VoiceBlue Next has to be at least v1.26.3. Please keep in mind that even when you have multiple entrances with intercoms, you still need only one gateway!
How to configure 2N® VoiceBlue Next
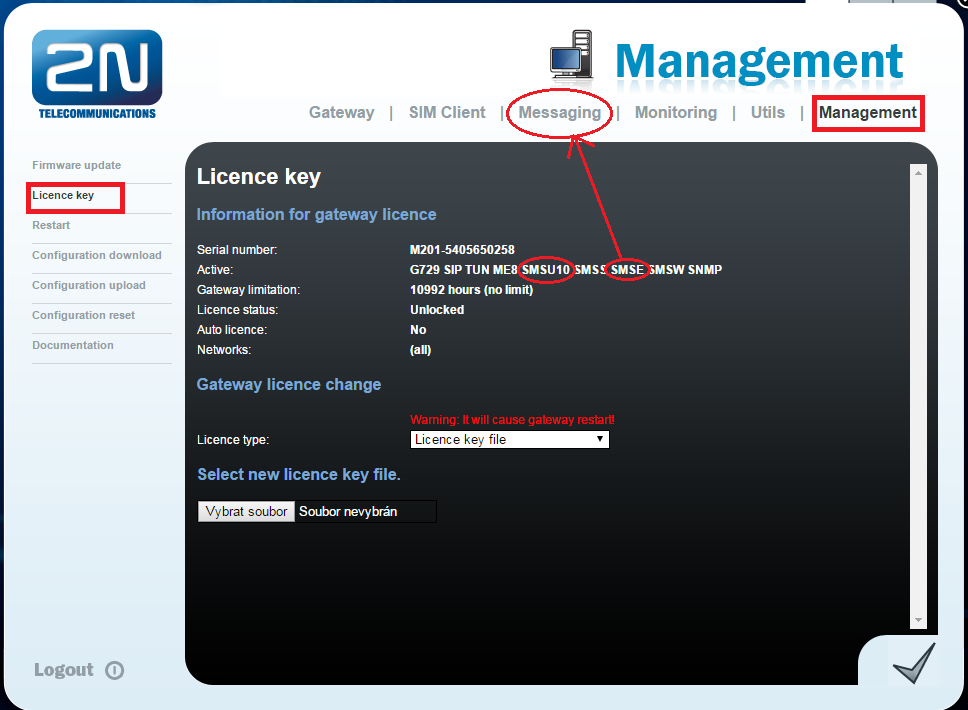
Note: As the very first step please make sure that the license for Email2SMS feature is uploaded into your 2N® VoiceBlue Next gateway. This license is sold as a package for 10 users (you can buy licence for 10, 20, 30, etc. users) and you can have up to 200 licensed users in the gateway. If you want to verify whether you have the correct license uploaded in your gateway, go to section "Management -> License key". You should see the licenses called SMSE and SMSUx and in the "Active" row. SMSE indicates that Email2SMS function is enabled and SMSUx indicates number of licensed users where x stands for this number (see the picture below). If there's not a license for Email2SMS (SMSE) then you won't see the "Messaging" on the top menu. For each intercom you need one Email2SMS licence in the gateway!
Configuration steps
Modules grouping
In the first step go to section "Messaging –> Modules grouping" and enable SMS server – check the appropriate check-box. Next add GSM modules to SMS groups in order to facilitate incoming/outgoing SMS routing. It can be done based on your requirements e.g. according to the GSM provider, etc. The last step in this section is to assign SMS groups created in the previous step to the User groups if you want to use messaging with different routing rules. The GSM gateway can contain up to 4 User groups and up to 4 SMS groups.

Add User
As a next step you need to skip to the section "Messaging –> Users", click on the "Add" button and create new SMS user(s) who will send and receive SMS messages. There are several parameters in this section which have to be set. You need to select the communication protocol for SMS processing (SMTP/POP3) and assign the user to User group. Also do not forget to define the Login name (without domain) and Password to log into the SMS server via your e–mail client. You can see all parameters from this section in the picture below where was created user "Helios IP" with the login "SMS" and password "Helios". Once you fill in all parameters, click on the "OK" button. The user will be added and after that you have to make one more click to the "Save settings" button in the bottom right corner of the page (blue circle label in the picture).

General settings
Set the parameters of domain in the "Messaging –> User Group –> General settings" sub-menu. The domain is automatically assigned to the user´s login in the selected User group and it represents the user´s e–mail address. In this section you can also define some parameters for POP3 and SMTP such as subject of email, maximum SMS per email, next you can add “From” field as well as “Subject” to SMS (see the picture below).
In our example (in the previous step) a new user was created with login name "SMS". In this section we will set domain as: gateway.com. Then the e-mail address of the user with rights to access the SMS server will be SMS@gateway.com. The “@” character is completed automatically and it is not included in the domain´s field.

Outgoing SMS routing
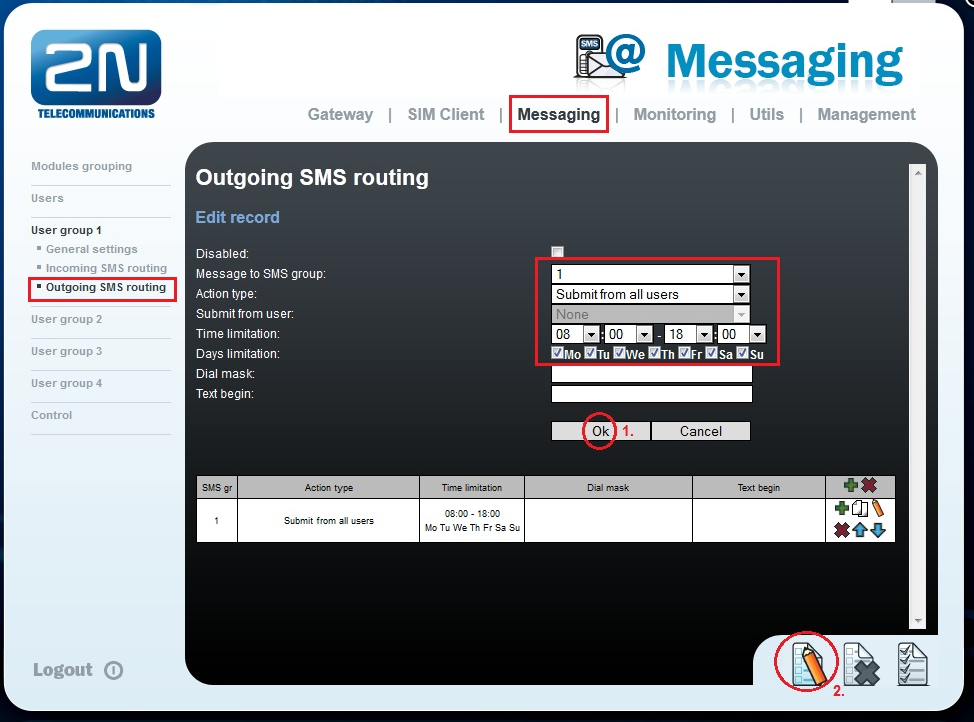
As a last step you need to specify routing rules for outgoing SMS – it is done in the "Messaging –> User Group –> Outgoing SMS routing" menu where you click on the "Add" button. In this section you will specify mainly these parameters:
- Message to SMS group – the SMS group via which the outgoing SMS will be routed
- Action type – define how to process outgoing SMS. You can choose from two options: Submit from user (SMS can be sent only from selected users) or Submit from all users (enable sending SMS from all the SMS group users).
- Submit from user – choose a user who can send SMS (this is used only if "Submit from user" was selected)
- Time limitation - here you can set time limitation for when is the routing active. So for instance you can set this only for morning, when students are arriving to school.
- Day limitation - choose days when the routing will be active. For instance only business days when school is opened.
Note: do not forget to enable the SMS server as shown in the first step (there is a check-box)!
In the picture below there is shown settings for User Group 1. Messages (emails) from all users in this User group are routed via SMS group 1. It means that these emails will be transferred to SMS and sent only via GSM modules assigned to SMS group 1. It is GSM module 2 in our example (as you can see in the picture from step 1).
How to configure 2N IP intercoms
Note: Please keep in mind that Enhanced integration (up to v2.35) or Gold (v2.35 onwards) license is needed in order to use email features!
Configuration steps
Add user
- firmware v2.23.1 and older:
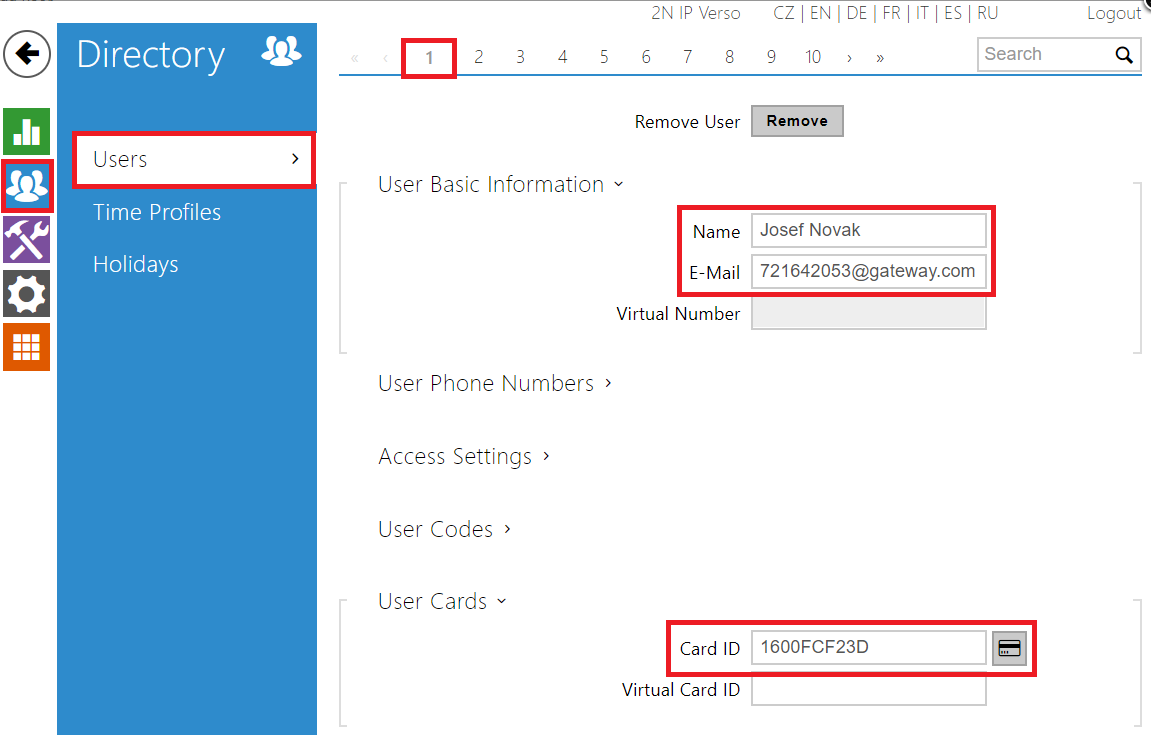
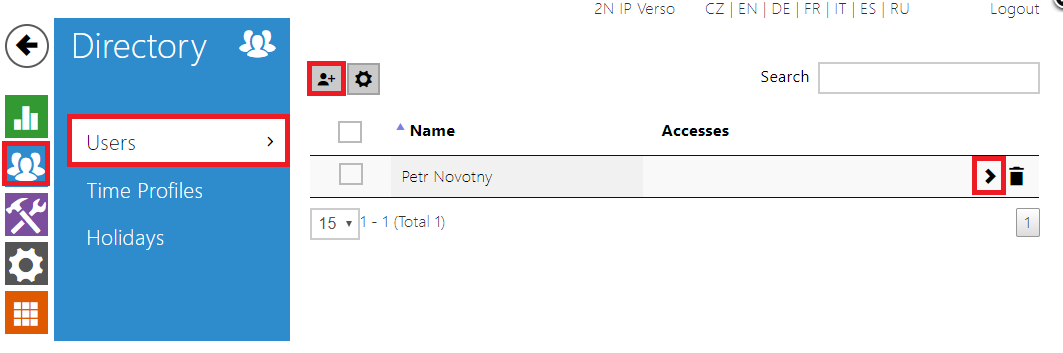
Go to section "Directory->Users" and choose a number of user on bar on the top of the screen (1, 2, 3 and so on). Check "Position Enabled" and fill "Name" (use name of the student, it will be used in the SMS), "E-mail" (email has to be in format phone_number@domain, so in our case 721642053@gateway.com for instance, number is phone number of the parents cell phone), "Card ID" (fill ID of the students card or fob).
- firmware v2.24.0 and later:
Go to section "Directory->Users" choose a user or create a new one. Fill "Name" (use name of the student, it will be used in the SMS), "E-mail" (email has to be in format phone_number@domain, so in our case 721642053@gateway.com for instance, number is phone number of the parents cell phone), "Card ID" (fill ID of the students card or fob).

SMTP configuration
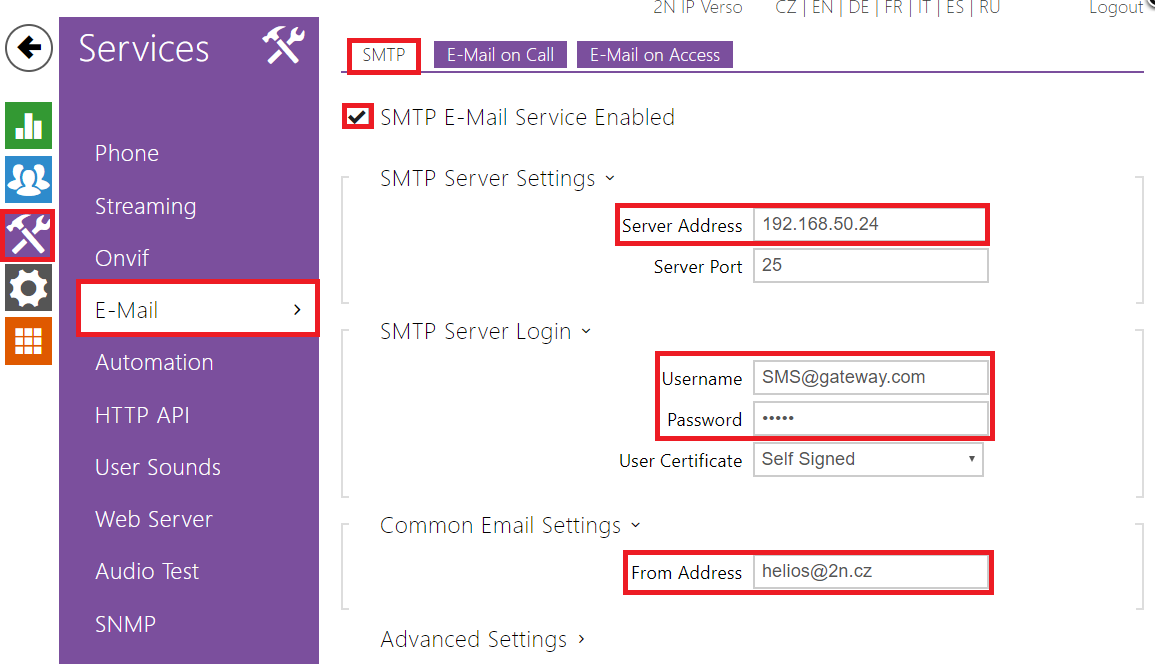
Go to section "Services->E-mail->SMTP" and check "SMTP E-Mail Service Enabled". Then fill "Server Address" (IP address of the gateway) if you did not change port in the gateway, then leave it as it is - port 25. Then fill "Username" and "Password", use credentials you used for user you created in the gateway, in case of Username you have to use domain as well. So credentials for this example are SMS@gateway.com/Helios. In the last step fill some email to field "From Address". As you are sending SMS messages in this scenario, it does not matter what you will fill there, you can even fill there address you made up, however this field is mandatory and has to be filled.
SMS configuration
Go to section "Services->E-Mail->E-Mail on Card". In this section set "All Accesses" for "Send E-Mail upon". To the field "Body" fill the message you want to send when student arrives to school. You can see example in picture below, we used variables $User$ (this variable will be substituted by name of the student who used the card) and $DateTime$ (this variable will add current time and date to the message). Please find list of available variables below:
- $User$ - Called username
- $DateTime$ - Current date and time
- $AuthId$ - User authentication ID
- $HeliosId$ - Intercom identification
Last thing you have to do in this section is uncheck "Attach Snapshot".

If you will swipe valid card now, 2N IP Intercom will send and email to the gateway and it will send SMS message to the predefined cell phone.
Set time on 2N IP intercom
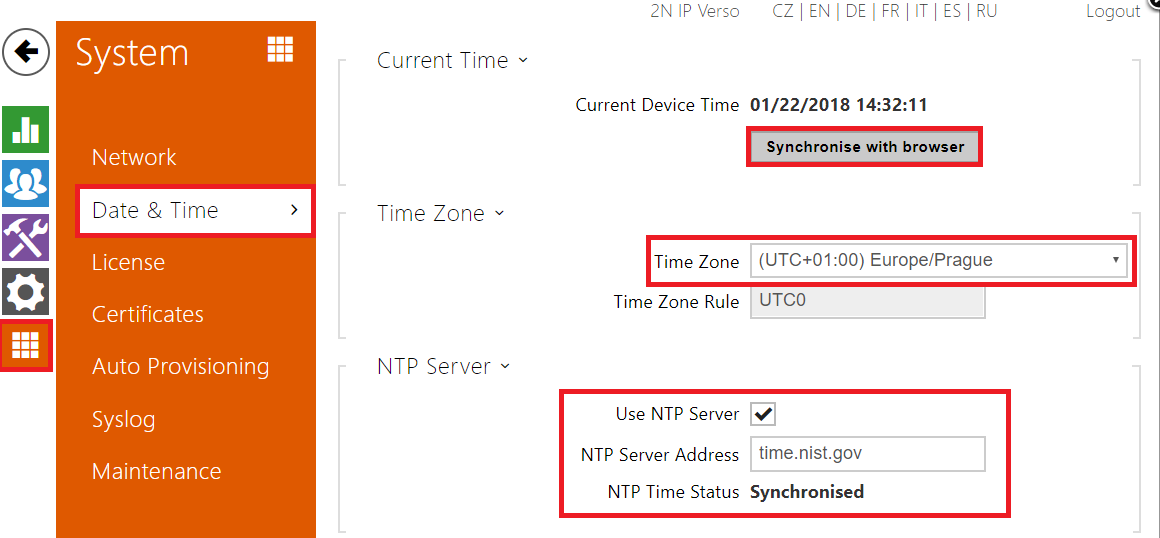
Go to section "System->Date & Time", pick the right "Time Zone" and if possible, you can synchronise the intercom with NTP server. If NTP server is not available, then you can synchronise the intercom with your browser by clicking on "Synchronise with browser".
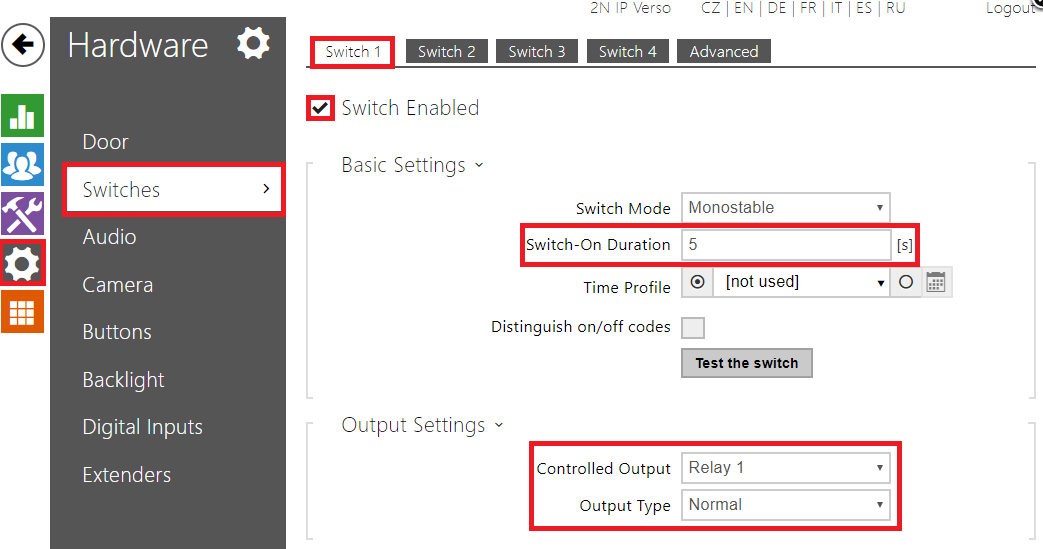
Switch configuration
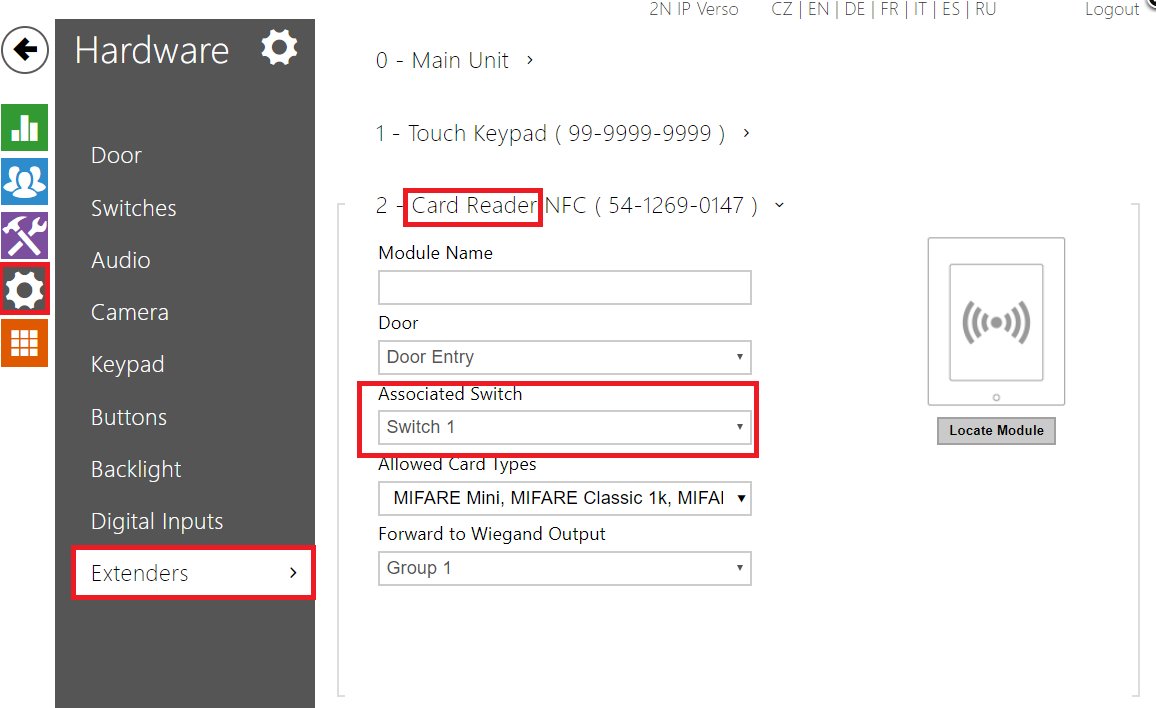
You also need to configure the intercom to open the door once the student swipes a card or fob. Go to section "Hardware->Extenders", find your card reader and again choose on of the switches for "Associated Switch".
Once you will set appropriate switch to be controlled by the card reader, then you can configure the switch itself. Go to section "Hardware->Switches" and pick Switch you choose before. If switch is not enabled, then do so by checking "Switch Enabled". There are three the most important settings for the switch. By "Switch-On Duration" you can define for how long the switch will be activated. "Controlled output" define which physical output will be controlled by the switch, you can choose from available relays or active 12V output. By "Output Type" you can define whether you are using normal locks (Normal) or inverted locks (Inverted).