Automation, Multicast - How to send/receive separate multicast streams on 2N IP Intercoms
Every 2N IP Intercom can receive/send one multicast stream by default with the basic license. If you wish to receive/send more multicast streams (up to 5 different multicast IP addresses or ports) then you need Enhanced integration license (up to v2.35) or Gold license (v2.35 onwards) which enables you to configure this feature via Automation. It is very useful if you have for example a building with 2 separated floors – 2N IP Intercoms on the 1st floor are listening on multicast IP address 224.10.10.1 and port 10 000 (represented by 2N® IP Video Kit in the example below), then 2N IP Intercoms on the 2nd floor are listening on 224.10.10.2 and port 10 000 (represented by 2N® IP Safety). Once you press the button on any of these intercoms on the 1st floor you will make an announcement to all other intercoms on the 1st floor. The same will happen once you press the button on any of the intercoms on the 2nd floor – you will multicast to all intercoms on the 2nd floor. Once you finish your announcement you press the button again and the multicast stream will finish — but let's imagine that you also need a few intercoms that are able to make an announcement to the 1st floor as well as the 2nd floor and also receive announcements from both these floors. In this case you will need an intercom with two buttons at least (or with a keypad).
How to configure intercoms (2N® IP Video Kit) on the 1st floor?
As mentioned previously all intercoms should be able to send multicast traffic once the quick dial button is pressed and also receive multicast if any other intercom is transmitting. Therefore we will set two functions in the section "Services -> Automation" for each intercom.
Send multicast: Once you press a specific quick dial button on any of intercoms from the 1st floor (it will be 2N® IP Video Kit in our example) then you engage conversation with all intercoms on this floor. Complete configuration of “Function 1” is shown in the picture below – when the first quick dial button is pressed for the first time, condition on the 2nd row is met and it will trigger actions on the 4th and 5th rows, i.e. 2N® IP Video Kit sends specific multicast request (command=group01) to all other intercoms and starts sending multicast traffic. Based on the request these intercoms open a multicast channel and are able to receive multicast traffic (on IP address 224.10.10.1 and port 10 000). Once you finish your announcement then you press the first quick dial button again to stop the multicast sending. In this case 2N® IP Video Kit sends another multicast command to all the intercoms (command=stopgroup01) and stops sending the multicast stream.
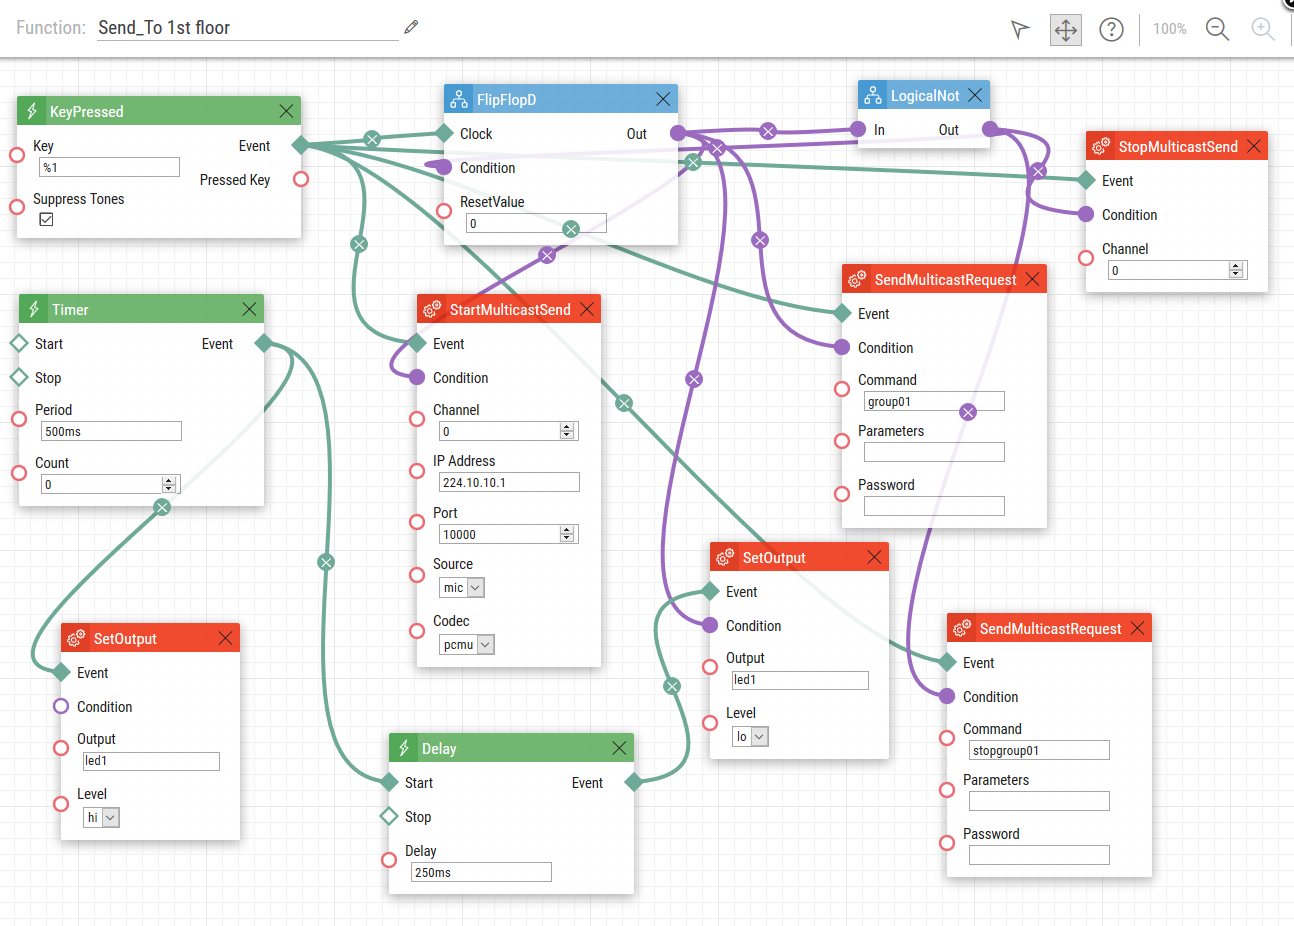
Note: Sometimes it is also very useful to check somehow if the first quick dial was pressed for the first time (to establish a multicast session) or for the second time (to finish a multicast session). This indication can be configured with some of our intercoms – you can use LED diode or a button of 2N® IP Safety which is always shining (idle time – no multicast stream initiated from this intercom) and once you press the button for the first time (to begin multicast a session) then this LED or button starts blinking (example below – 250ms shining and 250ms not).

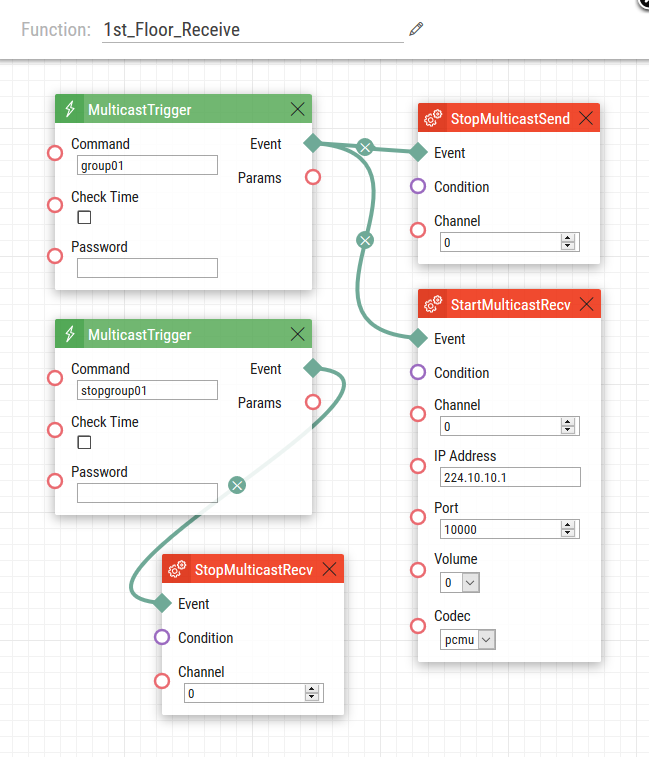
Receive multicast: All other intercoms on the 1st floor have to be configured that once they receive a specific multicast request (group01 in our example) they will activate a channel and start listening on a specific multicast IP address and port. After that, once the announcement from the selected intercom is finished, then another multicast request is received (stopgroup01) and multicast channel is closed.
How to configure intercoms (2N® IP Safety) on the 2nd floor?
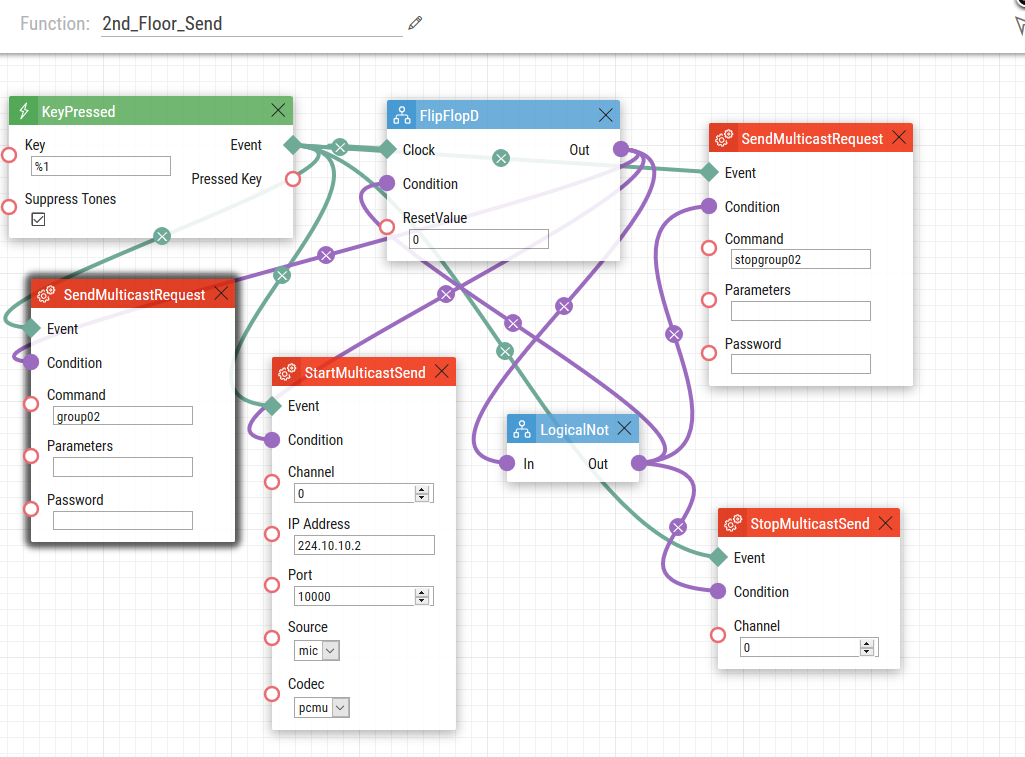
Configuration of intercoms on the 2nd floor will be almost the same as shown previously (1st floor) but in this case all intercoms send (and listen) multicast stream to IP address 224.10.10.2 and port 10 000. Also multicast request which activates / deactivates the channel was changed to "group02" for activation and to "stopgroup02" for deactivation.
Send multicast:
Receive multicast:

How to configure 2N® IP Audio Kit which can communicate with intercoms on the 1st floor as well as on the 2nd floor?
Configuration of these selected intercoms which can send multicast traffic to the 1st floor as well as to the 2nd floor is a combination of two previous configurations. But keep in mind that these intercoms need to have at least 2 quick dial buttons (or a keypad). In this case you have to configure three functions in the Automation section. Function 1 is absolutely the same as shown for 2N® IP Video Kit (1st floor intercom), Function 2 is the same as for 2N® IP Safety (2nd floor intercom) and Function 3 ensures that you can receive multicast from 1st floor intercoms as well as from the 2nd floor intercoms.
Send multicast (Send_To 1st Floor - downloadable here):
(Send_To 2nd Floor - downloadable here):

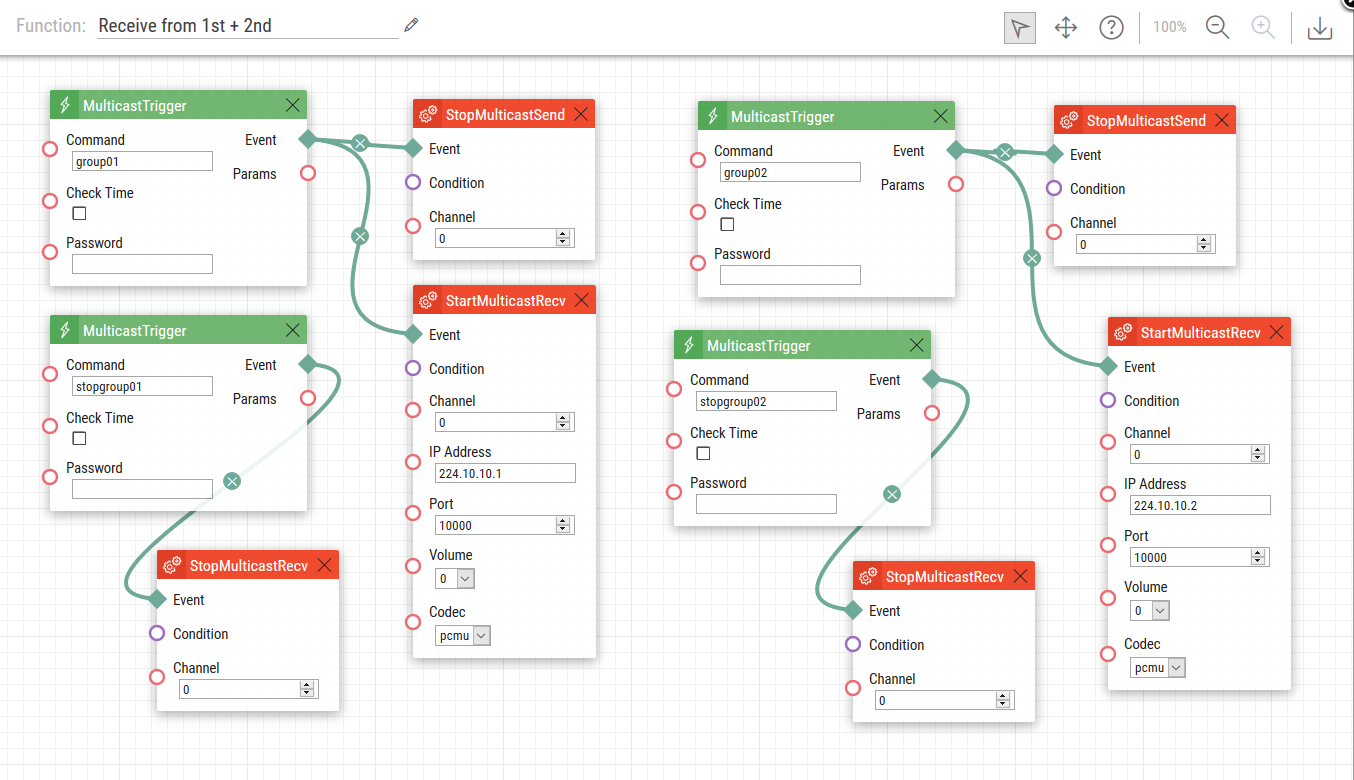
Receive multicast from different floors (Receive from 1st + 2nd Floor - downloadable here):
Note: All commands used in the Automation section are thoroughly described in our Automation manual altogether with corresponding examples.
- The manual is available on our web page: Automation Manual
More information: