Firmware update – How to do FW update or factory reset of 2N® Indoor Touch?
How to update 2N® Indoor Touch?
2N® Indoor Touch can be updated with microSD card (highly recommended) or web interface. The firmware package always includes the latest OS version, the 2N launcher (home screen) and 2N® IP Mobile application. The web interface is available since FW version 2.0.3. It can be used for FW update of the device besides other features. Main difference between these two options is the type of the update. In case of SD card you can choose between full or partial update. Full update will reflash everything and device configuration will be lost. However if you perform factory reset of the device, then the device will remain on the same FW version. If you choose partial update, then user configuration will be preserved. Nevertheless, the device will go back to the last FW version which has been uploaded by full update once factory reset is performed. The web interface update allows for partial update only.
How to update 2N® Indoor Touch via SD card
Warning
The complete FW/SW update of 2N® Indoor Touch resets the unit to factory defaults including all user data and previously installed applications!
Please follow the update steps below:
- Download the latest 2N® Indoor Touch firmware version here.
- Get a MicroSD card (SDHC) with maximum capacity of 16GB and formatted to the FAT32 file system.
- Save the *.ZIP file and unpack its contents to the root directory of the MicroSD card. SD card has to contain these files - MLO, service_system.img, u-boot.img, uImage, upgrade.img
- Insert the SD card into the MicroSD card slot on the right side of 2N® Indoor Touch.
Note: Make sure the contacts (pins) on the microSD card point towards the display of your 2N® Indoor Touch unit. - Reset the device as follows:
- Press the Reset button on the back shortly
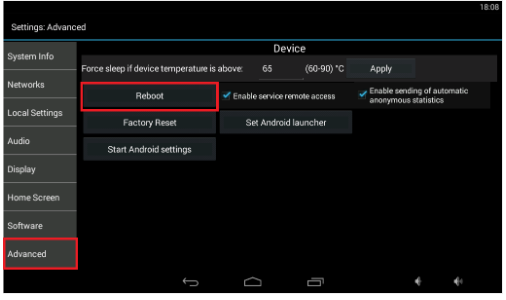
OR - Click the Reboot button in the Settings>Advanced menu:
- Press the Reset button on the back shortly
- Having detected the correct firmware files, 2N® Indoor Touch invites you to confirm the update via touch screen.
The update process is also indicated by an RGB LED on the device front.
Note: Don't turn off the device until the update process is finished. The update procedure takes approx. 10-15 minutes. - Remove the MicroSD card after the update procedure has finished and tap the display to restart the system.
How to update 2N® Indoor Touch via web interface
It is preferred to use the SD card for the update to ensure the clean installation of the firmware and prevent further issues.
Please follow the update steps below:
- Download the latest 2N® Indoor Touch firmware version from https://www.2n.cz/en_GB/support/documents/firmware.
- Open the web interface of 2N® Indoor Touch and log in (default credentials are Admin/2n).
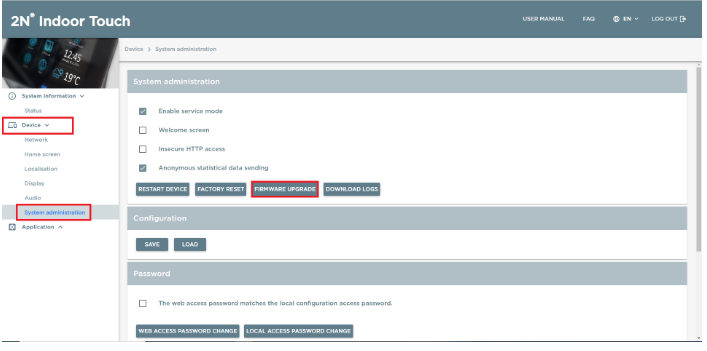
- Go to the section "Device>System Administration and click on "UPGRADE FIRMWARE".
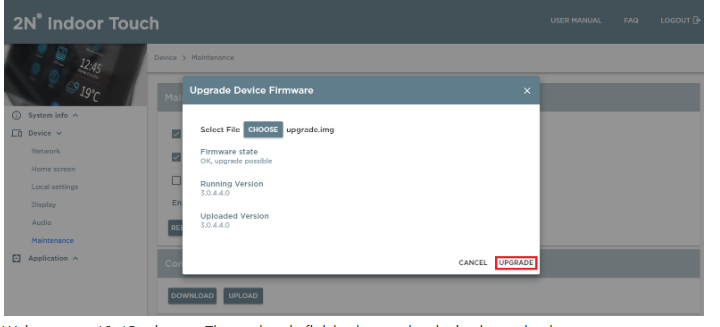
- Unpack the downloaded file to your PC. Click on "SELECT" and navigate to the folder containing the contents of the *.ZIP file. Then select the file named "update.img"

- Once the file is successfully uploaded and state changes to "OK, upgrade possible", then you can click on "upgrade" and the update will be performed.
- Wait approx. 10-15 minutes. The update is finished once the device boots back up.
How to do factory reset of 2N® Indoor Touch?
Follow the steps below to reset the 2N® Indoor Touch factory values:
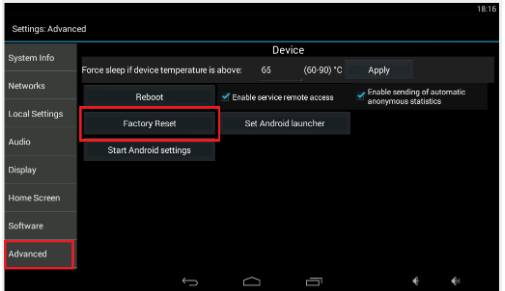
- Press the Factory Reset button in the Settings>Advanced menu:
OR - Press and hold the Reset button on the back of the device:
- Remove the device from the installation holder.
- Press and hold the Reset button until the RGB notification LED lights up (yellow).
- Release the Reset button and follow the instructions displayed.
Warning
Factory reset causes a complete deletion of all user data!
Where to find the reset button on 2N® Indoor Touch?
All connectors and hardware buttons can be found on the back of the device. See the picture below:
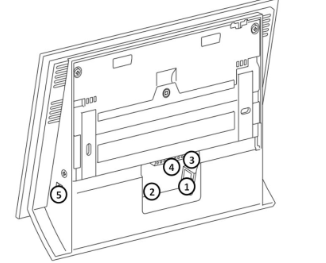
Backside Buttons/Connectors description:
- RJ-45 LAN 10/100BaseT connector
- 12V/2A DC supply terminal board (only if PoE is not used)
- Reset / Factory reset button
- Binary input/output terminal board (for application control)
- MicroSD card slot