How to control 2N® Indoor Touch via Automation of 2N IP intercom
Info
This FAQ describes how to control 2N® Indoor Touch with HTTP API with 2N IP intercom. On the side of the 2N® Indoor Touch HTTP API license is needed, ordering number is 91378395. On the side of the intercom you will need Enhanced integration license as Automation will be used, ordering number is 9137907. Below you will find screenshots of configuration with brief description of how to configure such function. Scenarios below serves mainly as a demonstration of possibilities given by HTTP API and examples of how to control your touch panel in this way. You can easily adjust them or use different ones with help from the HTTP API manual here.
How to control relay/output of 2N® Indoor Touch via 2N® IP Mobile
This function enables you to control the outputs of your touch panel via the native 2N application called 2N® IP Mobile. The output will be triggered by one of the lock buttons in the application showed below. All four locks will appear after you hold the button lock in the preview of a particular intercom. Those four locks are representing four switches in the 2N IP intercom web interface.

For our scenario we chose button one which is representing Switch 1. This switch can be configured in section "Hardware->Switches->Switch 1". Because these switches also serve to control the outputs of the intercom itself, you can optionally set parameter "Controlled Output" to "None". This will ensure that no output of the intercom will be triggered together with an output of the touch panel once the Switch 1 will be triggered.

Now we define the HTTP command which the intercom sends to itself once the lock button on the touch panel will be pressed. This HTTP command will be used in the next step, where the Automation function will be created. This command has to be entered in the field "Switch-On Command" and URL looks like this:
http://192.168.50.157/enu/trigger/test
Part "http://192.168.50.157/enu/trigger/" is mandatory. The string at the end (test) can be replaced by a custom one. The IP address has to be replaced by IP address of your intercom.

In the next step you need to create automation function to control 2N® Indoor Touch via its HTTP API. To create an Automation scenario, click on edit of one of the functions as shown on the picture below.Then create the scenario by dragging-and-dropping and connecting the objects from the left side of the screen. The description of the function is below.
- Event.HttpTrigger Name=Test - This Event serves to detect the HTTP command you created in the previous step. If you chose a custom string instead of Test, then please fill the right one for "Name="
- Action.SendHttpRequest uri=https://192.168.50.236/api/v1/login?login=Admin&password=2n; Event=1 - This object ensures, that once the HTTP command from the HttpTrigger is received, then the intercom will send the HTTP command with authentication credentials to create a session with the touch panel. The IP address has to be replaced by actual IP address of your 2N® Indoor Touch.
- Event.Delay StartEvent=1; Delay=300mss - Delay on the third row ensures that session is opened properly, before intercom will send next HTTP command. Hence that the delay starts as soon as the HttpTrigger receives the http command.
- Action.SendHttpRequest uri=https://192.168.50.236/api/v1/gpio?action=set&name=relay1&type=value&value=1;Event=3 - This command will trigger relay1 of the touch panel after the delay from the Delay object and will set it to "value=1" (at the end of URL). Values in the URL are described in HTTP manual here.
- Event.Delay StartEvent=3; Delay=3s - After this delay another command will be sent and the relay will be set back to 0. So this delay defines, for how long the relay will be closed.
- Action.SendHttpRequest uri=https://192.168.50.236/api/v1/gpio?action=set&name=relay1&type=value&value=0;Event=5 - This command will open the relay after the delay from the Delay object. You can see that the command is exactly the same as the command from the 4th row. Except for the value at the end which was changed to "value=0".


Export for sandbox style automation: click to download
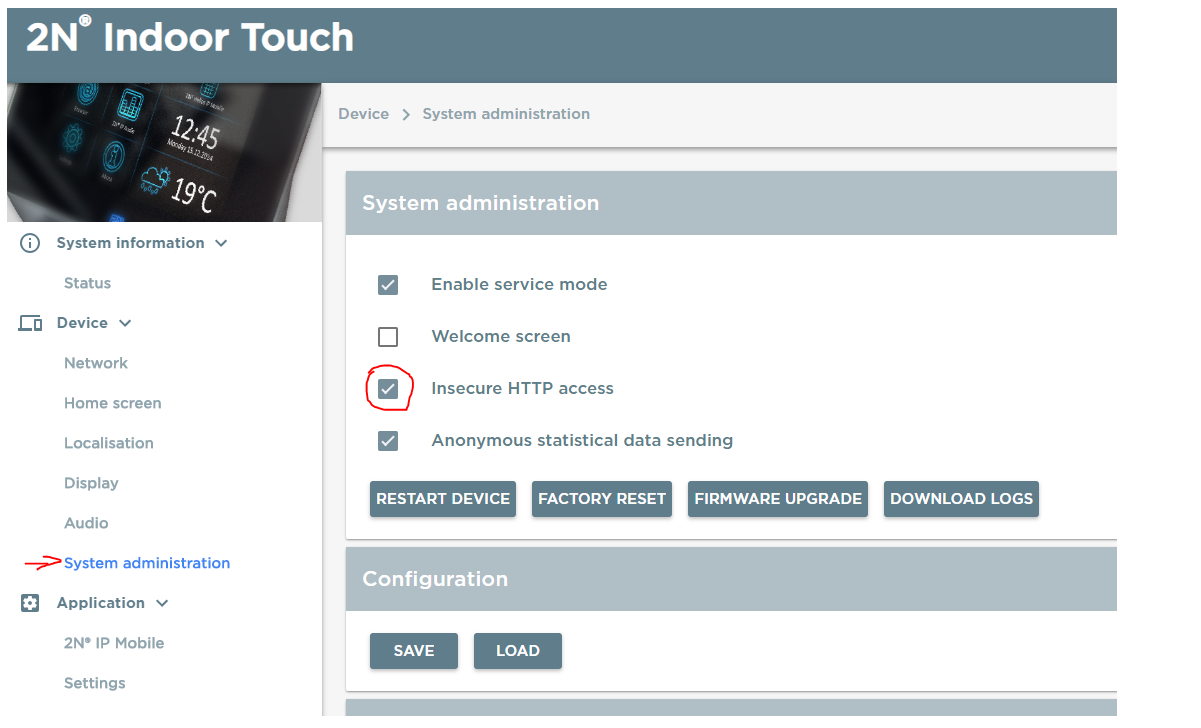
Last step will be to enable Unsecure HTTP API for your 2N® Indoor Touch. You will go to the web interface of your Indoor Touch then to the Device Section and finally to the System Administration, then check the Insecure HTTP Access like in the picture below.
How to minimize 2N® IP Mobile once call is ended
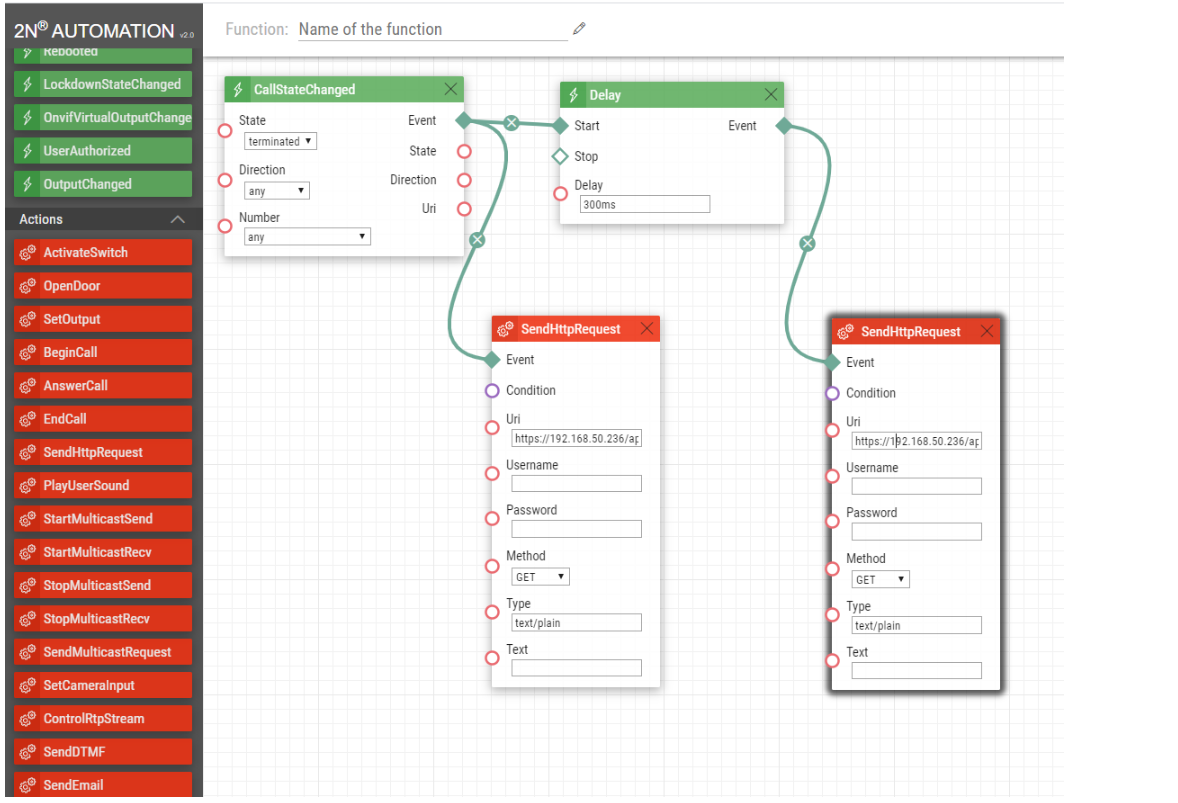
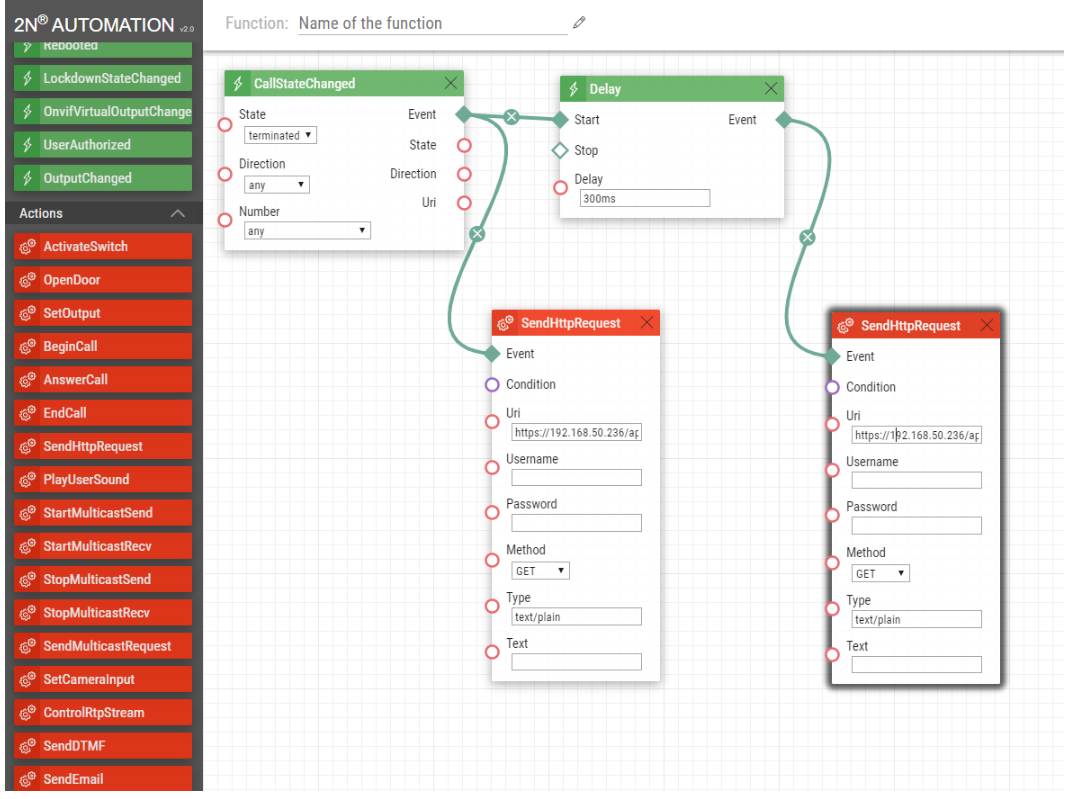
This feature is achieved by automation function only, so you don't need to configure switches like in previous scenarios. This function ensures, that everytime a call between the 2N® Indoor Touch and the 2N IP intercom is terminated, the application is minimized. How to create such a function is described below:
- Event.CallStateChanged State=terminated - This Event detects the end of a call and triggers the Action.
- Action.SendHttpRequest uri=https://192.168.50.236/api/v1/login?login=Admin&password=2n; Event=1 - This row ensures, that once the HTTP command from the CallStateChanged object is received, then the intercom will send HTTP command with the authentication credentials to create a session with the touch panel. The IP address has to be replaced by actual IP address of your 2N® Indoor Touch.
- Event.Delay StartEvent=1; Delay=300ms - Delay ensures that the session is opened properly, before the intercom will send the next HTTP command.
- Action.SendHttpRequest uri=https://192.168.50.236/api/v1/hipm?action=minimize; Event=3 - After the Delay ends, the intercom sends the HTTP command which will minimize the app. Description of this command can be found here.
How to restart 2N® Indoor Touch via 2N® IP Mobile
Now you will learn how to achieve a restart of the 2N® Indoor Touch by pressing the lock button in the app again. As the first three pictures are basically identical for this scenario, please refer to the previous one. We chose to use Switch 2 for this scenario represented by lock 2 in the app. You need to go to section "Hardware->Switches->Switch 2". If you want to disable controlled output on the intercom again, then the procedure is exactly the same as in previous step. You need to change parameter "Controlled Output" to "None". Then you need to fill "Switch-On Command" again. We chose this URL for this scenario:
http://192.168.50.157/enu/trigger/test1
Part "http://192.168.50.157/enu/trigger/" is mandatory. String at the end (test1) can be replaced by a custom one. The IP address has to be replaced by IP address of your intercom.
Now you need to create the automation function. Whole function is described below:
- Event.HttpTrigger Name=Test1 - This Event serves to detect the HTTP command you created in the previous step. If you chose a custom string instead of Test1, then please fill the right one.
- Action.SendHttpRequest uri=https://192.168.50.236/api/v1/login?login=Admin&password=2n; Event=1 - This row ensures, that once the Event from the first row is detected, then the intercom will send HTTP command with authentication credentials to create a session with the touch panel. The IP address has to be replaced by actual IP address of your 2N® Indoor Touch.
- Event.Delay StartEvent=1; Delay=300ms - Delay on the third row ensures that session is opened properly, before intercom will send next HTTP command.
- Action.SendHttpRequest uri=https://192.168.50.236/api/v1/maintenance/resetdevice; Event=3 - Once the Delay from the 3rd row ends, intercom sends HTTP command to restart the 2N® Indoor Touch. The IP address has to be replaced by the IP address of your touch panel. Description of this command can be found in manual here.