Static IP address - How to set up static IP address on 2N IP Intercom
In default setting the 2N IP Intercom device uses a dynamic mode, the IP address is obtained from DHCP server. In case you need to use a static IP address setting you have two options.
- In the web configuration menu navigate to System -> Network, disable the option "Use DHCP Server" and enter the network parameters described as below:

- Static IP address – static IP address of the intercom, which is used together with the below mentioned parameters if the Use DHCP Server parameter is disabled.
- Network mask – network mask.
- Default gateway – address of the default gateway, which provides communication with off-LAN equipment.
- Primary DNS – primary DNS server address for translation of domain names to IP addresses.
- Secondary DNS – secondary DNS server address, which is used in case the primary DNS is inaccessible.
- When setting Static IP Address please always fill at least Primary DNS so domain names can be properly translated to IP addresses.
2. In case that you do not have the possibility to change the settings via web configuration interface you can do it manually via quick dial buttons as described bellow for each model:
2N® IP Verso:
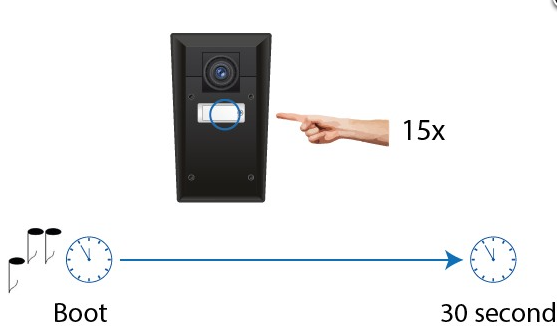
- Connect (or, if connected, disconnect and reconnect) 2N® IP Verso to the power supply.
- Wait for the first sound signal
 .
. - Press the quick dial button on the main unit 15 times.
- Switching is signalled with the sound signal
 .
. - Wait until the device is restarted automatically.
- Upon restart, the static IP address mode will be switched to the dynamic IP address mode and vice versa.


The following network parameters will be set after the static IP address mode is switched on and the device is restarted:
- IP address: 192.168.1.100
- Network mask: 255.255.255.0
- Default gateway: 192.168.1.1
Info
Be sure to press the button sequence within thirty seconds after the sound signal for security reasons. Up to 2 s intervals are allowed between the presses.
2N® IP Vario
- Connect 2N® IP Vario to the power supply (or, disconnect and reconnect it if already connected).
- Wait for the first acoustic signal
 .
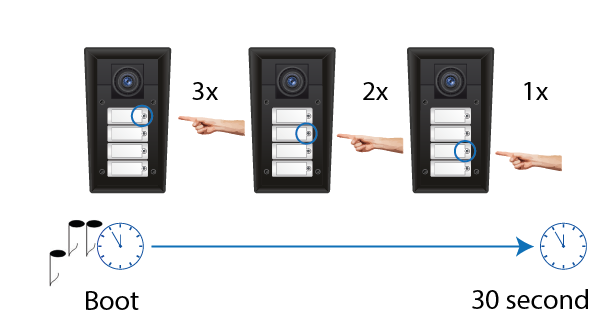
. - Press following buttons sequentially:
1, 1, 1, 2, 2, 3 for 3-buttons models
- 4, 4, 4, 5, 5, 6 for 6-buttons models

- The acoustic signal
 indicates mode switching.
 - Wait until the device is restarted automatically.

Info
The 1, 1, 1, 2, 2, 3 sequence must be entered within 30 seconds after the first sound signal for security reasons. The inter-digit delay may be 2 s at most.
2N® IP Force
- Static IP Address Setting for 4-button models
- Connect 2N® IP Force to the power supply (or, disconnect and reconnect it if already connected).
- Wait for the first acoustic signal
 .
. - Press buttons 1, 1, 1, 2, 2, 3 sequentially.
- The acoustic signal
 indicates mode switching.
 - Wait until the device is restarted automatically.

The device will have the following network parameters after restart:
- IP address – 192.168.1.100
- Network mask – 255.255.255.0
- Default gateway – 192.168.1.1
Info
The 1, 1, 1, 2, 2, 3 sequence must be entered within 30 seconds after the first sound signal for security reasons. The inter-digit delay may be 2 s at most.
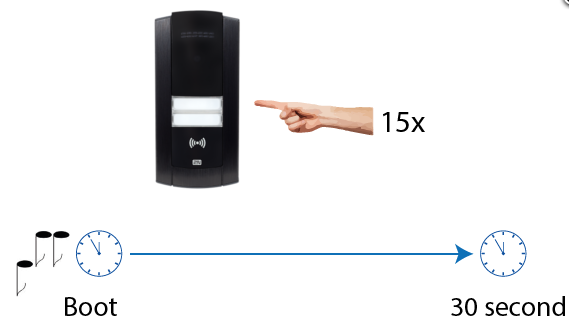
In case your 2N® IP Force device is equipped with 1 or 2 buttons, you can switch the modes using one button only.
- Connect 2N® IP Force to the power supply (or, disconnect and reconnect it if already connected).
- Wait for the first acoustic signal
 .
. - Press the first quick dial button 15 times.
- The acoustic signal
 indicates mode switching.
 - Wait until the device is restarted automatically.
Info
The 15 times 1 sequence must be entered within 30 seconds after the first sound signal for security reasons. The inter-digit delay may be 2 s at most.
2N® IP Safety
- Connect 2N® IP Safety to the power supply (or, disconnect and reconnect it if already connected).
- Wait for the first acoustic signal
 .
. - Press the quick dial button 15 times.
- The acoustic signal
 indicates mode switching.
 - Wait until the device is restarted automatically.

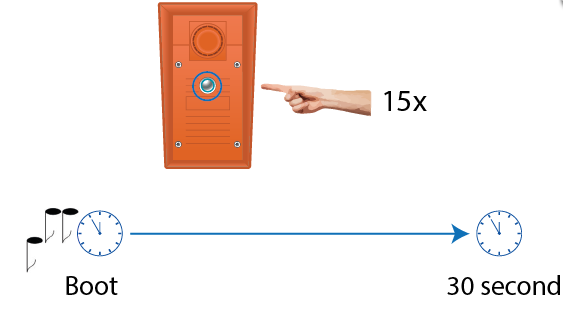
Info
The 15 times 1 sequence must be entered within 30 seconds after the first sound signal for security reasons. The inter-digit delay may be 2 s at most.
2N® IP Base:
- Connect (or, if connected, disconnect and reconnect) 2N® IP Base to the power supply.
- Wait for the first sound signal
 .
. - Press the quick dial button on the main unit 15 times.
- Switching is signalled with the sound signal
 .
. - Wait until the device is restarted automatically.
- Upon restart, the static IP address mode will be switched to the dynamic IP address mode and vice versa.
The following network parameters will be set after the static IP address mode is switched on and the device is restarted:
- IP address: 192.168.1.100
- Network mask: 255.255.255.0
- Default gateway: 192.168.1.
Info
Be sure to press the button sequence within 30 s after the sound signal for security reasons. Up to 2 s intervals are allowed between the presses.
2N® IP Uni
In case your 2N® IP Uni device is equipped with 1 or 2 buttons, you can switch the modes using one button only.
- Connect 2N® IP Uni to the power supply (or, disconnect and reconnect it if already connected).
- Wait for the first acoustic signal
 .
. - Press the quick dial button 15 times.
- The acoustic signal
 indicates mode switching.
 - Wait until the device is restarted automatically.


Info
The 15 times 1 sequence must be entered within 30 seconds after the first sound signal for security reasons. The inter-digit delay may be 2 s at most.