2N® NetStar - Initial configuration - How to start?
In this document you will learn how to set the initial configuration of 2N® NetStar. After having read this document you should be able to:
- connect to the NetStar via COM port (serial cable is attached to each NetStar delivery)
- configure network, time and system service parameters via COM port
- set the basic parameters of the NetStar with the help of configuration wizard
- explain the basic difference between online and offline database
Connection to the NetStar via COM
Each 2N® NetStar delivery includes a standard serial cable for the PC – 2N® NetStar connection. It is a six-core telephone cable which has RJ11 connector on one side and RS-232 female connector on the other side. For connection from your PC to 2N® NetStar you need to use HyperTerminal program or Putty. Set the Serial communication with these parameters:
- Transmission speed: 115 200Bd
- Data bits: 8
- Stop bits: 1
- Parity: None
- Flow control: None
After connection to the 2N® NetStar you have to enter the correct username and password in order to get access to the Main Menu of the configuration interface. The default Administrator settings are as follows:
- Username: Admin
- Password: 2n
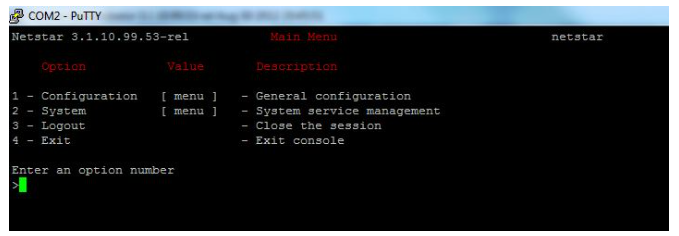
In Main Menu you can see four options for settings and you can also see there the actual firmware version that is loaded in 2N® NetStar. It is very important information for you because “Administration tool” which is used for next configuration needs to have the same version as firmware version uploaded in 2N® NetStar.
Configuration menu – number "1" in Main Menu
If you press number 1 in Main Menu you will go to Configuration menu. In this menu you can set network parameters, bridges and time. In bridges section you can open some ports (e.g. for CTI communication) and in time section you can set the actual time and date.
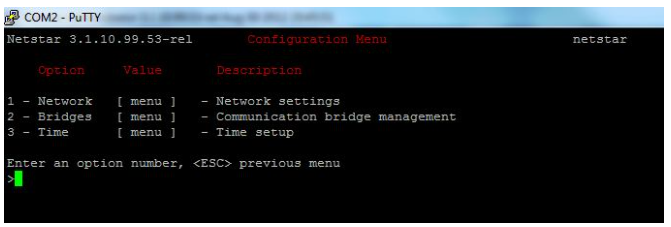
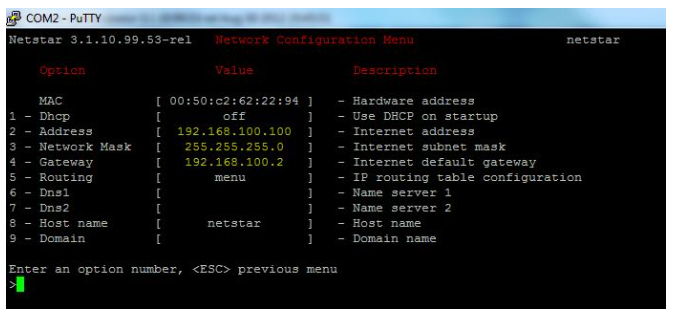
The most important part of this menu is Network settings. In this section you can set IP address of CPU, network mask and default gateway. You can also choose whether you want to use DHCP or if you set static IP. Default IP address is 192.168.100.100 (see next picture). Next parameters that can be set are DNS servers, host name of 2N® NetStar and domain name.
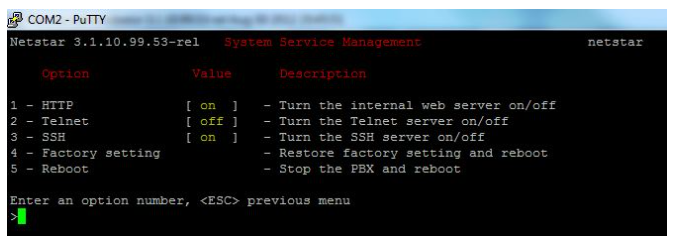
System menu – number "2" in Main Menu
If you press number 2 in Main Menu, you will go to System menu. In this menu you can turn the internal web server, telnet server and SSH server on or off. You can also restore factory settings here or reboot the 2N® NetStar.
Connection to the NetStar – Administrator tool
First of all you have to verify firmware version which is uploaded on NetStar. You can do it easily if you use Putty program for connection to 2N® NetStar and on the top left corner you will see the actual firmware version – it is visible in the first picture where there is the actual firmware marked with a red frame. After this you have to install Administrator tool to your PC – you can find this tool on the CD that is attached to each 2N® NetStar delivery or you can download it from our web page: http://www.2n.cz/en/products/pbx/netstar-ip/downloads/
Administration tool – connection parameters
When you have successfully installed the tool, you can launch it – you will have an icon on the desktop of your PC if you checked off this option during the installation or you will find it in the folder that you have selected for installation. Now you have to set new connection in Admin tool:
- Create new group – see the step 1 in the picture below. Click on the “Create group” icon and select “On the same level”. I have named this group 3.1.10.
- Add new PBX to this group – step 2 in the figure below. Click on the “Create PBX” icon and select “To group”. Then enter the name of PBX (in the example is Test_PBX) and click the OK button (step 3).
- Fill in the connection parameters – you have to fill in connection name, choose one of the modes option (on-line = only on-line connection to the 2N® NetStar, off-line = only off-line configuration of database or both). Next you have to set a method how you want to connect to NetStar:
- TCP/IP – you have to set IP address of CPU and IP port
- Modem - you have to set phone number
- COM port
It is also possible to set timeout between attempts if the connection was unsuccessful or you can preset username and password for this connection.
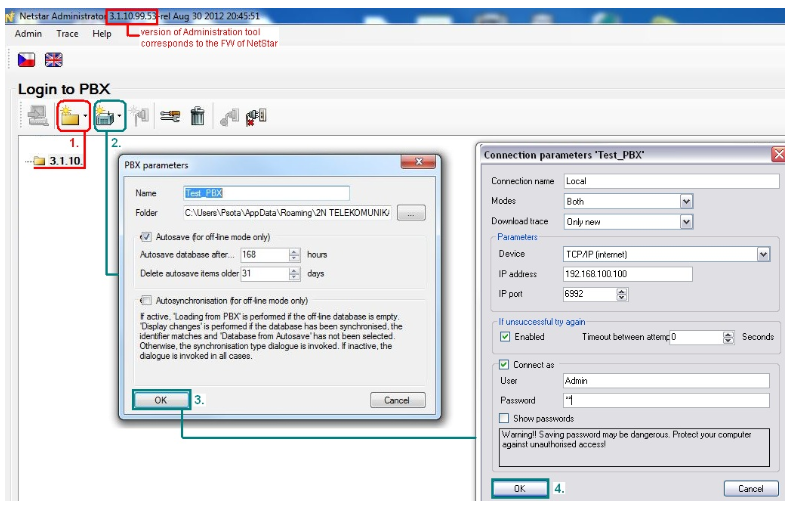
After this setting you will see your Test_PBX in group 3.1.10 and two connections for this PBX. Make a double click on the “Local – on-line” connection and you will be connected to the 2N® NetStar. Hardware installation wizard begins automatically.
Administration tool – hardware installation wizard
Now you will be briefly acquainted with the installation wizard and with the most relevant quick start settings. First of all 2N® NetStar needs to make hardware detection. In this case you have to set BRI configuration – if there are some BRI cards in the NetStar, ports will be selected by default.
- TE = terminal equipment (receives sync from the opposite side)
- NT = network termination (gives sync to the opposite side)
- PTP = point to point communication
- MPT = point to multipoint communication
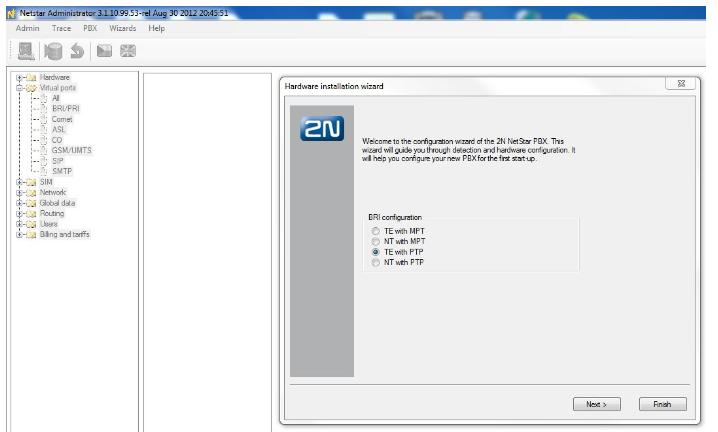
When you select one of these options, you should click on “Next” button and automatic hardware configuration will be finished (see the picture below).
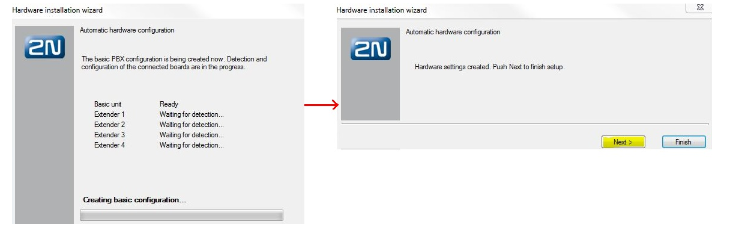
After finishing the hardware detection, you should press “Next” button and next installation wizard will start. This wizard will guide you through configuration of basic parameters of 2N® NetStar for the first start-up. There are 8 sections you will go through and you can see them on the figures below (images are arranged in the same order as in the wizard):
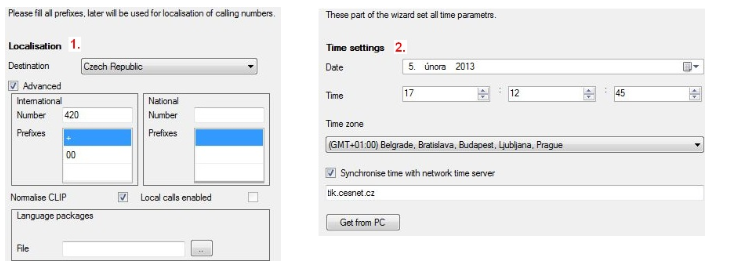
- Localization – set the destination where the 2N® NetStarwill be deployed. In Advanced settings you can fill in numbers and prefixes that will be used for localization of calling numbers (figure below - part 1)
- Time settings – set the actual date and time. You can do it manually or you can synchronize time of NetStar with network time server (NTP server) or you can get time from your computer (figure below - part 2)
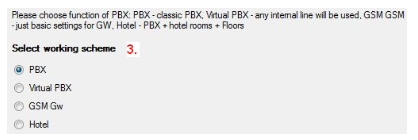
- Working scheme – select the working scheme in which you want to use 2N® NetStar. There are four options:
- PBX - classic PBX with SIP, ASL, cornet extensions, mobility extensions, etc.
- Virtual PBC - 2N® NetStar is e.g. structured for more companies in one building (each company has its own numbering plan, routing, special services, etc.)
- GSM gateway - 2N® NetStar is set as a basic gateway to GSM network
- Hotel
- Extensions definition – choose one of the options for extension settings. You can choose automatic extension settings (create a group to which all created extensions will be added and then set the numbers for ASL, SIP and cornet extensions. If you create some SIP extensions then default SIP proxy will be also automatically created). You can also import numbering plan from your PC or you can skip this option and set the extension later in the Administration tool (figure below - part 4)
- Assistant settings – if you plan to use Assistant server (web server for users), you can start this server right now from wizard and you can also generate default logins for users – these users were created in the previous step (figure below - part 5)

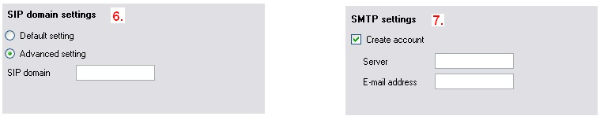
- SIP domain - set the domain name for SIP communication (figure below - part 6). This option is available only if you set some SIP extensions in previous step.
- SMTP settings – create the SMTP account for email sending. You can specify server address and also email address for this account (next figure - part 7)
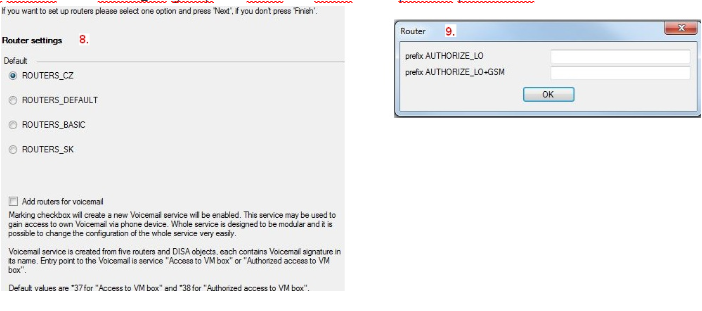
- Router settings – choose one of four options for router settings. Each option has different number of routers and also different type of routers. You can also add some more routers to each of these groups (next figure - part 8):
- ROUTER_CZ: there are 32 routers which can be configured in order to meet your requirements. You can specify routers for emergency calls, for local calls, for calls to national networks and GSM networks, etc. If you choose this router type, you can specify prefixes for AUTHORIZE_LO and AUTHORIZE_LO+GSM router (figure below - part 9).
- ROUTERS_DEFAULT: there are only 6 routers for this option. You can find there Default, Authorize, Internal, PSTN, Services and SMS Services routers.
- ROUTERS_BASIC: there are 14 routers in this section. You can find there same routers as was in routers_default plus there are routers for ME, PSTN, SMS in and out, etc.
- ROUTERS_SK: there are the same routers as in router_CZ group but there are some more prefixes predefined.
On-line and Off-line database
On-line database – it is an actual database saved in 2N® NetStar. If you want to make changes in this database, you need to have on-line connection to NetStar (via TCP/IP, COM port or modem). Changes are saved to NetStar after you click on the “Save changes” button on the top menu.
Off-line database – this database is saved on your computer and you can find it here:
C:\Documents and Settings\Administrator\App Data\2N TELEKOMUNIKACE\Netstar\Tools\PbxX. You can verify the destination folder in properties of PBX (see figure 5 – PBX parameters window). When you connect to the 2N® NetStar in off-line mode, the database from this folder will be uploaded – the name of this file is Db.xml. You can make changes in this off-line database without any impact to the 2N® NetStar configuration. From off-line database mode you can connect to the NetStar by click on the “Connect” button on the top menu.
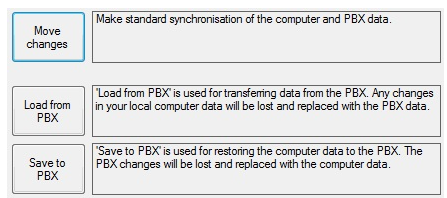
Then you can select one of three options you have (see the figure below):
- Load from PBX – you will load configuration from NetStar to off-line mode (configuration from NetStar will be saved to file Db.xml in you PC).
- Save to PBX – you will save your off-line configuration to the NetStar (this configuration will be saved there and will be active!)
- Move changes – you will only move changes that have been made in off-line mode to NetStar on-line configuration (you need not save all configuration to NetStar but only the difference between off-line and on-line configuration).