2N® VoiceBlue Next - How to set? (version 1.19 and lower)
- 2N® VoiceBlue Next is designed to reduce the costs of outgoing calls to GSM networks. The main advantage is the ability to expand the IP PBX to include a GSM gateway and make use of a LCR which selects the best GSM operator depending on the called number.
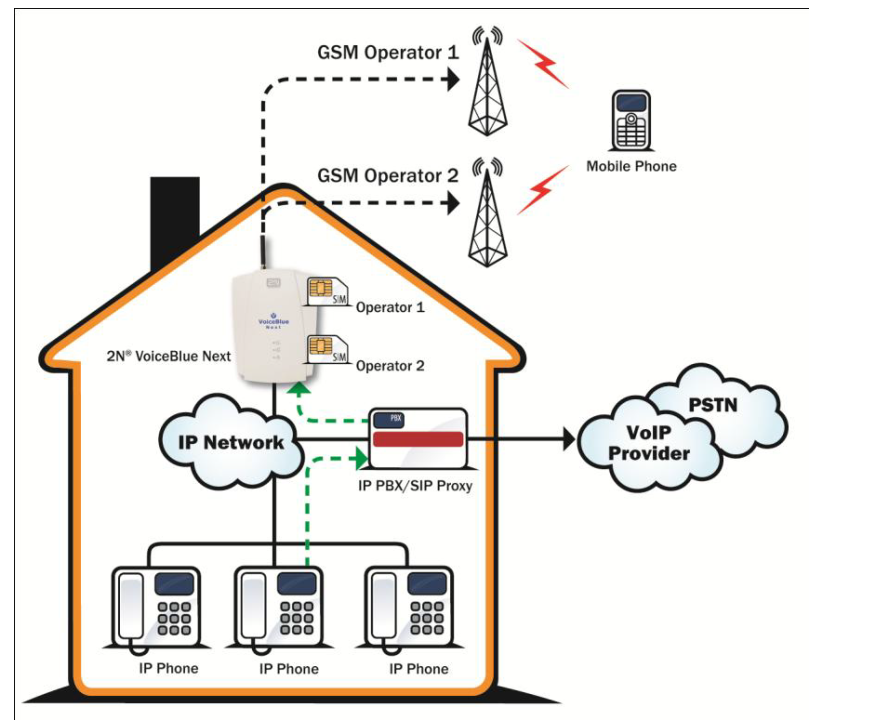 How to connect 2N® VoiceBlue Next
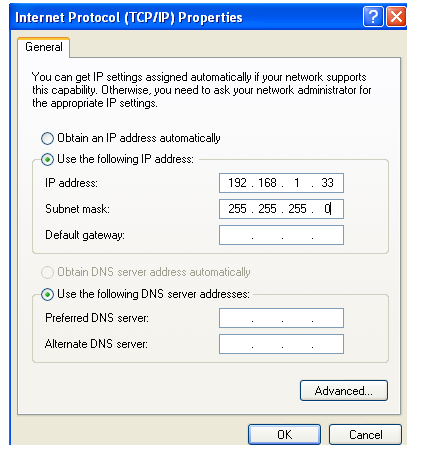
- Connect the 2N® VoiceBlue Next via Ethernet cable directly to the computer. Change the IP address setting in the configuration of your PC (e.g. 192.168.1.33 and Subnet Mask 255.255.255.0)
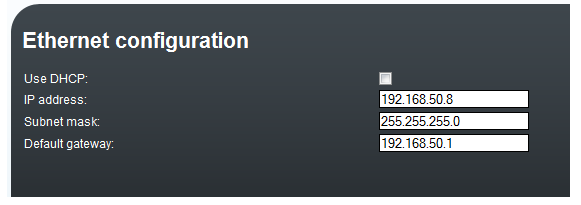
- Open your web browser and enter the default IP address of GSM gateway 192.168.1.2 with the default credentials (Admin/2n). If web page does not appear, make a factory reset of gateway with RESET button on front panel. Press it for 10 seconds. After this time gateway restarts and you can reload the page.
- In the gateway configuration and Ethernet configuration you are able to change the IP address.
How to set up connection to the opposite device (PBX)
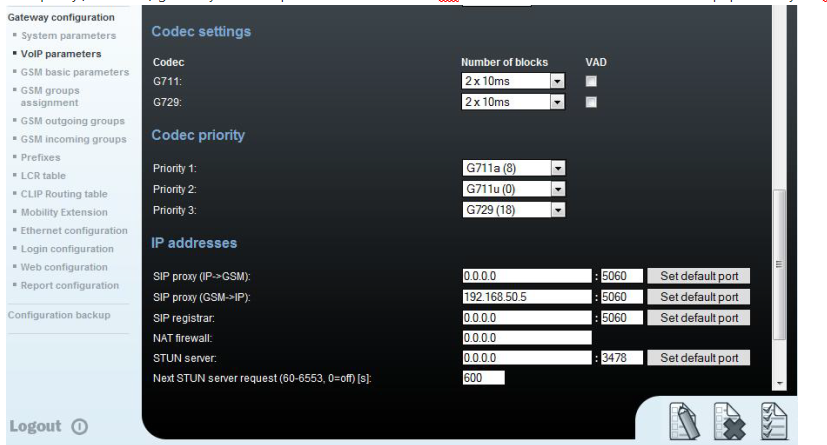
- For the setting of the trunk between the 2N® VoiceBlue Next and your PBX you need to configure SIP proxy (GSM→IP) for GSM incoming calls. SIP proxy (IP→GSM) is designed for secure communication just with traffic from your PBX. You can specify the IP address and port which will accept SIP packets from.
- In case you leave there 0.0.0.0 in SIP proxy(IP->GSM) gateway will be open for traffic from all IPs. !!! This can lead to misuse of the equipment by an unauthorized person !!!!
How to configure LCR table
Situation...
- Let's say we have SIM cards of two GSM operators:
- T-Mobile: Using the following prefixes (602, 606, 607, 723, 724) and it requires that you dial the number from your mobile phone with the international prefix (+420). All numbers have a nine digit length with the operator prefix but without the international prefix.
- Vodafone: Using the following prefixes (901, 902, 907, 909) and requires you to dial the number with the prefix (+420). All numbers have a nine digit length with the operator prefix and without "+420".
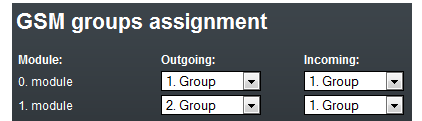
- First we have to assign modules to two GSM outgoing groups (for each operator).The first step which we have to do is to place the SIM cards into the SIM holders. We will start with modules 0 using the T-mobile operator SIM. Module 2 will follow the same procedure but using the Vodafone SIM.

- Configuration of GSM outgoing groups
You are able to set up different setting for each GSM group (CLIR, free minutes, Virtual ring tone, roaming and others).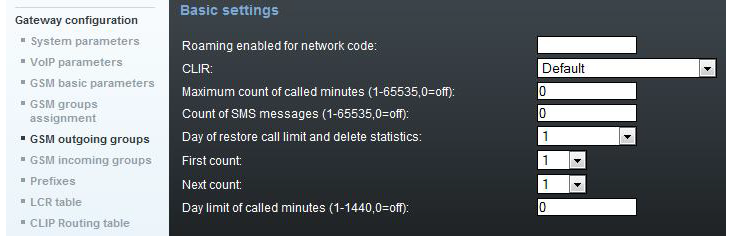
- Prefix lists
We have to create two network lists, the first one for T-mobile and the second one for Vodafone.- T-mobile network list:
We configure the normalization of Called party number in the Table of replaced prefixes (the number in front of the slash mark is replaced by number behind the slash mark. If there is not any number in front of the slash mark, it equals to "everything").
We also have to fill in the Table of prefixes with all prefixes of the T-mobile operator. Because all numbers are 9 digits length, it is not necessary to specify it for each prefix, we can use the parameter Default count of digits and fill there the value 9.
For the match in prefix list, the Table of replaced prefixes, Table of accepted prefixes and Digits count must correspond with the called number.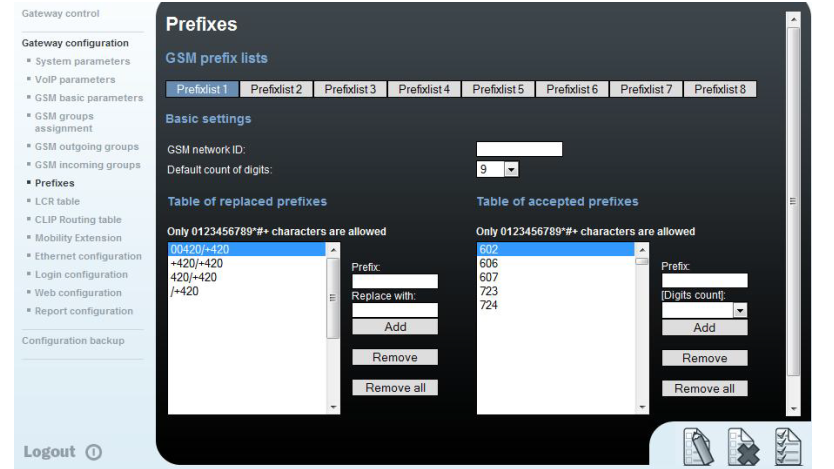
- Vodafone network list:
We configure the normalization of Called party number in the Table of replaced prefixes (the number in front of the slash mark is replaced by number behind the slash mark. If there is not any number in front of the slash mark, it equals to "everything"). We also have to fill in the Table of prefixes with all prefixes of the Vodafone operator. Because all numbers are 9 digits length, it is not necessary to specify it for each prefix, we can use the parameter Default count of digits and fill there the value 9.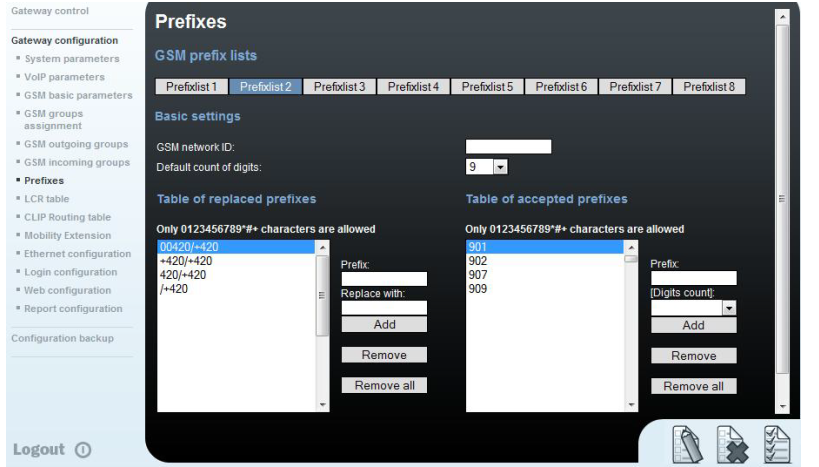
- T-mobile network list:
- LCR Table
We have to configure rows in the LCR table where we bind together GSM Outgoing groups with Prefix lists. Click on ADD button (or edit the first line of LCR table) to add the first line and configure it the following way for the T-mobile: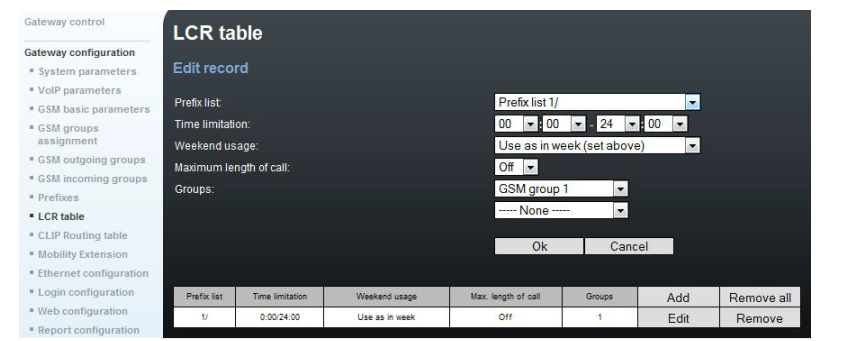 Click on ADD button to add the second line and configure it for the Vodafone.
Now you can see two LCR lines in the LCR table:
Incoming calls
- For incoming calls you can define 2 groups with the different behavior and assign them to the GSM modules. The settings are similar with GSM groups assignment for outgoing calls.
- In GSM incoming groups you can define the behavior for each GSM incoming group. Choose the mode to Reject, Ignore, Accept incoming calls or Callback.

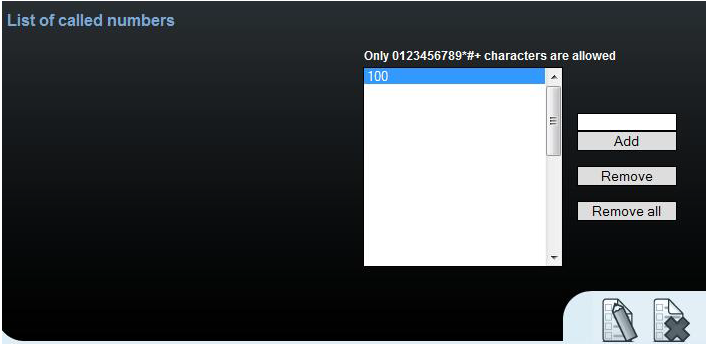
- With mode Accept..., you can define the list of called numbers which will be automatically dialed after DTMF dialing timeout in case the customer does not press any button within the specified time. From the configuration, you can see 5 seconds for DTMF dialing and after that the call will be routed to the extension 100 in your PBX (if you set up SIP proxy (GSM->IP) in VoIP parameters). If you want immediate connection set DTMF dialing timeout to 0.
SIM cards
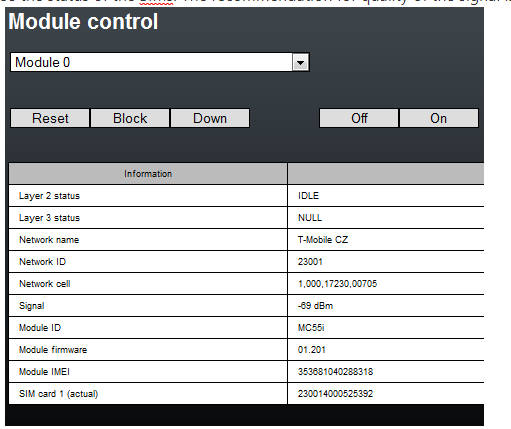
In the Gateway control and module control you can see the status of the SIMs. The recommendation for quality of the signal is between -65 and -85dBm.
- The logged SIM card is indicated by switched off the led diode on the 2N®VoiceBlue Next.