CTI Interface - How to set up_version 3.X.X
XML Bridge
The mission of the XML Bridge is to secure encapsulation and mediation of PBX proprietary interface (message bridge). Secure in the sense that the user application does not work directly with binary structures from which the messages are composed, but is their XML image. It avoids undesirable behavior of the system in case that misspelled external application sends an incorrectly formatted message. XML Bridge also defines a set of messages that may be exchanged between external programs and NetStar. Model user application is schematically illustrated in the following figure.
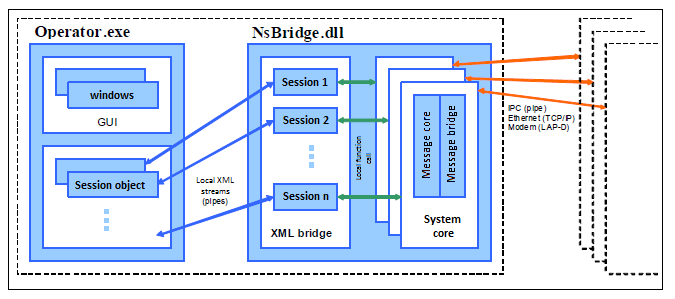
Communication Model of NetStar User Utilities
Operator.exe – any application using NsBridge.dll for communication with NetStar PBX
Message-bridge – proprietary communication interface of NetStar PBX.
A program that connects to the PBX NetStar needs a dynamically linked library NsBridge.dll. It consists of a message-core including message-bridge from XML compiler and the session manager. Library must be initialized after its introduction by calling function InitNsBridge. This function must be called before you use any other library function. Function ExitNsBridge needs to be called before library release in order to do the correct release of non-allocated sources. Value definitions for the functions in NsBridge.dll are located in NsBridge.h.
TestNsBridge.exe
We will use the TestNsBridge.exe application for the connectivity test. This application can be used as a simulator of your application.
- Check the version of NetStar PBX software (version NsBridge.dll must match the version of firmware in all 5 parts, for example: 3.1.4.99.20)
- Check opened ports through NetStar Administrator or via console menu. In the console menu you can find it in: Configuration> Bridges> Display
- Choose the port which will be used. For the first connection is recommended to use a port without authorization. This eliminates the need to enter the username and password. For our testing we could open port 6991 without authorization.
- Then connect using TestNsBridge.exe with parameter IP address:port
TestNsBridge.exe xxx.xxx.xxx.xxx: 6991 = where xxx.xxx.xxx.xxx is the IP address of the PBX and the 6991 port. - If you would like to use port with authorization, you need to enter username and password (see. Chapter 5)
- You are now connected to the PBX NetStar and you can use all the commands that can be found in the document: Example.xml
- All documents can be found in folder
C:\Program Files\2N Telecommunications a.s\NETSTAR\Administrator X.X.X\CTI_Interface\. . .
Connecting with TestNsBridge.exe to port without required authorization
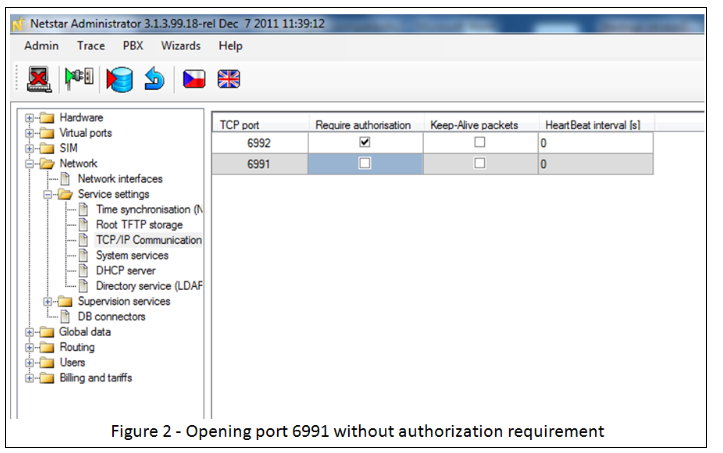
Through NetStar Administrator or through console menu check opened ports and set one port, which does not require authorization.
a) NetStar Administrator: In menu „Network“ – „Service settings“ – „TCP/IP Communication port“ add TCP port and uncheck field „Require authorization“
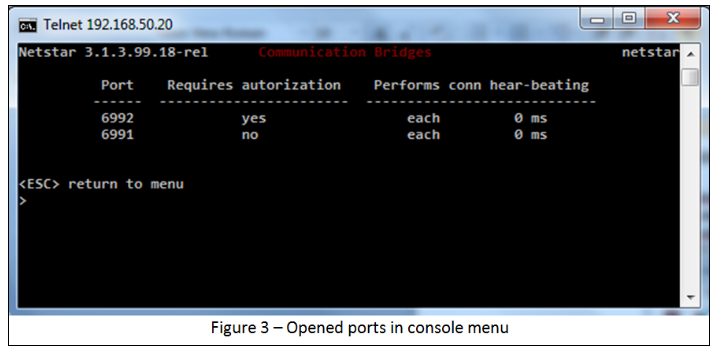
a) Console menu: In console menu „Configuration“ – „Bridges“ – „Open“ set port number to which you would like to connect (6991) and in the next step type „n“ to answer question „Has the bridge to require authorization“
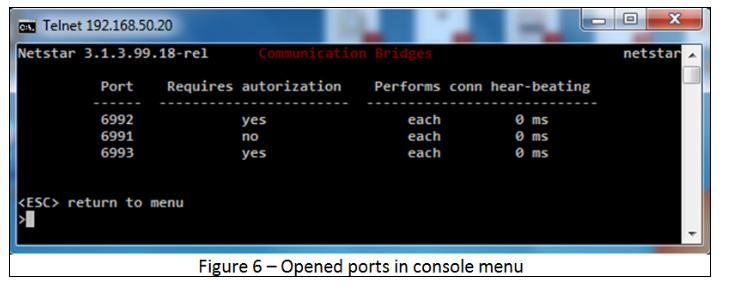
You can see opened ports in menu „Configuration“ – „Bridges“ – „Display“
We left port 6991 opened without authorization requirement in this example. Now we can connect via TestNsBridge.exe with parameter IP address:port
TestNsBridge.exe xxx.xxx.xxx. xxx:6991 = where xxx.xxx.xxx.xxx is IP address of NetStar PBX and 6991 is port.
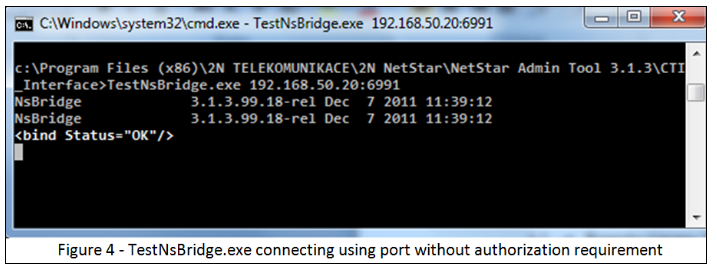
XML bridge connectivity to the target system is performed by BIND command. If the connection goes via unprotected channel, the connection is built and ready to use when this answer is received:
<bind Status="OK"/>.
Connecting with TestNsBridge.exe to port with required authorization
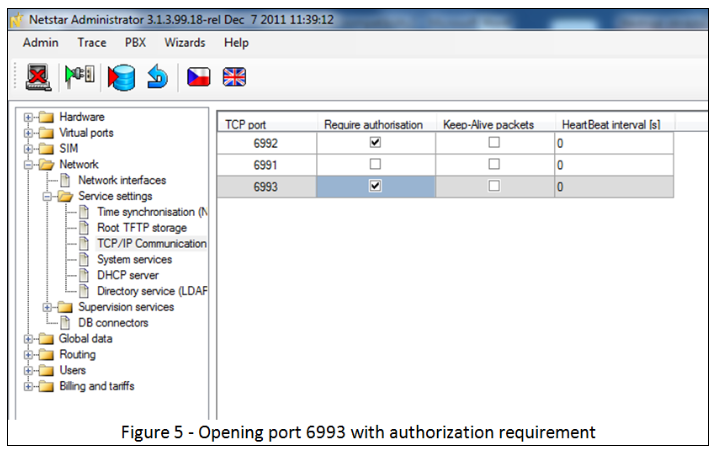
Every NetStar PBX has port 6992 opened with authorization required by default. We can choose port 6992 to connect application TestNsBridge.exe or create new port with authorization required. In our case we will open port 6993 which will require authorization. Again there are two choices how to do it:
a) NetStar Administrator : In menu „Network“ – „Service settings“ – „TCP/IP Communication port“ add TCP port and check field “Require authorization”
b) Console menu: In console menu „Configuration“ – „Bridges“ – „Open” set port number to which you would like to connect (6991) and in the next step type „n“ to answer question „Has the bridge to require authorization“
You can see opened ports in menu „Configuration“ – „Bridges“ – „Display“
In this example we left port 6993 opened with authorization requirement. Now we can connect via TestNsBridge.exe with parameter IP address:port
TestNsBridge.exe xxx.xxx.xxx. xxx:6993 = where xxx.xxx.xxx.xxx is IP address of NetStar PBX and 6993 is port.
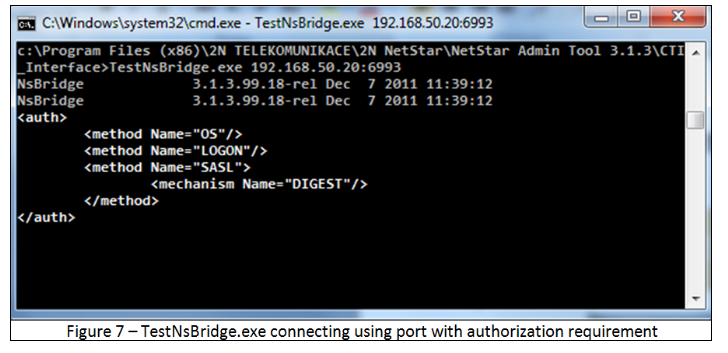
The application is informed about the need for authentication by receiving of the authentication element. This element has no attributes but contains sub-element method. This is a list of supported types of authentication. If bridge supports SASL method then under the appropriate element there is a list of supported authentication mechanisms - elements mechanisms. All types of authentication are described in the manual:
CTI doc_XML_bridge_1_22_cz.pdf
We will now login to PBX using method LOGON which requires username and password. For our purposes we will create user „Test“ with password „Test“ using application NetStar Administrator. Then we can send instructions to application TestNsBridge.exe:
<auth Method="LOGON" LoginName "Test" Password="Test"/>;
And wait for answer:
<auth Method="LOGON" Status="OK"/>.
<bind Status="OK"/>
Connection is now built and ready to use.
CTI
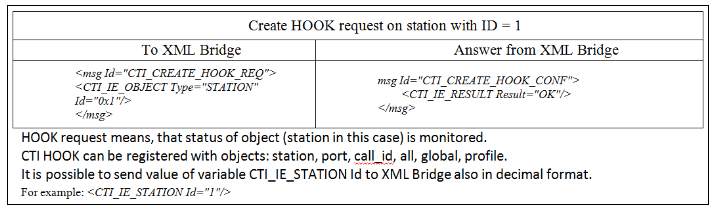
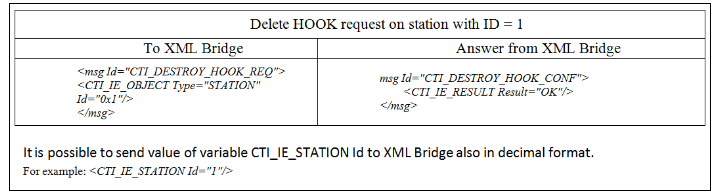
CTI module is primarily used for retrieving stations, users, monitoring of users and calls in PBX and last but not least to actively control the PBX and to receive and send messages.
Examples of CTI functions use:
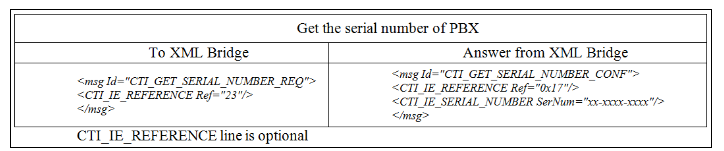
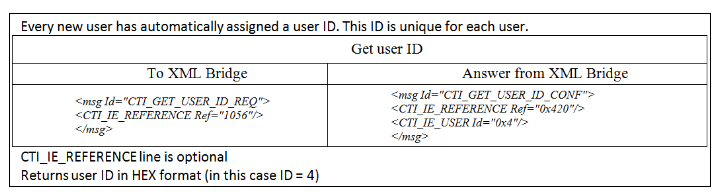
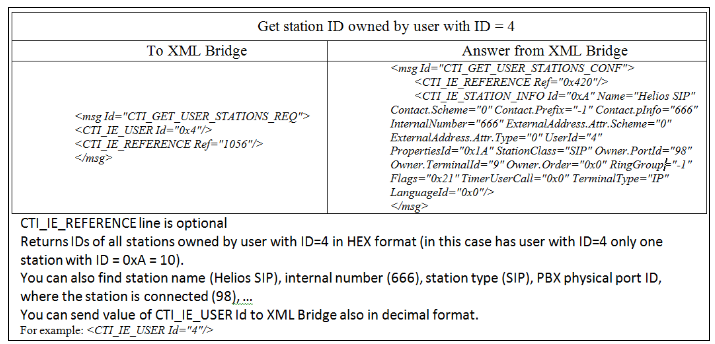
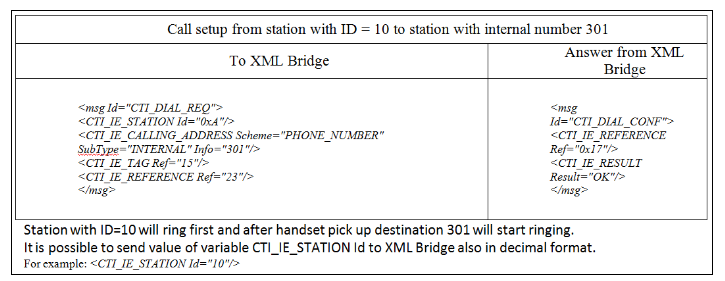
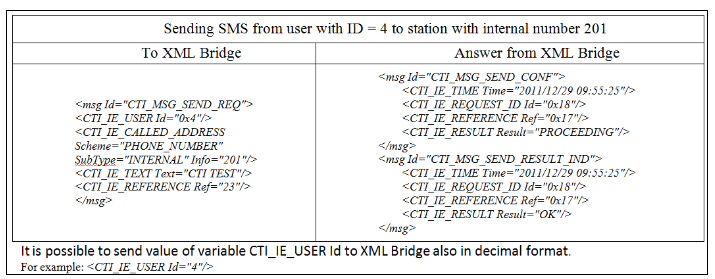
There are more examples of its use that are located in the document CTI doc_XML_bridge_1_20_en.pdf