IVR - How to set it in 2N® Netstar
- If you want to create IVR, first you have to prepare or imagine a tree which consists of Routers and DISA (Fig1). Let’s imagine that we want to make IVR for some company. DISA will have the following messages: Greeting-“Name of company. Good morning. Please, dial the number of one of the listed departments: 1-marketing, 2-technical support, and 3-HR”. When you dial one of mentioned number, you will be routed to the corresponding DISA. Each DISA can also ask you to dial number. For example, if you dial 1 in greeting message, you will be invited to dial number in order to be connected with some of salesmen. The similar is if you dial 2. In case number 3 is dialed, you will be connected with HR assistant. So for this case you need 4 DISA and 4 routers.
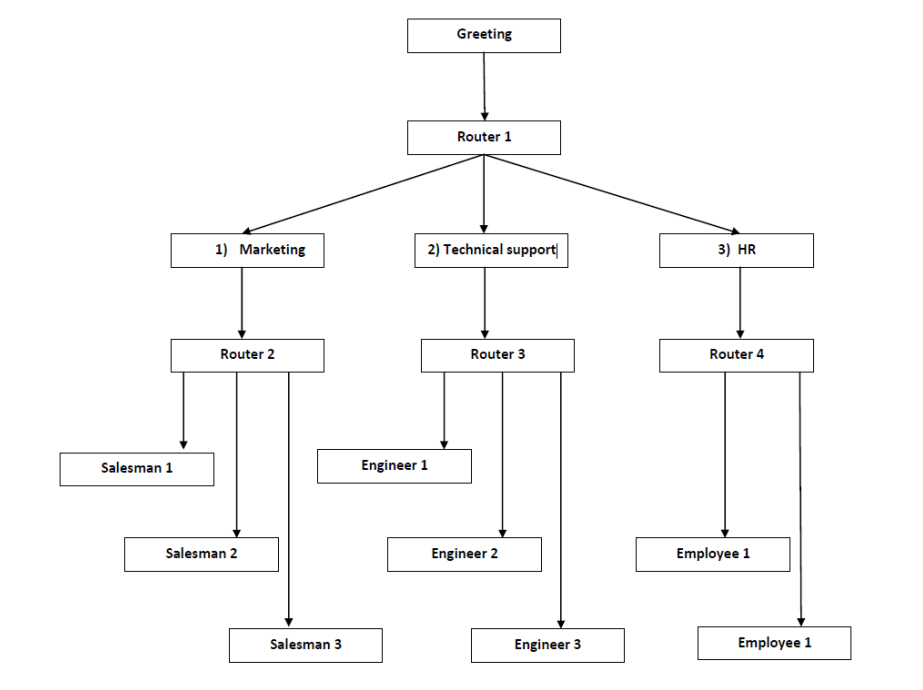
Fig.1
- When you have drawn scheme of IVR, you need to record DISA messages. You can do it by means of telephone device connected to NetStar. In your configuration tool go to Global data → Progress tones → Own tones (Fig.2).

Fig.2
- Right click in the field Progress List → Add, fill name and press OK. Then click back to tab Progress list. There in section Settings fill Number of your created tone. This number will be used in recording your messages. Save it! Now dial from some phone (connected to NS) *56. You will be asked to press number of record. Dial the number of your own progress and press #. Now you can record your message, then press # and again # to save it in NetStar. (With this procedure you will be led by NS voice automate – immediate after dial *56)
- Remember! The numbers you set in the field “Number„ must be different from already existing tones.
- When you have all necessary records, you need to create DISA and Routers. Go to Routing Routers and create 3 routers: router 1, router 2, and router 3 (All of them will be type: Called number). Then go to Routing objects → DISA/IVR. Then right click → Add, fill name of your DISA. In the field “Tone” select the record you have done. Check DTMF box, set Timeout, Type → Router, ID → router 1.
Fig.3
- In Routers for router 1 set the following settings: Prefix → 1, 2 and 3 (the numbers to be dialed), Destination type → DISA, Destination → Marketing, Technical support and HR. There are overall 3 rows. For router 2: Prefix → 1,2,3, Destination type → User, Destination → Salesman 1,2,3. For router 3: Prefix →1,2,3, Destination type →User, Destination → Engineer 1,2,3. For router 4: Prefix → 1,2, Destination type → User, Destination → Employee 1, 2. Now you need to assign Greeting DISA to defined virtual port. Let it be GSM.
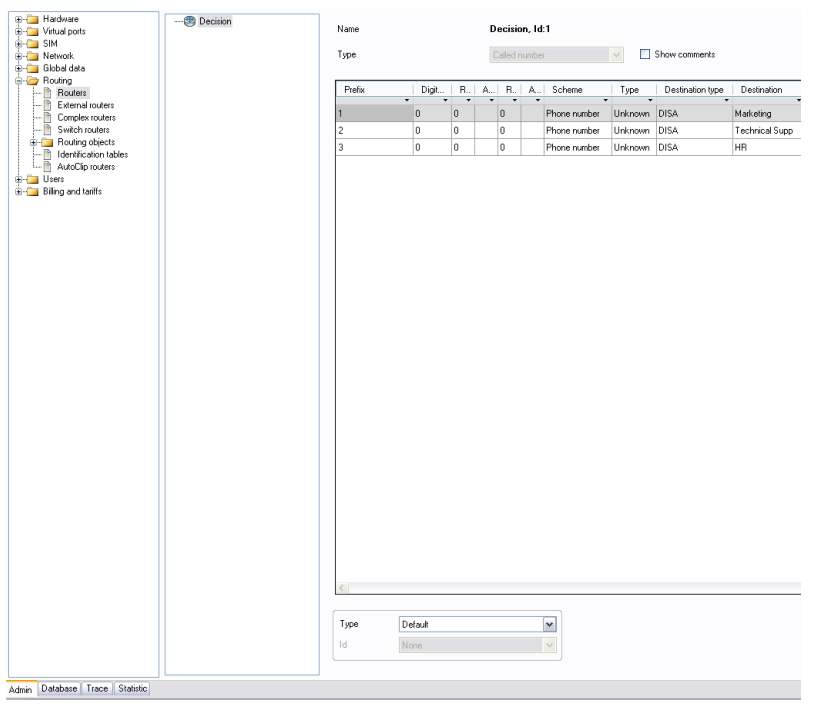
Fig.4
- Go to hardware → Boards → select GSM board → Virtual port → Properties → Routing. From port: Destination type → DISA, ID → Greeting. Save it and that is all. When somebody calls on GSM, he will hear Greeting message first and he can select where to call.
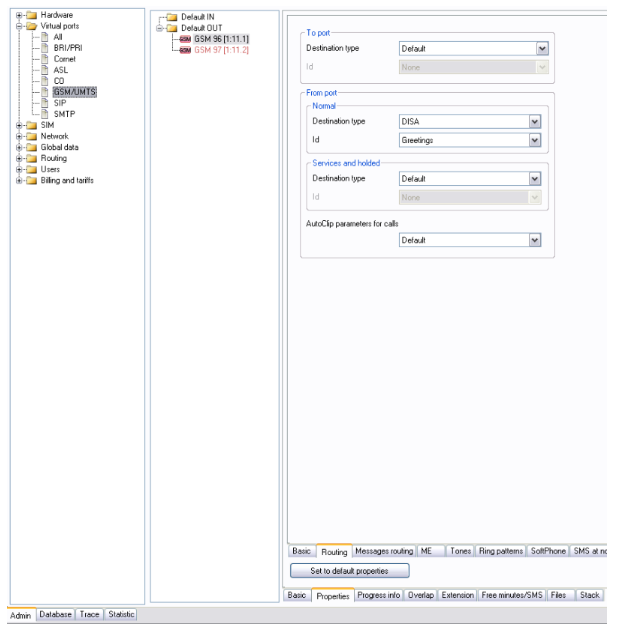
Fig.5