Linksys SPA3102 ATA
Preface
- this document describes configuration of Linksys SPA3102 and how to use it with 2N IP Intercom door intercom in order to connect the IP door intercom to analogue PBX (or PSTN line).
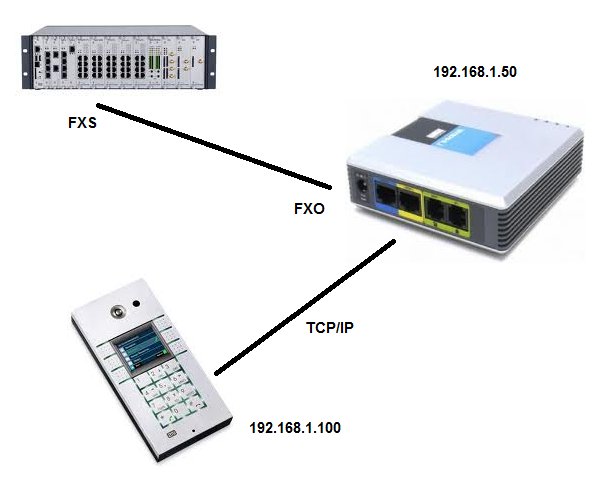 |
- Linksys SPA3102 can work as a router with NAT. In this scenario, NAT will be disabled and only WAN port (blue) will be used. LAN port (yellow) will be used only during initial configuration.
Configuring SPA3102
- The configuration information below is based on firmware version 5.2.13 (GW) which is the latest version (at the time of this manual).
- Before we proceed, please make sure that your SPA3102 is powered on and that you have an ethernet (RJ45) cable connected with one end to your PC and the other end to the yellow port on the back of the SPA3102. Default IP address of Linksys is 192.168.0.1, so you will need to set up IP address of your Ethernet card in the same range. Once you have verified this, please continue configuring your device with the instructions below.
Setting up web server and WAN port:
Log in into you device using web browser and typing IP address 192.168.0.1
- Click on admin login and advanced.
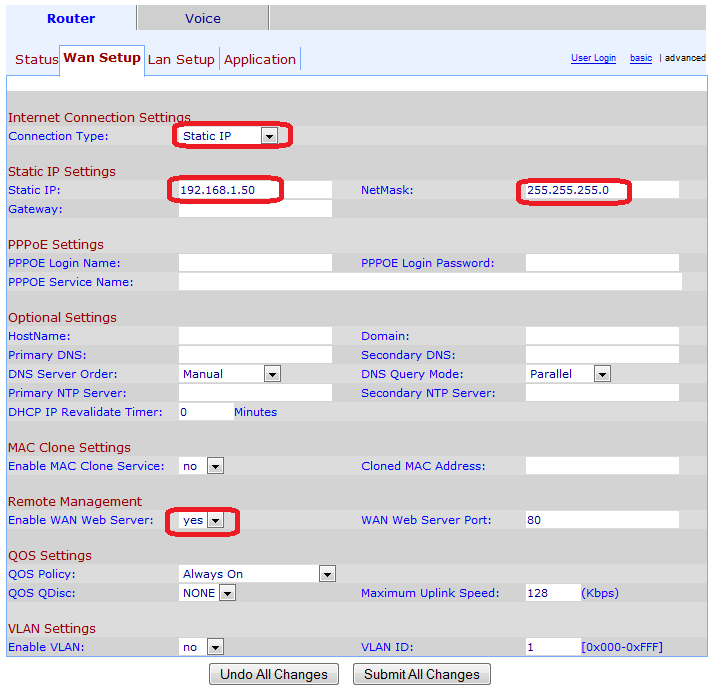
- Click on WAN setup.
- In our case, we use static IP address of WAN interface with IP 192.168.1.50.
- Enable WAN web server.
- Click on Submit all changes.
 |
Setting up LAN port:
You can set up LAN to work in bridge mode:
- Click on LAN setup → networking service and choose Bridge.
- Click on Submit all changes.
From now on the LAN port is in bridge mode with WAN port and IP address is 192.168.1.50 . Web server will be accessible from both ports on this IP address. However , Linksys SPA3102 will send all VOIP traffice to its WAN port!
VOIP to PSTN Gateway
- This section describes configuration of PSTN line of Linksys SPA3102 for calls from VOIP to PSTN. All configuration can be done in Voice tab → PSTN Line.
 |
You need to check couple of things:
- SIP port which will be forwarded to PSTN (in our case it is 5061).
- Turn off SIP registration (we do not need it).
- Enable making and answering calls without registration.
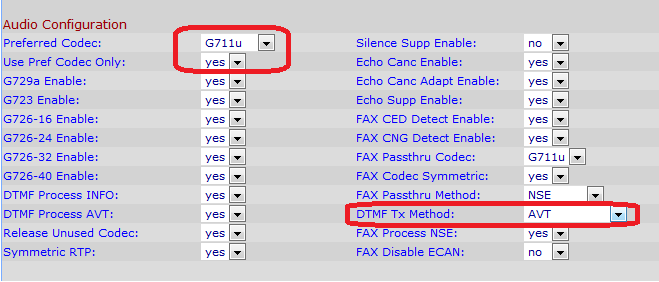 |
- In audio configuration choose Audio codec which should be used with intercom and use only this codec.
- If you would like to control relay of intercom, set up DTMF tx method as well. Recommended is AVT (according to RFC 2833).
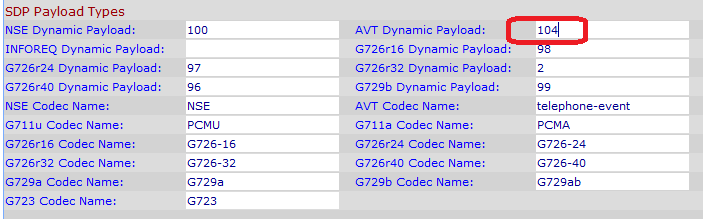
- If you have problems with receiving DTMF, change payload of AVT to 104 in Voice tab → SIP:
 |
- Last thing which you have to set up in order to make VOIP to PSTN working is disconnect detection in Voice → PSTN Line tab:
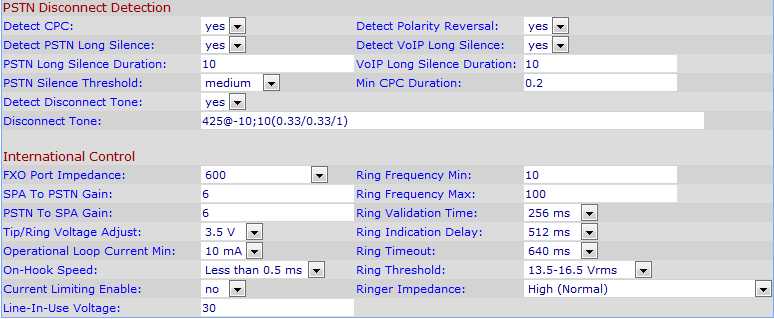 |
- We are detecting disconnect tone with frequency 425Hz, length of tone 330ms and length of pause 330ms (these settings depend on the region of the PSTN service). If there is a problem with detecting disconnect tone, you can detect silence as well.
- Another important thing is to set up SPA to PSTN gain and PSTN to SPA gain. Both are dB of digital gain (or attenuation if negative) to be applied to the signal sent from the PSTN side to the SPA of from SPA to the PSTN side. The range is -15 to 12.
PSTN to VoIP Gateway
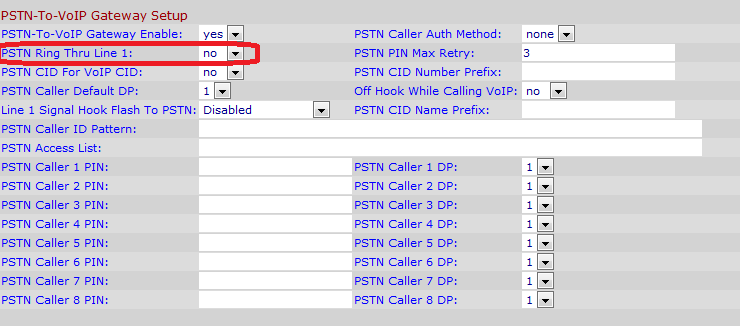
- If you would like to make calls from PSTN side to your IP intercom, all you have to set up is PSTN to VoIP GS Setup in Voice → PSTN Line tab:
 |
- And PSTN-To-VoIP Selective Call Forward Settings in Voice → PSTN User tab:
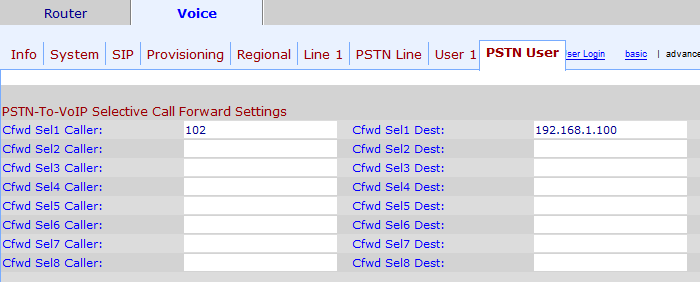 |
- If Linksys SPA3102 receives CLIP 102 from PSTN side, it will send it to IP address 192.168.1.100.
- You can set up 8 different CLIPs which could be sent to your intercom.
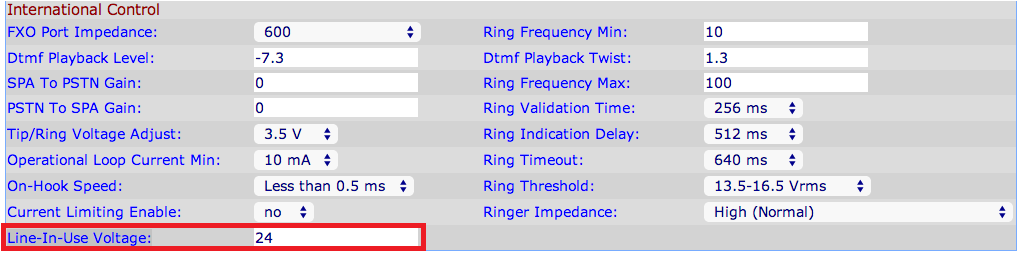
Line-in-use setting
Sometimes when you are connecting SPA to PBX there can be some differences in lines voltage of different types of PBX, so it wont work without adjusting these parameters in SPA. The SPA is using line voltage to check if line is in use or not, thats why it is essential to set right values. Otherwise line can be considered as in use and you will get a busy tone. At this page you can check what is voltage of your line when it is On-hook or Off-hook.

In this page you can set voltage for Line-in-use. Set this value about 2V lower then Line Voltage Off-hook.
 |
Configuring 2N IP Intercom (door intercom)
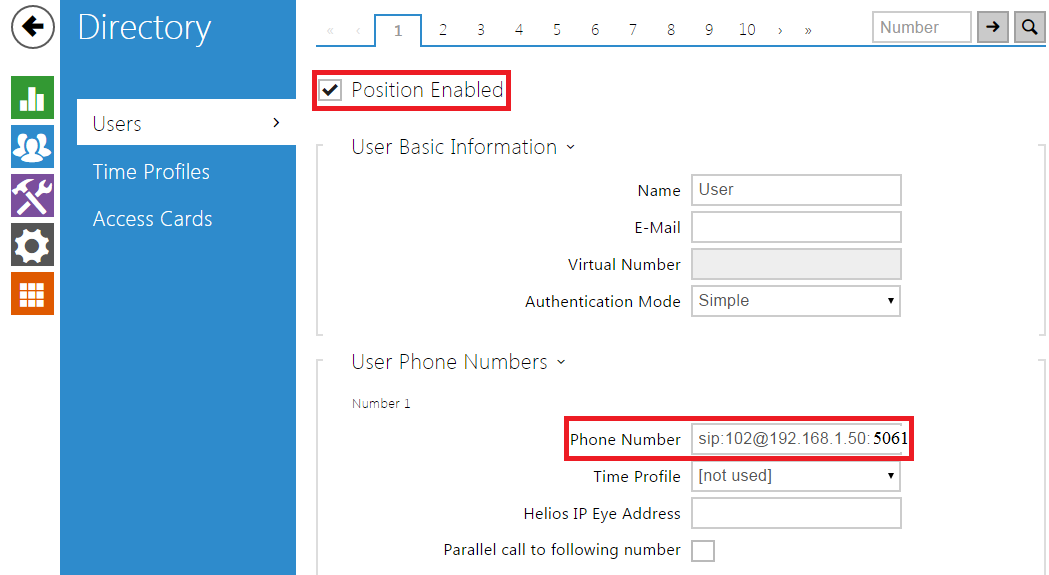
- We assume that you have IP address of your 2N IP Intercom 192.168.1.100. For outgoing calls set up button on 2N IP Intercom. We use peer-to-peer connection, so string in field Number 1 will look like:
sip:102@192.168.1.50:5061
- where 102 is number which you want Linksys SPA3102 to dial to its PSTN line, 192.168.1.50 is IP address of Linksys SPA3102, 5061 is port used by Linksys SPA3102 which is forwarded to PSTN line.
These setting are valid for first button on 2N IP Intercom. You can set up another buttons to dial different numbers.
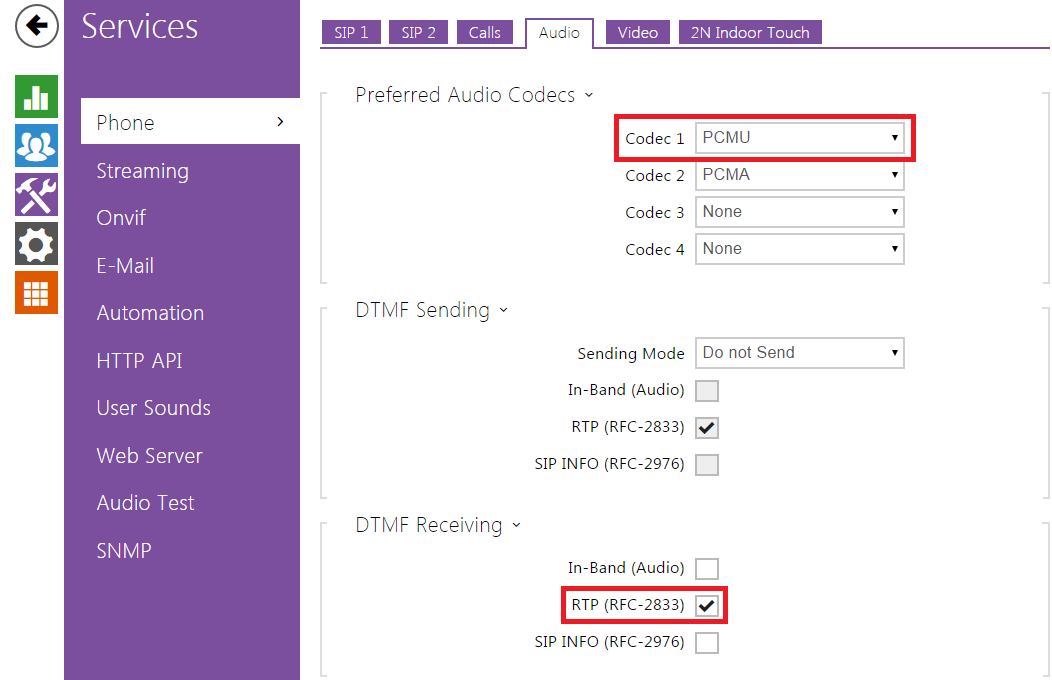
- In Audio setting make sure that 2N IP Intercom uses the same audio codec as Linksys SPA3102.
- If you would like to control relays by using DTMF from PBX side, check, whether you receive DTMF via RTP.
 |
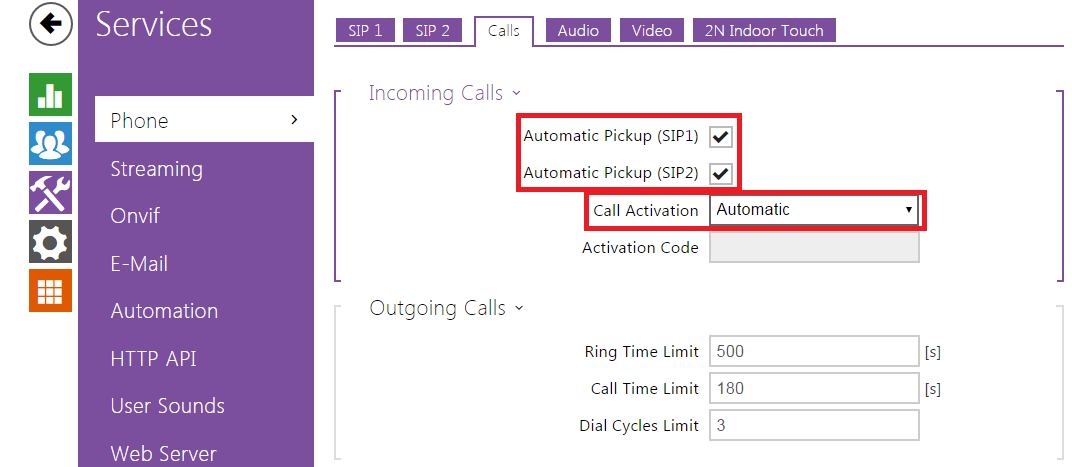
- For Incoming calls from PSTN side to 2N IP Intercom set up automatic pick up and activation mode:
 |
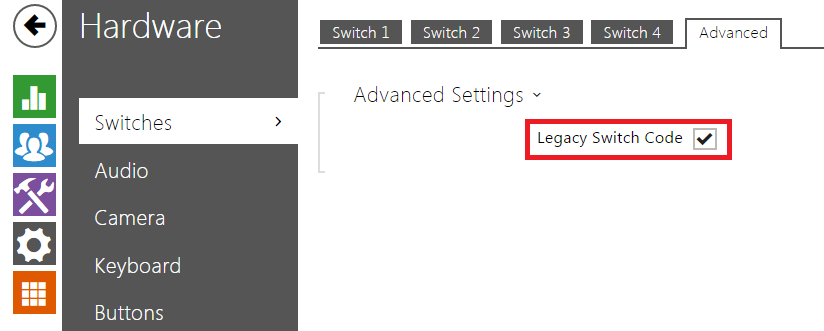
- If you would like to control relay switch only with number without confirming by pressing # key, enable Legacy Switch Code.
 |
- Last thing is to set up relay contact. You have to enable switch and then you can pick which output you want to control. Also you can set a code here.
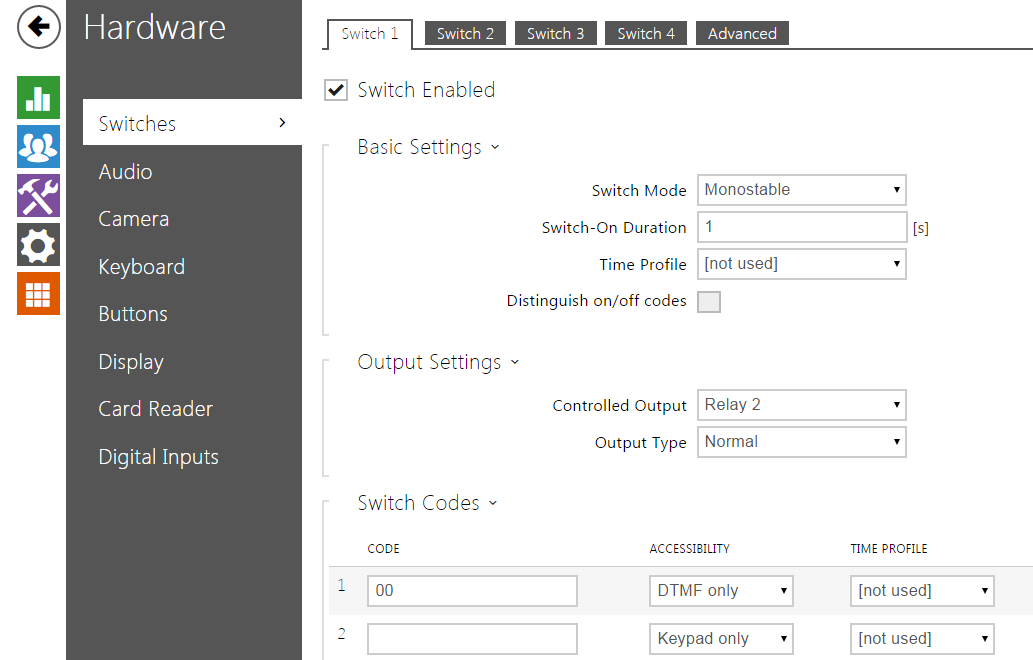 |