4. Configuration
Typically, configuration takes place via a web interface of the device. Alternatively, configuration can take place via My2N.
2N® LiftIP 2.0 is configured using a PC equipped with any Internet browser:
- Launch your Internet browser (Chrome, Firefox, Internet Explorer, etc.).
- Enter the IP address of your intercom (http://192.168.1.100/, e.g.).
- Log in using the username Admin and password 2n.
You need to know the device IP address and domain name to get access. Make sure that the device is connected to the local IP network and properly powered. Upon purchase, 2N® LiftIP 2.0 is set to the dynamic IP address mode – it retrieves the IP address automatically if there is a properly configured DHCP server in the LAN. If the DHCP server is unavailable, 2N® Lift IP 2.0 can be operated in the static IP address mode.
Domain Name
Enter the domain name as hostname.local (e.g. 2NILiftIP20-00000001.local) to connect to the device. The new device Hostname consists of the device name and serial number. See below for the device name formats in Hostname. The serial number is entered without hyphens. You can change Hostname in System > Network later.
2N Device | Device Name in Hostname |
|---|---|
| 2N LiftIP 2.0 | 2NILiftIP2 |
Login based on a domain name is advantageous if the dynamic IP address is used. While the dynamic IP address changes, the domain name remains the same. It is possible to generate certificates signed by a trusted certification authority for the domain name.
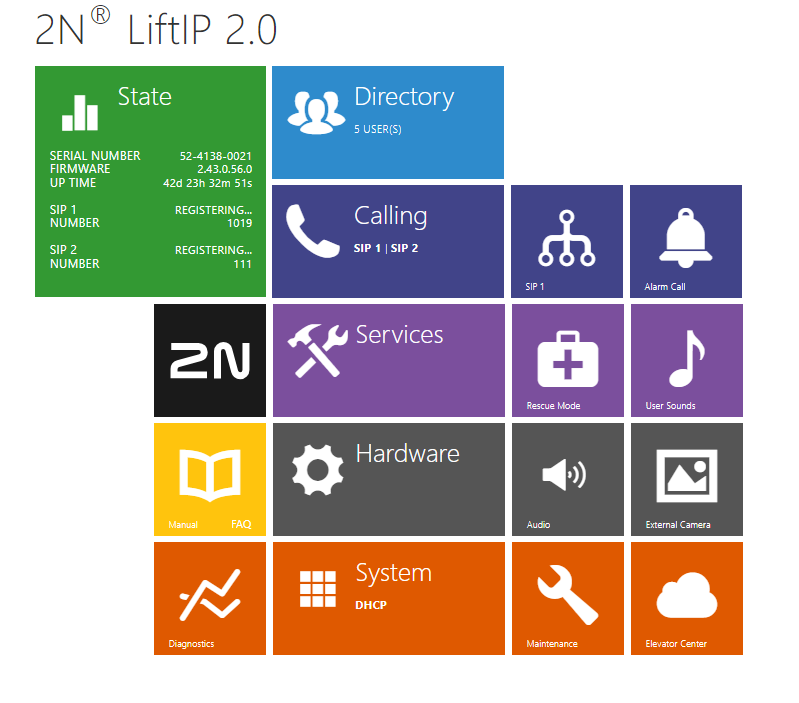
Start Screen
The start screen is an introductory overview screen displayed upon login to the device web interface. Use the button ![]() in the left-hand upper corner on each of the following web interface pages to return to this screen anytime. The screen header includes the device name (refer to the Display Name parameter in the Services / Phone / SIP menu). Use the menu in the right-hand upper corner of the web interface for selecting the language. Click Log out in the right-hand upper corner of the screen to log out from the device, press the question mark icon to display Help or use the bubble to provide feedback.
in the left-hand upper corner on each of the following web interface pages to return to this screen anytime. The screen header includes the device name (refer to the Display Name parameter in the Services / Phone / SIP menu). Use the menu in the right-hand upper corner of the web interface for selecting the language. Click Log out in the right-hand upper corner of the screen to log out from the device, press the question mark icon to display Help or use the bubble to provide feedback.
The Start Screen is the first menu level and provides quick navigation (click any tile) into selected parts of the device configuration. Some tiles also display the state of selected services.
Configuration Menu
The 2N® LiftIP 2.0 configuration is divided into 5 main menus – State, Directory, Calling, Services, Hardware and System – and their submenus, refer to the list below.
State
- Lift – display basic information on the lift / lift communicator and its error states.
- Device – display basic information on 2N® LiftIP 2.0.
- Services – display the states of the network interface and selected services.
- Events – display the last 500 events recorded by the device.
Directory
- Users – set the directory destination phone numbers.
Calling
- General Settings – incoming and outgoing call settings
- SIP 1 – SIP terminal settings
- SIP 2 – SIP terminal settings
- Alarm Call – set the alarm call.
- Checking Call – set the checking call.
- Notifications – set the event notifications.
Services
- Lift – set the lift identification.
- Phone – set the phone and SIP connection.
- User Sounds – set and record user sounds.
- Rescue Mode – set the rescue mode.
- Alarm Call – set the alarm call.
- Checking Call – set the checking call.
- Notifications – set the event notifications.
- Web Server – set the web server and access password.
- Audio Test – set the automatic audio test.
Hardware
- Audio – set the audio, signaling, etc. volume control, microphone parameters
- Input Polarity – set the button and input polarities.
- External Camera – set the external IP camera.
System
- Network – set the LAN connection, 802.1x, packet capturing
- Date and Time – set the real time and time zone.
- License – set the licenses, activate the trial license.
- Certificates – set the certificates and private keys.
- Update – set the automatic firmware and configuration updates.
- Syslog – set syslog message sending.
- Maintenance – set the backup and configuration reset, firmware update.