2N® Net Mic Quick Start
What you should know
- 2N® Net Mic provides announcements to the Session with button A if 2N® Net Mic is added to the Audio source for this Session.
- In the event of button action (playing playlist to zone or live announcements to zone), 2N® Net Mic transmits with the highest priority.
- Click the preset 2N® Net Mic button and button A to generate the live announcement to zone action.
- Button B is not supported in this version
- We recommend you to use the power adapter supplied by 2N TELEKOMUNIKACE to make 2N® Net Mic work properly.
- Please contact your reseller to get an extended warranty.
Warning!
- From version 2.0 not supported downgrade to version 1.5
Explanatory notes:
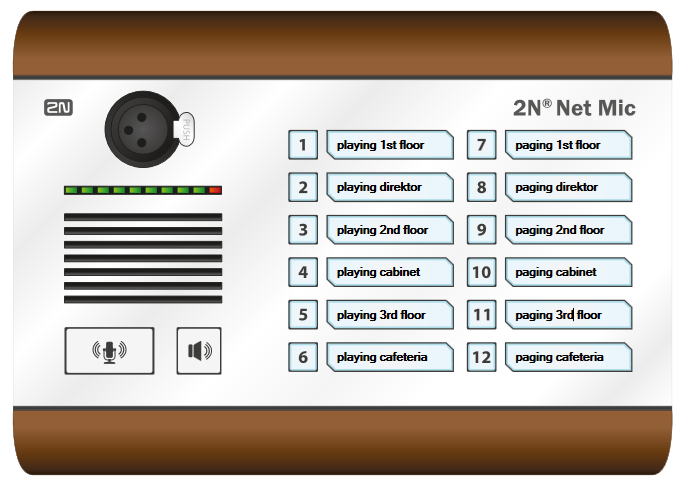
... A ... button for announcing
... B ... not supported in this version
... C ... function buttons 1–12 for playing playlist or making announcements to Zone/Net Audio Decoder/Net Speaker
2N® Net Mic Quick Start
2N Net Audio System consists of software application 2N® IP Audio Manager and number of end points (2N® Net Audio Decoder, 2N® Net Audio Decoder Lite, 2N® Net Audio Encoder, 2N® Net Mic and 2N® Net Speaker).
2N® Net Mic is a hardware console with microphone, which enables you to make live announcements or broadcast pre-prepared files to different zones. It is a hardware alternative to the 2N® IP Audio Console software application, which is primarily intended for such public facilities as schools, courts, railway stations, airports, medical facilities, amusement parks, swimming pools and sport centres. This manual describes how to set up quickly a simple audio stream playback from the 2N® Net Mic console to 2N Net Audio System.
Box Contents
In the box you find the supplied microphone, two serial number labels for indication, a 2N® Net Mic unit and this Quick Start manual. Refer to www.2n.cz for the latest 2N IP Audio Sytem playback and control software.
Installation Preparation
You need a 2N® Net Mic unit, a power supply (12 V / 2 A DC) or PoE switch (Power over Ethernet switch), an Ethernet cable and a PC with the 2N® IP Audio Manager installation. Connect 2N® Net Mic to the LAN using PoE or a power adapter (12 V / 2 A DC).
2N® Net Mic Setting
How to configure 2N® Net Mic via the 2N® IP Audio Control Panel:
- Launch the 2N® IP Audio Control Panel installer.
- Launch the 2N® IP Audio Control Panel application. Now click Audio sources → Net Mic to display the 2N® Net Mic setting window.
Initial View of 2N® Net Mic via 2N® IP Audio Control Panel
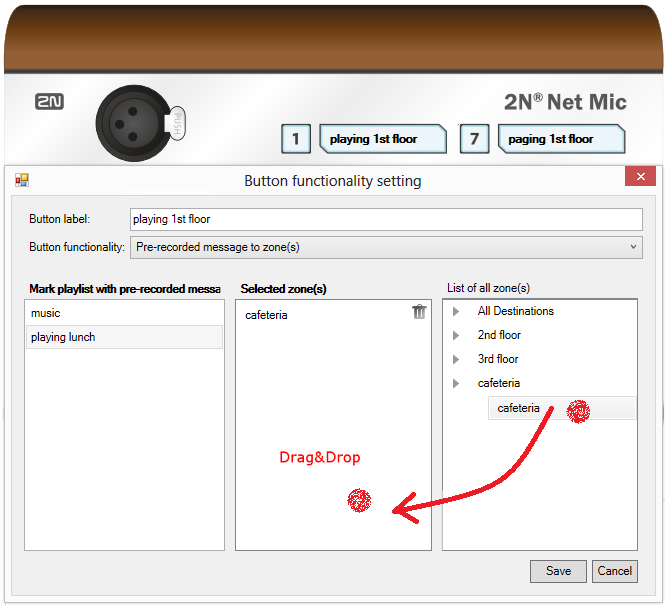
In the window above, set live announcements or playing files to 2N® Net Audio Encoder or 2N® Net Speaker to the 2N® Net Mic buttons. Click a number to set the function key.2N® Net Mic Button Function Setting
Select a playlist and drag it to the Selected zone to set Broadcasting to zone for the 2N® Net Mic button. Change the Button function item into Paging zone selection and drag the selected zone as mentioned above to assign live announcements to a zone. Now click Save and start using the 2N® Net Mic preset buttons.
The steps above should be sufficient for the basic settings of 2N® Net Mic in your network. In the case of troubles or advanced feature requirements refer to the 2N® IP Audio Control Panel Manual or wiki.2n.cz for more details.
2N TELEKOMUNIKACE a.s. hereby declares that this product complies with all basic requirements and other relevant provisions of the 1999/5/EC directive. For the full wording of the Declaration of Conformity see www.2n.cz.


