2.8 Console Access
You need a direct interconnection of your 2N® OfficeRoute gateway and PC especially when you do not know the gateway IP address and thus cannot configure it using a web browser. Also you can configure the DHCP server in the gateway or the VRRP function.
The console system is arranged as a set of nested menus. Entering a menu item number you either get into a submenu, or have the required operation executed, or set the selected parameter.
Serial Console Access
When the gateway is powered on, the main menu should get displayed after terminal connection (see chapter 2.4). To display the main console menu push Enter.
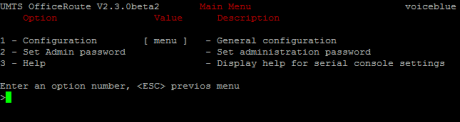 |
Figure 2.10: Serial Console Access - Main Menu
Figure 2.10: Serial Console Access - Main Menu
- Header – Contains (from the left): product name, firmware version, menu name and network name assigned to the equipment.
- Options – Numbers and names of available options.
- Value – If [menu] is displayed, the item includes a submenu. Otherwise it shows the current value of the option.
- Description – Explains briefly the meaning of every option in the menu.
- Enter an option number…> – Here enter the option number.
To select an option from a menu, enter its first number and push Enter for confirmation.
Submenus
If you select a submenu, this submenu gets displayed. Now you can select items from the selected submenu or push Esc for return.
Commands and Values
If you are requested to enter some information after selecting an item, you should enter one of the following values:
- Key word – List of one or more fixed strings. To select one, enter only so many initial characters as can distinguish it unambiguously from other key words.
Enter one of [ansi,color,teletype] : a
In the above mentioned case, select the key word by entering just an 'a', 'c', or 't' and push Enter.
- String – Arbitrary number of characters. The acceptable value interval may be included in the prompt.
Enter a hostname from 1 to 32 characters: OfficeRoute
- Integer – Decadic integral number. The acceptable value interval may be included in the prompt.
Enter a size between 1 and 100 : 99
Hexadecimal integral number – number to be entered in the hexadecimal format using characters 0÷9 and a÷f or A÷F.
Enter a hex number between 1h and ffh : 1a
- MAC address – Up to 12 hexadecimal digits of the physical address. Zeros at the beginning can be omitted.
Enter the remote network address : 50C229C4E2
- IP address – Internet address in the format of four digits of 0÷255 separated with dots.
Enter an IP address – 192.168.22.30
As soon as the requested information is entered, the respective operation is executed and new values are displayed in the redrawn menu.
Some configuration parameters may have just one of two constant values. By selecting such an item you immediately select a value opposite to that preceding the selection. Typical examples are on and off parameters. If the value is on, then it becomes off when the item is selected and vice versa.
Some commands execute operations that have a serious impact on the behaviour of the entire system (such as restart). Therefore, the system usually 'makes sure' before execution that it is really your intention.
Are you sure [y/n] – If you give an answer other than 'y' or 'Y', the command will not be executed.
To cancel the command execution and quit the prompt, push the Esc key any time.
About Menus…
We shall discuss the serial console menus in detail in the sections devoted to the gateway parameter settings. Below is a brief survey of these menus only.
Main menu
Appears after the USB cable is connected to the terminal (sometimes you must push Enter).
Configuration menu
Contains six submenus – network configuration, serial console settings, command line configuration, calls and device states, reboot and settings of VRRP and DHCP.
Network configuration
Used for setting the gateway IP address, network mask, initial router, DNS addresses, network name and domain.
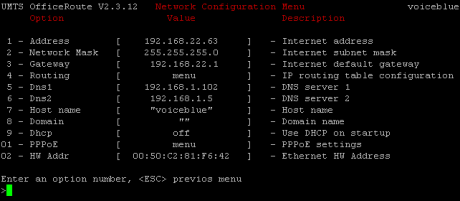 |
| Figure 2.11: Serial Console - Network Configuration |
- Address – IP address of the gateway. If the dynamic address obtaining function using the DHCP is enabled, the value cannot be changed manually.
- Network mask – Network mask. If the dynamic address obtaining function using the DHCP is enabled, the value cannot be changed manually.
- Gateway – Default router IP address. It is used for routing the data traffic beyond the network limits. If the dynamic address obtaining function using the DHCP is enabled, the value cannot be changed manually.
- DNS1 – IP address of the first DNS.
- DNS2 – IP address of the second DNS.
- Host name – Network name of the GSM gateway.
- Domain – Domain name.
- Location – Any text describing the gateway location. This value is published through the SNMP (in special firmware versions).
- Contact – Text containing the gateway administration contact information. This value is published through the SNMP (in special firmware versions).
- DHCP – Mark of the dynamic address assignment function. If selected, the gateway gets its network settings from the DHCP server. If not, the values must be entered manually.
- Class – The equipment class name that is sent in the network setting sending request. This string can help the DHCP server distinguish different types of equipment and assign configuration parameters to them accordingly.
- PPPoE – User name and password for PPPoE–based connection.
- HW Addr – Stable hardware address of equipment, i.e. the MAC address.
The DHCP or Address/Network mask parameters at least must be set correctly for the gateway communication to be established within the TCP/IP network. The address of one DNS at least should be set too.
- Serial console configuration – Set the terminal type and change the initial serial link parameters – transmission rate, data and stop bits, parity and flow control type.
- Command line – Set/change basic telephony settings – LCR, routes, SIP, devices, calls, DISA.
- States – States of devices (signal strength, registration status, etc.) and calls.
- Reboot – This option restarts the device.
- Settings – DHCP and VRRP server settings.
Telnet Console Access
This is a short description of new features added to the serial console configuration. For the standard serial console configuration capabilities refer to the section 2.11.
There is also a possibility of using Telnet for 2N® OfficeRoute configuration in addition to the standard serial console configuration.
Connect to your 2N® OfficeRoute via the Telnet type telnet <your OfficeRoute IP address> in the command line.
If successful, 2N® OfficeRoute will require authentication from you. To log in, use the valid login and password of one of the 2N® OfficeRoute users in the Administrators group. No user other than a member of the Administrator group may log in. If the login and password are entered correctly, you will be logged in.
Now you will see a window similar to the standard serial console configuration window and you can work with it in the same way. To log out, get to the main menu and choose the Logout option (this option is not visible in the serial console window).
There are all menus available as for the USB access.
Note
- The Telnet function may not be enabled by default in some newer Microsoft Windows OS. For a Telnet console access enable the Telnet client.