3.5 User Management
Users
In this menu you can see a list of all users and the Add/Remove user item. A user is either an extension or a user allowed to send SMS. A user may log in to the gateway and make some changes (send SMS) according to the rights assigned. If a line number is assigned to a user, the user is an extension at the same time.
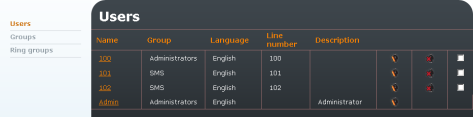 |
Obrázek 3.25: List of Available Users
Admin – is the default user and cannot be removed. It is primarily used for device management.
Emergency change of Admin password – if you are connecting 2N® OfficeRoute via a USB cable or a serial console, change the Admin password (it is not necessary to know the old one).
Add User
To add a new user/extension click on the Add user  icon in the right-hand bottom corner.
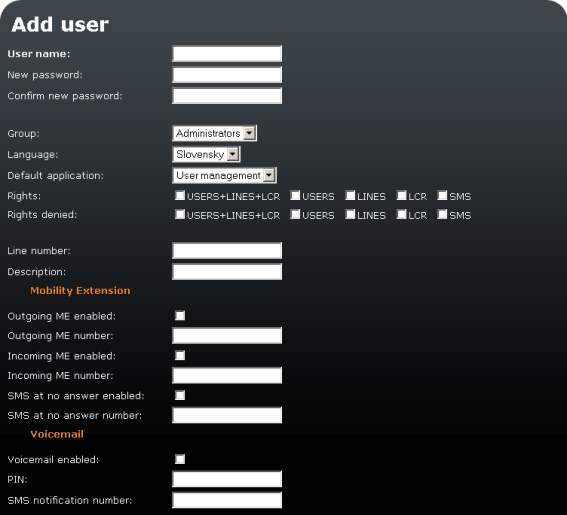 |
Obrázek 3.26: Addd User Form
- User name – Enter the user name for login to 2N® OfficeRoute web interface and SIP authentication.
- New password – Set the password for login and SIP authentication.
- Group – Select the user group. Different user groups can have different settings. Thus, you can simply select a group of pre-defined user rights to create a new user account. Moreover, you can adapt security rules to a particular user.
- Language – Select the default language for the user.
- Default application – Webpage/form after login to 2N® OfficeRoute web interface.
- Rights/Rights denied – Select rights or leave empty – the rights are assigned by group selection except for the SMS rights.
- Line number – In case the user is both extension and user, the Line number is UID (number of extension/SIP name).
- Description – User description.
MOBILITY EXTENSION
- Outgoing ME enabled – Enable/disable the outgoing Mobility Extension (ME) function for the selected user.
- Outgoing ME number – Enter the ME number.
- Incoming ME enable – Enable/disable the incoming Mobility Extension (ME) function for the selected user.
- Incoming ME number – Enter the ME number.
- SMS at no answer enabled – Enable/disable sending of info SMS to the ME station at no answer. Fill in the test in the Telephony services group tag in the Mobility Extension menu.
- SMS at no answer number – Enter the number to which the SMS At no answer should be sent.
VOICEMAIL
- VoiceMail enabled – Enable/disable VoiceMail for the selected user.
- PIN – Set the VoiceMail access PIN for the selected user.
- SMS notification number – Enter the number of the user to be informed of a new VoiceMail message.
Caution
- VoiceMail is a licensed service. Make sure that the count of licences is sufficient for all VoiceMail users. Click on any group tag icon to display the list of licences.
Groups
Groups are created to eliminate the need to specify access rights for each user individually. Upon login, the resultant set of assigned and barred rights consists of the selected rights group settings and, if necessary, corrections made during the user account creation.
 |
Figure 3.27:List of Avalable Groups
Administrators – is a group with all rights enabled.
SMS – is a group with the SMS rights enabled only.
Add Group
To add a new group click on the Add group icon in the right-hand bottom corner.
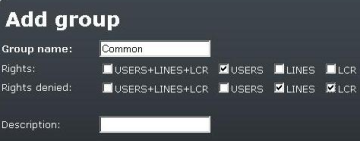 |
Figure 3.28: Group Adding Form
The form in Fig. 3.28 contains the following fields:
- Group name – Unique identifier.
- Rights – Parts of the system to be made available.
- Rights denied – Parts of the system to be barred.
- Description – Any text that describes the meaning of a group.
The web interface is divided into parts to/from which access rights can be assigned/removed. The checkboxes in the above-mentioned forms, one pair per group, are used for right group and user account setting. They are as follows:
- USERS+LINES+LCR – Whole system.
- USERS – Definition of the user accounts and groups.
- LINES – Communication line settings.
- LCR – Least Cost Router configuration.
Ring Groups
To add a ring group click on the Add group  icon in the right-hand bottom corner. Use digital characters for the group name only as the group name is identical with the group telephone number.
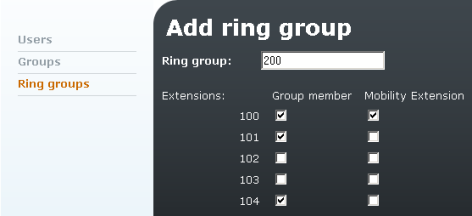 |
Figure 3.29: Ring Group Adding Form
Tick off the checkboxes to assign the extensions and their Mobility Extension numbers to the members of a new ring group.