7.5.9 Audio Inputs and Outputs
What is Audio I/O?
The Audio I/O ports are routing objects that cooperate with the audio ports of the Audio/IO/Relay board. Sounds enter the PBX or are played back through these inputs. The inputs can be used as a source of external progress tones and the outputs as a broadcast, for example.
Audio Ports
The Audio/IO/Relay board can be equipped with two or four stereo jack ports with the diameter of 3.5 mm, which represents four or eight ports (each stereo port is used as two mono ports). No port can be used as an input and output at the same time. Define the attenuation value for each port ranging from -70 to 70 dB.
The audio ports cannot be used as standard PBX virtual ports and should be assigned to a specific routing object of the Audio I/O type. Each audio port can be assigned to multiple Audio I/O routing objects.
Audio I/O Setting
The menu for the Audio I/O routing objects is divided into two parts. You can add, delete or rename the routing objects on the left and define a selected object on the right using the following parameters.
- Name – display the name of a selected routing object only. It cannot be directly configured here.
- Audio I/O – assign a selected Audio/IO/Relay board source to an object.
- Cancelled by incoming call – is a radio function option (has not been implemented yet). If a call comes during radio playing, the radio function is terminated and the terminal starts ringing. If this option is not checked, the incoming call is rejected with the user busy cause (or queued).
- Turn on tone to caller – enable playing of the below-defined tone to the calling user. The calling user should always hear the tone. It means that you cannot play a tone to the assigned source only but you can disable tone playing for both directions.
- Turn on tone to Audio I/O – enable playing of the below-defined tone to a selected Audio/IO/Relay board source.
- Tone – define the tone to be played to the calling party or/and to the selected Audio/IO/Relay source.
- Turn off tone after a time limit – enable the tone time limit. If the time parameter is switched off, the whole tone is always played back. After the tone has been played, the calling user is connected to the assigned source for broadcasting.
- Tone time [ms] – define the tone playing time. It may be shorter or longer. After this period, the calling user is connected to the assigned source for broadcasting.
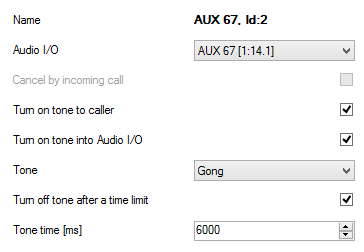 |
Figure: View of Audio I/O Configuration Menu
Example 1 – Broadcast
To use the audio port for broadcasting set the selected port onto Output in the Boards menu and then assign it to the selected Audio I/O routing object. The broadcast function is activated by an incoming call to this routing object. To play an announcement (e.g. We are beginning ... 5, 4, 3, 2, 1, on air...), select the message in the Tone parameter. When a call comes to the routing object, the selected message is played in the selected direction (calling or both) first and then the calling user is connected to the assigned source for broadcasting.
Example 2 – External Music on Hold source
To use an Audio/IO/Relay board source as an external Music on Hold (or other progress tone) source, configure it as Input. You do not even need the Audio I/O routing object for this purpose. Add a new input to the Audio inputs tab in left-hand upper part of the Global data – Progress tones menu and then assign Localisation and the Audio/IO/Relay board port to it in the right-hand upper part of the menu. Subsequently, use the Progress list tab to select this Audio input as a Music on Hold input. Now assign the progress tone to a selected user group on the Properties – Basic tab in the Hold tone parameter. The selected group of users will thus get music played to the port from an mp3 player or another source instead of the Music on Hold.