3.3.2 Remote Control (SNMP)
What is SNMP?
The Simple Network Management Protocol (SNMP) is part of the Internet protocol suite as defined by the Internet Engineering Task Force (IETF). The SNMP is used in network management systems for data acquisition and network monitoring for administration purposes. It consists of a set of network management standards, including the Application Layer protocol, a database schema and a set of data objects. The SNMP is available in three versions. Compared with the first version, version 2 is enhanced with authentication and version 3 with encryption. A majority of today's devices support the SNMP version two.
There are two sides in the SNMP communication – the monitoring one and the monitored one. These parts can run on separate physical devices or within one piece of equipment. The monitored side is often called Agent and the monitoring side Manager. The monitoring side flexibly collects information on the system state. The Manager sends requests to the Agent, mostly requesting some system state information. The Agent provides responses to the Manager. The Agent-Manager communication is often marked as an SNMP operation.
The OID or Object Identifier is an identifier used for explicit identification of each value in the SNMP communication. The OID is composed of a dot-separated sequence of numbers where each dot represents one level of the OID tree structure. The numerical identifications in subtrees are not unique and that is why the OID is always sent as a whole string. Each company and each of its SNMP supporting devices has an international OID of its own.
The MIB or Management Information Base is used for translation of OID strings into a more comprehensible text. The MIB database can be extended to include more MIB files.
Users
The SNMP v3 is a user oriented communication protocol. The user created in this part of configuration corresponds to the USM (User Security Model) in the SNMP v3 and to Community in the other versions. In addition to standard options Add, Delete and Rename user, the Default option is available, which helps introduce the default SNMP setting, including creation of the public user, right line Unrestricted and filters Internet and NetStar Traps.
- Authentication – define the password and way of encryption for authentication.
- Protocol – use the MD5 or SHA methods to secure your password.
- Password – enter the user password.
- Privacy – define the password and way of encryption for data transmission.
- Protocol – use the DES or AES methods to secure your transmission.
- Password – enter the encryption password.
- Access – assign a right to a selected user by selecting an item from the right list included on the Rights tab.
Rights
The Rights tab includes the following parameters:
- Name – define the name of the right to be created. This name is displayed in the Users selection.
- Context – use a text string to identify the SNMP module within the client address. This parameter need not be filled in.
- Full match context – enable requirement of full match including context. It is mostly unnecessary.
- Security model – choose either a specific security model (SNMP v1, SNMP v2c, USM = SNMP v3) or the Whatever option. Any selection has to be supported by the other party too since no communication feedback is available.
- Minimum security level – the parameter offers three different models:
- Authentication and privacy
- Without authentication and privacy
- Authentication only
- Read filter – set the Read filter by choosing an item from the list of available filters on the Filters tab. The filter restricts access to the system information for selected users.
- Write filter – set the Write filter by choosing an item from the list of available filters on the Filters tab. The filter restricts writing within the system for selected users.
Notify filter – set the Notify filter by choosing an item from the list of available filters on the Filters tab. The filter restricts notifications from the system for selected users.
 |
Figure: View of SNMP User Right Setting Menu
Filters
The Filters tab displays the list of filters created. The Internet and NetStar Traps filters are created by default. Use the context menu to add, edit and derive the filters.
- OID root – set the OID tree root to be used as a base for filter setting. You can view the OID structure in a tree or an alphabetical list.
- Exception – change the meaning of a filter rule. If this option is not checked, the defined OID subtree is used. If it is checked, the use of a subtree from this row is denied. With this parameter you can specify that the whole section 2.1 will be used except for subsection 2.1.3.
- OID subtree – choose restrictions for a subtree. If the row is empty, the whole of the above specified OID root is used. Every filter should have one rule at least, even an empty row. It is because the filter compares rules with the subtrees instead of the OID root. If some subtrees overlap, the most common (the shortest OID) rule is applied.
MIB files
The MIB files section includes the following parameters:
- Add – add a selected MIB file to the MIB database.
- Delete – delete a selected MIB file.
- Recompile – recompile a selected MIB file.
- File – this column shows the path to the MIB file source. This path is relevant for the Recompile option.
- Status – this column shows the current status of a MIB file. The options are Compiled, Not compiled and Not found. The MIB file statuses are also indicated by the icons on the line beginnings as shown in Figure 2.
- Additional information – display additional information.
 |
Figure: View of MIB File Management Section
Default Notify filter options according to RFC3415
The section includes the following parameters:
- Internet access:
- subtree 1.3.6.1
- Restricted access:
- System – subtree 1.3.6.1.2.1.1 according to RFC3918
- SNMP – subtree 1.3.6.1.2.1.11 according to RFC3918
- snmpEngine – subtree 1.3.6.1.6.3.10.2.1 according to RFC3411
- snmpMPDStats – subtree 1.3.6.1.6.3.11.2.1 according to RFC3412
- usmStats – subtree 1.3.6.1.6.3.15.1.1 according to RFC3414
This means that the following events are sent upon start:
- The ColdStart message is sent to announce that restart has been executed.
- Information on all SIP ports is sent after the ColdStart message.
- Information on all physical storages is sent as the last event.
Answer
In this tab specify the ports and the client from which the system is able to receive requests.
The tab includes the following parameters:
- Peer port – here the system expects the SNMP requests and acknowledgements. The default SNMP port is 161.
- From this client address only – lock request receiving from a selected IP address or domain name.
 |
Figure: View of Listening Port Setting Section
Notification
The Notification tab includes the following parameters:
- Client address – define the client's IP address or domain name to which notifications are filtered as mentioned below are sent.
- Client port – define the client port to which notifications are sent.
- Used local port – specify the system port to be used for sending notifications if necessary. And for receiving info request confirmations. If this option is disabled, the port is selected randomly.
- Notification type – select the type of notification to be used. For SNMP v1, Traps may be selected only, for higher versions info requests are also available.
- Trap – is an SNMP message sent to the client about an event that should be notified. The message does not require acknowledgement.
- Inform request – is an SNMP message sent to the client about an event that should be notified. Unlike traps, inform requests can be resent if undelivered within the acknowledgement timeout.
- Repeat – define the count of notification sending attempts.
- In interval – define the time interval during which confirmation is awaited from the client.
- Version – specify the notification coding type according to the SNMP version used.
- SNMP v1
- SNMP v2c
- SNMP v3
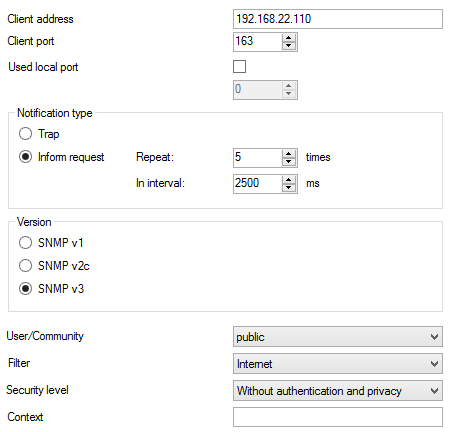 |
Figure: View of Notification Configuration Menu
- User/Community – define the SNMP user that corresponds to the USM for SNMP v3 and Community for the other versions.
- Filter – define the Notify filter. The longer the root and subtree OID, the stricter the filter.
- Security level – this parameter can be used for SNMP v3 only and defines the notification security level. Choose one of the following options:
- Authentication and privacy
- Without authentication and privacy
- Authentication only
- Context – use a text string to identify a SNMP module within the client address. This parameter need not be filled in.