7.1 Setting Properties
Fall-Down Hierarchy
All the Properties parameters are used according to a fall-down hierarchy of the PBX. It means that setting a parameter on one level you cannot be sure that it will be used. Each level of this fall-down hierarchy has a preset priority. The following figure defines all the fall-down hierarchy levels. The higher the level, the higher the priority.
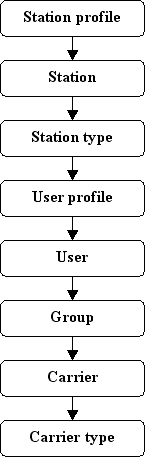 |
Figure: View of system Fall-Down Hierarchy. Higher Levels Have Higher Priorities
It implies from the figure above that the parameters set on the extension profile level have the highest priority and the parameters set on the virtual port type level have the lowest priority. If a parameter is set to the Default value on a level, a different setting on a lower level is searched for this parameter. If a parameter is not set on any level (Default is set on all levels), the PBX uses the value preset by the source code.
Properties
The Properties tab is situated in the menus of all routing objects as mentioned above (Figure 1). By default, the properties are not set on all levels as they are unnecessary for normal PBX operation. To set a parameter for an object, simply push the Create properties button. To cancel a parameter, click the Reset default properties button. The Properties tab consists of fourteen subtabs, which are logically divided according to functions. Some are only used on certain levels because they have no sense on others. The text below explains all the parameters available in the subtabs.
Basic
The parameters of this subtab are mostly divided into sections according to their functions:
- No answer timeout [s] – set the maximum time of alerting the called phone. After the timeout, the call establishing process is terminated with the 'User not responding' cause and the calling user hears the congestion tone. The default value is 180s. The maximum value is 1 hour.
Holdoff parameters
The menu contains the following parameters:
- Call hold – enable holding of a call. The default value of this parameter is YES (Hold enabled).
- Hold tone – set the tone to be played to the user during call holding by the other party. The default tone is the Music on Hold progress tone.
- Maximum hold level – define the maximum count of held calls per extension. Reclick the call holding button to get connected to the first held subscriber, push it once again to get connected to the second held subscriber, and so on. If a held subscriber hangs up, the released position can be used for another hold.
Transfer parameters
The menu contains the following parameters:
- ICT enabled – (Implicit Call Transfer) – enable call transfer via a connected terminal (phone). You can use one of the following options:
- Blind transfer (with hang-up) – the call is not answered by the other party before transfer. E.g. user A calls to user B. User B answers the call and users A and B are talking with each other. User B holds the call. User A hears the Music on Hold and user B establishes a new connection to user C. User C does not answer the call and user B terminates the call. User A is transferred to user C and hears the alert tone instead of the Music on Hold. When user C answers the call, users A and C can talk to each other.
- Transfer without hang-up – the call is answered by the other party before transfer. E.g. user A calls to user B. User B answers the call and users A and B are talking to each other. User B holds the call. User A hears the Music on Hold and user B establishes a new connection to user C. User C answers the call and user B terminates the call. User A is connected to user C and they can talk to each other.
- Transfer return timeout [ms] – define the timeout for return from the blind transfer. After this timeout (if not answered), the call returns to the extension that transferred it. The default value of this parameter is 20s.
Queue parameters
The queue parameters are only available on the group and user levels. The Station polling timeout is the only parameter on the station level.
- Queue – enable call queuing. It means that if an incoming call is routed to a busy extension with a queue, the call is not terminated, the calling user hears the alert tone and can wait for connection. After the current call is terminated, the phone of the called user is alerted again with your call from the queue. If the queue is disabled, the incoming call on a busy extension is terminated with the 'User busy' cause. The default value of this parameter is NO (queue disabled).
- User busy when station busy – select whether or not an incoming call shall make the user busy. The option is enabled by default, which means that the user cannot use two own stations at the same time or call from one own station to another.
- Queue depth – set the maximum count of calls to be queued. All excessive calls will be rejected as if the queue had been disabled (User busy). If you set this parameter to zero, the count of queued calls will be unlimited. The default value of this parameter is zero (unlimited).
- Queue timeout [ms] – define the delay between the end of the previous call and the beginning of the next queued call alerting. The default value 0 s (alerting starts without delay).
- Maximum time in queue [s] – define the period of time for which the calling subscriber may stand in the queue. When this time elapses, the incoming call is terminated.
- Repeated attempt timeout for stations [s] – set the time interval for the PBX to re-try to route a call to the selected station. The selection is designed primarily for external stations, which may be occupied by a call that is not made via the PBX. The busy status is identified the moment the PBX tries to make a call and the network sends the busy tone (cause 17 – User busy is only respected). Call routing is terminated temporarily, but, with an active queue, it is necessary to know when the given station is free and ready to answer. In these cases, the other user stations are not called repeatedly. The parameter is also useful for internal ports with multiple logged-in stations. While one station is speaking on one port, the other cannot be used and is attempted repeatedly until it gets free or the calling subscriber hangs up. In this case, the other user stations are alerted too since the busy cause from the virtual port does not mean a busy user.
- Next call – compile a caution on an incoming queued call. The default value of this parameter is NO (caution disabled).
- Next call tone – set the progress tone to be played to the user during an active call if there is a call in the queue for the user. The progress tones with the Off option can only be used for this function. The Queue Alert tone is a good example. If you do not have this progress tone in your list, click on Add default progresses.
Identification parameters
The identification parameters are available on all hierarchical levels of the PBX except for the Outgoing hold CLIP parameter, which is active on the group and user levels only.
- Incoming hold CLIP – forward the called party number to the called user in the case of call transfer made by the extension where this parameter is being enabled. It means that, if YES is selected, the transferred call will be identified by the CLI of the transferred user (A) instead of that of the user who transferred it (B). The default value of this parameter is NO.
- Outgoing hold CLIP – display the original calling party number in the case of call transfer. It means that, if YES is selected, you will see the calling party number of the transferred user (A) instead of that of the user who transferred the call (B). The default value of this parameter is NO.
- Use Replace in identification table – replace a part of the preset identification (as specified in the identification table) with your own calling extension identification. The default value of this parameter is YES (replacement enabled).
- CLIR – restrict the calling line identification. Use a service or a pre-programmed 2N® StarPoint phone button to change the station settings. The parameter is set to NO by default.
- Language – select the language to be used by the 2N® StarPoint terminals. Choose one of the languages listed. The default value corresponds to the preset Localisation of the PBX.
- Max phone directory item count – set the maximum count of records in a user private phone directory. This parameter is available on the user level only! The default value of this parameter is 10 records.
Routing
The menu contains the following parameters:
- To port – route an outgoing call through the selected port. Outgoing means the outward direction from the PBX.
- From port – the section includes two types of call routing.
- Normal – define routing of the calls that arrive in the PBX via the port.
- For services and calls on hold – set the routing destination for calls on hold or services without a destination of its own. This helps you easily create a complete routing system for PBX external stations.
- AutoClip parameters for calls – choose an AutoClip parameter set for storing of AutoClip router records. This option can be used on the user profile, user and group levels only.
- No port – set routing for extensions not assigned to a virtual port. It is primarily used for the external, email and virtual port extensions that are used for special routing cases. This setting is available on the virtual port and virtual port type levels only.
For more information on call and SMS routing refer to Subs. 5.1 Routers.
Message routing
The Message routing tab is available on all hierarchical levels. Its structure is similar to that of the Call routing tab but includes several additional parameters.
- To port – set routing rules for the messages that go out of the PBX through the port.
- From port – set routing rules for the messages that come into the PBX through the port.
- AutoClip parameters for messages – assign a set of AutoClip parameters as defined in the Global data – AutoClip parameters menu. All records on outgoing SMS messages are stored in the AutoClip router including these parameters.
- No port – set routing rules for the extensions that are not assigned to any port. Such extensions include, in particular, PBX external or virtual port extensions used for special routing cases.
- For call routing via the PBX refer to Subs. 7.1 Routers.
- Parameters of unsuccessful sending
- Repeat at fail – enable repeating of a failed SMS sending attempt. An attempt may fail due to a GSM network rejection or bad signal quality. This option does not refer to SMS delivery failures due to switch-off or temporary unavailability of a remote GSM extension.
- Number of repeated attempts – set the maximum count of sending attempts at an SMS sending failure due to network rejection or temporary signal unavailability. The default value is 4000.
- Time for message repeat [s] – set the interval between successive SMS sending attempts. The default value is 180 s.
ME
The ME subtab is used for setting parameters for external extensions. They mostly include parameters for call holding using an external extension. Mobile phones are not equipped with a standard PBX call holding key and that is why this function has to be replaced with a sequence of DTMF symbols. This tab contains the following parameters:
- Transfer – enable call holding from an external extension. This function is subject to licence and hierarchy. If you define this parameter on the user level, you need as many licences as many extensions the user has (the external extension is not included because it needs licence for use).
- Pattern time interval [ms] – set the time interval between individual characters of the FLASH and DISCONNECT patterns. This time interval is important for a correct recognition of the pattern. If the delay between the pattern characters is longer than the preset time value, the pattern will not be recognised.
- FLASH pattern – set the sequence of the FLASH pattern characters used for call holding. Re-enter the FLASH pattern to reconnect a held call or switch between two calls (one active and one on hold).
- DISCONNECT pattern – set the sequence of the DISCONNECT pattern characters. When you have one active call and one call on hold, use this pattern to terminate the active call and reconnect the call on hold.
- Do not end outgoing call – select that an outgoing call from the PBX to an external station shall not be terminated after the calling user hangs up. Instead, the user gets the busy tone from the PBX and can, using the DISCONNECT PATTERN, return to the dialtone and dial the required station through the PBX. The selection is disabled by default.
- Do not end incoming call – select that an incoming call from an external station to the PBX shall not be terminated after the calling user hangs up or the DISA fails. Instead, the user gets the busy tone from the PBX and can, using the DISCONNECT PATTERN, return to the dialtone and dial the required station through the PBX. The selection is disabled by default.
Forwarding
The whole tab is available on the group and user levels only.
This Forwarding subtab is used for call forwarding setups. The unconditional call forwarding (CFU) has the highest priority. The other two forwarding types have the same priority and each is used in a different situation. The call forwarding settings on this tab can be changed for a selected group of users in the Forwarding exceptions tab, which has a higher priority. Furthermore, it holds true that if extension A forwards its calls to extension B, then extension B can call to extension A without being forwarded. This function is called Boss-secretary. The following parameters are available in the Forwarding subtab:
- CFNA – Call Forwarding at No Answer – set call forwarding in case the called user fails to answer within a timeout.
- CFNA timeout [ms] – set the timeout for CFNA forwarding. After the timeout expiry, the call is forwarded to the preset destination.
- CFU – Call Forwarding Unconditional – set call forwarding of all incoming calls (highest priority). Each incoming call is forwarded to the preset destination regardless of other settings of this subtab.
- CFEC – Call Forwarding on Error Cause or Busy – set call forwarding in the case of routing on a busy extension or routing ending up with an error cause.
- Cause object – select one of the cause objects as pre-defined in the Global data – Causes – Cause objects menu. Basically, a cause object is a set of error causes, which are subsequently respected in the CFEC forwarding mode. You can disable the cause objects or use the default settings of any of the lower levels (Default).
Forwarding – exceptions
The whole tab is available on the group and user levels only.
The Forwarding – exceptions subtab is used for specifying exceptions from the forwarding rules set in the Forwarding subtab. The exceptions are also applied when no forwarding rule has been set in the Forwarding subtab. This tab is also called a Black/White list. Use the phone directory to fill the list with addresses.
A field is available here for each type of forwarding (CFU, CFNA and CFEC), where you can add a limited number of exceptions. Each row represents one exception and is divided into two parts. In the first part, the calling party is defined for which this exception will be valid, and in the other part, a new call routing rule is determined. Setting the calling party, select a extension, user, ring group, virtual port, virtual port type and extension type. Setting the rule, choose any of the destinations available in the Forwarding subtab, or select one of the following three options:
- Disabled – disable call forwarding as defined in the Forwarding subtab for a selected calling user (users) and allow this user (users) to call the selected destination.
- Enabled – route a forwarded call to the destination preset in the CFW (Forwarding enabled) field. If this field is not filled in, the call is routed as with the Disabled option.
- Rejected – terminate a forwarded call with the CALL REJECT cause. The calling user hears the congestion tone.
Tones
Use the Tones tab to define the basic tones of the PBX to be played to the calling user. The menu is divided into three parts. The first part, Dial, helps you set various dial tones, the second part, Alert, helps you set various alert tones and the third part, Congestion, helps you set various congestion tones. To add a row defining which tone would be used for which situation use the context menu. A list of situations (states) related to specific types of tones is displayed in the Type column. A list of available progress tones is displayed in the Tone column. It holds true for the dial tones that a higher row has a higher priority. It is because there may be more valid conditions than one in the dial tones. To change the priority of the rows, use the two arrow buttons on the right. To add a row with a certain priority easily use the Insert ahead selected and Insert behind selected options. The Add option is used for adding a record behind the currently last one (i.e. the lowest priority record).
Softphone
The Softphone subtab is used for setting parameters of the 2N® StarPoint key phones. These settings are not created automatically (except for the Default IN virtual ports), but on all levels of the fall-down hierarchy using the Create Softphone extension button. To delete a setting, use the Remove Softphone extension button. The Keypad tab helps you set the type of the terminal connected. The key phones are detected automatically on the extension level only. The other subtab settings relate to 2N® StarPoint key phones only.
- Terminal – choose an item from a list of available terminals:
- VoIP – indicates any VoIP terminal.
- 2N StarPoint IP T20 – indicates a 2N® StarPoint IP type T20 IP phone.
- 2N StarPoint IP T22 – indicates a 2N® StarPoint IP type T22 IP phone.
- 2N StarPoint IP T26 – indicates a 2N® StarPoint IP type T26 IP phone.
- 2N StarPoint IP T28 – indicates a 2N® StarPoint IP type T28 IP phone.
- 2N StarPoint IP T32 – indicates a 2N® StarPoint IP type T32 IP phone.
- 2N StarPoint IP T38 – indicates a 2N® StarPoint IP type T38 IP phone.
Well VP-2009 – indicates a Well VP-2009 IP phone.
Well VP530 – indicates a Well VP530 IP phone.
Well YV2 – indicates a Well YV2 IP phone.
Well YV3 – indicates a Well YV3 IP phone.
- Yealink T19P – indicates a Yealink T19P IP phone.
- Yealink T21P – indicates a Yealink T21P E2 IP phone.
- Yealink T23G – indicates a Yealink T23G IP phone.
- Yealink T27P – indicates a Yealink T27P IP phone.
- Yealink T29G– indicates a Yealink T29G IP phone.
- Yealink T46G – indicates a Yealink T46G IP phone.
Yealink T48G – indicates a Yealink T48G IP phone.
- Yealink W52P – indicates a Yealink W52P IP phone.
Cisco SPA 525G – indicates a Cisco SPA 525G
Cisco SPA 504G – indicates a Cisco SPA 504G
Grandstream GXP1625 – indicates a Grandstream GXP1625
Htek UC902 – indicates a Htek UC902
Htek UC903 – indicates a Htek UC903
Htek UC912 – indicates a Htek UC912
Htek UC923 – indicates a Htek UC923
Htek UC924 – indicates a Htek UC924
Htek UC926 – indicates a Htek UC926
Helios IP 1 (3, 6) – indicates a 2N® Helios IP intercom with one, three or six buttons and with the keyboard or display.
- Extenders
- Up to two 38-button extenders (IP key module) can be connected to the 2N® StarPoint IP type T26 and T28 phones.
- 40-button extender EXP40 can be connected to the Yealink T46G and Yealink T48G.
- 20-button extender Htek UC46 can be connected to the Htek UC924 and Htek UC926.
- 8/16-button extenders or an Infopanel can be connected to the selected 2N® Helios IP intercom.
- Restart IP terminal – restart the selected IP terminal. The function is available for the 2N® StarPoint IP T2x terminals only. Make sure that the terminal type is correctly completed in the Virtual ports – SIP – Stack – Terminals menu.
With the Entry, Economy, Basic, Standard and Advanced terminals, you can set the following parameters:
Key setting
To program the phone keys display a dialogue box by clicking on the selected key. Select the key function and legend in the window and choose any of the following functions:
- Speed dialling/State – press State to set speed dialling for a number and monitor the state of the selected port/user/station. All the user stations are monitored in the user state. The state is indicated by the LED next to the button as follows:
- Relax – the LED is off when all the user stations are at relax (station/port at relax).
- Off-hook – the LED is on when one of the user stations is off-hook (station/port off-hook).
- Ringing – the LED flashes when one of the user stations at least is ringing (station/port ringing).
- Intercom – push the Intercom button to interconnect two key phones. All you have to do is dial the called station number and press the button. The connection will be set up automatically. Make sure that the called party is equipped with a HandsFree key phone.
- No function – the button is assigned no function and does not respect the fall-down hierarchy.
- Call slot – the button is used as a slot for another call via the selected station. The call slot count is limited by the Maximum hold level in the Properties – Basic menu. Press the button to hold the active call. When you hear the dialtone, you can route the call to another station. If Queue is selected in the Properties – Basic menu, the call slots are occupied with incoming calls. You can thus switch the callers: the inactive call is held and the caller hears the Hold tone.
AoC
The whole tab is available on the group and user levels only.
The AoC subtab helps you define the warranted count of call records to be displayed on the key phone. Set the count of Missed, Received and Dialled calls separately. The default count of records is twenty. This limit applies to PBXs with a high number of users (carried calls) only. If a PBX has a capacity to store more records, all of them are displayed at any time.
Caution
- The 2N® NetStar Assistant web application can display up to 20 records of each type, i.e. the total of 60 records.
SMS at no answer
Use the SMS at no answer subtab to set parameters for the SMS at no answer function. An SMS at no answer is a message that is sent automatically to the called user if the following conditions are satisfied:
- The called party rejects or does not answer the incoming call.
- The SMS at no answer is activated on one of the levels of the fall-down hierarchy for the calling or called user.
The SMS at no answer is sent through the destination defined here. Usually is this destination defined as bundle of virtual GSM ports. Type the SMS text to be sent to the called users in the SMS subtab. You can also add information on the calling number (string %c) and the calling extension name (%n) to the SMS body.
Note
- If you use a text string %n in the SMS text, select a phone directory for the port via which the SMS is to be sent in order to complete the name. Refer to the Send information on name in the 2.5 Virtual Port Options subsection.
SMS setting:
- Send SMS at no answer – send this SMS as an SMS at no answer to the called extension. This setting has a higher priority than that for an external extension.
- Send SMS at no answer of external extension – send this SMS as an SMS at no answer to the called external extension. This setting has a lower priority than the general one mentioned above.
Moreover, you can define the sending timeout. If you set this timeout to 20 s, the outgoing call has to alert the called extension for more than 20 s so that the SMS can be sent after the call end. The timeout is the fourth condition for SMS at no answer sending.
The message sending principle is illustrated on the examples below (calls to GSM):
- User A calls to an external GSM phone via a GSM port of the PBX. The SMS at no answer has been enabled and the timeout is 20s. The GSM phone begins to ring, but the called user does not answer the call. After the timeout (20s), user A hangs up (or the call is rejected by the other party). Then the SMS set in the upper configuration row is sent to the selected destination. If the Origin type is selected for the destination, the SMS will be sent via the same GSM port that was used for the call .
- User A calls to an external GSM extension of user B. The SMS at no answer is disabled for User A while enabled with no timeout for user B. After no answer or call rejection by the external GSM extension, an SMS at no answer is sent containing the text as defined in the bottom row of the configuration of user B. When the SMS at no answer is enabled for user A too, an SMS at no answer is sent containing the text from the upper row of the configuration of user A.
Services
The Services subtab helps you create individual service settings, thus replacing the global ones. You can modify such parameters as progress tones, timers and routers, or activate the PIN request in the service settings. To disable individual settings click the Remove individual setting button.
User reservation
The User reservation service helps you reserve the user that is not accessible at the moment (is busy or does not answer). When the function is enabled both for the called and calling users, the PBX starts monitoring the called user's activity. As soon as the user becomes available, the User reservation service makes a CallBack to the user-reserving subscriber and automatically connects the two users.
Note
- The service is only available for internal system calls.
Note
- The service is enabled by default.
The User reservation tab is divided into three sections: Reservation made by other users enables/disables a user to be reserved by the other users and Reservation made by this user and Settings for service help the calling user set the reservation parameters.
- Reservation made by other users
- Others can make reservation on this user – enable/disable the called user to be reserved.
- Maximum time of reservation – set the maximum reservation time. Reservation will be cancelled after this timeout.
- Reservation made by this user – set the reservation parameters for the calling user or enable reservation in the following situations:
- Enabled when busy – enable/disable reservation if the called user is busy.
- Enabled when no answer – enable/disable reservation if the called user does not answer within a timeout.
- Enabled when queue – enable/disable reservation if the user's queuing time expires.
- Settings for service – enable the caller to change the service parameters contrary to the global settings.
- Reserve when busy – set the tone to be played to the calling user if the called user is busy and enabled reservation.
- Reserve when no answer – set the tone to be played to the calling user if the called user does not answer and is enabled reservation.
- Reserve when queue – set the tone to be played to the calling user if the queuing time expires and the called user is enabled reservation.
- Reservation confirmation – set the tone to be played to the calling user when the called user reservation has been successful (upon entering the reservation code).
- Dialling error – set the tone to be played to the calling user after the third attempt to enter an invalid reservation code.
- Incoming call tone – set the tone to be played to the calling user after receiving the User reservation call. After that, the reserved user is dialled automatically.
- Reservation code – set a numeric code to be entered by the calling user for user reservation confirmation.
- Create settings / Delete individual settings – create/delete individual service settings for the given level.
Recording
The whole tab is available on the user, group, virtual port and virtual port type levels only.
You can set the call recording parameters in this tab. Find the tab in the Properties on the user, group, virtual port and virtual port type levels.
- Recording – specify the recording mode for the level.
- Default – settings from other hierarchical levels are used.
- Disabled – disable call recording regardless of lower level settings.
- Upon request – enable call recording activation/deactivation during the call. The parameters Pattern length, ON pattern and OFF pattern are used.
- Turn on at alerting – call recording is activated by ringing detection and deactivated by the call end.
- Turn on at connect – call recording is activated by the call connection and deactivated by the call end.
- Recording direction – define which calls are to be recorded from the viewpoint of the PBX (not the user or group).
- All – all the object calls are to be recorded.
- Incoming only – all incoming calls to the PBX are recorded only. These calls are outgoing calls when viewed by the user/group (the user/group calls the PBX).
- Outgoing only – all outgoing calls from the PBX are recorded only. These calls are incoming calls when viewed by the user/group (the user/group phone ringing ).
- Marked only – the outgoing calls from the PBX are only recorded that have the Recording mark option enabled in the Complex router.
- Marked only and incoming – the outgoing calls from the PBX that have the Recording mark option enabled in the Complex router plus all incoming calls to the PBX are recorded.
- Pattern length [ms] – set the time for which the recording ON/OFF pattern characters are to be awaited. If a character comes after the timeout, it is identified as invalid (the pattern is not recognised).
- ON pattern – define the recording ON pattern during the call. The parameter is applied by PBX extensions only if the Upon request recording mode is active. The default pattern is 1*.
- OFF pattern – define the recording OFF pattern during the call. The parameter is applied by PBX extensions only if the Upon request recording mode is active. The default pattern is 3#.
- Hang up at unsuccessful recording – use the parameter to enable call termination in case call recording fails (due to an unavailable storage, invalid licence, etc.).
- The following parameters relate to the saved files with call records. If they are inactive, create new properties of the object used. Thus, you add a row to the Call recording logical storage.
- Item lifespan [s] – set the storing time for a file with a call record. When the time expires, the items are deleted sequentially. The item lifespan is automatically set to 10 years if this option is not selected.
- Maximum count of items – set the count of records in a storage for an object. After the limit is reached, no more calls are recorded unless deleting of oldest files is enabled.
- Available space for all items – define some space in a storage to be reserved for records of the given object. When the space is full, no more calls are recorded unless deleting of oldest files is enabled.
- Delete oldest after reaching limit – enable deleting of the oldest record files if necessary.
Caution
- 2N TELEKOMUNIKACE a.s. shall not be held liable for any recording errors due to unavailable network disks and/or exceeding of the maximum storage capacity.
Customer
The Customer subtab provides parameters for functions that have been implemented for a specific customer and so their meanings will be explained marginally only. This subtab is divided into three sections. Define the supported method of the CPN sending for call billing purposes in the first section. Set the called party identification to be transmitted via a DSS1 message in the remaining parts.
- Forwarding number – is used in DSS1 messages for communication with Nokia exchanges for billing purposes. Set the Scheme (Number or URI), Subtype (Unknown, Internal, Local, National, International) and Number/URI (specific number or address).
- Facility – is used in DSS1 messages for communication with Ericsson exchanges for billing purposes. Set the Scheme (Number or URI), Subtype (Unknown, Internal, Local, National, International) and Number/URI (specific number or address).
- Enabled – enable/disable sending of the Facility or Redirecting number in signalling for the given level.
- Enabled when forwarding – enable/disable sending of the Facility or Redirecting number in signalling for the given level in the case of call forwarding . If this option is enabled for a user with call forwarding enable to a destination off 2N® NetStar, enter the user number into the Facility or Redirecting number parameter.
The number for call billing is sent using this information element. Make sure that the parameter is set for the virtual port too. Choose Yes, No, or Default.
In addition to DSS1, the parameter is also used in SIP signalling, where it sets the Diversion header.