Visits - Manage visits in 2N® Access Commander from version 2.1
Since the version 2.1 there is a new "Visitors" section in 2N® Access Commander, enabling a management of visiting persons.
Visitors are not included in the number of "users" under the license (due to the limited duration of the visit).
Version 3.0+
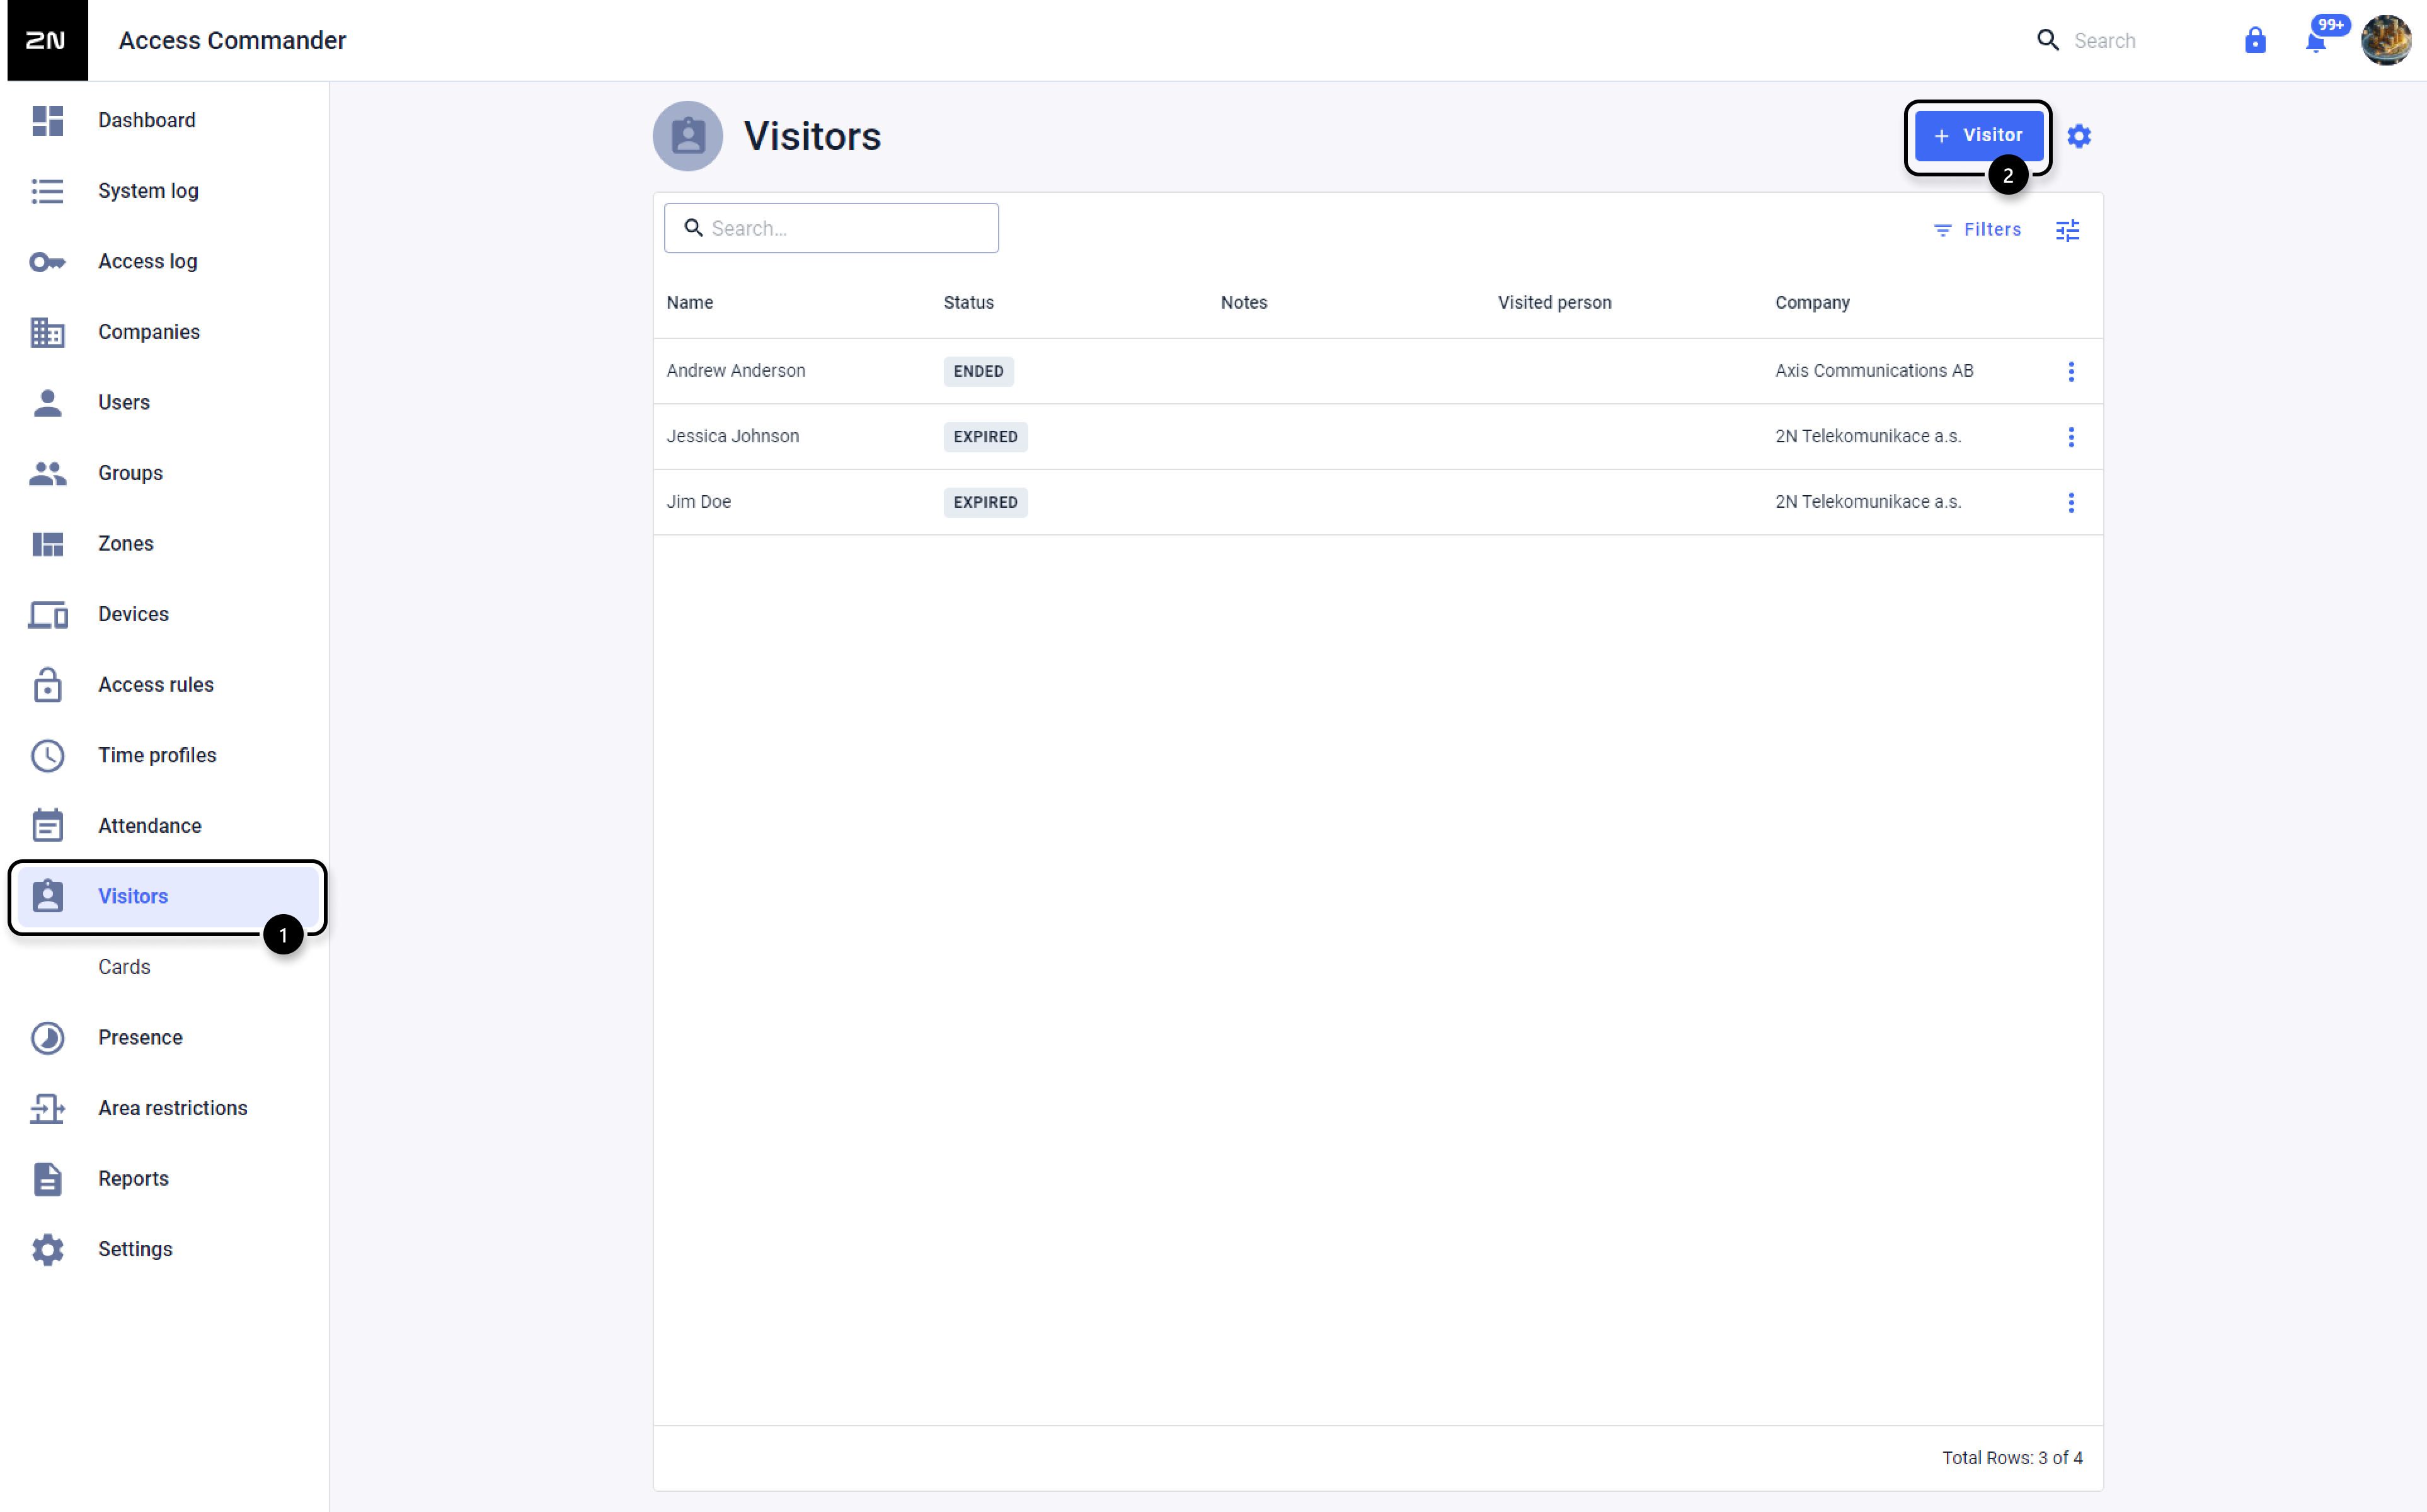
- in the 2N® Access Commander's web interface go to the Visitors section and click on +Visitor on the top-right corner:
fill in the details of the visit - name, visited company, or also the visited person, when the "visited company" is then selected automatically,
further notes on the visit, date and time of the beginning and end of the visit: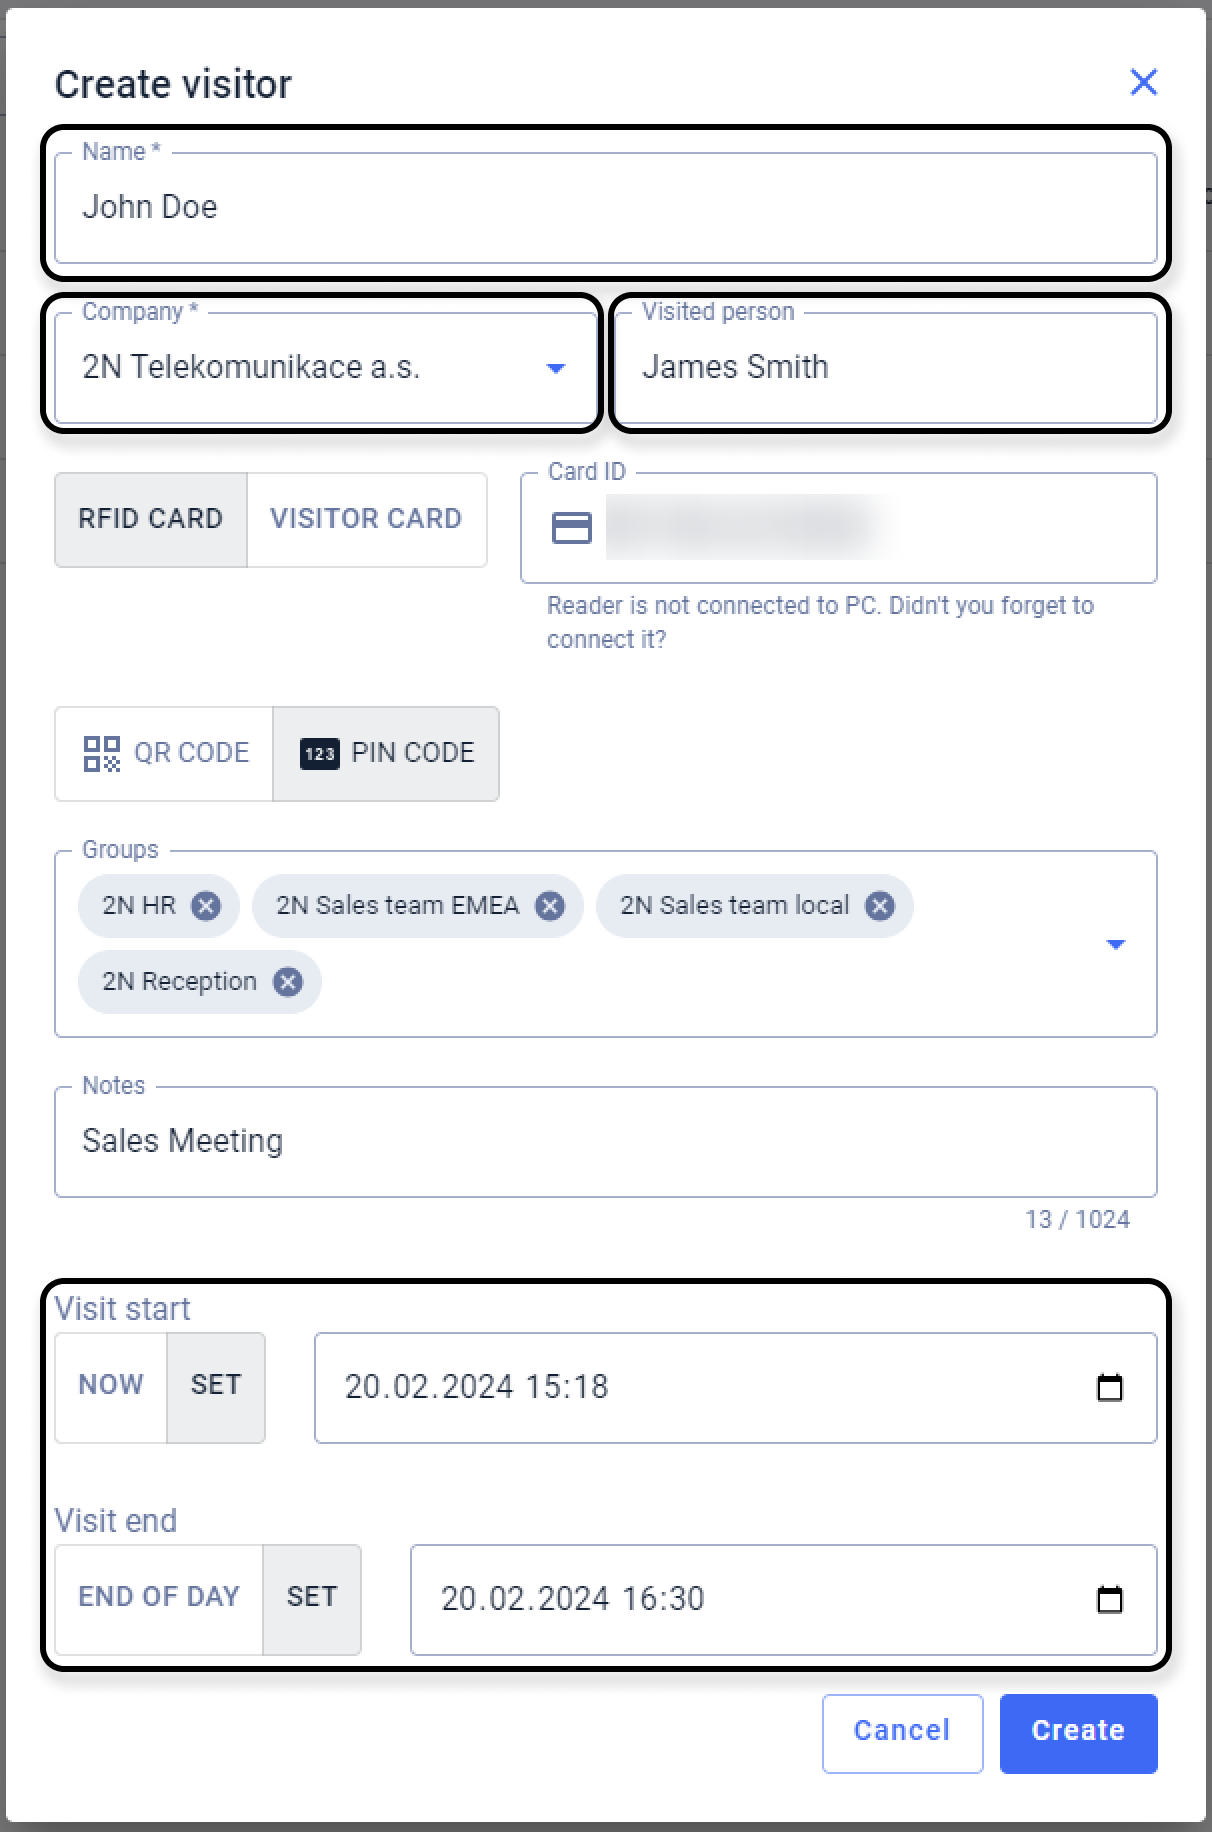
then enter the card number, which can be entered manually, read from an external USB reader
(if the 2N® USB Driver is running on the PC and the reader is connected - more here: Driver for External USB Readers - How to use it?),
or select from the preset cards (see chapter Possible presets below):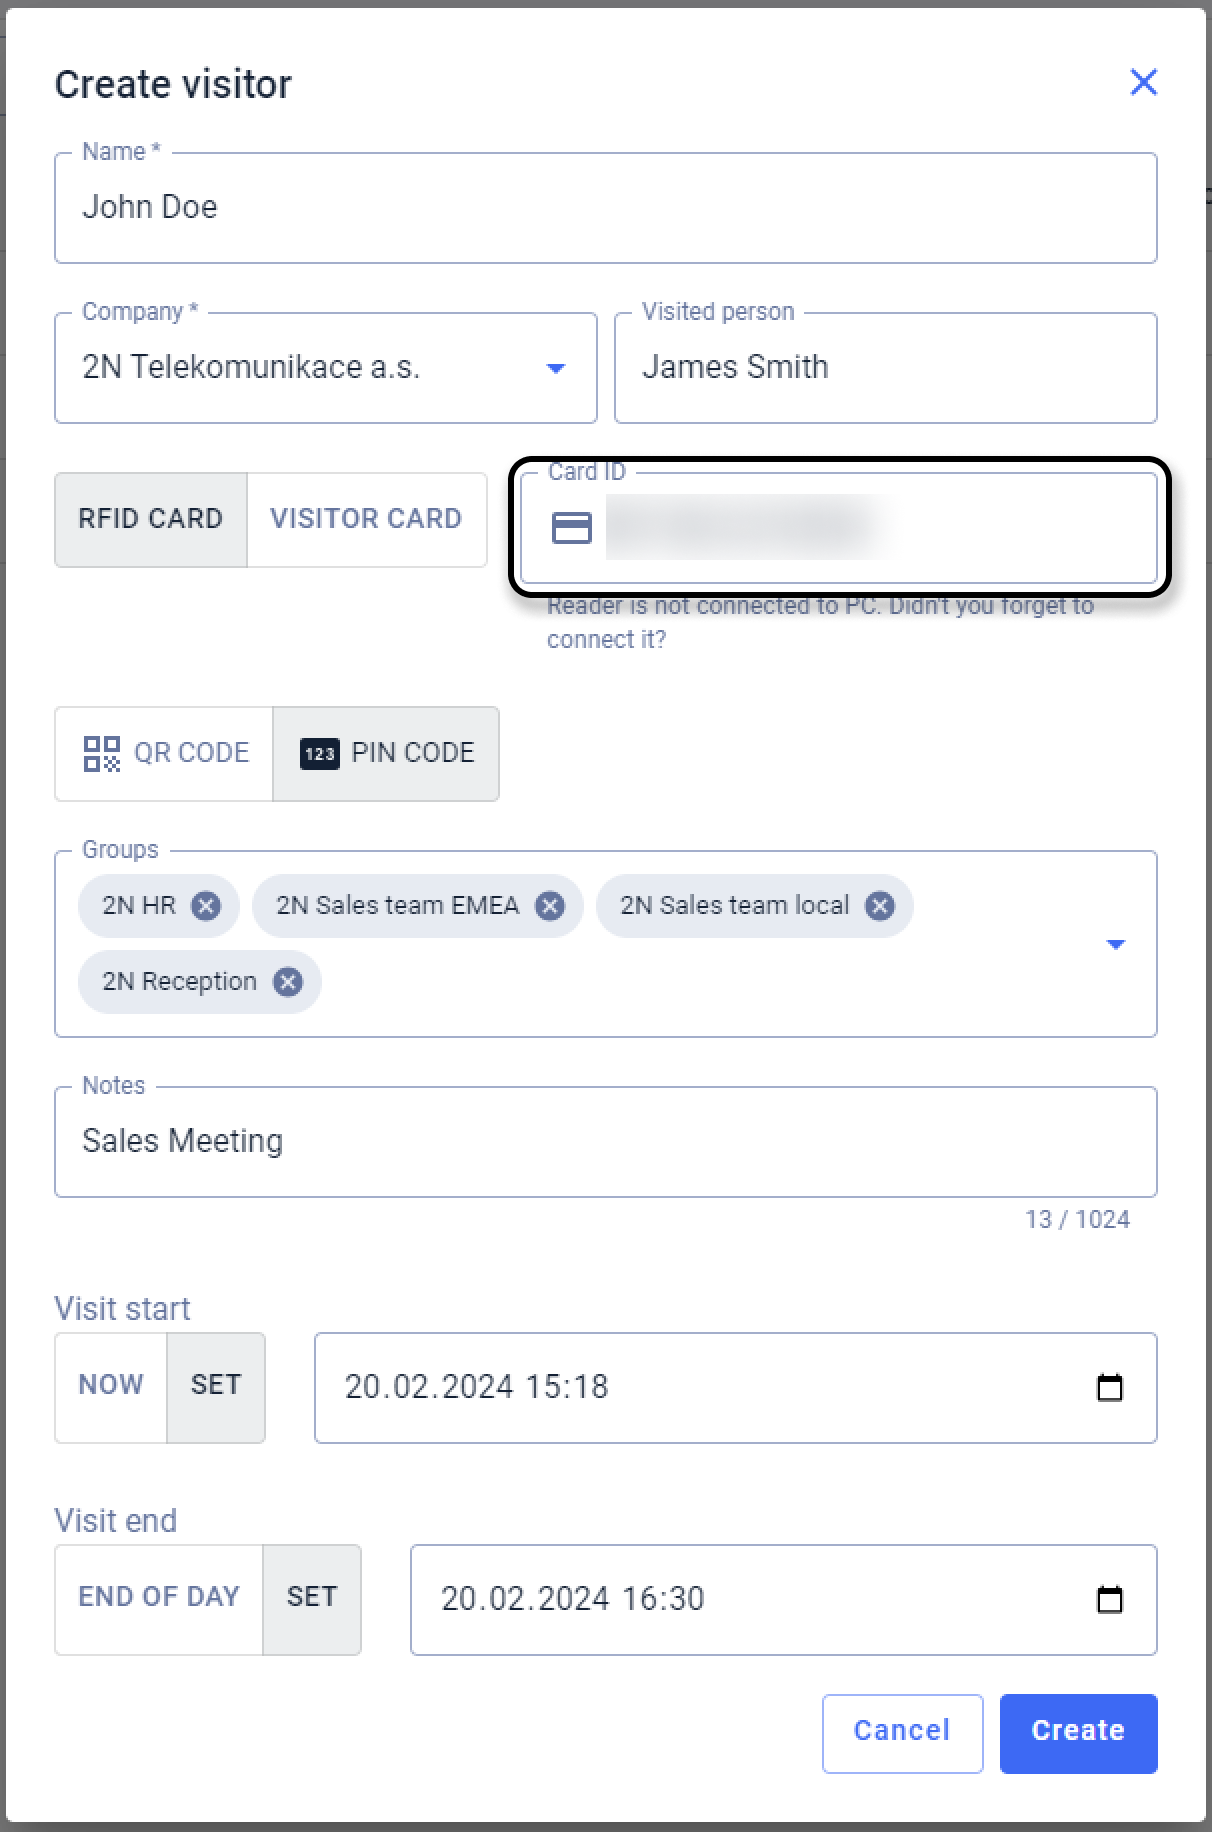
and select the group within which the visit will have the same access rights, and save it by clicking on CREATE
(we can also pre-define the group for visits directly in the settings of the given company, on the VISITORS tab, and then it will be filled in automatically here - see the chapter Possible presets below):
- then you see the visitor in the list of visitors and after clicking on the three dots to the right of it you can end or delete it immediately:
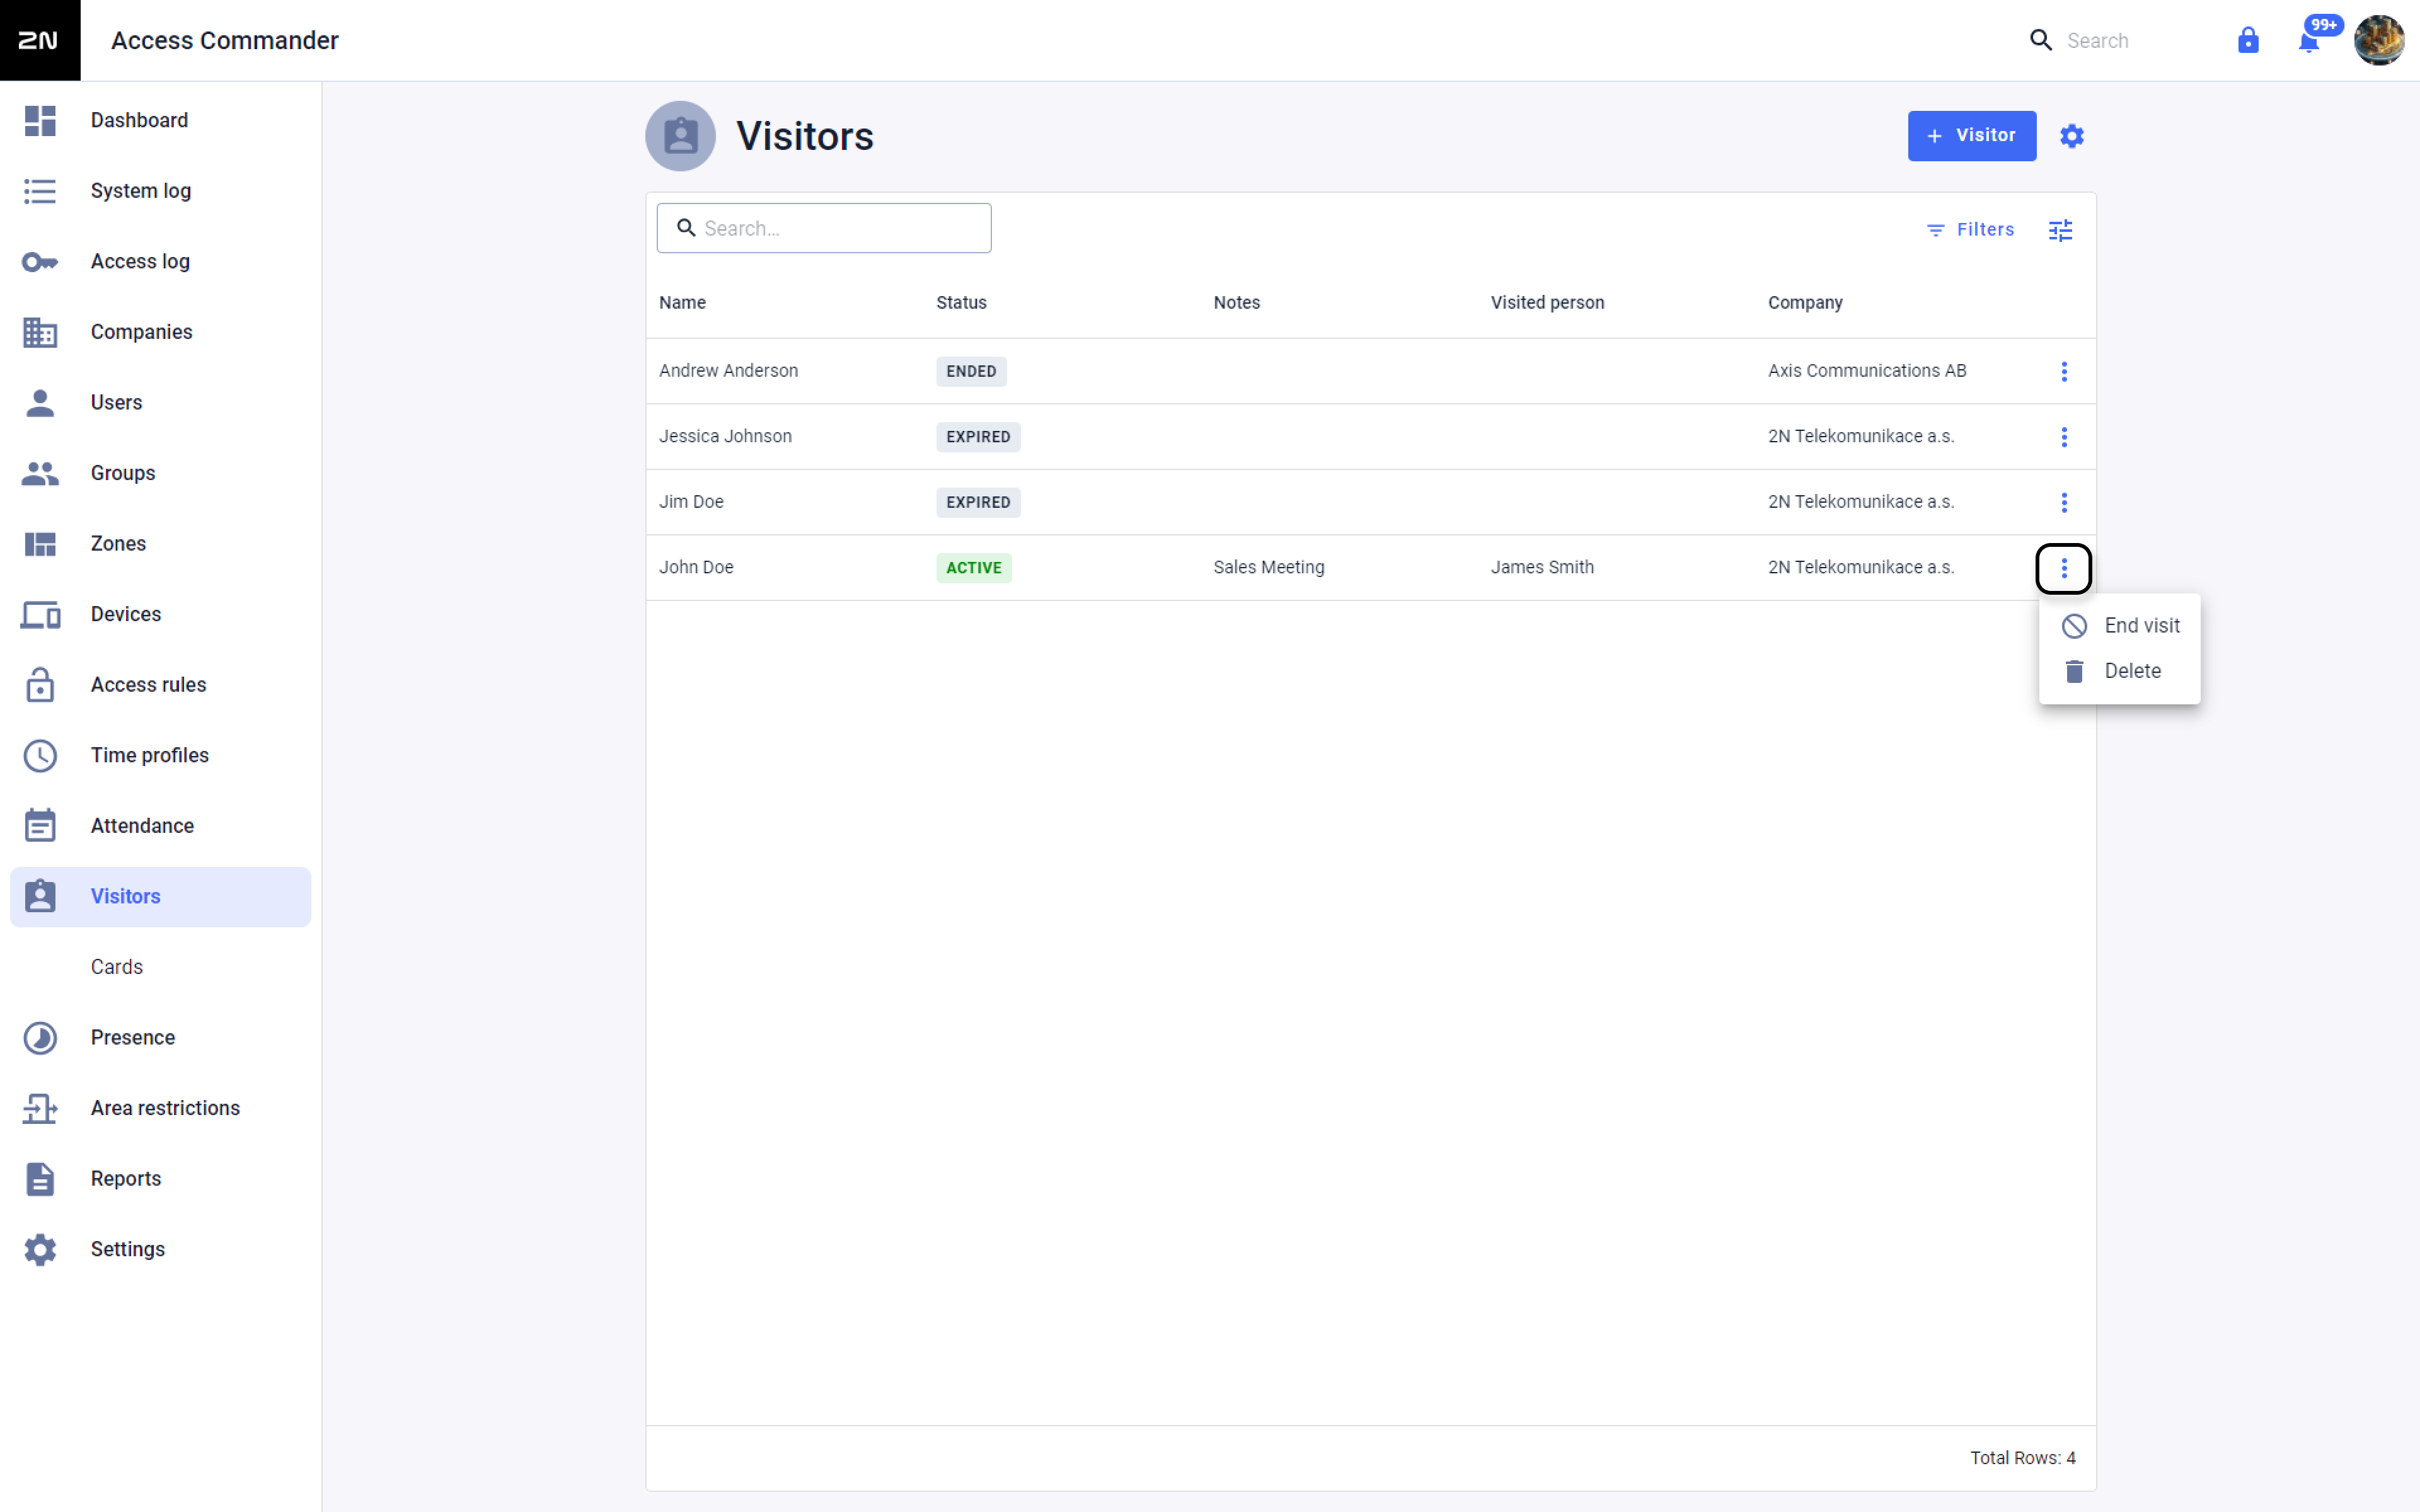
- the visitor will then also appear within users under the group in the Groups section
you can also use the gear icon at the top right to define the maximum number of days of a visit.
See the info on the picture below for storing the details and logs of such a visit (maximum number of days is 365):
How to assign access data of the visitor and send them to an e-mail (in case of PIN code)
in the 2N® Access Commander web interface go to the Visitors section and click on a specific visit,
where its details can be seen, including card assignment, PIN-code or vehicle license plate entry: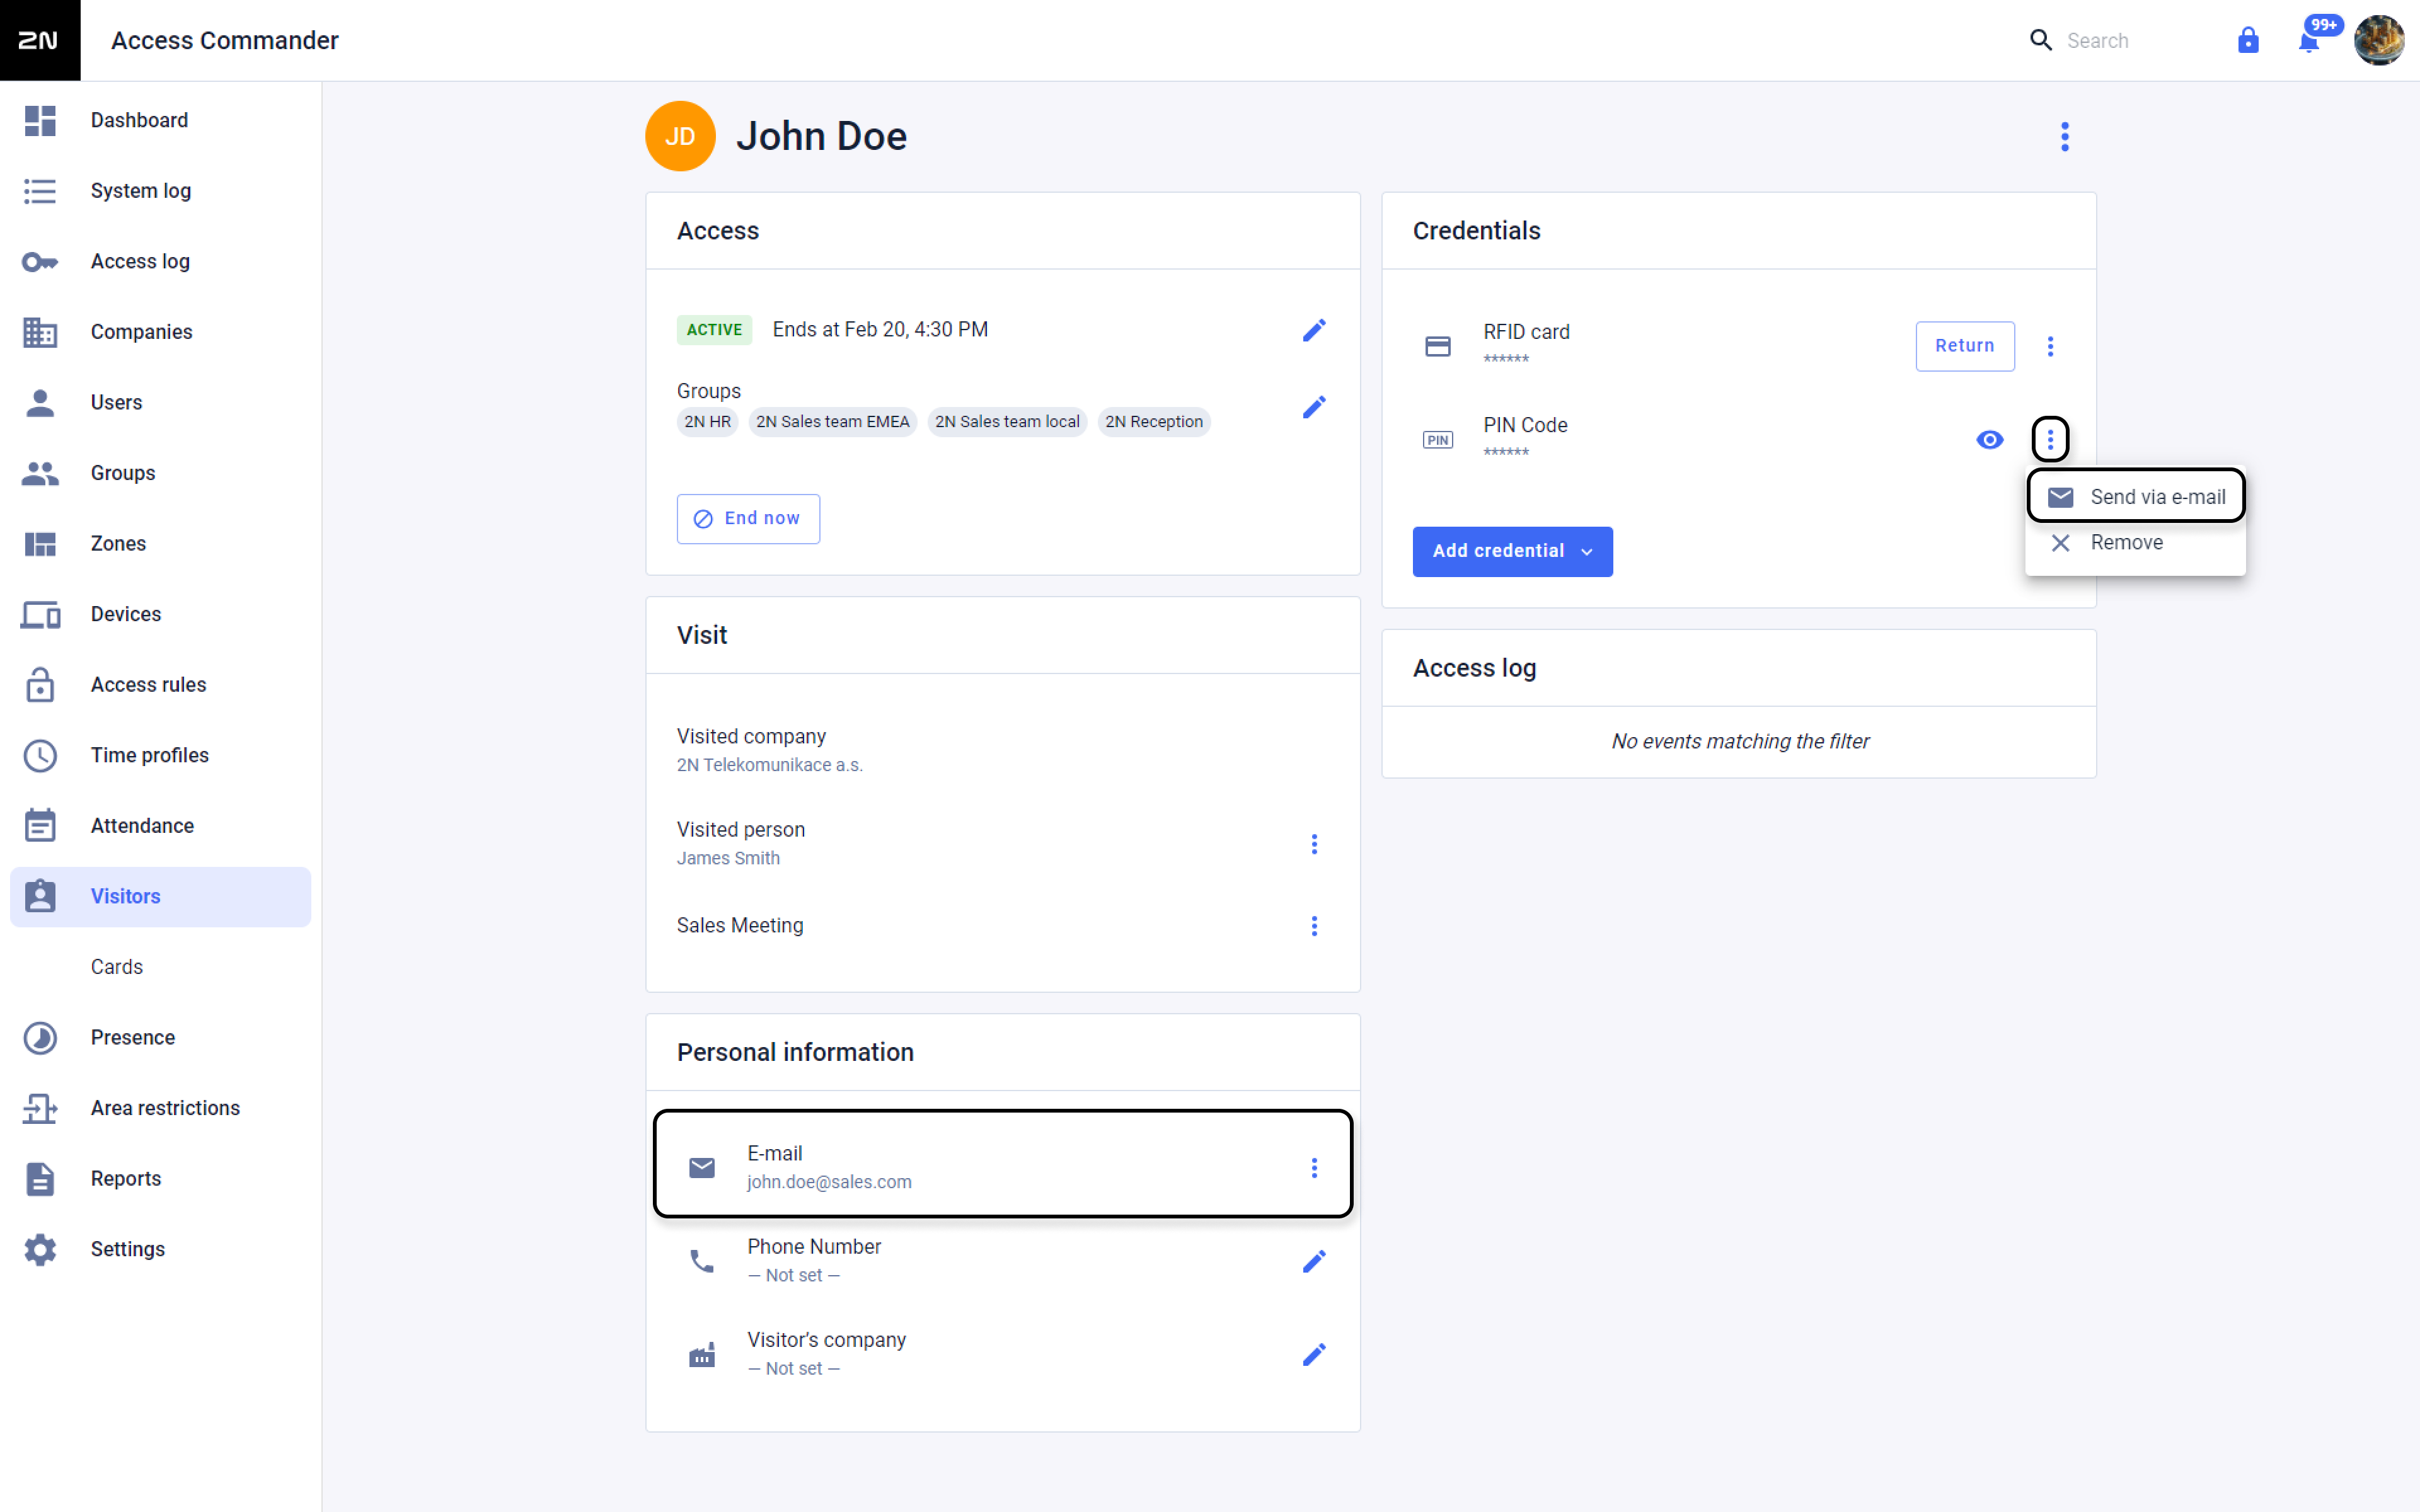
if we have filled in the e-mail address of the user and if we have the SMTP server configured in the 2N® Access Commander in the Settings > E-MAIL section
(more here - on the example of Gmail: Gmail SMTP service configuration in 2N® Access Commander), we can send the given PIN-code to the given person by e-mail
(in the settings of the given company, on the Visitors tab, it is possible to predefine a sample e-mail - see the chapter Possible presets below):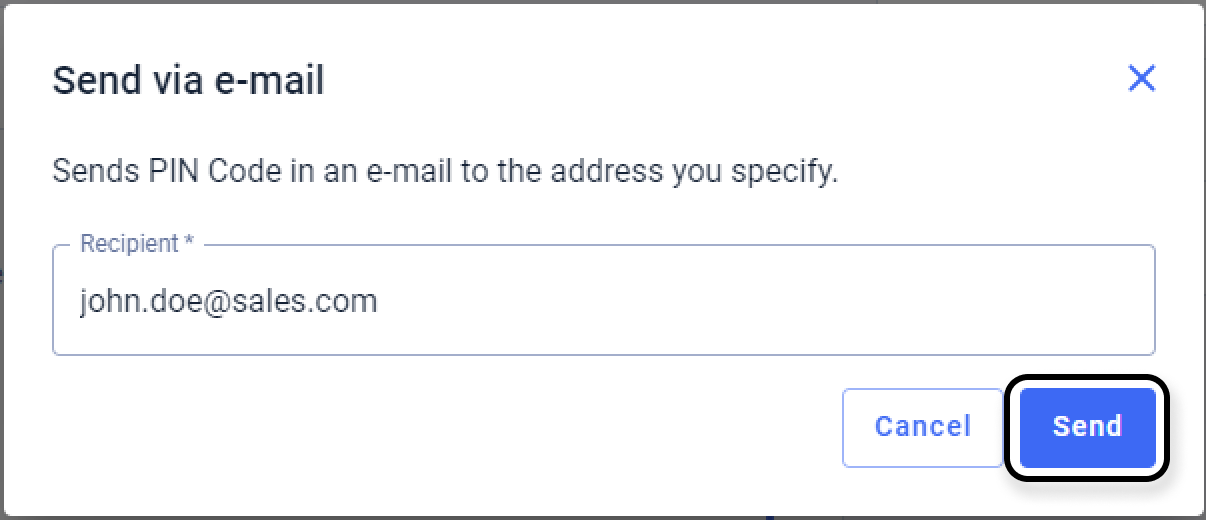
Possible presets
VISITOR CARDS
- in the 2N® Access Commander's web interface go to the Visitors section, to the CARDS tab, where click on the +Visitor Card button:

then name the card, enter its ID (which can again be entered manually or read from an external USB reader - see above) and select to which company the card will be assigned.
Finally, confirm by clicking on CREATE below right: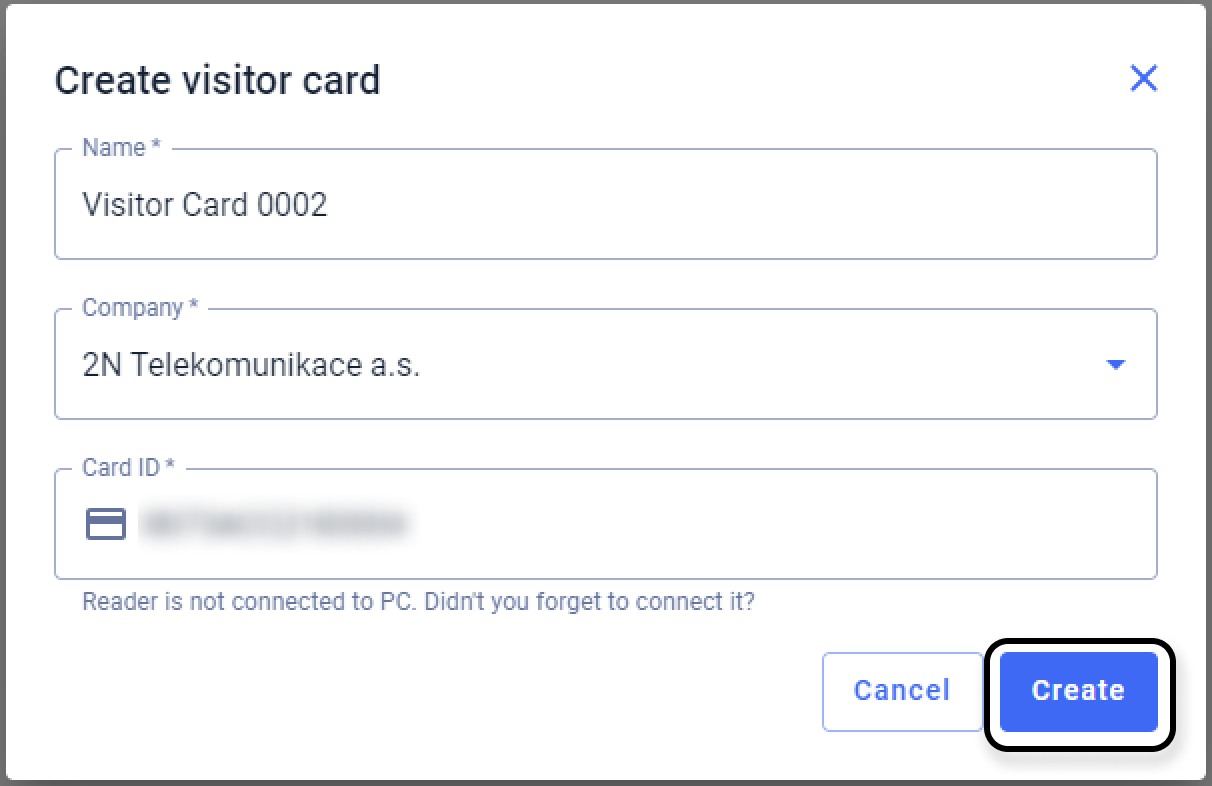
SAMPLE E-MAIL
in the 2N® Access Commander's web interface go to the Companies section, the selected company and to the EMAIL tab,
where you can edit e-mail template with the sent PIN or QR code (according to clicking on the associated option there below):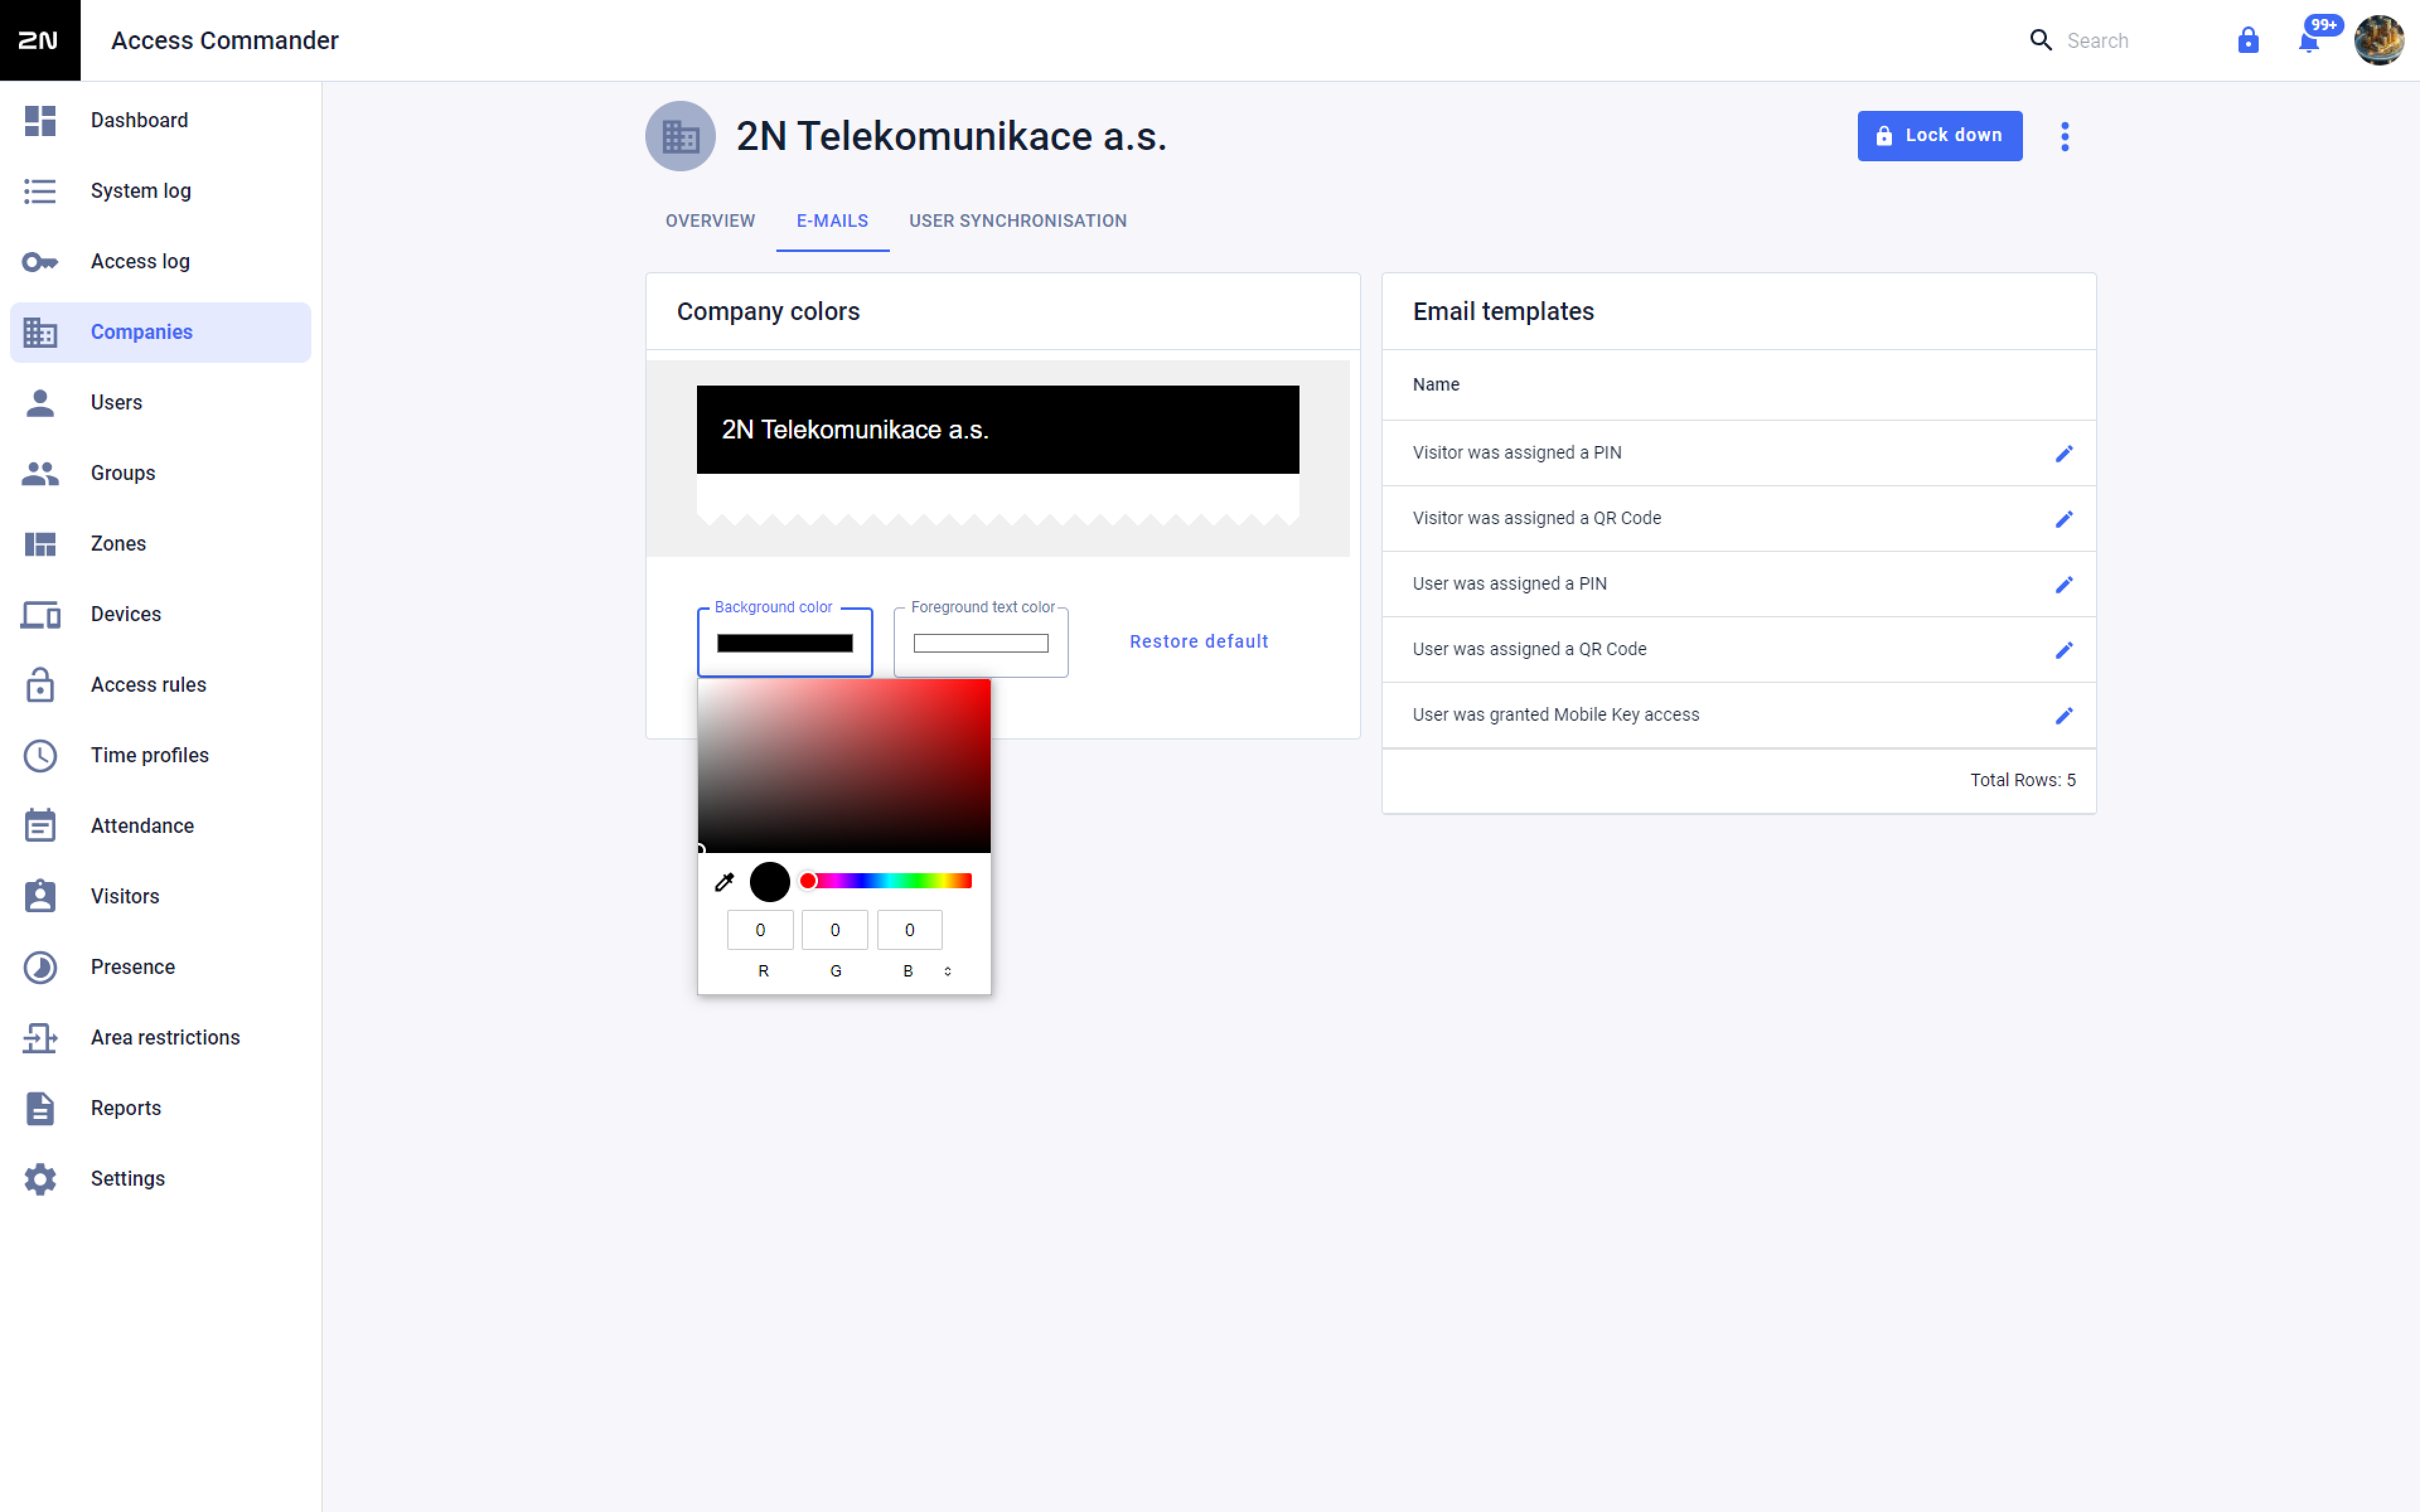
- here you can also define the background colour and the foreground text colour (marked blue on the picture above)
- within the editing you can change email's subject, header, introduction, signature or add your own text (confirm by clicking on SAVE at the bottom right):

- you can also send a test email to a given email address (marked blue on the picture above)
GROUP FOR ADDING VISITORS
in the 2N® Access Commander's web interface go to the Companies section and to the VISITORS tab,
where it is possible, after clicking the ADD button, to select a group (within the given company), which will be automatically pre-filled for it when adding a new visit:
it is also possible to define here, what group the "manager" can add manually (marked blue on the picture above)
The group(s) selected at "Predefined Groups For New Visitors" has to be selected as well below at "Groups Available To Visitor Managers" !
Management of non-returned cards
if the visit was terminated without returning the access card in advance (click "RETURN" next to the card of the given visit),
this can be done additionally in the detail of the visit: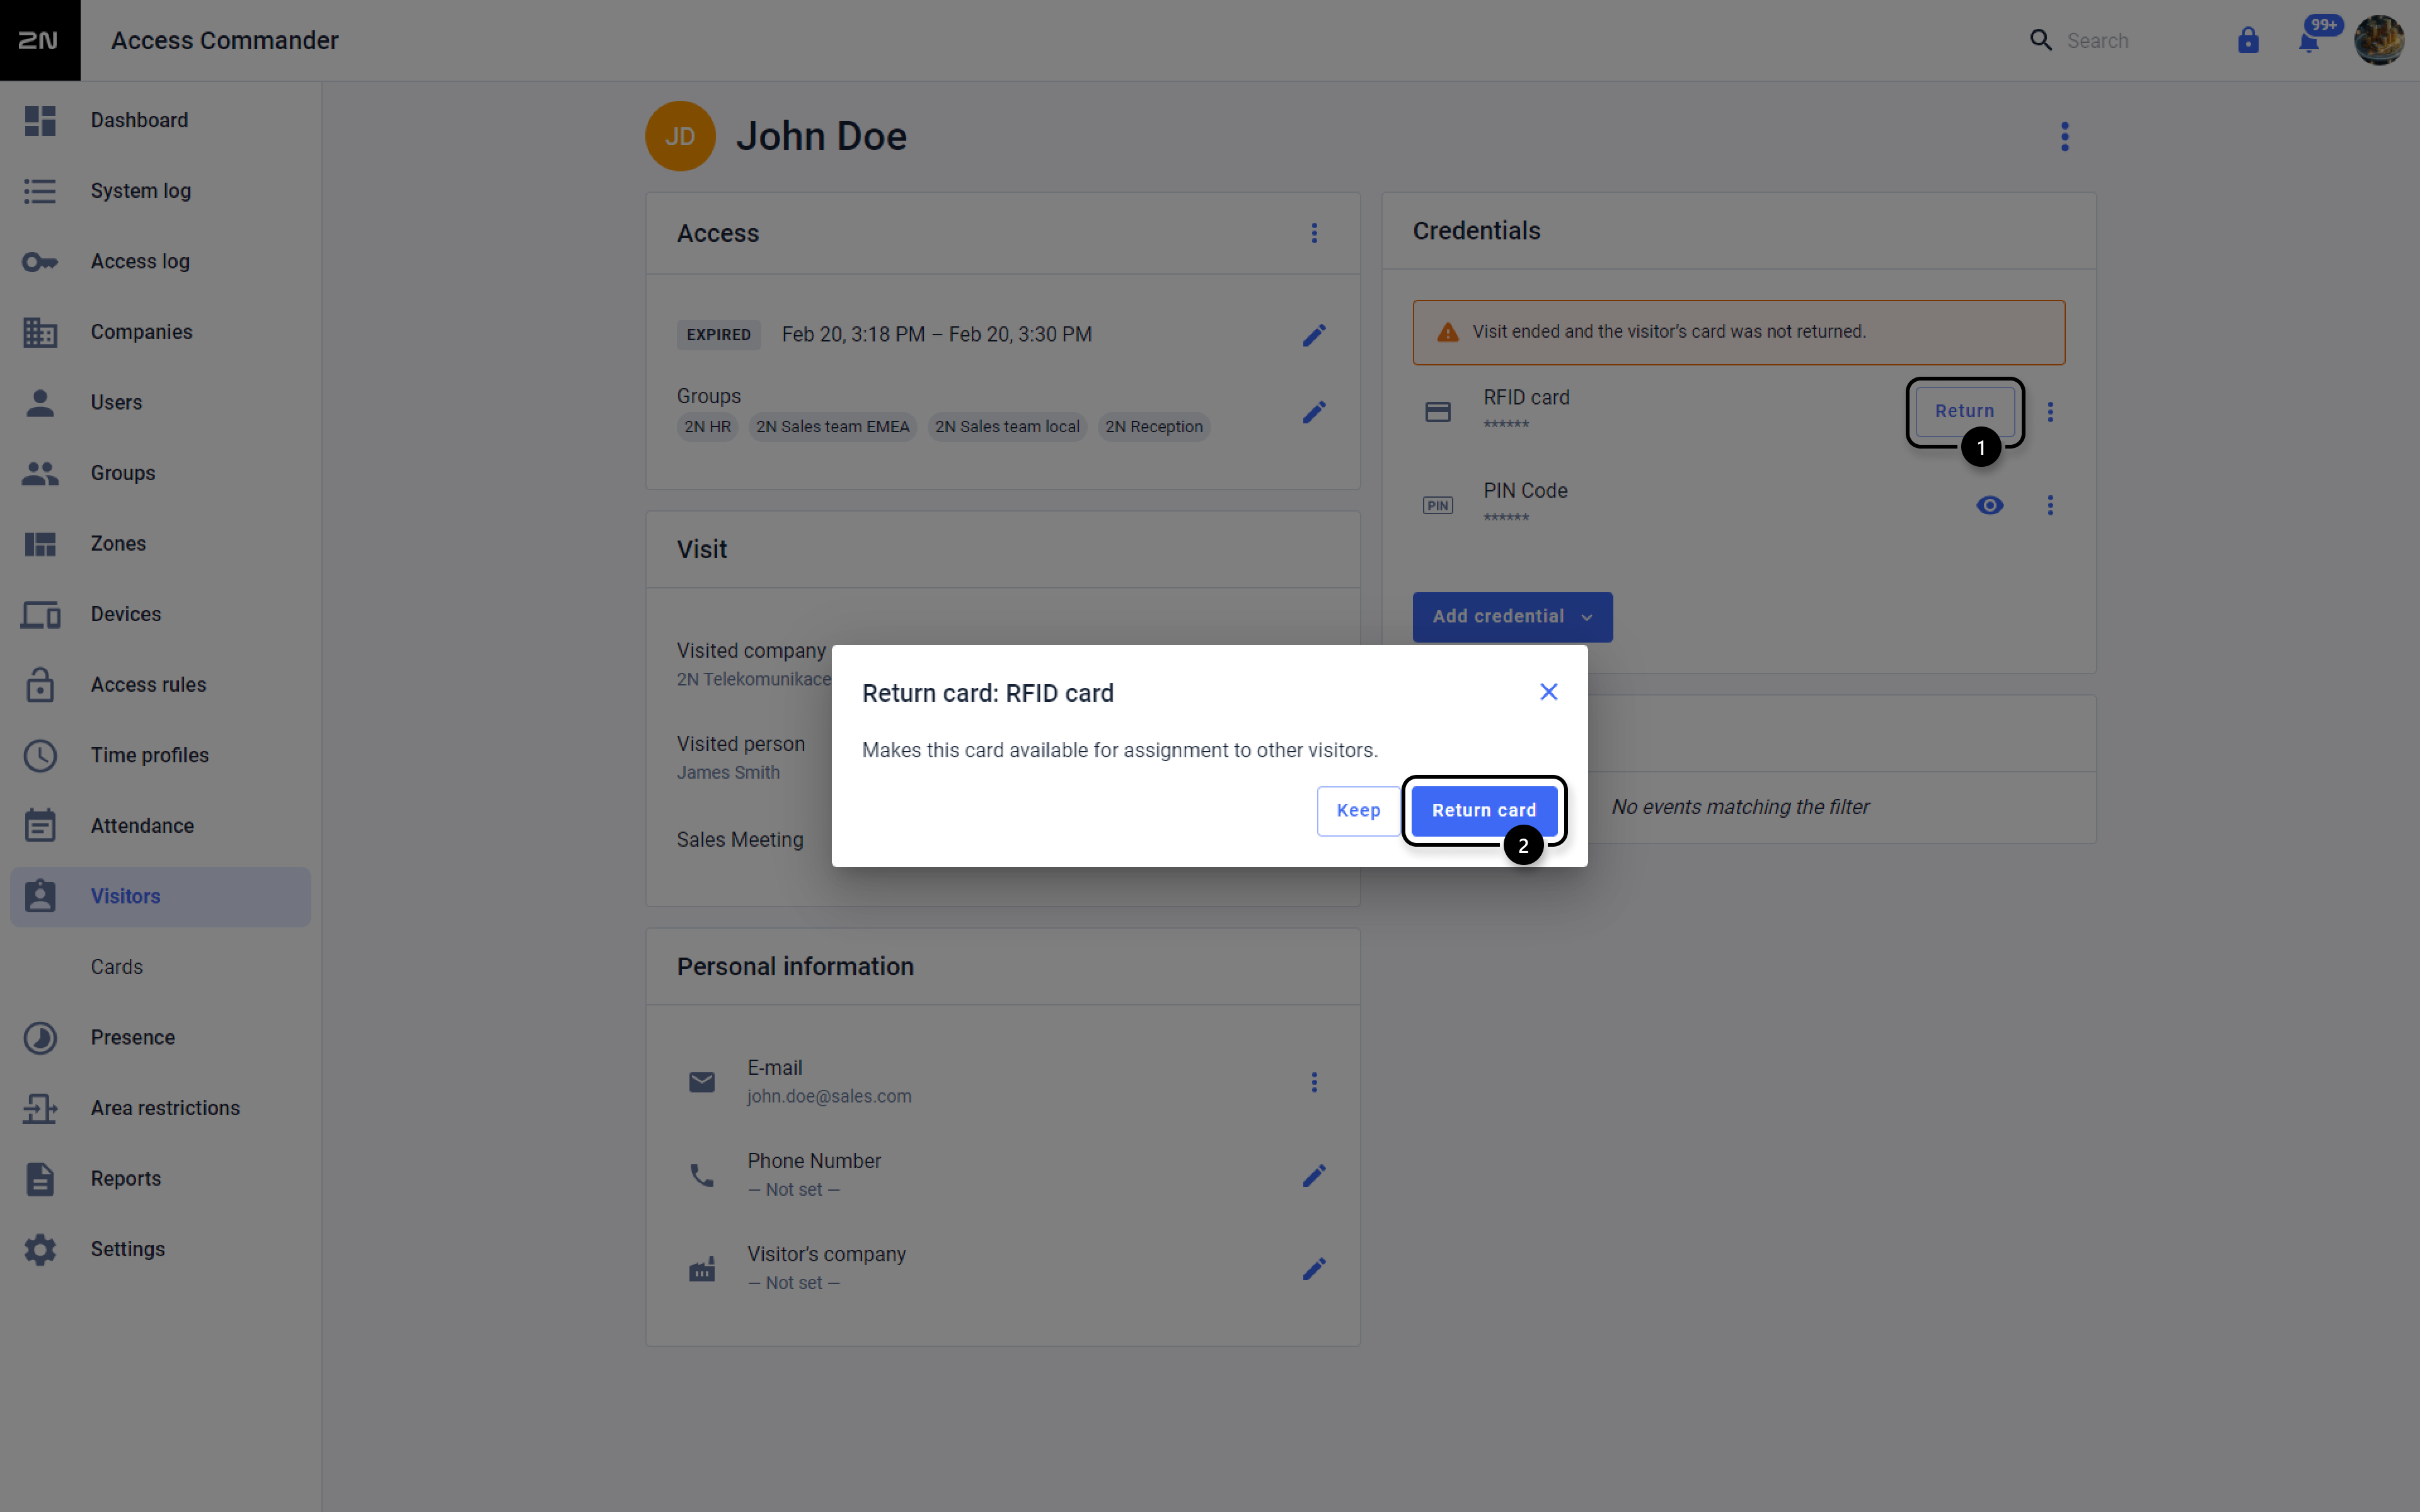
Version 2.1 - 2.7.1
How to set up a visitor and how to (prematurely) end or delete him/her
- in the 2N® Access Commander's web interface go to the Visitors section and click on NEW VISITOR on the right:

fill in the details of the visit - name, visited company, or also the visited person, when the "visited company" is then selected automatically,
further notes on the visit, date and time of the beginning and end of the visit: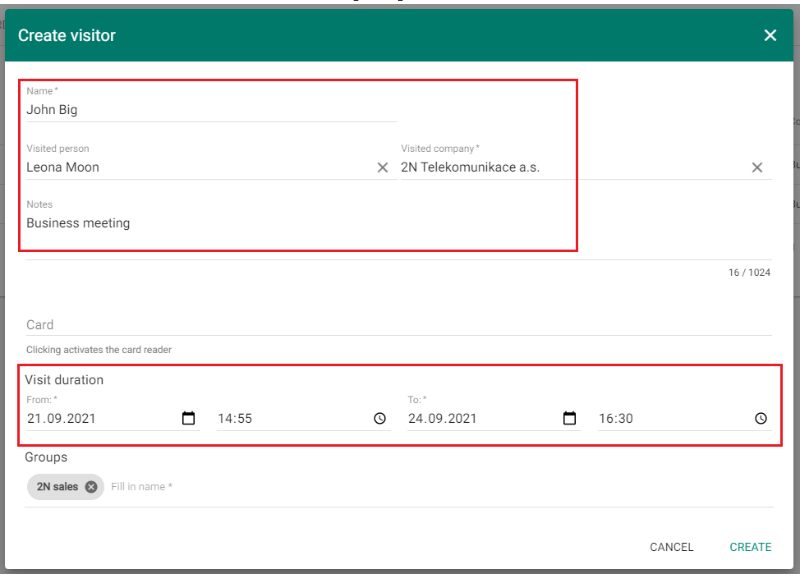
then enter the card number, which can be entered manually, read from an external USB reader
(if the 2N® USB Driver is running on the PC and the reader is connected - more here: Driver for External USB Readers - How to use it?),
or select from the preset cards (see chapter Possible presets below):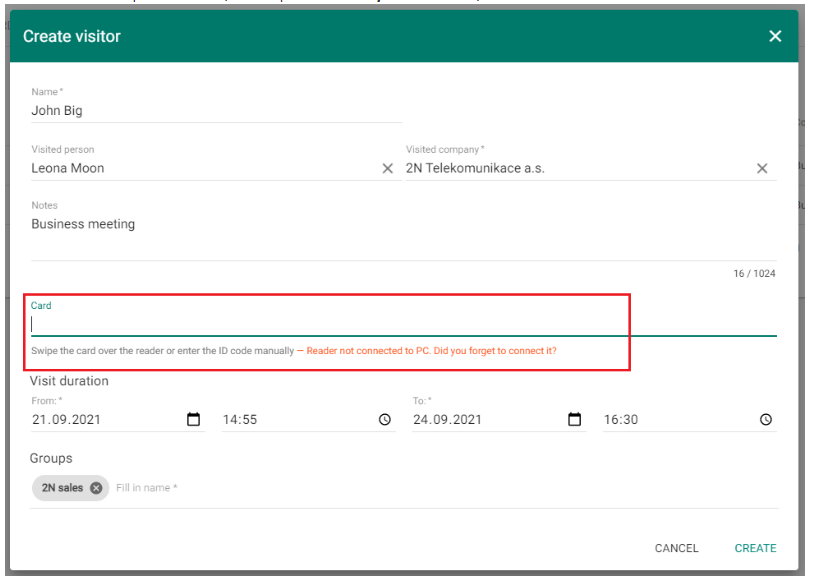
and select the group within which the visit will have the same access rights, and save it by clicking on CREATE
(we can also pre-define the group for visits directly in the settings of the given company, on the VISITORS tab, and then it will be filled in automatically here - see the chapter Possible presets below):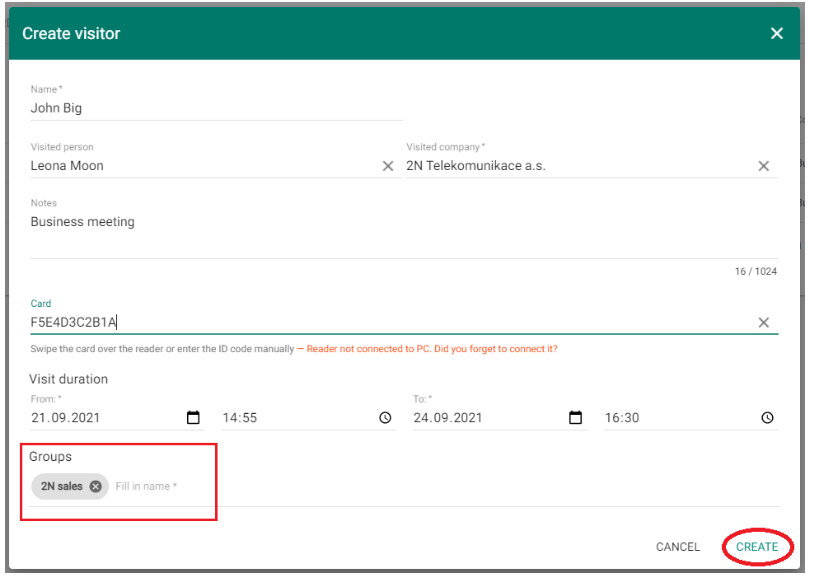
- then you see the visitor in the list of visitors and after clicking on the three dots to the right of it you can end or delete it immediately:

- the visitor will then also appear within users under the group in the Groups section
you can also use the gear icon at the top right to define the maximum number of days of a visit.
See the info on the picture below for storing the details and logs of such a visit (maximum number of days is 365):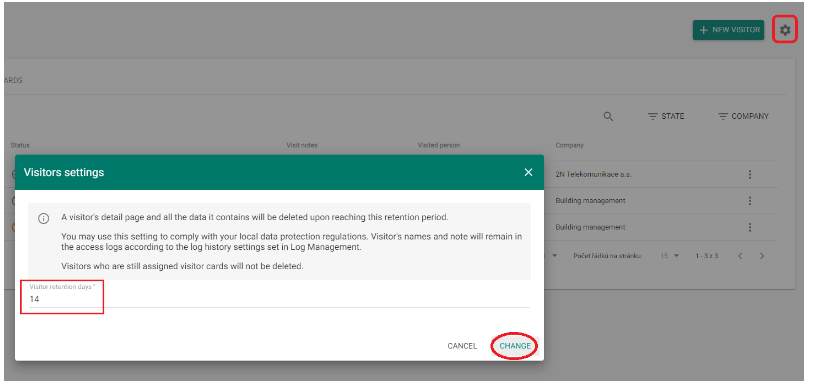
How to assign access data of the visitor and send them to an e-mail (in case of PIN code)
in the 2N® Access Commander web interface go to the Visitors section and click on a specific visit,
where its details can be modified, including card assignment (removal), PIN-code generation or vehicle license plate entry:
if we have filled in the e-mail address of the user and if we have the SMTP server configured in the 2N® Access Commander in the Settings > E-MAIL section
(more here - on the example of Gmail: Gmail SMTP service configuration in 2N® Access Commander), we can send the given PIN-code to the given person by e-mail
(in the settings of the given company, on the Visitors tab, it is possible to predefine a sample e-mail - see the chapter Possible presets below):
Possible presets
VISITOR CARDS
- in the 2N® Access Commander's web interface go to the Visitors section, to the CARDS tab, where click on the ADD button:

then name the card, enter its ID (which can again be entered manually or read from an external USB reader - see above) and select to which company the card will be assigned.
Finally, confirm by clicking on CREATE below right: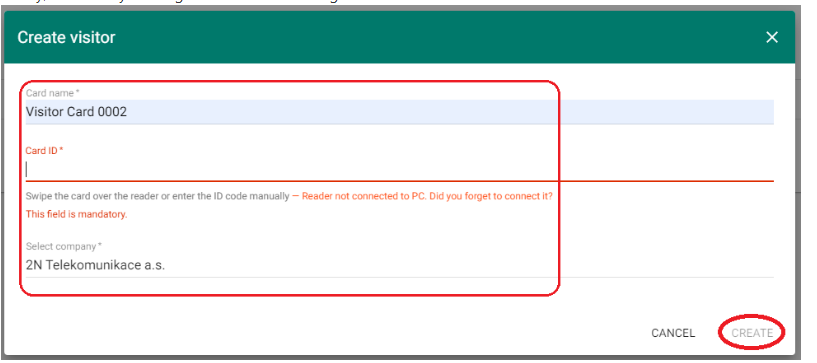
SAMPLE E-MAIL
in the 2N® Access Commander's web interface go to the Companies section, the selected company and to the EMAIL tab,
where you can edit e-mail template with the sent PIN or QR code (according to clicking on the associated option there below):
- here you can also define the background colour and the foreground text colour (marked blue on the picture above)
- within the editing you can change email's subject, header, introduction, signature or add your own text (confirm by clicking on SAVE at the bottom right):

- you can also send a test email to a given email address (marked blue on the picture above)
GROUP FOR ADDING VISITORS
in the 2N® Access Commander's web interface go to the Companies section and to the VISITORS tab,
where it is possible, after clicking the ADD button, to select a group (within the given company), which will be automatically pre-filled for it when adding a new visit:
it is also possible to define here, what group the "manager" can add manually (marked blue on the picture above)
The group(s) selected at "Predefined Groups For New Visitors" has to be selected as well below at "Groups Available To Visitor Managers" !
Management of non-returned cards
if the visit was terminated without returning the access card in advance (click "RETURN" next to the card of the given visit),
this can be done additionally in the detail of the visit:
- in the Visitors section access cards not connected to a specific person can also be activated under the CARDS tab:
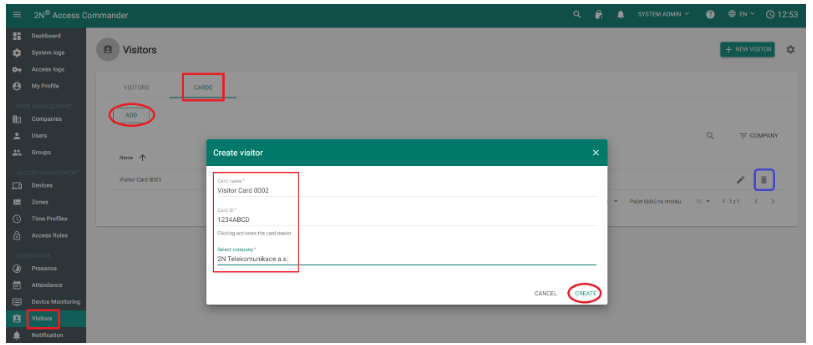
- by clicking on the trash can icon next to the given card on the right we can delete the card (see the blue box on the picture above)