Automation, on demand lock activation / deactivation code in combination with time profiles and other access methods
This FAQ shows you how to create an automation to be able to activate the switch by a special code for certain amount of time.
Requirements
- Be able to open door by special code - door will remain open until deactivation code will be used
- While time profile is used - activation / deactivation code does not have any effect
- While time profile is used - user can access the building and can also use his access methods - intercom will signalise that the door is open only - door remain open until the time profile is active
- While activation code is used - door is open until the deactivation code is used or activation timeout expires
- While activation code is used - user can access by using any access method - intercom will signalise that the door is open only - door remains open until the deactivation code is used or activation timeout expires
- While activation code is not used - user can use any access method and the door remains open based on delay object in automation (default value is 5s) and will be closed after the timeout
Settings pre-requisities:
It is necessary to associate switch with the bluetooth, RFID, or fingerprint modules in case that these access methods will be used. In this example bluetooth module is used and it is necessary to associate module to a specific switch. In this example switch 1 is used.

Switch 1 has following parameters:
- Switch mode: Monostable
- Switch-on duration: 5s
- Controlled output: None
- HTTP switch-on command: https://<IP address of the intercom>/enu/trigger/<keyword>

Example
Note: In this example the http command looks like this: https://192.168.1.131/enu/trigger/open where:
- 192.168.1.131 - is the IP address of the intercom (loopback address 127.0.0.1 can be also used)
- open - keyword used in the automation event HttpTrigger
Notice that the Switch 1 does not control any output. To be able to met all requirements described at the beginning of the article, it is necessary to control the outputs via Automation. Switch 1 is used only to transfer the information about the activation of the switch to the Automation function. Switch 1 can be activated by the bluetooth, RFID card, fingerprint or by numeric code defined in the global switch codes of the Switch 1.

It is necessary to configure Door section and assign the switch, which will be used, to the controlled output and door. Switch 2 is used in this example.
Switch 2 parameters:
- Switch mode: Bistable
- Controlled output: Output 1
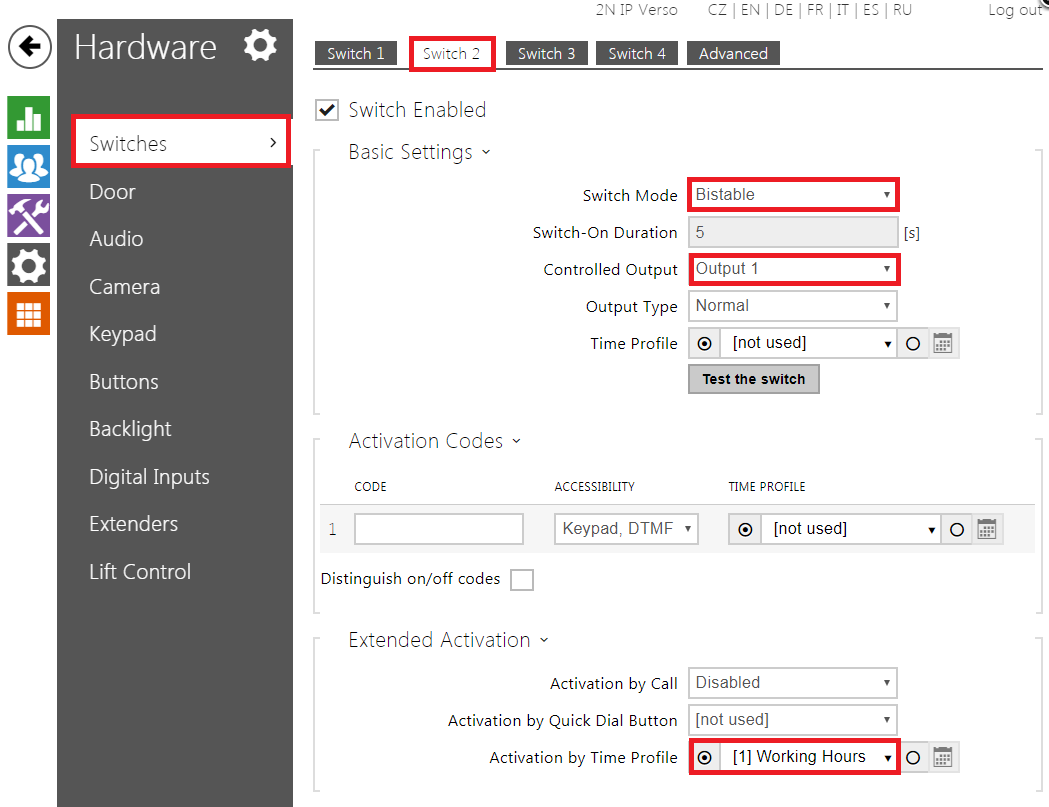
Switch 2 is set to control the output. Notice that the switch mode is in Bistable mode - this is crucial to ensure that the Switch 2 remains activated during the time specified in the Automation function. If the time profile has to be used, it has to be applied on the Switch 2.
Automation function
Automation file can be downloaded here

How it works
- If the 666 code is entered - Switch 2 will be activated and also Delay for 50s will be activated. This delay can be modified and it determines the time which the Switch 2 will be active during. Also FlipFlopRS is set to 1 to save the info that code 666 has been used. Once the timeout expires, Switch 2 is deactivated - if the time profile is not active. HTTP command with "reset" keyword is sent to reset FlipFlopRS to 0. Switch 2 deactivation related to 666 activation code is highlighted on the picture as object with ID 1.
- If code 777 is used - the Switch 2 is deactivated (if the time profile is not active) and HTTP command to loopback address is sent with the keyword "reset" - this will reset FlipFlopRS to 0.
- If any access method associated with Switch 1 is used, then the Switch 1 will send the HTTP command with the keyword "open". Based on this keyword, the Switch 2 is activated and after 5s timeout the Switch 2 is deactivated, if the condition is met. Switch 2 deactivation is highlighted on the picture as object with ID 2.
Conditions and logic description
| Time profile | state of FlipFlopRS | Object ID 1 condition state | Object ID 2 condition state |
|---|---|---|---|
| 1 | 0 | 0 | 0 |
| 1 | 1 | 0 | 0 |
| 0 | 0 | 1 | 1 |
| 0 | 1 | 0 | 1 |
Firmware & License info
- 2N OS v2.37 with GOLD license
- Last updated on 25th of January 2023
Note: All commands used in the Automation section are thoroughly described in our Automation manual altogether with corresponding examples.
- The manual is available on our web page: Automation Manual
More information: