External IP Relay - How to connect it to the 2N IP Intercom
Overview
To use External IP relay the 2N IP Intercom requires Enhanced Intergration/GOLD license.
Tested on firmware v2.37; last updated on 19th December 2022

Default parameters

IP: 192.168.1.2
Username: -
Password: webrelay
If you have your IP relay in the default setting, open your web browser and enter IP address http://192.168.1.2 then you should be able to see control page similar as in the picture on the right site depending on the version of the product you own.
Note: If you are not able to access the IP relay web interface, then please check if your computer is in the same network as IP relay (PC must have an IP address 192.168.1.x).
Setup of external IP relay
For entering the IP relay configuration menu type to web browser http://192.168.1.2/setup.html. Now if you are in IP relay configuration menu, you can configure its parameters according to your needs. If the IP address of your 2N IP Intercom is different than 192.168.1.x, you can change the IP address so it is in the same network as the 2N IP Intercom.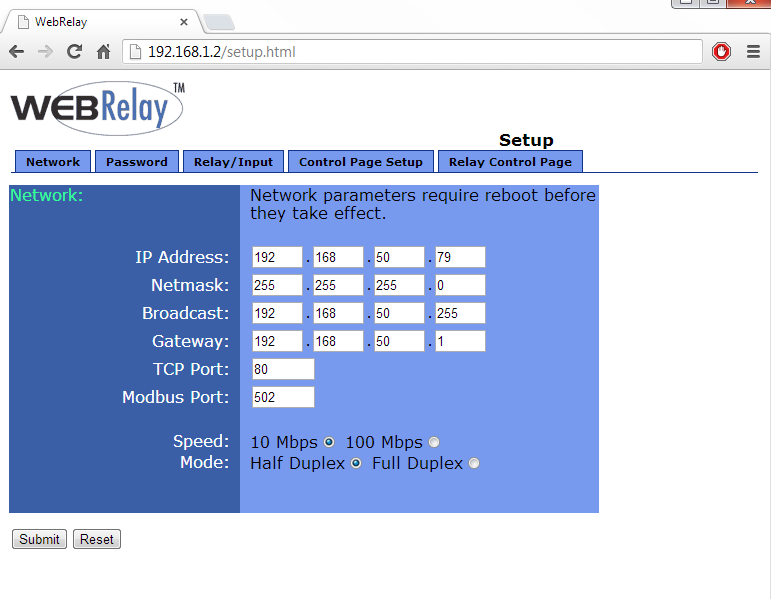
IP relay with one output (9137410E)
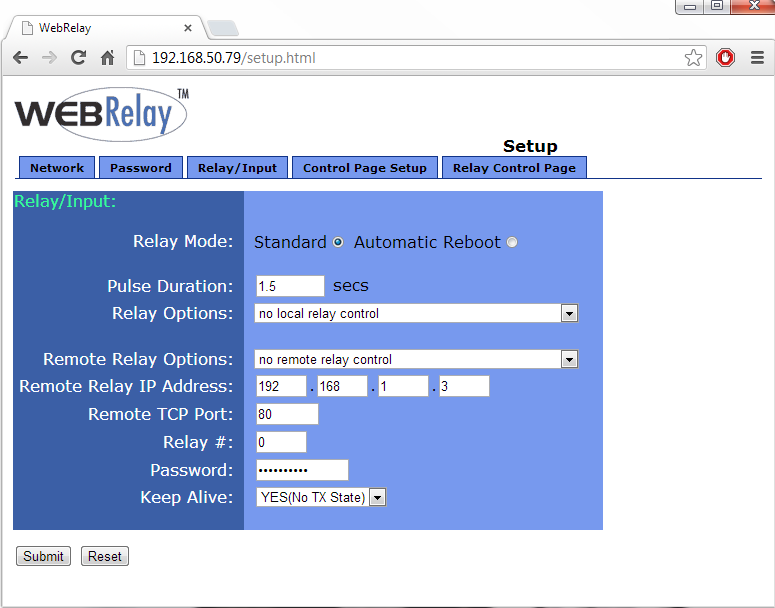
In Relay/Input tab change parameter Relay Options to “no local relay control”. With that you make sure, that the relay will be controlled only HTTP commands.
HTTP switch ON command:
HTTP switch OFF command:
All relay State options:
0 = Turn relay off1 = Turn relay on 2 = Pulse relay- If you want to change look of the Relay Control Page, you can do it in Control Page Setup.
IP relay with four outputs (9137411E)
 HTTP WebRelay - Quad switch ON command:
http://192.168.1.2/state.xml?relay1State=1
http://192.168.1.2/state.xml?relay2State=1
http://192.168.1.2/state.xml?relay3State=1
http://192.168.1.2/state.xml?relay 4State=1
HTTP WebRelay - Quad switch OFF command:
http://192.168.1.2/state.xml?relay1State=0
http://192.168.1.2/state.xml?relay2State=0
http://192.168.1.2/state.xml?relay3State=0
http://192.168.1.2/state.xml?relay4State=0
All relay State options:
0 = Turn relay off
1 = Turn relay on
2 = Pulse relay
- If you want to change look of the Relay Control Page, you can do it in Control Page Setup.
Detailed information about the IP relay settings and additional features is found in the manual linked below. If you would like to upgrade the IP relay, please follow the manual as well:
http://www.controlbyweb.com/webrelay/WebRelay_Manual_v3.3.pdf
Setup 2N IP Intercom (GOLD license required)
Login to 2N IP Intercom web configuration menu and in Hardware - Switches - Switch 1 set the switch parameters according to your needs. If this setting is done and you want to activate/deactivate external IP relay the same way as the internal, set the External command parameters as below.
Now every time when the 2N IP Intercom internal relay is be activated, also the IP relay will be triggered on and after 5 second will be both relays deactivated again.
You can find more information about Switch settings in our manual: 2N IP Intercoms: Hardware -> Switch settings
Setup 2N IP Intercom using Automation (GOLD license required)
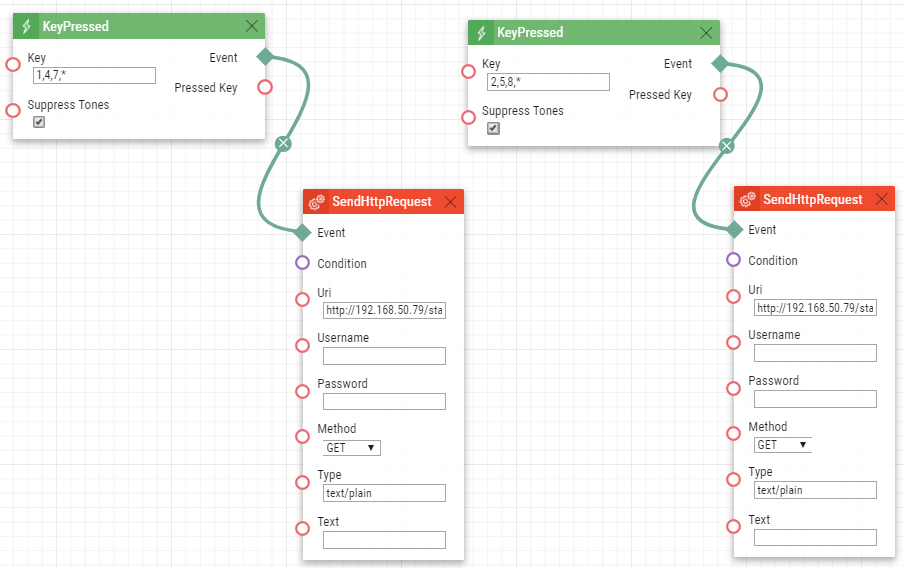
Login to 2N IP Intercom web configuration menu and in Services - Automation - Function 1 set the script according to your needs. Please check the picture below that will help you how to configure the Automation. In this script you have to press 147* to active external IP relay and if you press 258* it will deactivate the external relay. Please remember that with Automation you can setup your own script to activate/deactivate the external relay via HTTP commands.
Note: All commands used in the Automation section are thoroughly described in our Automation manual altogether with examples. The manual is available on our web page:
https://wiki.2n.cz/hip/auto/latest/en