OpenVPN - OpenVPN server & client
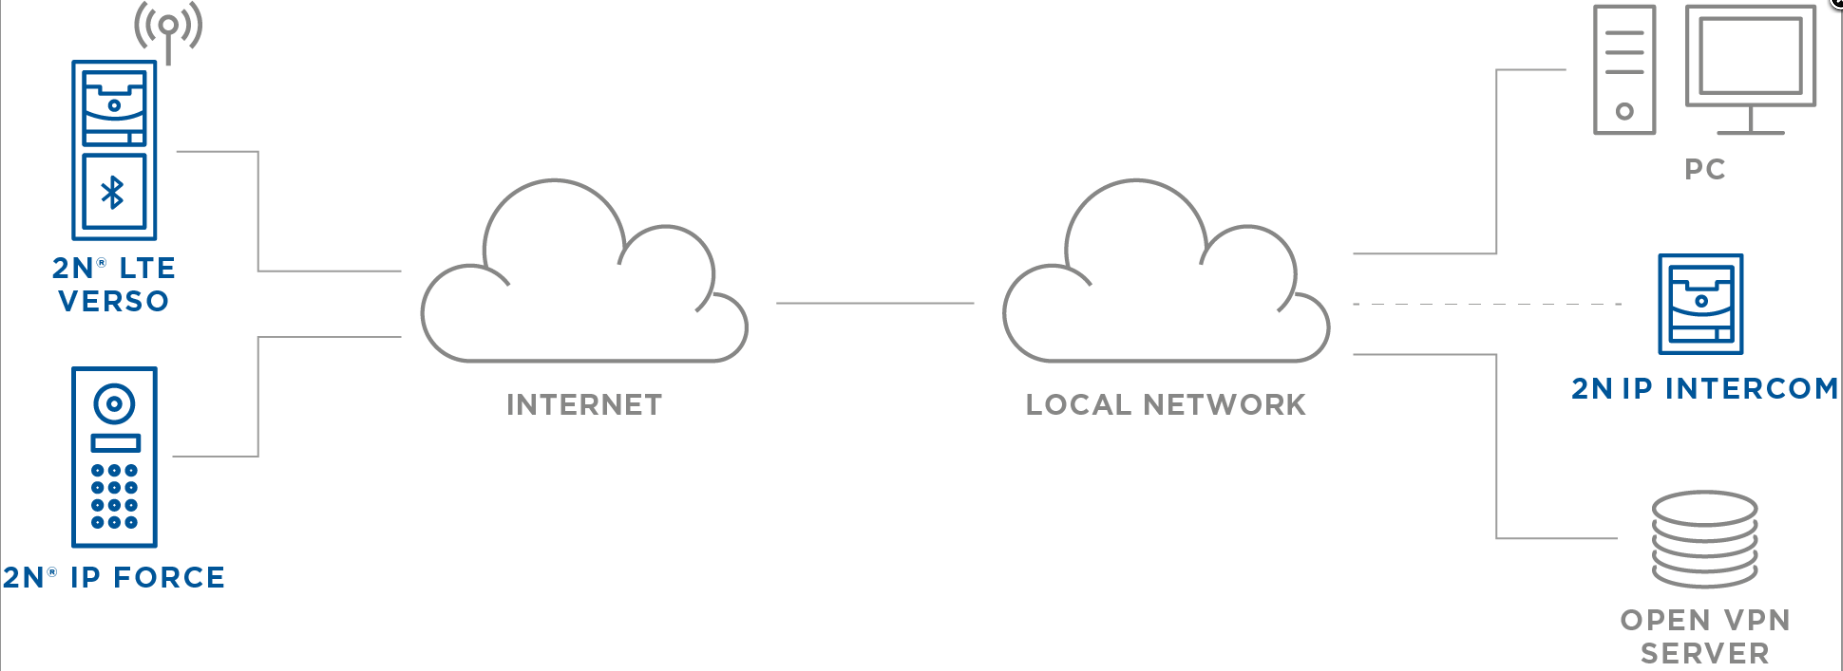
This guide describes connecting the 2N IP intercom, 2N® Access Unit, 2N® Access Unit 2.0 or 2N® LTE Verso (2N device), that is already connected to the Internet, to the user’s remote LAN.
This connection creates network bridge and thus enables connection to 2N device in the same way as it would be in the local network (2N device obtains IP address from local network DHCP where OpenVPN server is, uses network protocols like ARP, can perform broadcast and so on).
Connected 2N device can then be used as usual (for calls, video surveillance of its IP camera, 2N® Access Commander connection , etc..) as it was in same local network.
Device which is in same local network as 2N OpenVPN server does not need to connect to VPN, since all devices connected over VPN will have local network IP addresses from local DHCP. Solution is designed for OpenVPN to be installed on Linux.
VPN connection is pushed through stunnel for additional level of security.
Disclaimer
Please note that this guide and its content is provided "as is" without warranty of any kind, express or implied.
Therefore by using it you hereby agree with the use of the guide content and are aware of all and any functionality
limitations and consequences associated with the nature of this content, and by using it you also agree that this guide
has been provided without any guarantee and that 2N TELEKOMUNIKACE a.s. shall not be held liable for function limitations, security limitations or damage, if any, incurred as a result of using this guide.
You acknowledge that 2N TELEKOMUNIKACE a.s. provides the guide content for limited purpouse.
Please also note that various Linux distributions or versions may not accept all commands shown in this guide and 2N TELEKOMUNIKACE a.s. does not provide support for Linux.
OpenVPN server is designed to connect 2N devices exclusively, 3rd party devices or software may not be able to connect properly
Requirements:
- Public IP address at the router on local network side where OpenVPN server is, accessible from the Internet with a possibility of redirecting TCP port 443 to LAN (DMZ for OpenVPN server optional).
- DHCP at the local network side where OpenVPN server is.
- Linux PC running OpenVPN server (virtualization optional).
- OpenVPN server
- Stunnel4
- bridge-utils
- lshw
- openssl
- Firmware 2.31 or never in 2N device
- Intel PRO/1000T Server compatible network controller
- Promiscuous Mode enabled on network controller
- Required IT knowledge: Linux command line (bash), bash scripting, certificates, SSL, networking, VPN
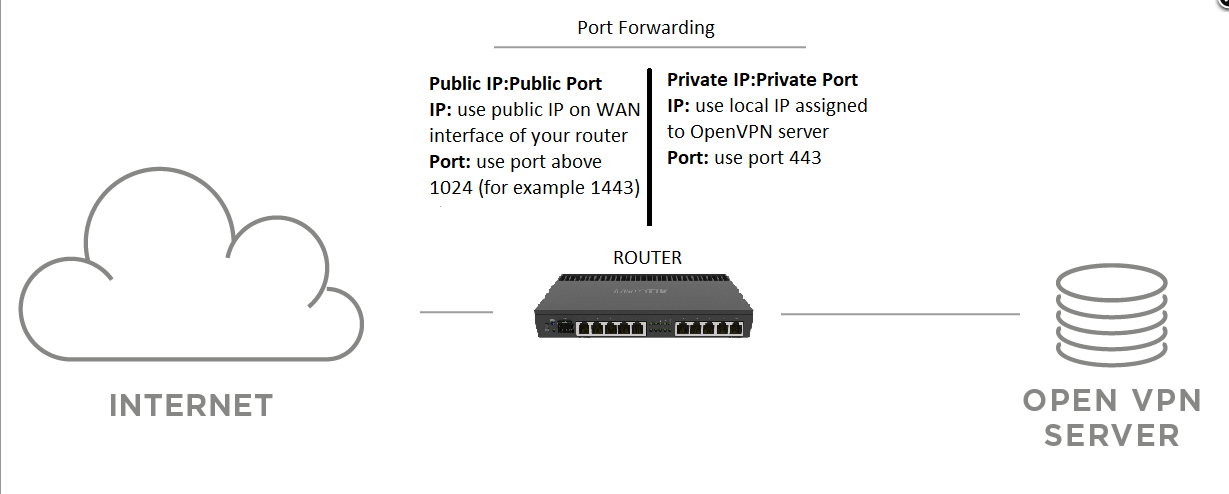
Network topology
In case you cannot put OpenVPN server machine to DMZ and you need to use standard LAN and private address, you need to setup port forwarding so incoming connections from internet to OpenVPN server reach target machine. You will also need to allow such communication on router's firewall
1) Configure the local network on its router – set DHCP IP reservation for OpenVPN server virtual machine (based on MAC address of virtual machine's ethernet port). DHCP server will always assign this machine same IP address.
2) Configure port forwarding if needed - forward public port to port 443 TCP on IP address assigned by DHCP for OpenVPN server.
Choose public port number above 1024 TCP to avoid using privileged ports.
See picture below:
2N OpenVPN server installation:
All examples shown in this article require to be run with elevated rights, either login as root or use proper command to gain required rights.
1) .On Linux machine, deploy following applications: stunnel4, openvpn, bridge-utils, lshw.
Example for Debian 10
apt-get install -y stunnel4 openvpn bridge-utils lshw >/dev/null
2) Create certificates for OpenVPN. You need server certificate, server key, ca and intercom certificate with intercom key. Then you need to put those certificates to correct folders for stunnel,openvpn and intercoms.
To make script run , you need to save it in EOL conversion to UNIX and encoding UTF-8 format, then upload it and apply chmod a+x to make script executable.
Example script for Debian 10
This script will generate unique certificates each time it is run and put them in /tmp/certs folder. Then it moves all required certificates to appropriate folders.
It also generates client certificates for IP Intercoms / Access Units and place them to folder /root/certs from where you can download them.
In order to run the script, please place it to .sh file and add neccessary privileges so you can execute the file.
Alternatively you can avoid using the script and create certificates and folders manually.
Password to intercom.key in this example is set to Test1234
Due to security we recommend to create your own certificates with own password and settings, use this example as a reference only. 2N TELEKOMUNIKACE a.s. does not hold any responsibility if example certificates will not be secure enough.
#!/bin/bash
################################################################################
# Settings                                                                     #
################################################################################
# Certificates
C_C=""     # Country Name (2 letter code)
C_ST=""    # State or Province Name
C_L=""     # Locality Name
C_O=""     # Organization Name
C_OU=""    # Organizational Unit Name
C_CN=""    # Common Name
################################################################################
VERSION=1.0
################################################################################
print_step()
{
    echo -n "${1} ... "
}
print_ok()
{
    echo "[ OK ]"
}
check_error()
{
    if [ $1 -ne 0 ]; then
        echo
        echo
        echo
        echo "Error: $2"
        echo
        exit $1
    fi
}
print_step "Generating certificates"
TMP_CERTS=/tmp/certs
EC=prime256v1
EC_PARAMS=ec-${EC}-params.crt
PASS=Test1234
rm -rf ${TMP_CERTS}
mkdir ${TMP_CERTS}
check_error $? "can't generate certificates"
touch ${TMP_CERTS}/index.txt ${TMP_CERTS}/index.txt.attr
check_error $? "can't generate certificates"
echo "01" > ${TMP_CERTS}/serial.txt
check_error $? "can't generate certificates"
cat <<EOF >${TMP_CERTS}/openssl.cnf
[ ca ]
default_ca      = CA_default
[ CA_default ]
database        = ${TMP_CERTS}/index.txt
serial          = ${TMP_CERTS}/serial.txt
policy          = policy_default
[ policy_default ]
commonName      = supplied
EOF
check_error $? "can't generate certificates"
openssl ecparam -name ${EC} -out ${TMP_CERTS}/${EC_PARAMS} &>/dev/null
check_error $? "can't generate certificates"
subj="/C=${C_C}/ST=${C_ST}/L=${C_L}/O=${C_O}/OU=${C_OU}/CN=${C_CN:-Certificate Authority}"
openssl req -subj "${subj}"                                                  \
            -passout pass:${PASS}                                            \
            -new -x509 -newkey ec:${TMP_CERTS}/${EC_PARAMS}                  \
            -days 3650 -sha256                                               \
            -keyout ${TMP_CERTS}/ca.key -out ${TMP_CERTS}/ca.crt             \
        &>/dev/null
check_error $? "can't generate certificates"
subj="/C=${C_C}/ST=${C_ST}/L=${C_L}/O=${C_O}/OU=${C_OU}/CN=${C_CN:-Server Certificate}"
openssl req -subj "${subj}"                                                  \
            -new -nodes -newkey ec:${TMP_CERTS}/${EC_PARAMS}                 \
            -keyout ${TMP_CERTS}/server.key -out ${TMP_CERTS}/server.csr     \
        &>/dev/null
check_error $? "can't generate certificates"
subj="/C=${C_C}/ST=${C_ST}/L=${C_L}/O=${C_O}/OU=${C_OU}/CN=${C_CN:-Intercom Certificate}"
openssl req -subj "${subj}"                                                  \
            -new -nodes -newkey ec:${TMP_CERTS}/${EC_PARAMS}                 \
            -keyout ${TMP_CERTS}/intercom.key -out ${TMP_CERTS}/intercom.csr \
        &>/dev/null
check_error $? "can't generate certificates"
openssl ca -config ${TMP_CERTS}/openssl.cnf                                  \
           -passin pass:${PASS}                                              \
           -cert ${TMP_CERTS}/ca.crt -keyfile ${TMP_CERTS}/ca.key            \
       -outdir ${TMP_CERTS} -days 3650 -md sha256 -batch                 \
       -in ${TMP_CERTS}/server.csr -out ${TMP_CERTS}/server.crt          \
        &>/dev/null
check_error $? "can't generate certificates"
openssl ca -config ${TMP_CERTS}/openssl.cnf                                  \
           -passin pass:${PASS}                                              \
           -cert ${TMP_CERTS}/ca.crt -keyfile ${TMP_CERTS}/ca.key            \
       -outdir ${TMP_CERTS} -days 3650 -md sha256 -batch                 \
       -in ${TMP_CERTS}/intercom.csr -out ${TMP_CERTS}/intercom.crt      \
        &>/dev/null
check_error $? "can't generate certificates"
print_ok
################################################################################
rm -rf /etc/stunnel/keys
mkdir /etc/stunnel/keys
cp ${TMP_CERTS}/ca.crt /etc/stunnel/keys/ca.crt
check_error $? "can't set stunnel service"
cat ${TMP_CERTS}/server.crt >/etc/stunnel/keys/server.pem
check_error $? "can't set stunnel service"
cat ${TMP_CERTS}/server.key >>/etc/stunnel/keys/server.pem
check_error $? "can't set stunnel service"
rm -rf /etc/openvpn/server/keys
mkdir /etc/openvpn/server/keys
cp ${TMP_CERTS}/ca.crt /etc/openvpn/server/keys/ca.crt
check_error $? "can't set openvpn service"
cp ${TMP_CERTS}/server.crt /etc/openvpn/server/keys/server.crt
check_error $? "can't set openvpn service"
cp ${TMP_CERTS}/server.key /etc/openvpn/server/keys/server.key
check_error $? "can't set openvpn service"
rm -rf /root/certs
mkdir /root/certs
cp ${TMP_CERTS}/ca.crt /root/certs
check_error $? "can't copy intercom certificates"
cp ${TMP_CERTS}/intercom.key /root/certs
check_error $? "can't copy intercom certificates"
cp ${TMP_CERTS}/intercom.crt /root/certs
check_error $? "can't copy intercom certificates"
3) Now you need to setup stunnel configuration.
Example for Debian 10
Commands to run from command line
cat <<EOF >/etc/stunnel/stunnel.conf
[openvpn]
accept  = 443
connect = 1194
CAfile  = /etc/stunnel/keys/ca.crt
cert    = /etc/stunnel/keys/server.pem
verify  = 2
EOF
4) Next step is to configure OpenVPN service
Example for Debian 10
Commands to run from command line
cat <<EOF >/etc/openvpn/server/server.conf
local 127.0.0.1
server-bridge
dev   tap
proto tcp-server
port  1194
ca   /etc/openvpn/server/keys/ca.crt
cert /etc/openvpn/server/keys/server.crt
key  /etc/openvpn/server/keys/server.key
dh   none
tun-mtu 1500
script-security 2
auth-user-pass-verify /bin/true via-file
client-to-client
duplicate-cn
auth   none
cipher none
up   "/etc/openvpn/server/up.sh"
down "/etc/openvpn/server/down.sh"
verb 0
EOF
5) OpenVPN service requires also to configure up.sh and down.sh scripts and give then proper file rights.
Example for Debian 10
Commands to run from command line
cat <<EOF >/etc/openvpn/server/up.sh
#!/bin/bash
TAP="\${1}"
MTU="\${2}"
. ./settings.sh
dhclient -x \${ETH}
ip link set \${ETH} promisc on mtu \${MTU}
ip link set \${TAP} promisc on mtu \${MTU} up
brctl addbr \${BR}
brctl setfd \${BR} 0
brctl addif \${BR} \${ETH} \${TAP}
dhclient \${BR}
EOF

chmod +x /etc/openvpn/server/up.sh
cat <<EOF >/etc/openvpn/server/down.sh
#!/bin/bash
. ./settings.sh
dhclient -x \${BR}
ip link set \${BR} down
brctl delbr \${BR}
ip link set \${ETH} promisc off
dhclient \${ETH}
EOF

chmod +x /etc/openvpn/server/down.sh
ETH=$(lshw -quiet -class network -short | awk '/^\/0\//{print $2}')
cat <<EOF >/etc/openvpn/server/settings.sh
ETH=${ETH}
BR=br0
EOF

chmod +x /etc/openvpn/server/settings.sh
6) Then it is needed to bridge network traffic properly (do not run commands in this step over SSH as they include bringing ETH interface down which will result in connection loss)
Example for Debian 10
Commands to run from command line
sed -i 's/inet dhcp/inet manual/' /etc/network/interfaces

sed -i '/br0/d' /etc/network/interfaces

cat <<EOF >>/etc/network/interfaces
# openvpn bridge br0
allow-hotplug br0
iface br0 inet manual
EOF

ifdown ${ETH} &>/dev/null
ifup ${ETH} &>/dev/null

systemctl enable stunnel4.service &>/dev/null


systemctl enable openvpn-server@server.service &>/dev/null
7) Restart OpenVPN and asociated services
Example for Debian 10
Commands to run from command line
systemctl restart openvpn-server@server.service

systemctl restart stunnel4.service
8) Check if stunnel and openvpn service are running with command run from command line, otherwise repeat step 7
lsof -i 4
9) If firewall is installed, enable ports 1149 and 443 to be accepted(example configuration uses TCP protocol for OpenVPN)
Example for UFW
ufw allow 1149/tcp
ufw allow 443/tcp
systemctl restart ufw
2N IP Intercoms, 2N® LTE Verso, 2N® Access Unit
In order to connect 2N IP device to 2N OpenVPN server, you need to upload certificates downloaded from OpenVPN server to 2N IP device and configure OpenVPN connection in 2N device. After successful connection, 2N device will receive DHCP address from local network where 2N OpenVPN server is and will appear to local network as local device.
1) Login to 2N device you want to connect to 2N OpenVPN server over internet
2) Go to System – Certificates
3) Upload ca.crt file to Trusted certificates:

4) Upload intercom.crt and intercom.key files to User Certificates:
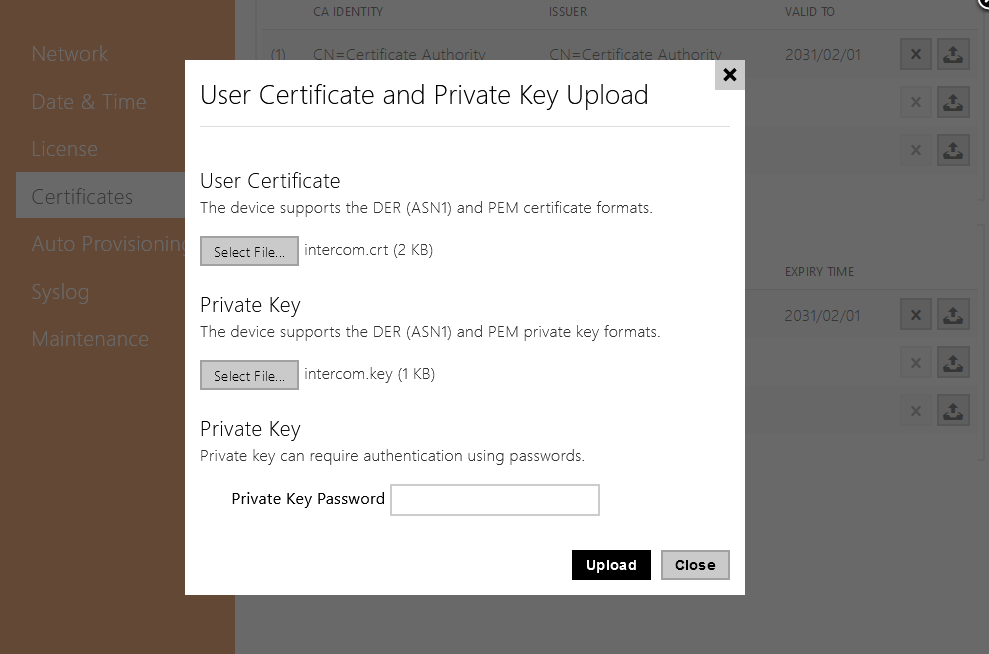
So finally it looks like that:

You will use same client certificates for every 2N device connecting to this VPN.
5) Go to System – Network – OpenVPN and set following:
- Enabled: Yes
- Default Interface: No
- Server Address: Public IP (which belongs to router where 2N OpenVPN server is)
- Server Port: Public Port (port used for forwarding on router where 2N OpenVPN server is - for example 1443)
- Trusted Certificate: 1
- Client Certificate: 1
Set Default interface parameter to Yes if 2N device connected via VPN is supposed to communicate outside local network connected over VPN.
Otherwise, 2N device will route such traffic via its own connection and will not route it to VPN.
6) Save your settings
7) Press START button to connect to 2N OpenVPN server
2N Device now should be able to initiate connection to 2N OpenVPN server and will receive new IP address from DHCP in local network where 2N OpenVPN server is.