SMS messages - How to set SMS2Email and Email2SMS on 2N®StarGate with CPU M202 version (2013+) with Microsoft Outlook?
In this FAQ you will see how to configure Email2SMS and SMS2Email feature on 2N® StarGate gateway. First of all you can read a brief introduction how these features work and after that there are several important steps which have to be followed for proper settings of this feature:
- Set the GSM gateway to send/receive SMS via SMTP/POP3
- Define the routing rules for incoming and outgoing SMS messages
- Check the GSM gateway SMS database filling capacity
- Set an email of the client (MS Outlook) for sending and receiving emails
Introduction and requirements
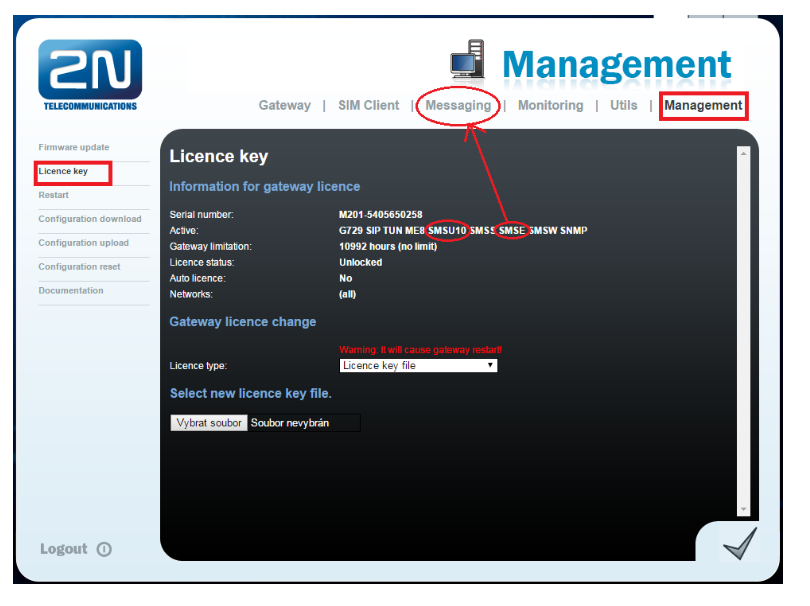
Note: As a very first step please make sure that the license for Email2SMS feature is uploaded into your 2N®StarGate gateway. This license is sold as a package for 10 users (you can buy licence for 10, 20, 30, etc. users) and you can have up to 200 licensed users in the gateway. If you want to verify whether you have the correct license uploaded in your gateway, go to section "Management -> License key". You should see the licenses called SMSE and SMSUx in the "Active" row. SMSE indicates that Email2SMS function is enabled and SMSUx indicates number of licensed users where x stands for this number (see the picture below). If there is not a license for Email2SMS (SMSE) then you will not see tab "Messaging" on the top bar!
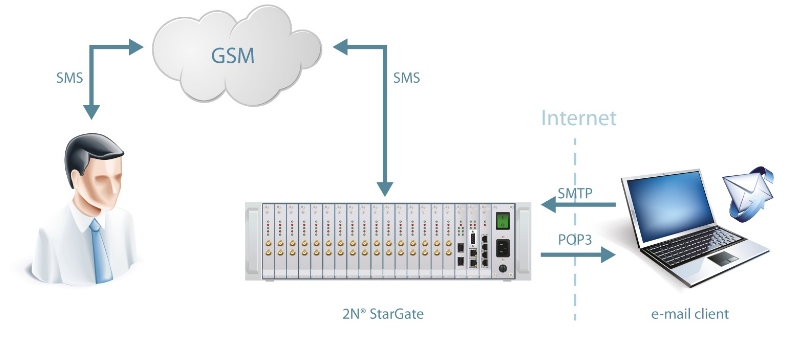
2N® StarGate can be configured to resend email messages from the PC to any address (GSM numbers) in the form 734123456@domain.com. The subject and the body of the email will be sent as one or more SMS messages to the mobile number e.g. 734123456 showing the 2N® StarGate user as the sender. On the other hand, if the user sends a SMS from his mobile phone to the SIM inserted in the 2N® StarGate gateway, the SMS will be sent to the user´s email account associated with the gateway.
The figure below shows sending/receiving SMS via SMTP/POP3. When having created user accounts in the gateway, the users can access the accounts via the e-mail client and send SMS messages to the gateway via SMTP. The gateway receives the messages and re-sends them to the GSM users (mobile phones) according to the predefined routing rules.
A message coming to 2N® StarGate from GSM is routed according to the incoming SMS rules and delivered to the user´s email account via POP3.
Configuration steps
Modules grouping
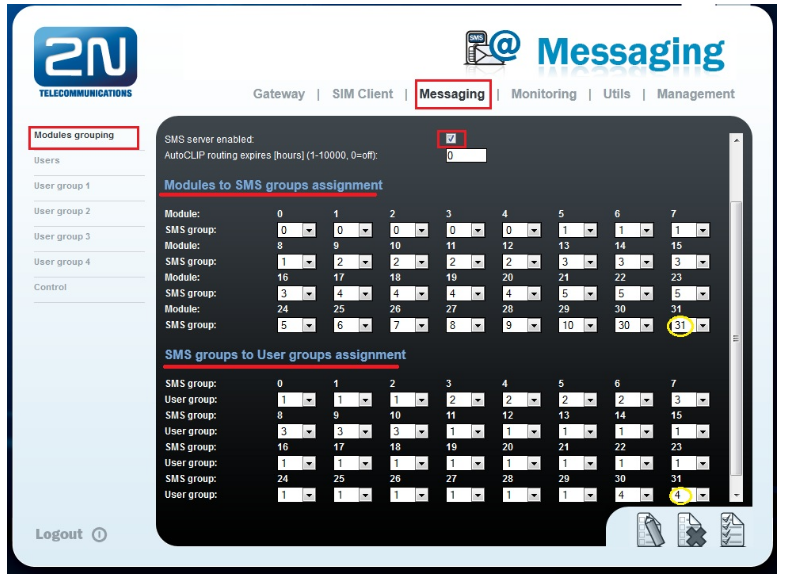
In the first step go to section "Messaging –> Modules grouping" and enable SMS server – check the appropriate check-box. Next add GSM modules to SMS groups to facilitate incoming/outgoing SMS routing. It can be done based on your requirements e.g. according to the GSM provider, etc. The last step in this section is to assign SMS groups created in the previous step to the User groups if you want to use messaging with different routing rules (e.g. to different company departments). The GSM gateway can contain up to 4 User groups and up to 32 SMS groups (yellow circle in the picture below).
Note: in this section you can also enable AutoClip routing for SMS. Set the maximum time for which the automatic SMS routing record (response) will be saved in the AutoCLIP table. It means that once you send an email to some specific GSM number (734123456@domain.com) and after some time the mobile user responds to this message and sends SMS message to SIM card inserted in the GSM module from which the email was previously sent, then this message will be automatically resent directly to the user who sent the email.
In the example below GSM modules 0, 1, 2, 3 and 4 were added to SMS group 0 and only users from User group 1 can use these modules (for incoming and outgoing SMS routing).
Add User
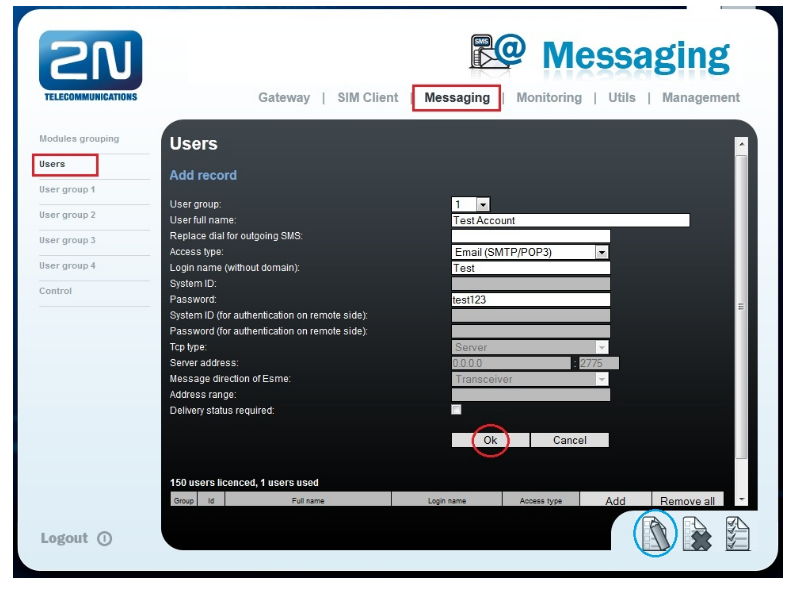
As a next step you need to skip to the section "Messaging –> Users", click on the "Add" button and create new SMS user(s) who is going to send and receive SMS messages. There are several parameters in this section which have to be set. You need to select the communication protocol for SMS processing (SMTP/POP3 ) and assign the user to User group. Also don not forget to define the Login name (without domain) and Password to log into the SMS server via your e–mail client. You can see all parameters from this section in the picture below where was created an user "Test Account" with the login "Test" and password "test123". Once you fill in all parameters click on the "OK" button. The user will be added and after that you have to make one more click to the "Save settings" button in the bottom right corner of the page (blue circle label on the picture).
General settings
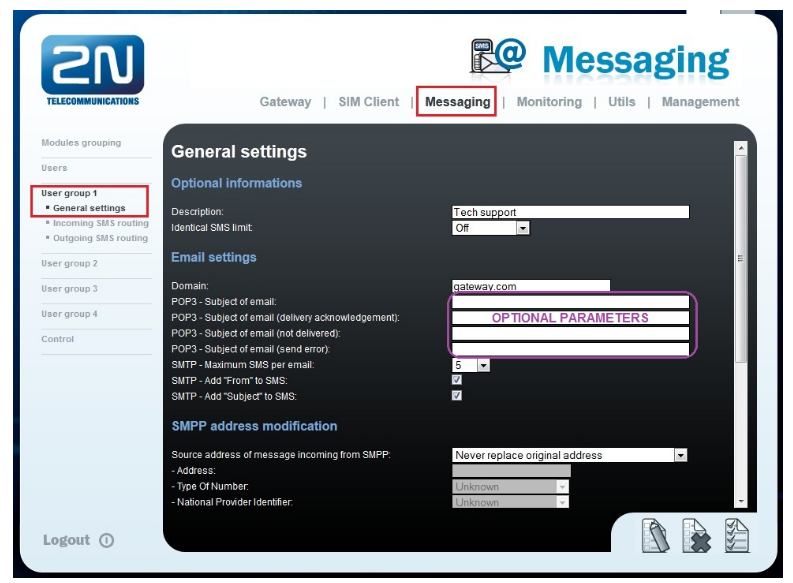
Set the parameters of domain in the "Messaging –> User Group –> General settings" sub-menu. The domain is automatically assigned to the user´s login in the selected User group and represents the user´s email address. In this section you can also define some parameters for POP3 and SMTP such as a subject of email, a maximum SMS per email. Then you can add "From" field as well as "Subject" to SMS (see the picture below).
In our example (in the previous step) the new user was created with login name "Test". In this section we will set domain as: gateway.com. Then the email address of the user with rights to access the SMS server will be Test@gateway.com. The “@” character is completed automatically and is not included in the domain field.
Incoming SMS routing
Now specify the routing rules for incoming SMS messages – this is done in the "Messaging –> User Group –> Incoming SMS routing" menu where you click on the "Add" button. There are several parameters which can be set or modified (see the picture below). Three most important ones are:
- Message from SMS group – select the SMS group that receives SMS messages
- Action type – specify how incoming messages will be processed. You can set AutoCLIP routing (the incoming SMS will be routed according to the AutoCLIP table records), Deliver to user (the SMS will be delivered to the selected user) or Drop message (the SMS will be dropped).
- Deliver to user – this field is used only if you have selected "Deliver to user" in the previous step. Here receives the SMS the user previously defined.
Note: The rules apply to incoming SMS sequentially, starting from the first rule. If all the set rules are met in a row, the SMS is routed according to the row.
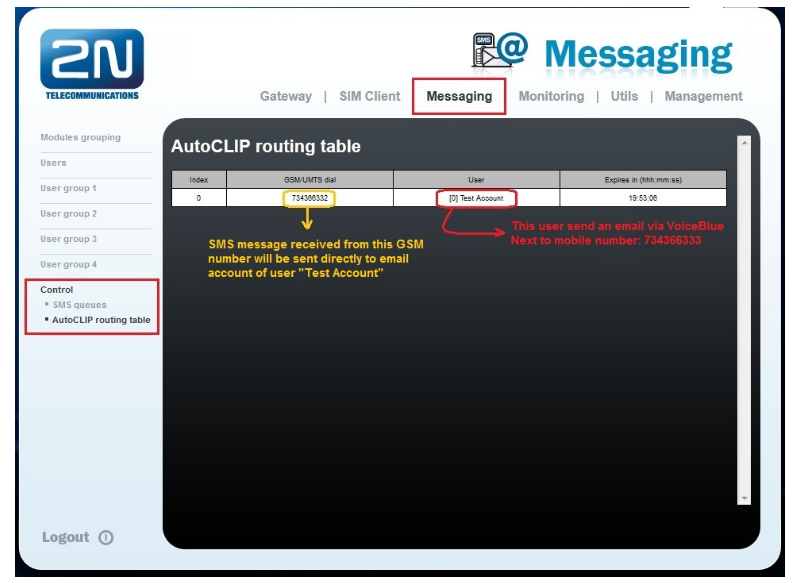
- SMS routed directly to one user´s email account
In the picture below you can see that each message which is received on GSM modules assigned to SMS group 0 (in our case these are GSM modules 0, 1, up to 4 – set in the 1st step) is routed directly to the user "Test Account". It means that once you send a SMS to the SIM cards inserted in one of the GSM modules 0 - 4, this SMS will be converted to the email and sent to the email account Test@gateway.com. You can also specify the time and day when this routing rule is going to be active. Once you finish the configuration, click on the "OK" button and after that on the "Save settings" button.
- SMS routed based on the AutoCLIP routing table
Sometimes it is not desirable to send all received SMS messages to one user but you require to send SMS messages based on the AutoCLIP routing table records. Only if there is no record in this table for incoming message then you can forward the message to one specific user. The settings is shown below – firstly 2N® StarGate tries to deliver SMS message based on the AutoCLIP routing and if there is no record for incoming GSM number then the SMS message is sent to the Receptionist´s email account.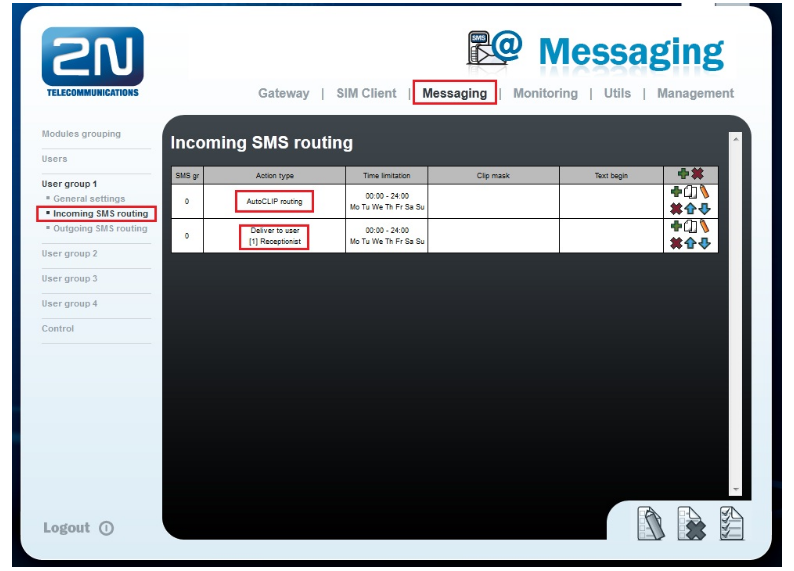
Outgoing SMS routing
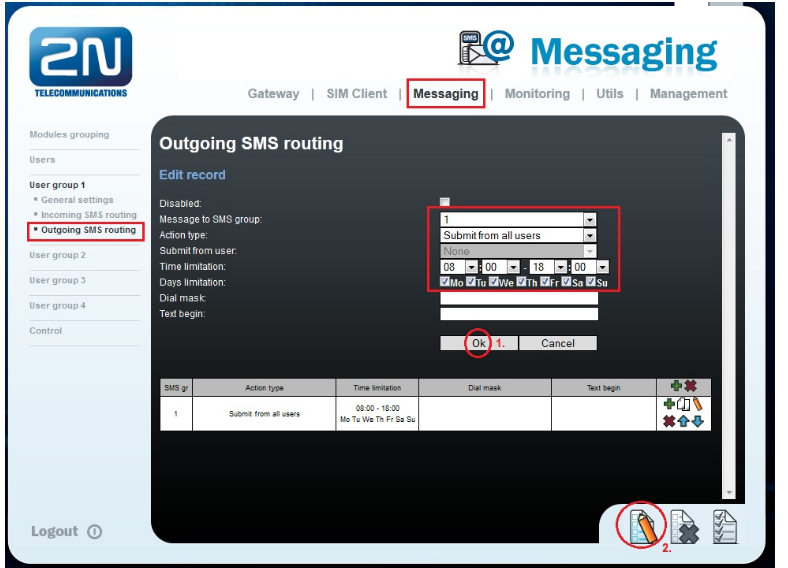
As a first step you need to specify routing rules for outgoing SMS – it is done in the "Messaging –> User Group –> Outgoing SMS routing" menu where you click on the "Add" button. In this section you will specify mainly these parameters:
- Message to SMS group – the SMS group via which the outgoing SMS will be routed
- Action type – define how to process outgoing SMS. You can choose from two options: Submit from user (SMS can be sent only from selected users) or Submit from all users (enable sending SMS from all the SMS group users).
- Submit from user – choose a user who can send SMS (this is active only if "Submit from user" was selected)
Note: don not forget to enable the SMS server as shown in the first step (there is a check-box)!
In the picture below there is shown the setting for User Group 1. Messages (emails) from all users in this User group are routed via SMS group 1. It means that these emails will be transferred to SMS and sent only via GSM modules assigned to SMS group 1. It is GSM module 2 in our example (as you can see in the picture from step 1).
Configuration of Microsoft Outlook
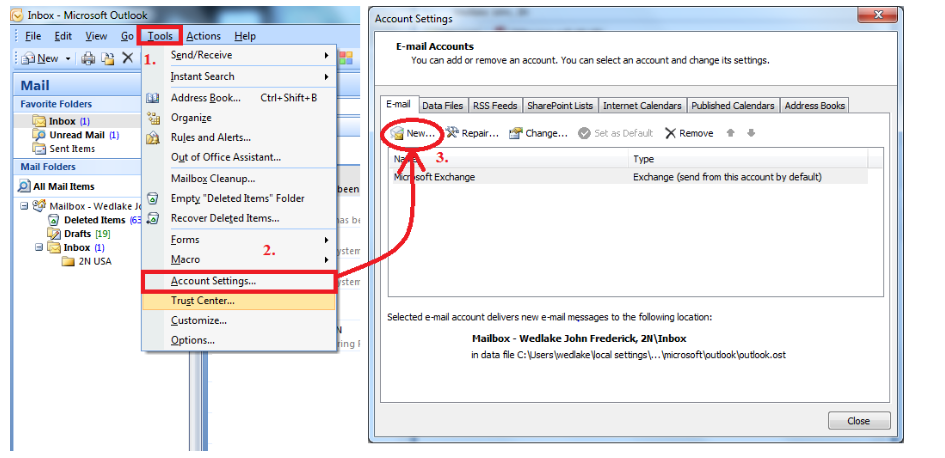
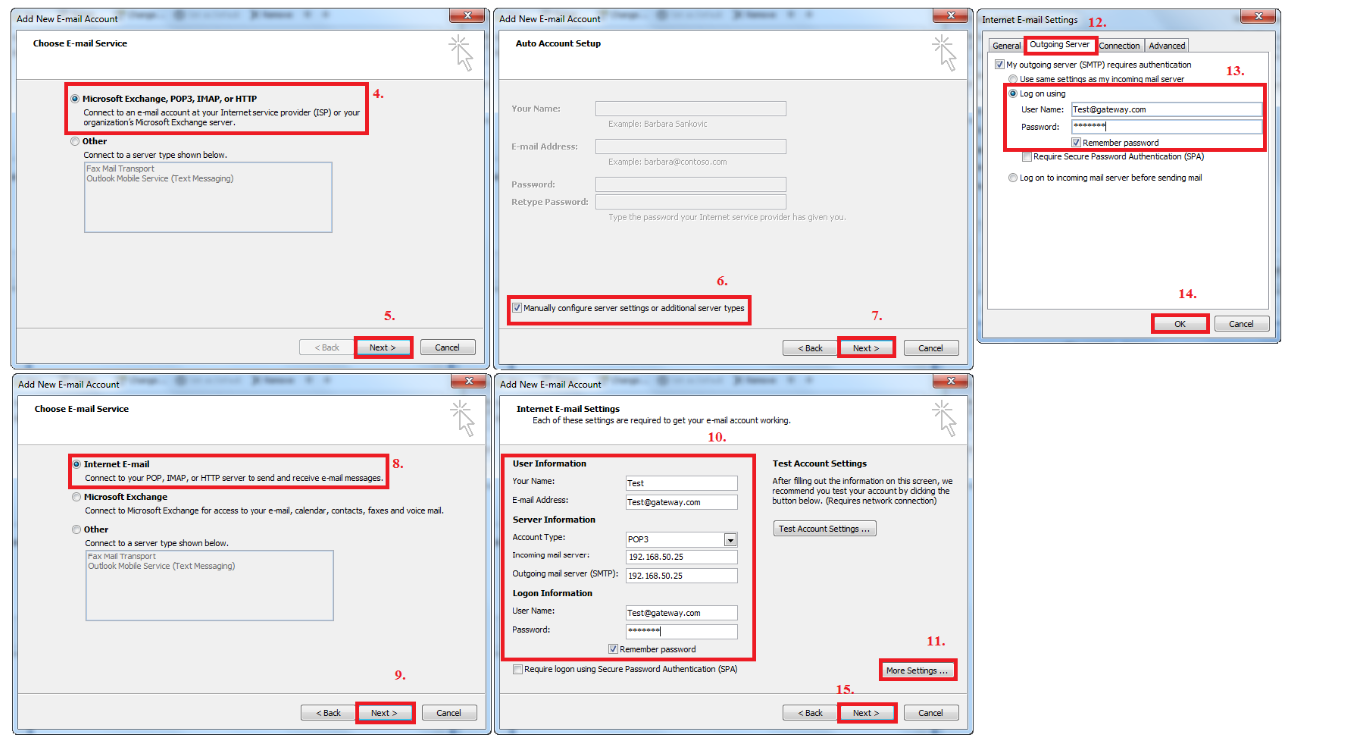
Follow the steps in pictures below. In step 10, you have to fill Name (choose name of account), Email address (fill the address which you created in gateway in previous part, for this example it is Test@gateway.com), server of incoming and outgoing mail (fill IP address of the gateway), Username (same as email address) and password (fill password which you created in gateway in previous part, for this example it is test123)
Continue to step 13, there you have to fill username and password again, it is same like in step 10 (Test@gateway.com and test123). After you will press on "next" in step 15, new window will pop up and all you have to do is press "Finish". Now you can start using sms2email feature.