SIP Provisioning - How to set it in 2N®NetStar
SIP Provisioning is a feature that allows an automatic and remote installation of IP terminals connected to the NetStar. It means that every IP terminal connected to the Netstar will get automatically all settings including IP address and Account settings.
SIP provisioning is supported for following IP phones: (from NetStar firmware version 4.4.21)
- 2N StarPoint IP T20 – indicates a 2N® StarPoint IP type T20 IP phone.
- 2N StarPoint IP T22 – indicates a 2N® StarPoint IP type T22 IP phone.
- 2N StarPoint IP T26 – indicates a 2N® StarPoint IP type T26 IP phone.
- 2N StarPoint IP T28 – indicates a 2N® StarPoint IP type T28 IP phone.
- 2N StarPoint IP T32 – indicates a 2N® StarPoint IP type T32 IP phone.
- 2N StarPoint IP T38 – indicates a 2N® StarPoint IP type T38 IP phone.
Well VP-2009 – indicates a Well VP-2009 IP phone.
Well VP530 – indicates a Well VP530 IP phone.
Well YV2 – indicates a Well YV2 IP phone.
Well YV3 – indicates a Well YV3 IP phone.
- Yealink T19P – indicates a Yealink T19P IP phone .
- Yealink T21P – indicates a Yealink T21P E2 IP phone.
- Yealink T23G – indicates a Yealink T23G IP phone.
- Yealink T27P – indicates a Yealink T27P IP phone.
- Yealink T29G– indicates a Yealink T29G IP phone.
- Yealink T46G – indicates a Yealink T46G IP phone .
Yealink T48G – indicates a Yealink T48G IP phone.
- Yealink W52P – indicates a Yealink W52P IP phone .
- Cisco SPA 525G – indicates a Cisco SPA 525G
Cisco SPA 504G – indicates a Cisco SPA 504G
- Grandstream GXP1625 – indicates a Grandstream GXP1625
Htek UC902 – indicates a Htek UC902
Htek UC903 – indicates a Htek UC903
Htek UC912 – indicates a Htek UC912
Htek UC923 – indicates a Htek UC923
Htek UC924 – indicates a Htek UC924
Htek UC926 – indicates a Htek UC926
2N® NetStar configuration
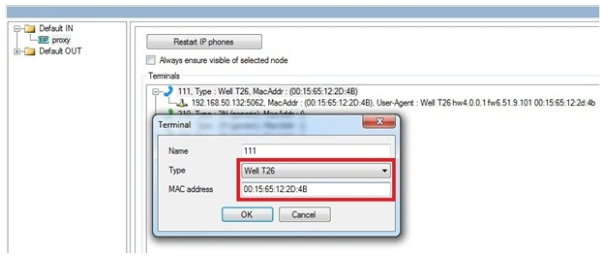
- In order to user this feature, it is necessary to know in advance the MAC addresses of the IP terminals that will be connected to the 2N® NetStar.
- Go to "Virtual ports -> SIP -> SIP Proxy" and fill in for each terminal its exact type and MAC address.
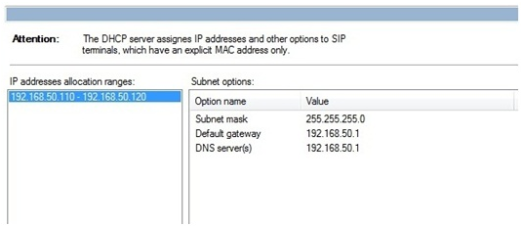
- If 2N® NetStar will be used as the DCHP server, set the range of IP addresses which will be assigned to terminals.
- Go to "Network -> Service settings -> DHCP server".
- The terminal should have activated the DHCP client parameter, so once it is connected, it will get IP address and settings automatically from the 2N® NetStarDHCP server. Once all of the previous parameters are properly set, you only need to restart the terminal and it will be automatically configured and registered in the 2N® NetStar.
- Note: It could happen that the terminal restarts itself several times during the procedure.
IP terminal configuration (only if you will not use the DHCP from 2N® NetStar)
Open the web configuration of the IP terminal, go to the Upgrade menu and define the IP address of the TFTP server (NetStar PBX) for provisioning.
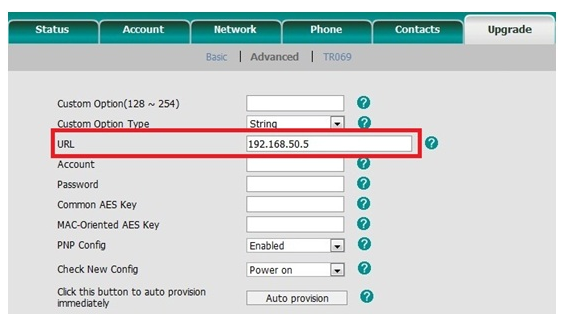
Run provisioning
After the proper configuration of 2N® NetStar, the only thing you have to do is to restart the terminal (when you use the DHCP from NetStar PBX) or click on the "Auto provision" button from the terminal menu (when you use dedicated DHCP server; see picture above).
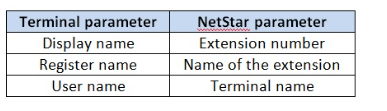
What is provisioning changing in the terminal configuration?
- The admin password: 2n
- Registration name: sipprovisioning, password: 2n
- IP address, port and codecs of the SIP proxy
- Account parameters: