Trace - How to get internal trace from 2N® StarGate / 2N® BlueTower?
Web interface - short trace, just few calls
The internal trace can be run via menu Utils -> Report capture. Check in Gateway -> Gateway configuration -> Report configuration that all fields are enabled.
Online view for the internal trace is shown in menu Gateway -> Gateway control -> Online report.
For long trace ("unlimited") you can use either Telnet connection, Serial connection or PRI Configuration tool (for older M112 CPU).
Telnet client - long trace, "unlimited"
Serial (COM) connection - long trace, "unlimited"
In PRI Configuration tool (for older M112 CPU)
Telnet client - long trace, "unlimited"
The web interface can store up to 512kB long trace. Telnet client allows to use your computer as a storage for a longer trace.
Bellow you can find instructions for application Putty. You can also use other telnet capable applications.
Putty (www.putty.org)
- Download and run Putty.
- Choose Telnet in Connection type and fill in 2N® StarGate / 2N® BlueTower's IP address.
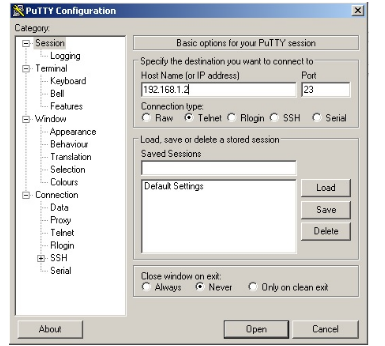
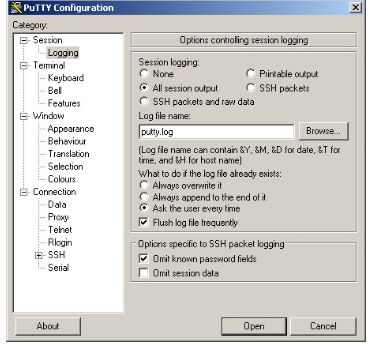
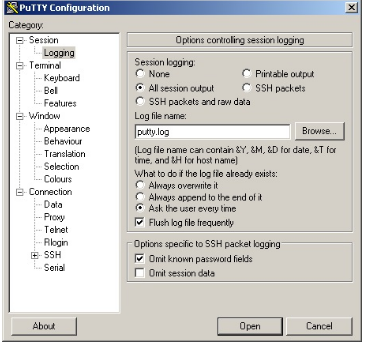
- In Menu Session -> Logging, select Session logging: All session output and choose a file where the trace capture will be saved to.
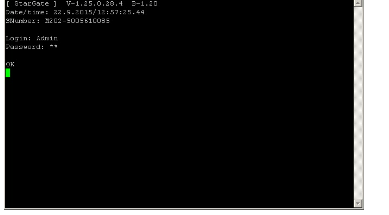
Establish connection with your gateway and fill login.
Firmware 1.25+
Firmware 1.24 and older
5. To set the right tracing characteristics use following commands.
AT%X91=3F,3,0 - for full calls tracing (including LCR)AT%X92=7,0 - for full SMS tracing
AT%X92=0,7 - for full SMPP tracing
AT%X92=7,7 - for full SMPP and SMS tracing
Combination of commands AT%X91=3F,3,0 and AT%X92=7,7 sets FULL
tracing.
6. Use command AT&S. This information is summary about status of
inserted cards and modules.
7. Use the command ATI3 and ATI4. Those commands provides information about
your gateway and installed licenses.
8. Optional: If we request module restart then do AT&GALL=RESET.
9. To start tracing write command AT!RP
If you get BUSY response, run AT!RX first. This command clears previously not correctly ended trace.5. To set the right tracing characteristics write the command.
AT%S92=31
This command sets FULL tracing.6. Use command AT&S. This information is summary about status of
inserted cards and modules.
7. Use the command ATI3 and ATI4. This information is about your
gateway and licenses.
8. Optional: If we request module restart then do AT&GALL=RESET.
9. To start tracing write command
AT!R2If you get BUSY response, run AT!RX first. This command clears previously not correctly ended trace.
10. Now you can make test calls and other needed tests.
11. Pack the created trace file and send it to us via email with following information:
- the description of numbers you tried to dial / send sms to
- issues which occurred
- requested scenario details (what you need to achieve - such as routing specific numbers to different modules/SIM cards, etc...).
Serial (COM) connection - long trace, "unlimited"
The web interface can store up to 512kB long trace. Serial client allows to use your computer as a storage for a longer trace.
Bellow you can find instructions for application Putty. You can also use other Serial connection capable applications.
Putty (www.putty.org)
- Download and run Putty.
- Choose Serial in Connection type and fill in COM port (COM1,COM2, etc...) used for connection between PC and 2N® StarGate / 2N® BlueTower.
Use speed value 57600.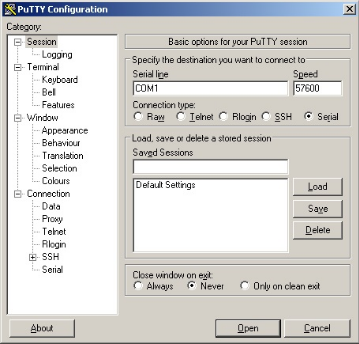
- In Menu Session -> Logging, select Session logging: All session output and choose a file where the trace capture will be saved to.
- Establish connection with your gateway.
To make sure that the gateway communicates correctly with your PC, write command AT and hit ENTER.
You must get an answer OK. Continue further only in case that you have got the OK answer.
If not, double check the connection between PC and gateway, make sure that you use the correct COM port for communication and that the COM port is not occupied by another session (for example configuration tool or XAPI server, etc.)Firmware 1.25+
Firmware 1.24 and older
5. To set the right tracing characteristics use following commands.
AT%X91=3F,3,0 - for full calls tracing (including LCR)AT%X92=7,0 - for full SMS tracing
AT%X92=0,7 - for full SMPP tracing
AT%X92=7,7 - for full SMPP and SMS tracing
Combination of commands AT%X91=3F,3,0 and AT%X92=7,7 sets FULL
tracing.
6. Use command AT&S. This information is summary about status of
inserted cards and modules.
7. Use the command ATI3 and ATI4. Those commands provides information about
your gateway and installed licenses.
8. Optional: If we request module restart then do AT&GALL=RESET.
9. To start tracing write command AT!RP
If you get BUSY response, run AT!RX first. This command clears previously incorrectly ended trace.5. To set the right tracing characteristics write the command.
AT%S92=31
This command sets FULL tracing.6. Use command AT&S. This information is summary about status of
inserted cards and modules.
7. Use the command ATI3 and ATI4. This information is about your
gateway and licenses.
8. Optional: If we request module restart then do AT&GALL=RESET.
9. To start tracing write command
AT!R2If you get BUSY response, run AT!RX first. This command clears previously not correctly ended trace.
10. Now you can make test calls and other needed tests.
11. Pack the created trace file and send it to us via email with following information:
- the description of numbers you tried to dial / send sms to
- reported issues
- desired scenario details (what do you need to achieve - such as routing specific numbers to different modules/SIM cards, etc...).
In PRI Configuration tool (for older M112 CPU)
Connect with PRI configuration tool to the gateway (over serial communication or LAN)
Go to Gateway control -> Tracing
Set details of the tracing:
- select all check boxes (it will set the level of trace)
- select tracing: GSM/VoIP/ISDN Messages
- choose Layers 2,3,4
Click on the button choosing (creating) the file to which the trace will be saved
Click the button Start. When trace is done, press Stop and text of the trace will be saved in file which you set above.