5.3.2 Dialing
Quick Dial Buttons
Assign the Directory > Users users to the quick dial buttons. By default, all available intercom buttons are assigned to the listed users. A non-assigned button can be used for automation or switch activation, for example. In the 2N IP Base models, however, first select the count of buttons in Hardware > Extending modules.
 |
- Clear Button Assignment – clear all button assignments to users.
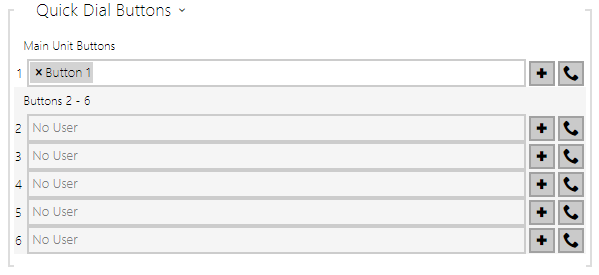 |
It displays the list of all potentially available buttons on the intercom (or 2N IP Style extending module). In some intercom models (2N IP Vario, 2N IP Verso), the button list is divided into 8/5-item groups corresponding to the button extending modules. Click ![]() , select the user and press Add to add a user to the editing field. To search a user in the list, use the fulltext field and the username. One quick dial button can be shared by multiple users. Click
, select the user and press Add to add a user to the editing field. To search a user in the list, use the fulltext field and the username. One quick dial button can be shared by multiple users. Click ![]() to test the set quick dial button. A dialog box is displayed including detailed information on the ongoing call (user, call direction, state, reason and last event time).
to test the set quick dial button. A dialog box is displayed including detailed information on the ongoing call (user, call direction, state, reason and last event time).
Info
- Up to 16 users can be assigned to one speed dial button.
- The maximum total count of numbers called in parallel is 16. This can occur in the case of group call and multiple called users assigned to one quick dial button.
Directory
This tab helps you configure a structured user list to be displayed. Create any count of groups and add any count of phone book users to groups. No user can be assigned more times to a group, but one user can be added to multiple groups at the same time.
 |
- – choose whether or not the images in the directory display shall be shown in the item list display.
 |
The created folders and users are displayed to the left. Click ![]() to add a folder. Click
to add a folder. Click ![]() to remove a directory including users and groups. Click
to remove a directory including users and groups. Click  to rename a group. Click
 ![]() to move a user from the main tree to a folder.
to move a user from the main tree to a folder.
The users assigned to the selected group are displayed to the right. Click  to add a user to the group; yet the user remains in the phonebook main tree. Press
 ![]() to highlight the first item in the group on the display. Click
to highlight the first item in the group on the display. Click ![]() to remove a user.
to remove a user.
The groups and users are arranged in the alphabetical order on the display. Click ![]() to assign a priority. The directory items have 8 possible priorities. Priority
to assign a priority. The directory items have 8 possible priorities. Priority ![]() 1 places the item on the top of the list. No priority puts it on the end of the list. Multiple items with identical priorities, if any, are grouped and arranged alphabetically.
1 places the item on the top of the list. No priority puts it on the end of the list. Multiple items with identical priorities, if any, are grouped and arranged alphabetically.
Caution
- Remember to save the phone book changes.
- The setting (photos, root folder, content) display changes are not applied until you go to the search or dialing menu.
Blind Assistance Mode
The Blind Assistance mode makes the intercom control accessible to users with visual impairments. Thanks to this function, the users who have problems with visual orientation on the display can locate the intercom and touch the display with the palm of their hand to set up a call to a preset contact.
The Blind Assistance Mode is activated whenever the intercom camera detects a person approaching the intercom head-on. The intercom camera must detect the person approaching the device for a defined period of time, which can be set in the Blind Assistance Mode in the web configuration interface. Once the user is detected successfully, the Blind Assistance Mode is activated and the intercom starts navigate the user to the display by sound. The user is audibly instructed to touch the display with the palm of their hand, which automatically sets up a call to a preset contact.
Tip
- The instruction message can be changed. Record a sound message of your own in Services > User sounds.
- – enable the Blind Assistance Mode.
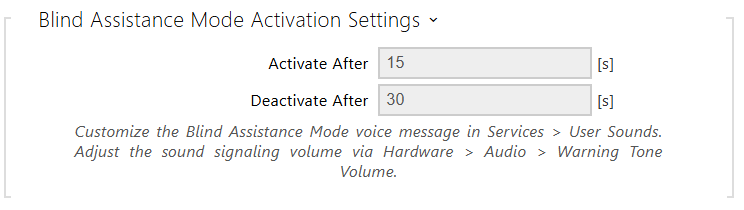 |
- Activate After – set the period of time during which the intercom shall detect the user face to activate the mode.
- Deactivate After – set the period of time after the user disappearance during which the Blind Assistance Mode will be still active.
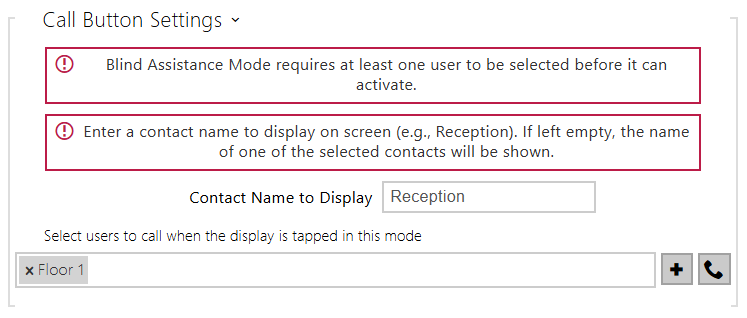 |
- Contact Name to Display – set a text to be displayed as a call contact on the device (Reception, e.g.) If you leave the parameter empty, the name of one of the selected contacts will be displayed.
The field under the contact name helps you select the contact(s) to which a call will be set up in the Blind Assistance Mode.