Avaya IP Office
Content
About
Avaya IP Office is Avaya's global midsize solution for enterprises, supporting up to 3,000 users at a single location with IP Office Select editions. For businesses with multiple locations, IP Office provides a powerful set of tools to help streamline operations, centralize management, and reduce total cost of ownership for converged networks. Using industry standards, IP Office enables companies to share resources, provide improved customer service, and keep mobile employees accessible.
Tip
Parallel calls from the intercom are not supported by this PBX. You can call to more destinations by
- creating a ring group on the PBX
- registering the intercom to two SIP account on the PBX
Version 10.0
Tested with
Avaya Aura Platform | 2N IP Intercom | Registrations | Calls |
|---|---|---|---|
| 10.0 | 2.8.0.17.2 |
Settings
The process is the same as with Avaya IP Office Platform version 8.0.
Version 8.0
Tested with
Avaya Aura Platform | 2N IP Intercom | Registrations | Calls |
|---|---|---|---|
| 8.0 | 2.8.0.17.2 |
Settings
Configure Avaya IP Office
The configuration changes in this section for IP Office are performed through the IP Office Manager. Except where it is stated, the parameters in all steps are the default settings and are supplied for reference.
The procedures fall into the following areas:
- Setting LAN Parameters
- Administer SIP registrar
- Add SIP extensions
- Add users
- Configure sequential hunt group
- Save configuration
Setting LAN Parameters
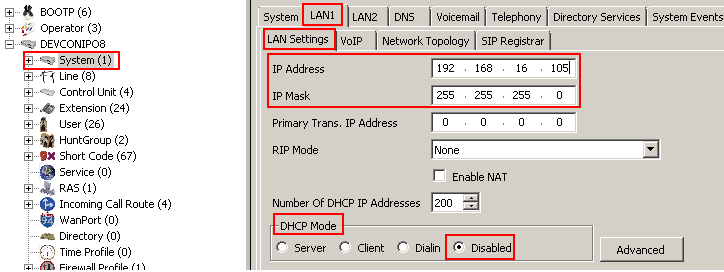
From the configuration tree in the left pane select System. Click tab LAN1 / LAN Settings to display the LAN Settings screen in the right pane.
- Set the IP Address which will be the address of the IP Office.
- Set the IP Mask based on the network setup.
- Set the DHCP Mode based on the network requirement. In this case the Disabled option is chosen since DHCP has not been used.
- Other fields can be left blank or in the default settings.
 |
Administer SIP Registrar
Select SIP Registrar sub-tab in the right pane and enter the following values:
- Domain Name: Enter a valid Domain Name. In this case, it was left blank as registration is done using the IP address of the LAN1 interface.
- Layer 4 Protocol: Select Both TCP & UDP.
- TCP Port: Set to 5060 (default).
- UDP Port: Set to 5060 (default).
 |
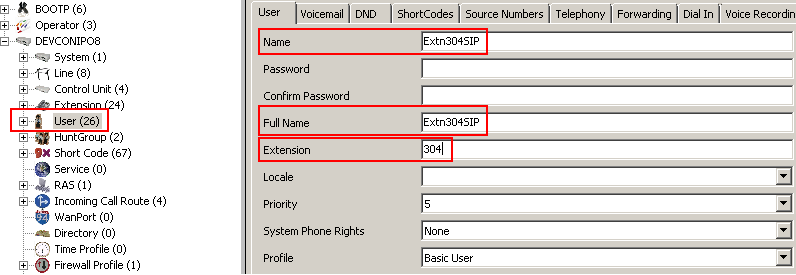
Add users
Add a User by right-clicking User from the left pane and select New (not shown). For the Name field, enter a descriptive name, for example, Extn316. For the Full Name field, enter a descriptive name for the user. For the Extension enter a valid extension Number.
 |
Select the Voicemail tab and uncheck the Voicemail On field.
 |
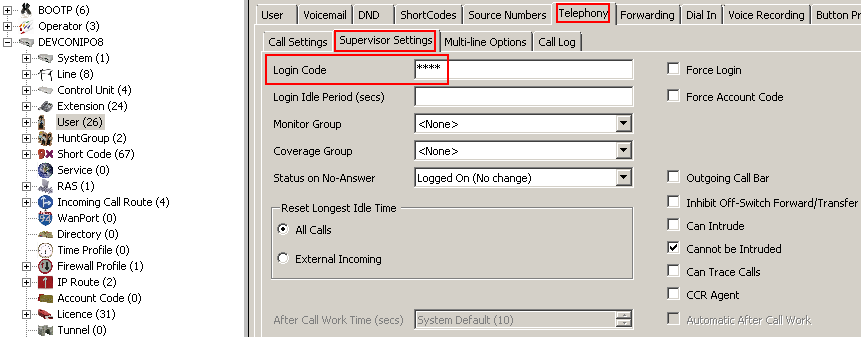
Select the Telephony / Supervisor Settings tab. Enter a Login Code. The Login Code is used to configure 2N IP Intercom in Section 6.2 to log the user into the IP Office. Click OK (not shown) when it is done.
 |
 |
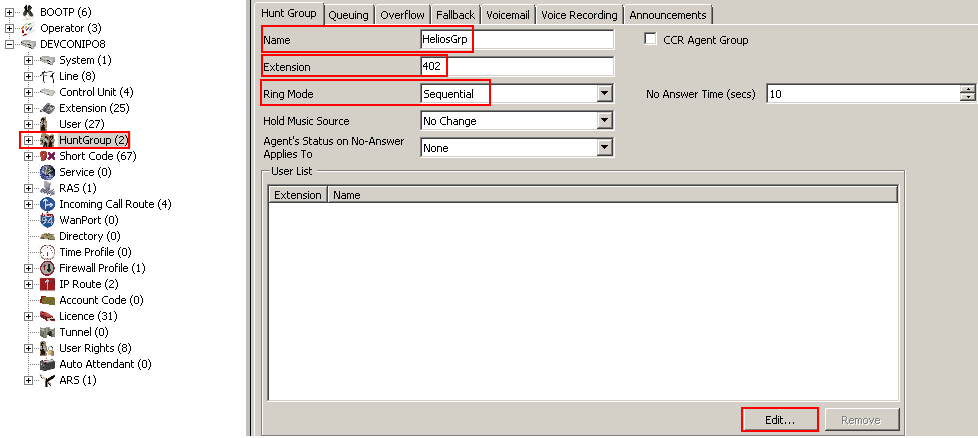
Configure Sequential Hunt Group
- In the left panel right-click HuntGroup and select New (not shown). For the Name field enter a descriptive name for the hunt group. Set the Extension field to an unused extension, in this case, 402 and set Ring Mode to Sequential. For the No Answer Time (secs) field, set the number of seconds an extension rings before the call is passed to the next extension in the list, in this case 10. Click Edit to configure the list of extensions.
 |
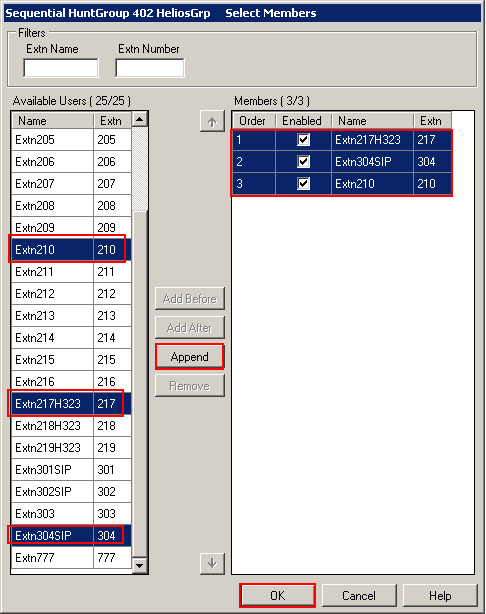
- The screen below will appear, select the newly created SIP User and any other users required in the hunt group and click Append. Click OK to return to the previous window and click OK when done.
 |
Save Configuration
- Send the configuration to the IP Office in the customary fashion when all configuration is complete.
Configure 2N IP Intercom
- The following steps show in the detail the configuration for 2N IP Intercom using the Web Interface. The steps include the following areas:
- Launch Web Interface
- Administer SIP Settings
- Administer Codecs
- Configure Quick Dialing Buttons
- Configure Miscellaneous Settings
The factory default setting for DHCP is on.
Launch Web Interface
Access the 2N IP Intercom web interface, enter http://<ipaddress> in an Internet browser window, where <ipaddress> is the IP address of 2N IP Intercom. Log in with the appropriate credentials.
Administer SIP Settings
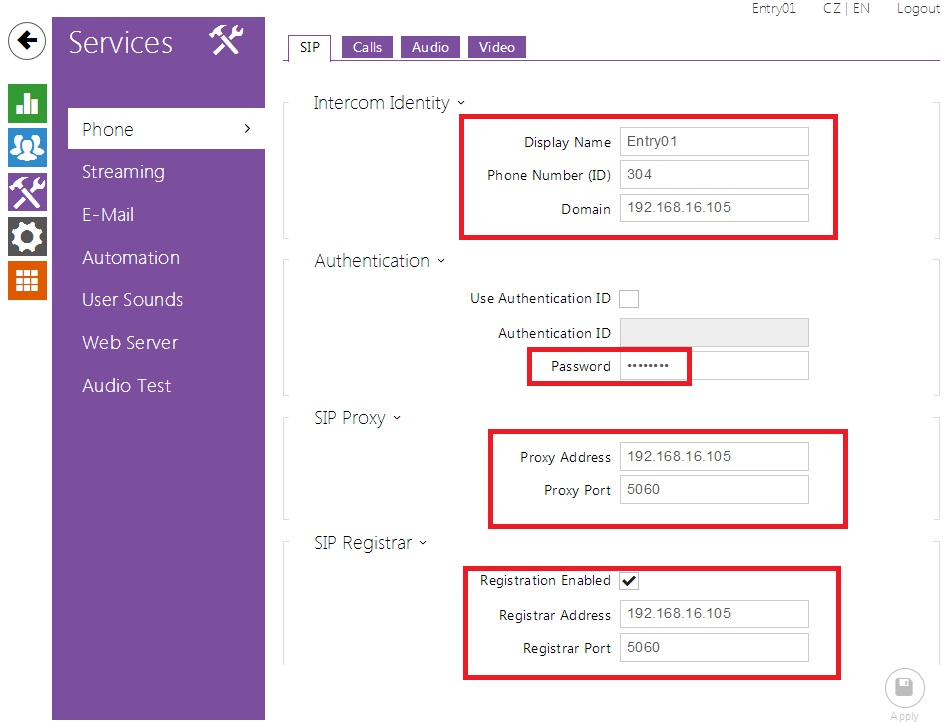
Select Advanced Settings / SIP Settings from the left menu. In the User settings section, configure the following:
- Display name: Enter the desired name.
- User ID: Enter the user extension from Section Add users
- Domain: Enter the IP address of Avaya IP Office from Section Setting LAN parameters.
- Use auth ID: Select No.
- Password: Enter the Login Code from Section Add users.
In the SIP proxy settings section configure the following:
- Proxy address: Enter the IP address of Avaya IP Office from Section Administer SIP registrar.
- Proxy port: Enter 5060 (default).
In the SIP registration section configure the following:
- Register 2N IP Intercom: Select Yes.
- Registration expires: Enter the number of seconds for 2N IP Intercom to re-register.
- Registrar address: Enter the IP address of Avaya IP Office from Section Add users.
- Registrar port: Enter 5060 (default).
Retain the default values for the remaining fields. Click the disk icon (not shown) to save when done.
 |
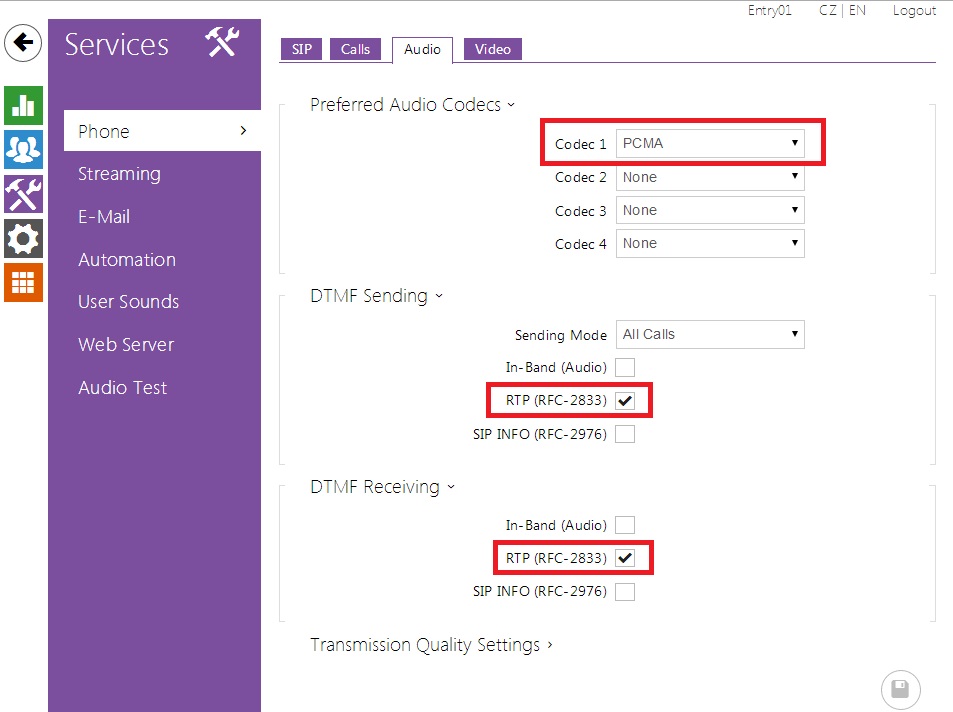
Administer codecs
- Click Advanced Settings / Audio Codecs from the left menu to configure the audio codecs. In the Preferred audio codecs section enable and prioritize the codecs as per requirement. To enable DTMF using RFC2833, set Receive via RTP and Send via RTP to Yes. Click the save icon (not shown) when it is done.
 |
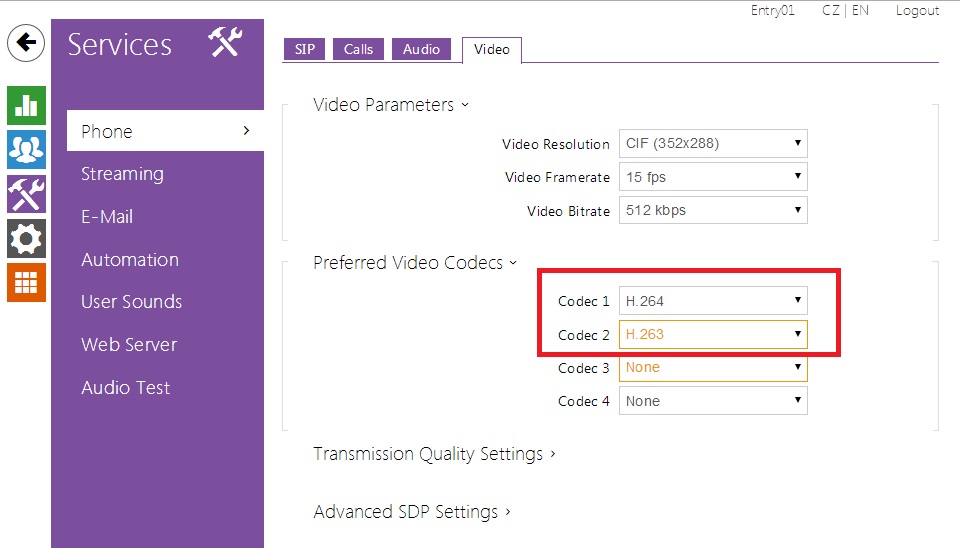
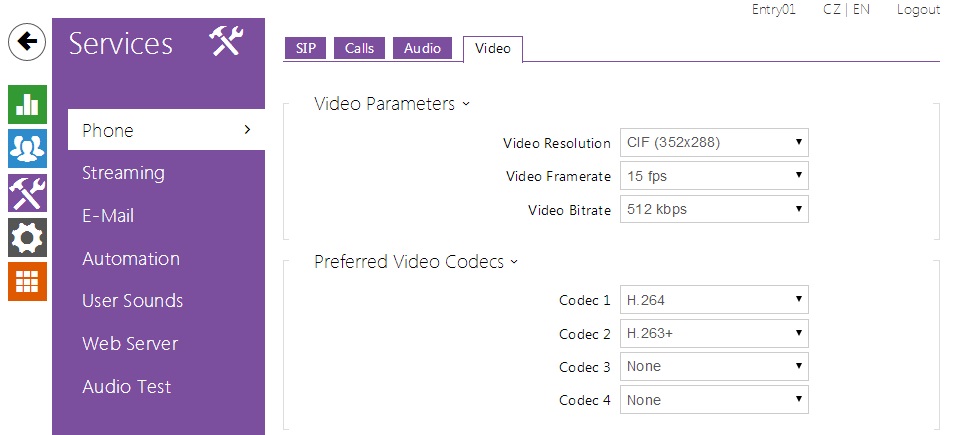
- Select Advanced Settings / Video Codecs from the left menu to configure the video codecs. In the Preferred video codecs section enable and prioritize the codecs as per requirement. The default values were used for the remaining fields.
 |
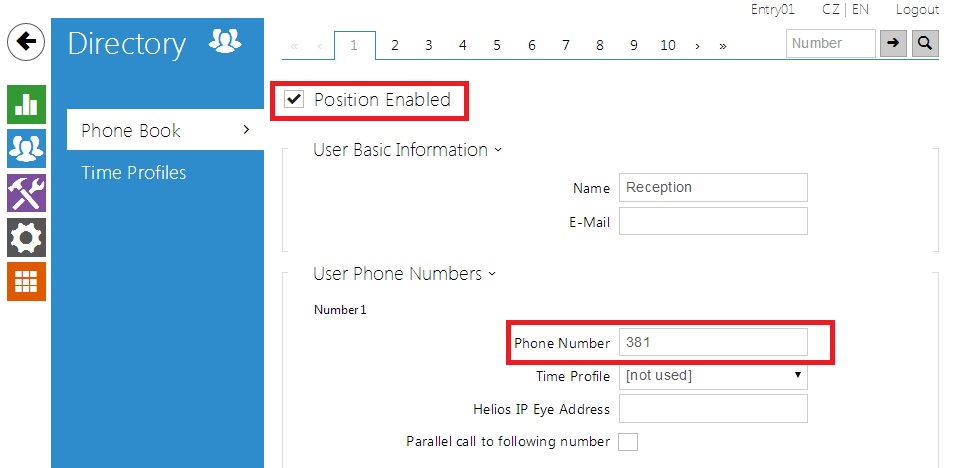
Configure Quick Dialing Buttons
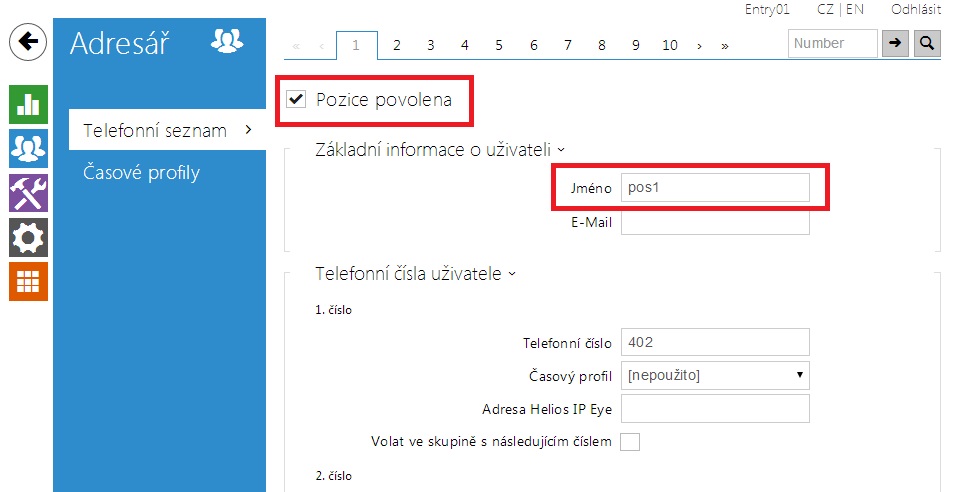
- Select Basic Settings / Phone book from the left menu and select one of the positions (e.g. 1 to 10 as shown below) to configure it. The position number corresponds to the Quick Dialing Button on the 2N IP Intercom. For example the following shows the configuration for Position 1.
- Position enabled: Select Yes.
- Position name: Enter a descriptive name.
Number 1: Enter the number to call when the button is pressed, for example, calling the Sequential Hunt Group created in Section Configure Sequential Hunt group.
 |
Configure Miscellaneous Settings
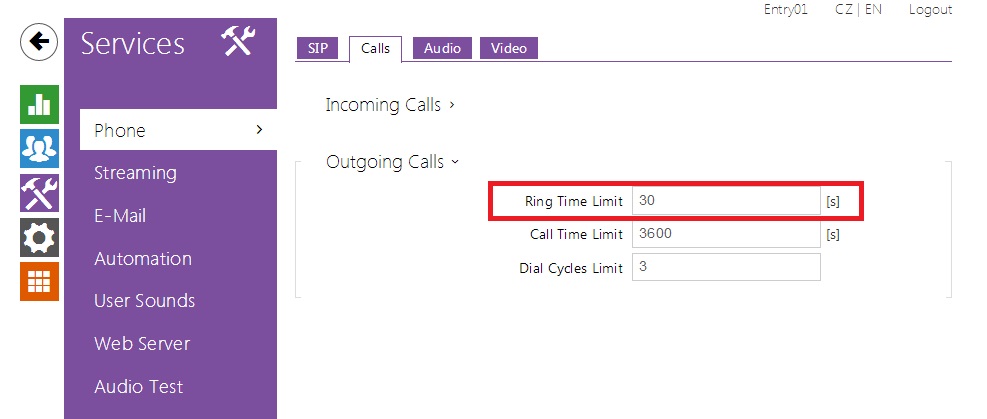
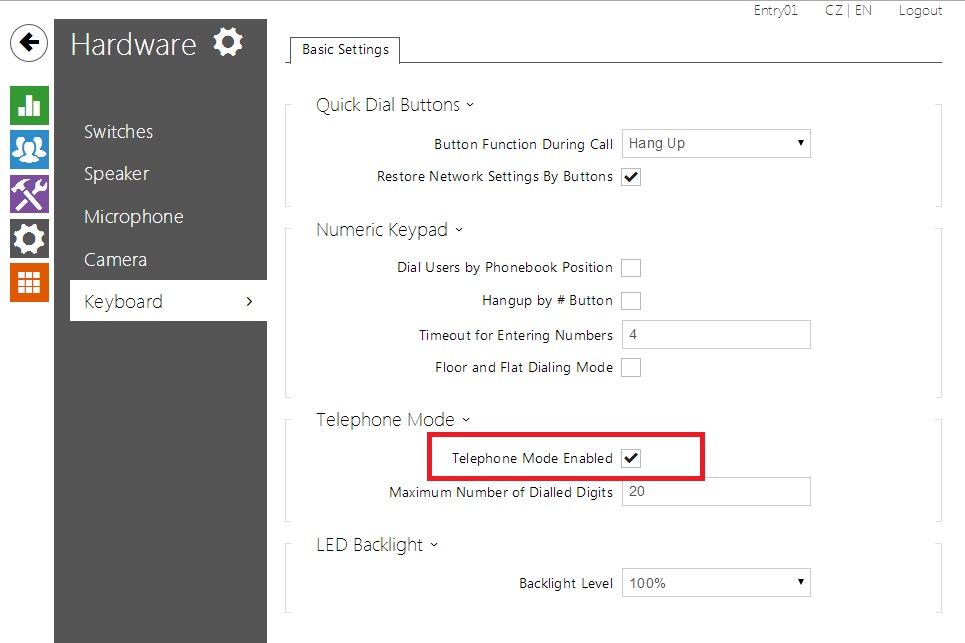
- Select Advanced Settings / Miscellaneous from the left menu. To allow 2N IP Intercom to ring all the users in the Sequential Hunt Group, configure the Ring time limit with a value that is equal to or greater than the No Answer Time (secs) value multiplied by the number of users in the list created in Section Configure Sequential Hunt group. Optionally set Enable telephone mode to Yes to allow 2N IP Intercom to call any number using the keypad.
 |
 |
Verification steps
- This section provides the tests that can be performed to verify correct configuration of IP Office and 2N IP Intercom.
Verify Avaya IP Office
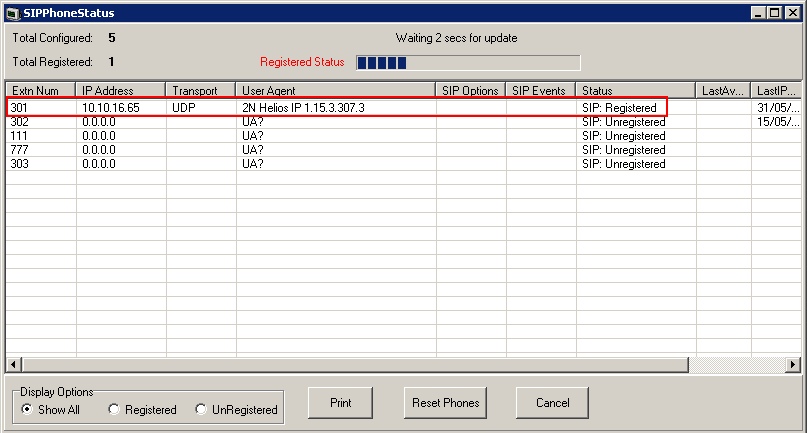
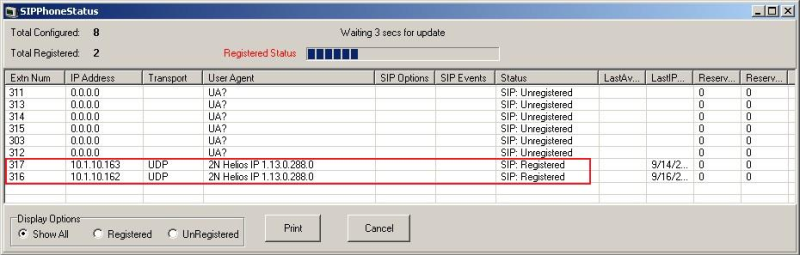
- From a PC running the IP Office Manager select Start / Programs / IP Office / Monitor to launch the Monitor application. Choose the Status menu and select SIP Phone Status (not shown). This will display a table of the SIP phones and indicate those registered. Verify that 2N IP Intercom endpoints are successfully registered as shown below.
 |
Verify 2N 2N IP Intercom
From the 2N 2N IP Intercom web interface, select Information from the left menu. Verify that the Registration state shows Registered. Place a call to another phone on the IP Office to verify basic call operation.
Version 7.0
Tested with
Avaya Aura Platform | 2N IP Intercom | Registrations | Calls |
|---|---|---|---|
| 7.0 | 2.8.0.17.2 |
Settings
Configure Avaya IP Office
The configuration changes in this cestion for IP Office are performed through the IP Office Manager. Except where stated, the parameters in all steps are the default settings and are supplied for reference.
The procedures fall into the following areas:
- Verify Avaya IP Office Licensing
- Setting LAN Parameters
- Administer SIP Registrar
- Add SIP Extensions
- Add Users
- Configure Sequential Hunt Group
- Save Configuration
Verify Avaya IP Office Licensing
- Log into the Avaya IP Office Manager PC and select Start > All Programs > IP Office > Manager to launch the Avaya IP Office Manager application. Select File > Open Configuration to search for IP Offices in the network. Select the appropriate Avaya IP Office and click OK(not shown). Log into the Avaya IP Office Manager application using the appropriate credentials.
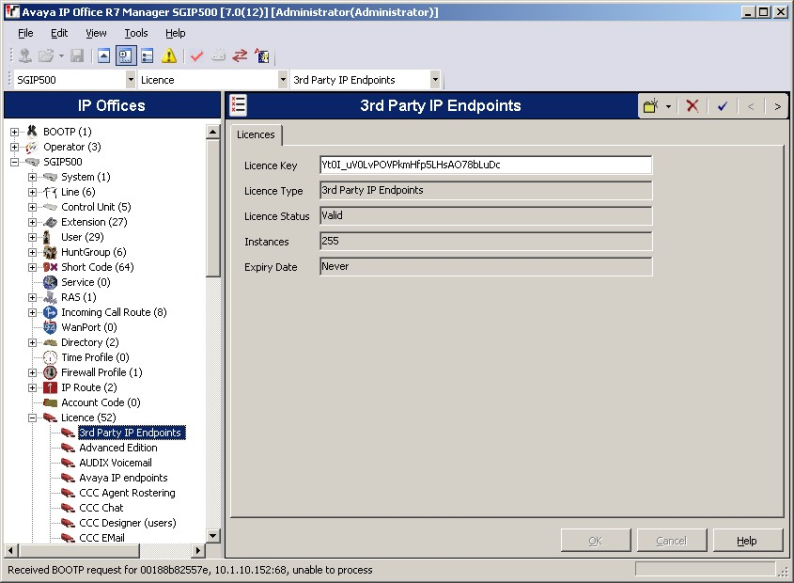
- The main IP Office Manager window appears. From the configuration tree in the left panel, select License > 3rd Party IP Endpoints to display the 3rd Party IP Endpoints screen in the right panel. Verify that the License Status is Valid and the value for Instances is sufficient for the number of SIP endpoints to be deployed.
 |
Setting LAN Parameters
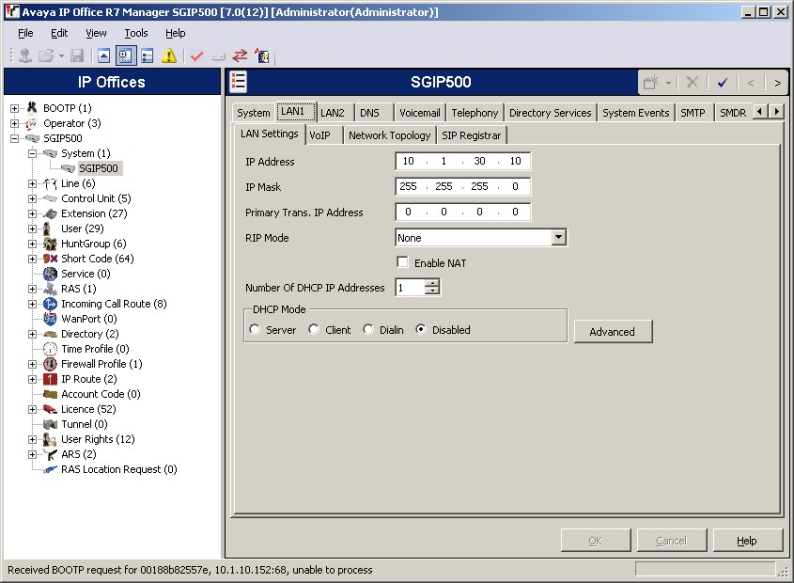
- From the configuration tree in the left pane select System. Access the tab LAN1 > LAN Settings to display the LAN Settings screen in the right pane.
- Set the IP Address which will be the address of the IP Office.
- Set the IP Mask based on the network setup.
- Set the DHCP Mode based on the network requirement. In this case the Disabled option is chosen since DHCP has not been used.
- Other fields can be left blank or in the default settings.
 |
Administer SIP Registrar
- Select SIP Registrar sub-tab in the right pane and enter the following values:
- Domain Name: Enter a valid Domain Name. In this case it was left blank as registration is done using the IP address of the LAN1 interface.
- Layer 4 Protocol: Select Both TCP&UDP.
- TCP Port: Set to 5060(default).
- UDP Port: Set to 5060(default).
 |
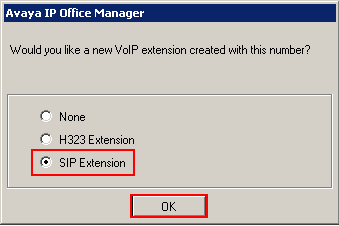
Add SIP Extensions
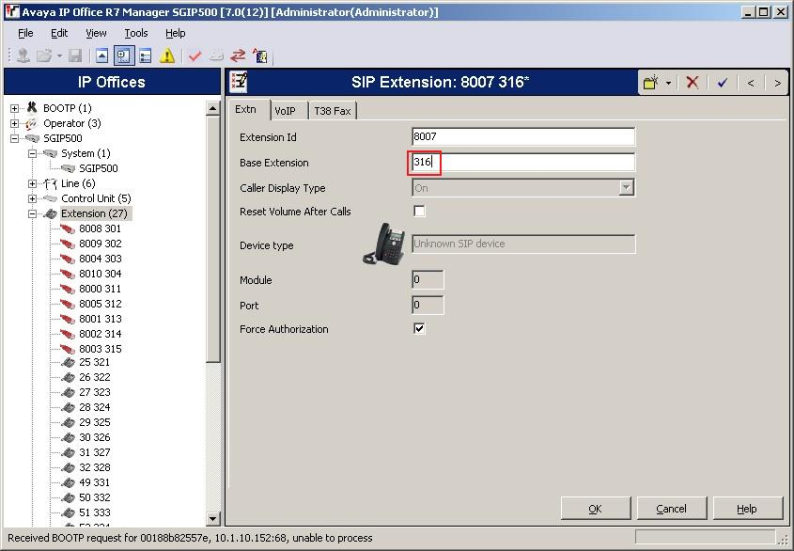
Add a SIP Extension by selecting Extension from the left pane. Right--click and select New > SIP Extension(not shown). In the Extn tab, set the Base Extension to an unused extension, in this case, 316.
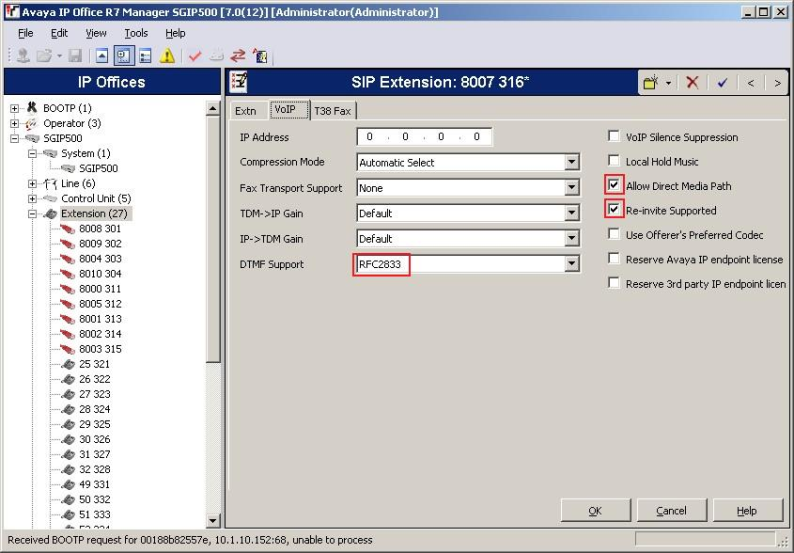
Select the VoIP tab. Verify that Allow Direct Media Path and Re-invite Supported are checked. Select RFC2833 for DTMF Support.
Repeat Steps 1 and 2 in order to create more SIP extensions. In this testing extensions 316 to 317 are created.
Add Users
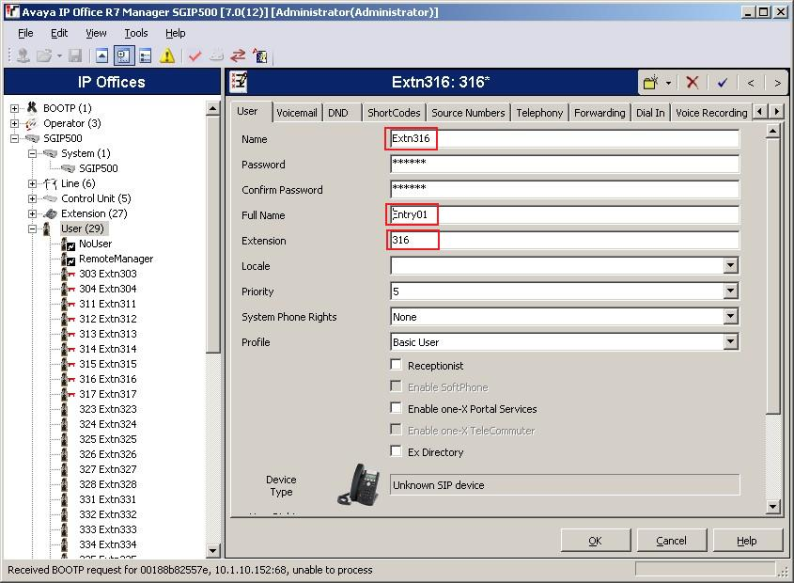
Add a User by right-click User from the left pane and select New(not shown). For the Name field enter the extension that was created in Section Add SIP Extensions and precede it with Extn, for example, Extn316. For the Full Name field, enter a descriptive name for the user, for example, Entry01. Enter the extension created in Section Add SIP Extensions for Extension.
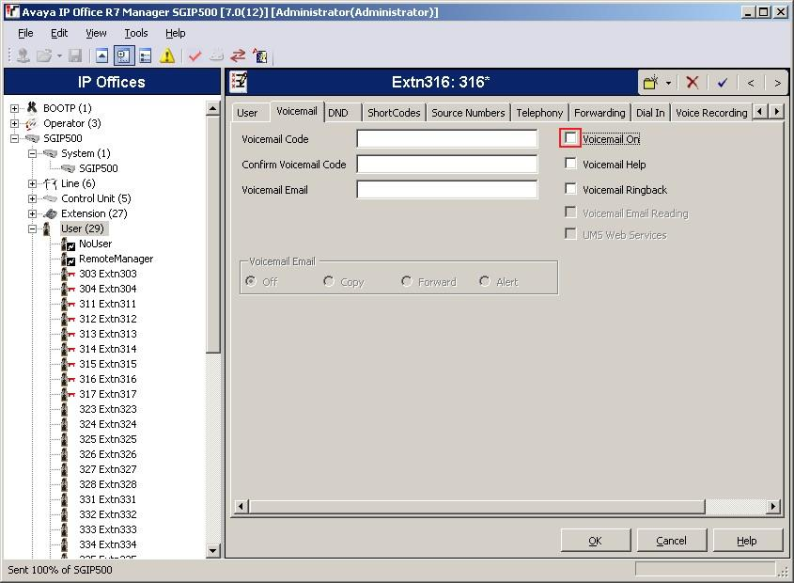
Select the Voicemail tab, and uncheck the Voicemail On field.
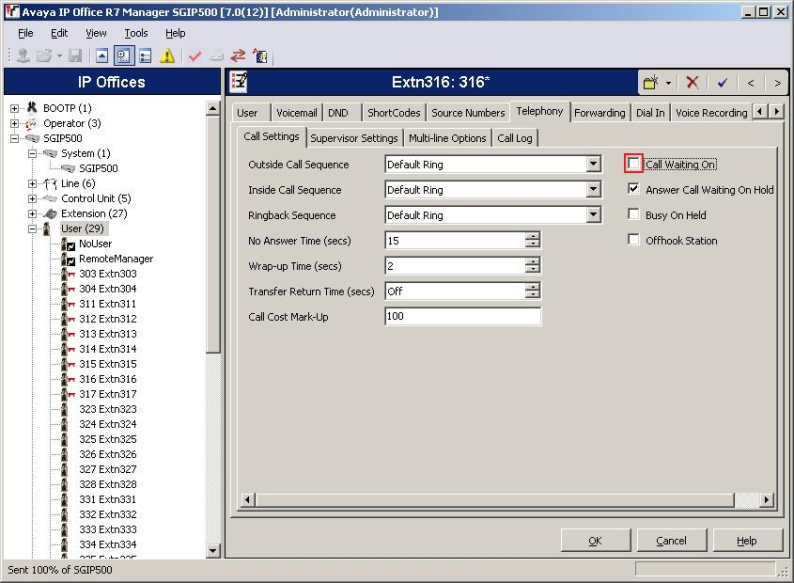
Select the Telephony > Call Settings tab and uncheck the Call Waiting On field.
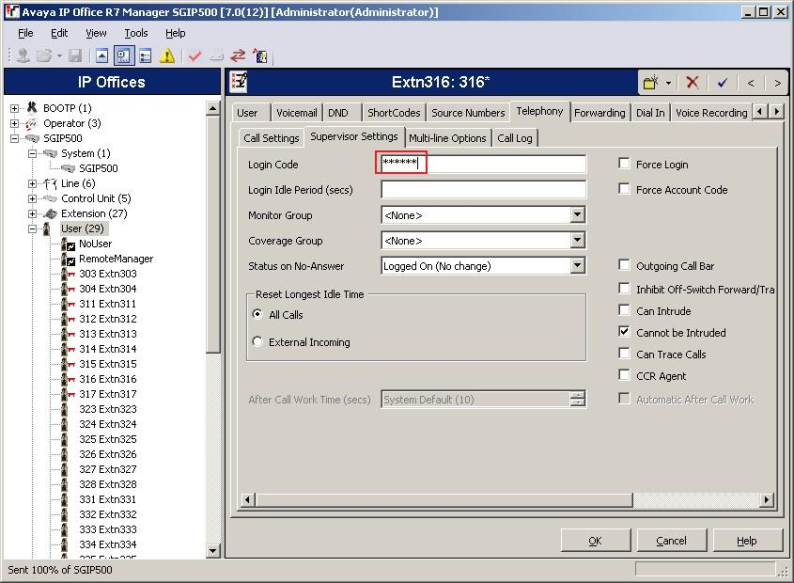
Select the Telephony > Supervisor Settings tab. Enter a Login Code, e.g. 111222 was used for compliance testing. The Login Code is used to configure 2N IP Intercom to log into the IP Office.
 |
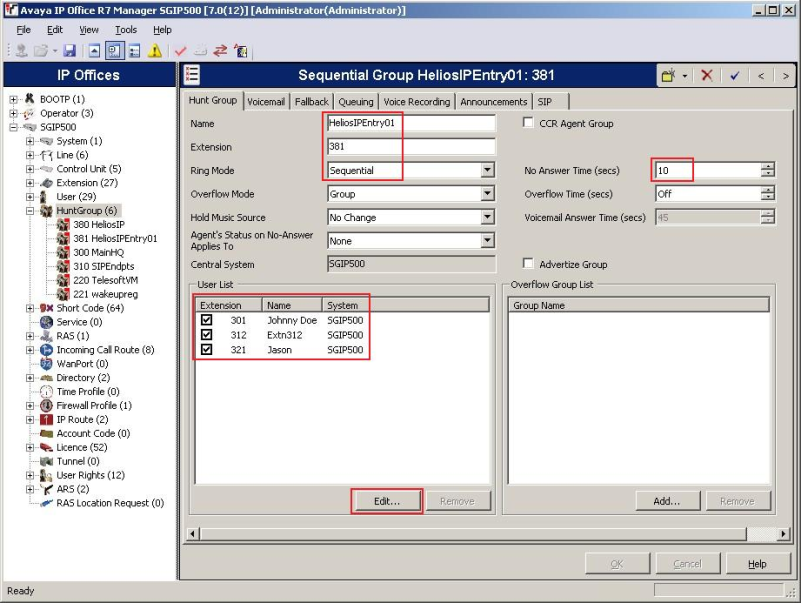
Configure Sequential Hunt Group
- Add a Sequential Hunt Group by right-click HuntGroup from the left pane and select New (not shown). For the Name field enter a descriptive name for the hunt group. Set the Extension field to an unused extension, in this case 381, and set Ring Mode to Sequential. For the No Answer Time(secs) field set the number of seconds before the call is passed to the next extension in the list, in this case, 10. Click Edit to configure the list of extensions.
 |
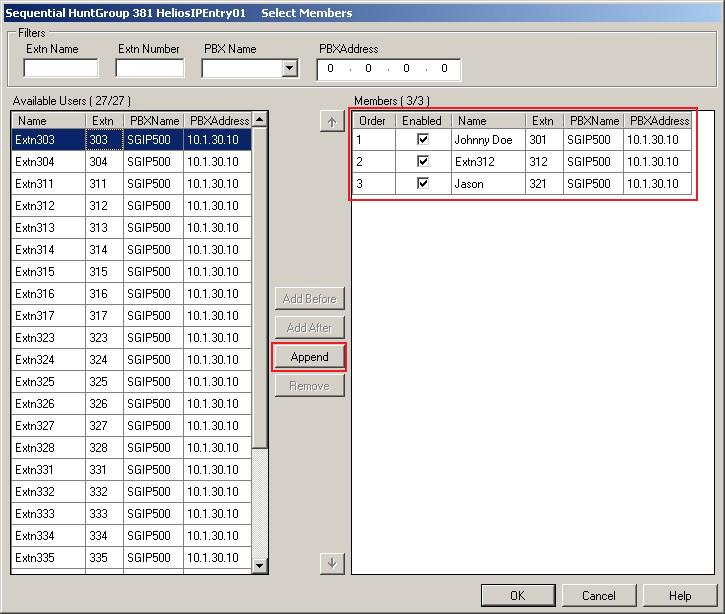 |
Save Configuration
Select File > Save Configuration to save and send the configuration to the IP Office server.
Configure 2N IP Intercom
The following steps show in the detail the 2N IP Intercom when using the Web Interface. The steps include the following areas:
- Launch Web Interface
- Administer SIP Settings
- Administer identity
- Administer function keys
The factory default settings for DHCP is On.
Launch Web Interface
- Access the 2N IP Intercom web interface http://<ipaddress> in an Internet browser window where <ipaddress> is the IP address of 2N IP Intercom. Log in with the appropriate credentials. The 2N IP Intercom Information screen is shown.
Administer SIP Settings
Select Advanced Settings > SIP Settings from the left menu. In the User Settings section configure the following:
- Display name: Enter the desired name.
- User ID: Enter the user extension from Section Add User Step 1.
- Domain: Enter the IP address of Avaya IP Office from Section Step 1.
- User auth ID: Select No.
- Password: Enter the Login Code from Section Add User Step 4.
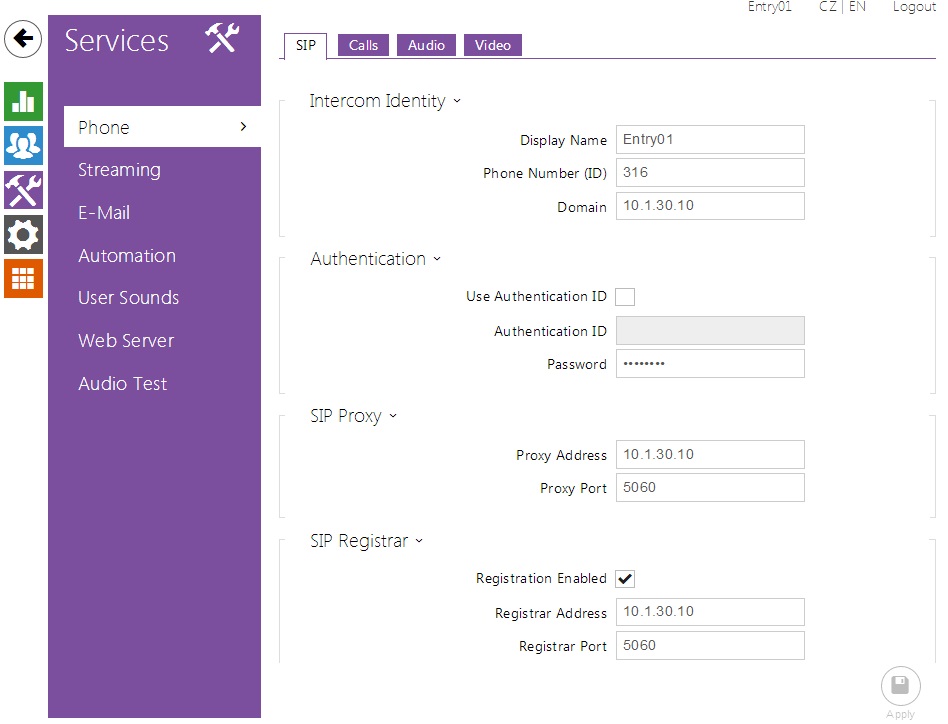 |
- Proxy address: Enter the IP address of Avaya IP Office from Section Setting LAN Parameters Step 1
- Proxy port: Enter 5060(default).
In the SIP registration section configure the following:
- Register 2N IP Intercom: Select Yes.
- Registration expires: Enter the number of seconds for 2N IP Intercom to re-register, e.g. 300 secs were used.
- Registrar address: Enter the IP address of Avaya IP Office from Section Setting LAN Parameters Step 1
- Registrar port: Enter 5060(default).
Retain the default values for the remaining fields.
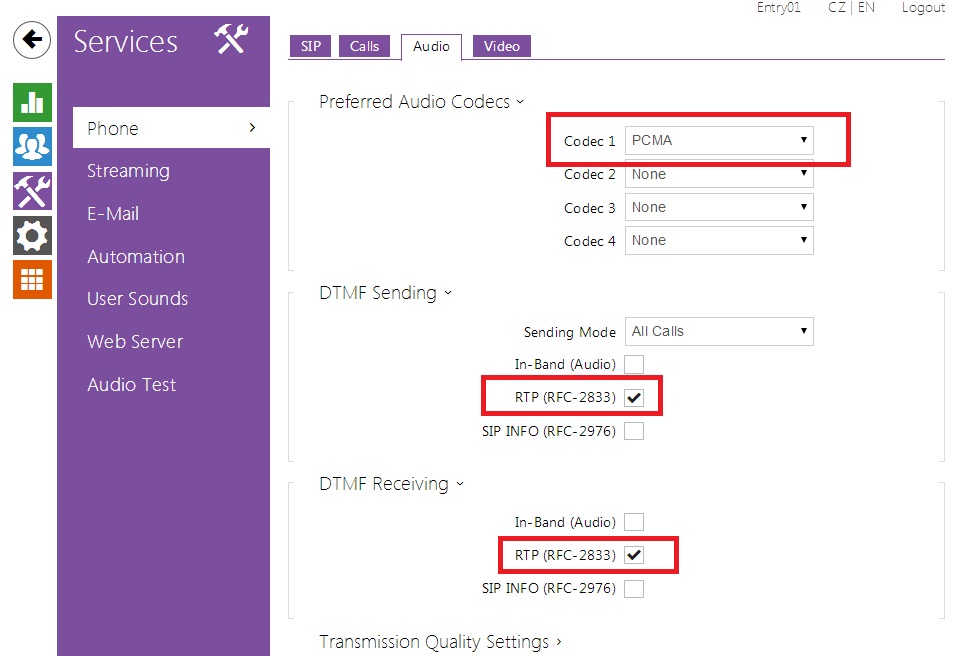
Administer Codecs
- Select Advanced Settings > Audio Codecs from the left menu to configure the audio codecs. In the Preferred audio codecs section enable and prioritize the codecs as per requirement. To enable DTMF using RFC2833, set Receive via RTP and Send via RTP to Yes.
 |
 |
Configure Quick Dialing Buttons
Select Basic Settings > Phone Book from the left menu and select one of the positions (e.g. 1 to 10 as shown below) to configure it. The position number corresponds to the Quick Dialing Button on the 2N IP Intercom. For example, the following shows the configuration for Position 1.
- Position enabled: Select Yes.
- Position name: Enter a descriptive name.
- Number 1: Enter the number to call when the button is pressed, for example calling the Sequential Hunt Group created in Section Configure Sequential Hunt Group.
- Station name: Optionally, enter the IP address of a PC to receive video streaming from the 2N IP Intercom camera using the 2N® IP Eye application when the call is made. This is useful when the receiving phones do not support video.
 |
Configure Miscellaneous Settings
Select Advanced Settings > Miscellaneous from the left menu. To allow 2N IP Intercom to ring all the users in the Sequential Hunt Group, configure the Ring time limit with a value that equals to the same or greater than the No Answer Time(secs) value multiplied by the umber of users in the list created in Section Configure Sequential Hunt Group. Optionally, set Enable telephone mode to Yes to allow 2N IP Intercom to call any number using the keypad.
 |
 |
Verification Steps
This section provides the tests that can be performed to verify correct configuration of Avaya IP Office and 2N IP Intercom.
Verify Avaya IP Office
From a PC running the Avaya IP Office Manager select Start > Programs > IP Office > Monitor to launch the Monitor application. Choose the Status menu and select SIP Phone Status (not shown). This will display a table of the SIP phones and indicate those registered. Verify that 2N IP Intercom endpoints are successfully registered as shown below.
 |
Verify 2N 2N IP Intercom
From the 2N2N IP Intercom web interface select Information from the left menu. Verify that the Registration state shows Registered. Place a call to another phone on the Avaya IP Office to verify basic call operation.
Used Symbols
![]() - Verified with video
- Verified with video
![]() - Verified with audio only
- Verified with audio only
![]() - Work with limitation
- Work with limitation
![]() - Incompatible
- Incompatible