exacqVision
Content
About
exacqVision software is based on a client/server architecture in which every computer is a client, server, or client/server combination. These configurations are defined as follows: A client computer provides access to a remote service on another computer over a TCP/IP network. The exacqVision Client software is a thick client, and the web browser is a thin client. A server computer provides services to client computers over the TCP/IP network. An exacqVision server receives and stores video from cameras; provides audio, video, and data as requested by thick clients; and hosts a web server (if enabled) for thin clients. The exacqVision Server software does not have a graphical user interface; only the client software allows interaction. A server can serve multiple simultaneous client connections, within hardware limitations. A client/server combination simultaneously operates client and server software. A loopback TCP/IP address of “localhost” (127.0.0.1) allows the client software to communicate with the server software on the same computer. exacqVision servers are configured at the factory as a client/server combination to provide a convenient initial configuration experience.
Version 21, 20
Tested Functions
| exacqVision | 2N IP Intercom Version | Scan device | Video from 2N IP Intercom | Audio from 2N IP Intercom | Audio to 2N IP Intercom | Switch control | Events from 2N IP Intercom |
|---|---|---|---|---|---|---|---|
| 2.46 | |||||||
| 2.43 | |||||||
| 23.06.2.0 | 2.39.2.51.6 and higher | ||||||
20.12.106.0 | 2.30.2.39.7 | N/S |
2N IP Intercom Settings
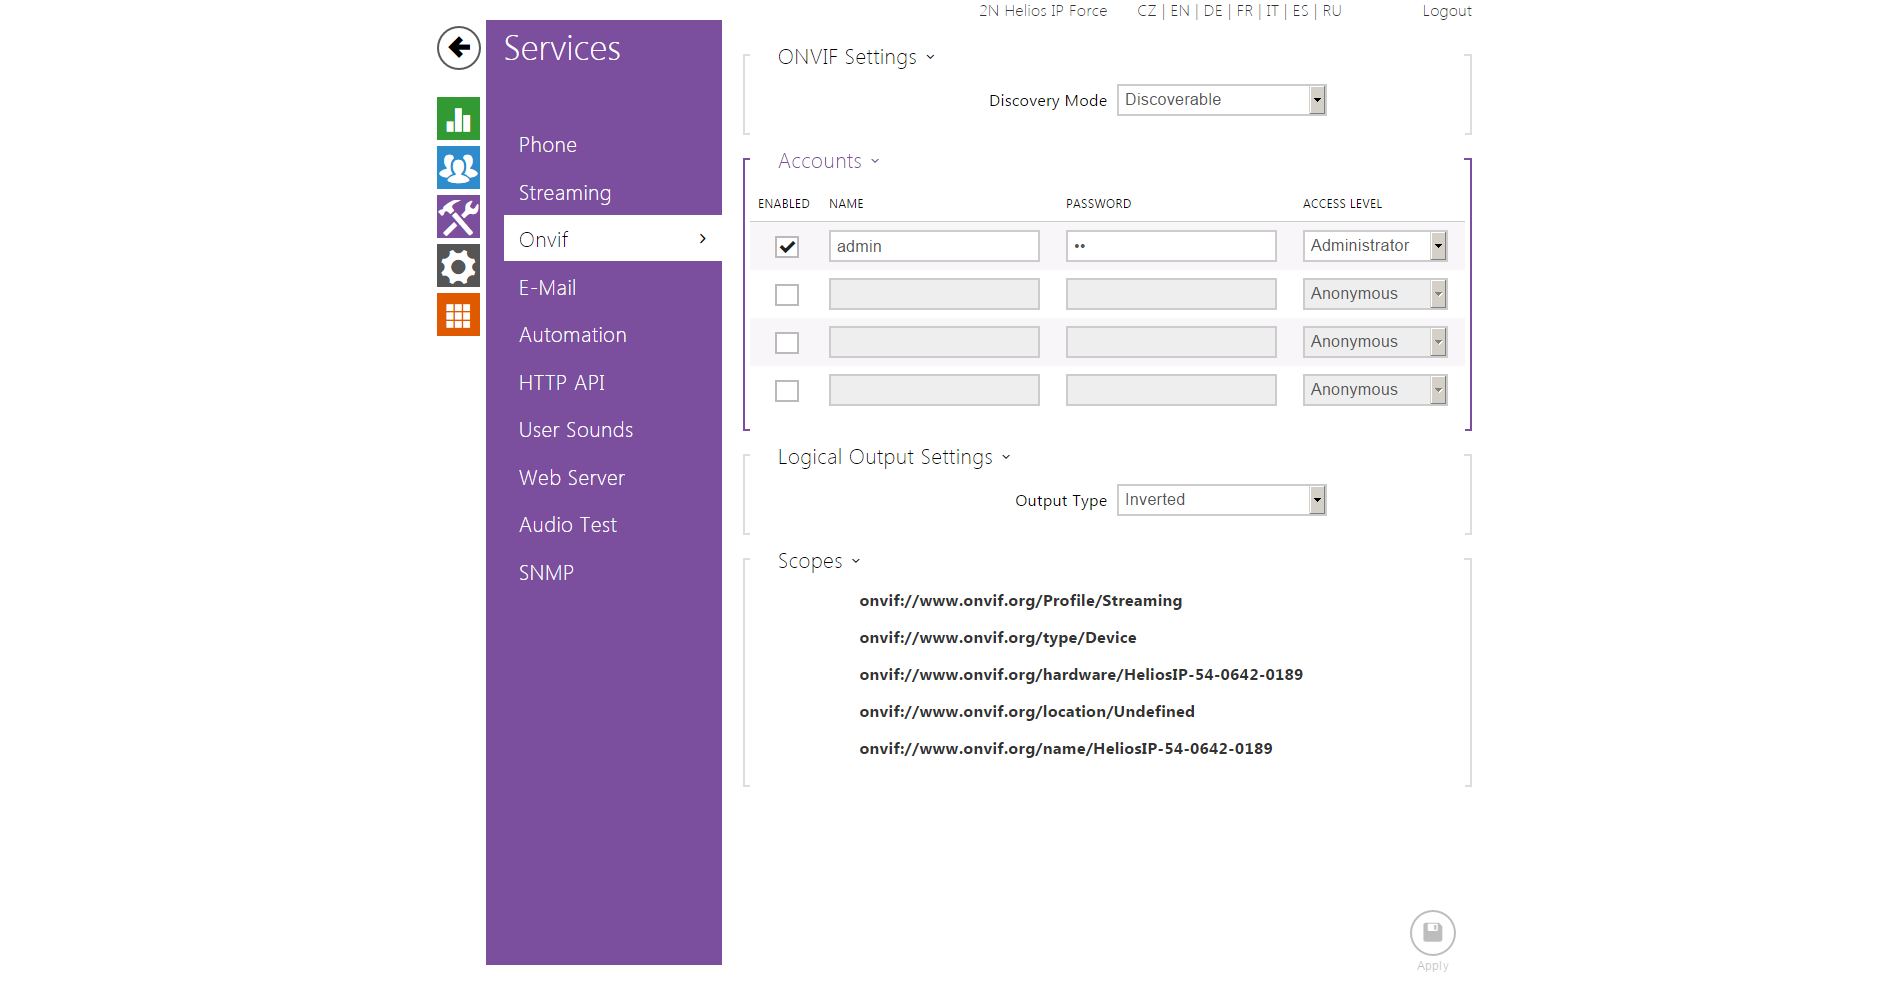
Set ONVIF Service (Enhanced Video license required) to Discoverable mode. Default ONVIF user has username "admin" and password "2n".
 |
Enable Streaming service. Make sure you have enabled Audio Streaming if you want to stream audio too.
 |
 |
 |
Tested Features
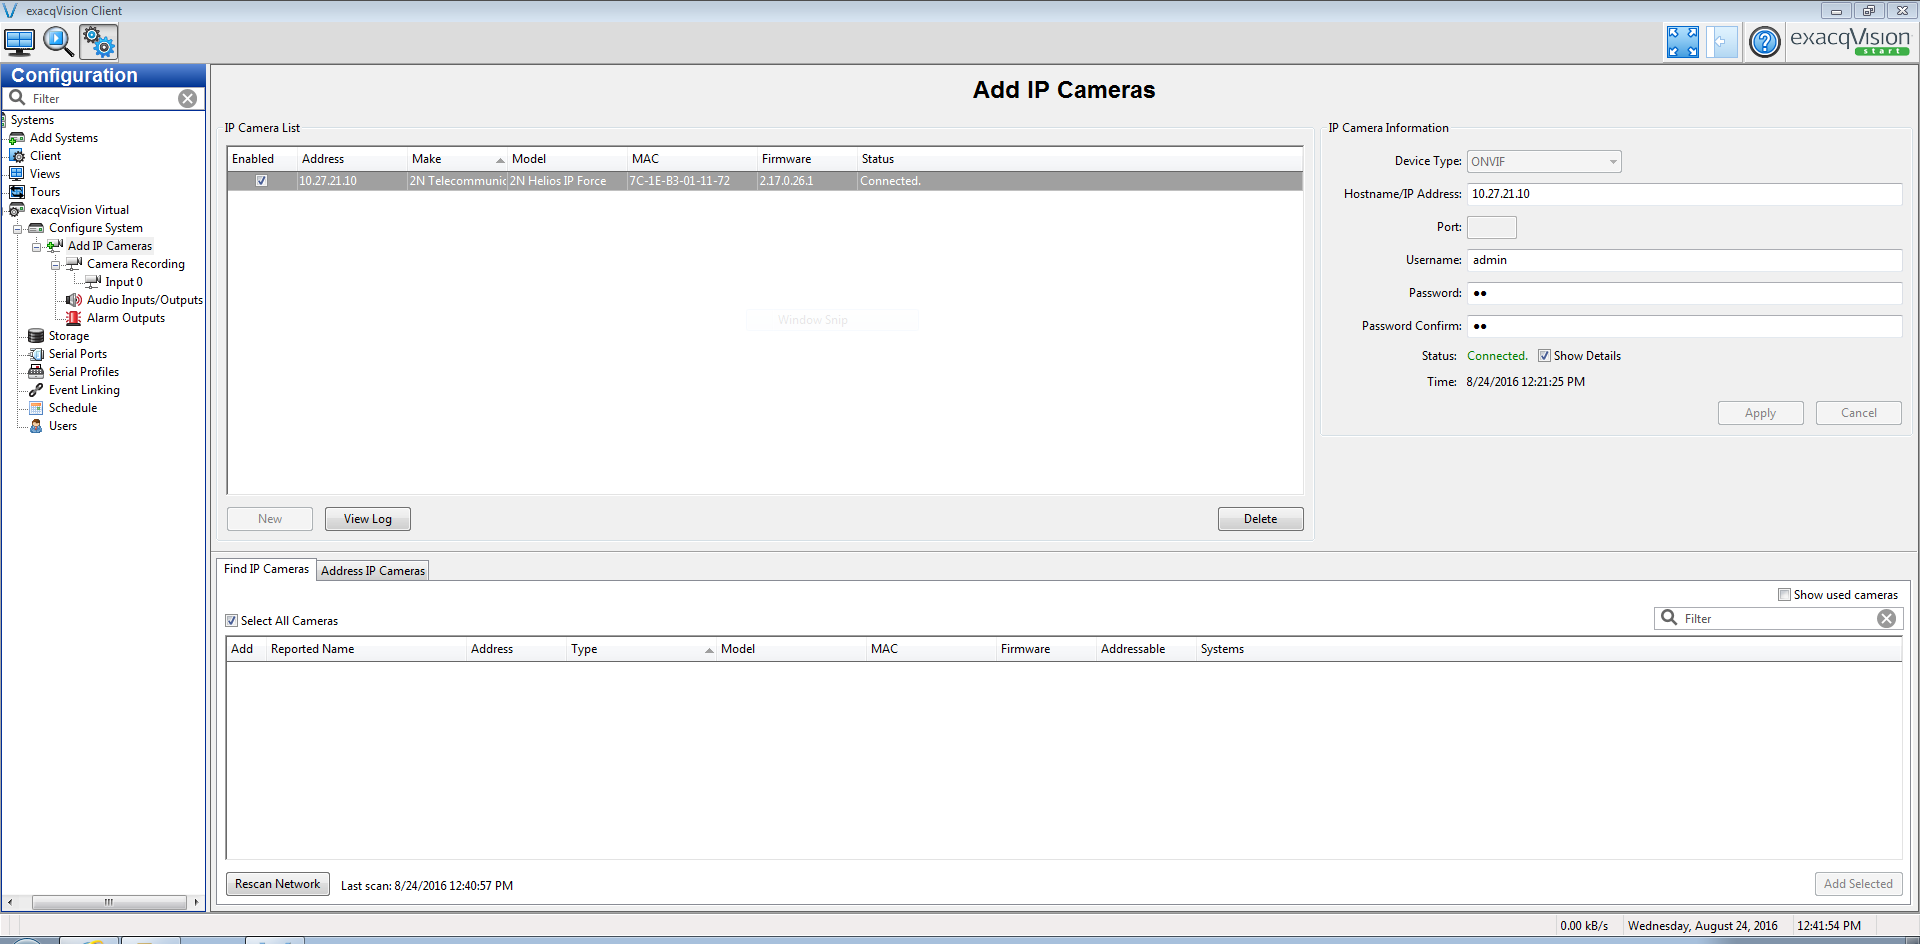
After first login to the server you will be prompted to add the cameras. You can scan your network for the 2N IP Intercoms or you can add them manually. To access the intercoms from exacqVision client use the credentials you set in the ONVIF service configuration.
|
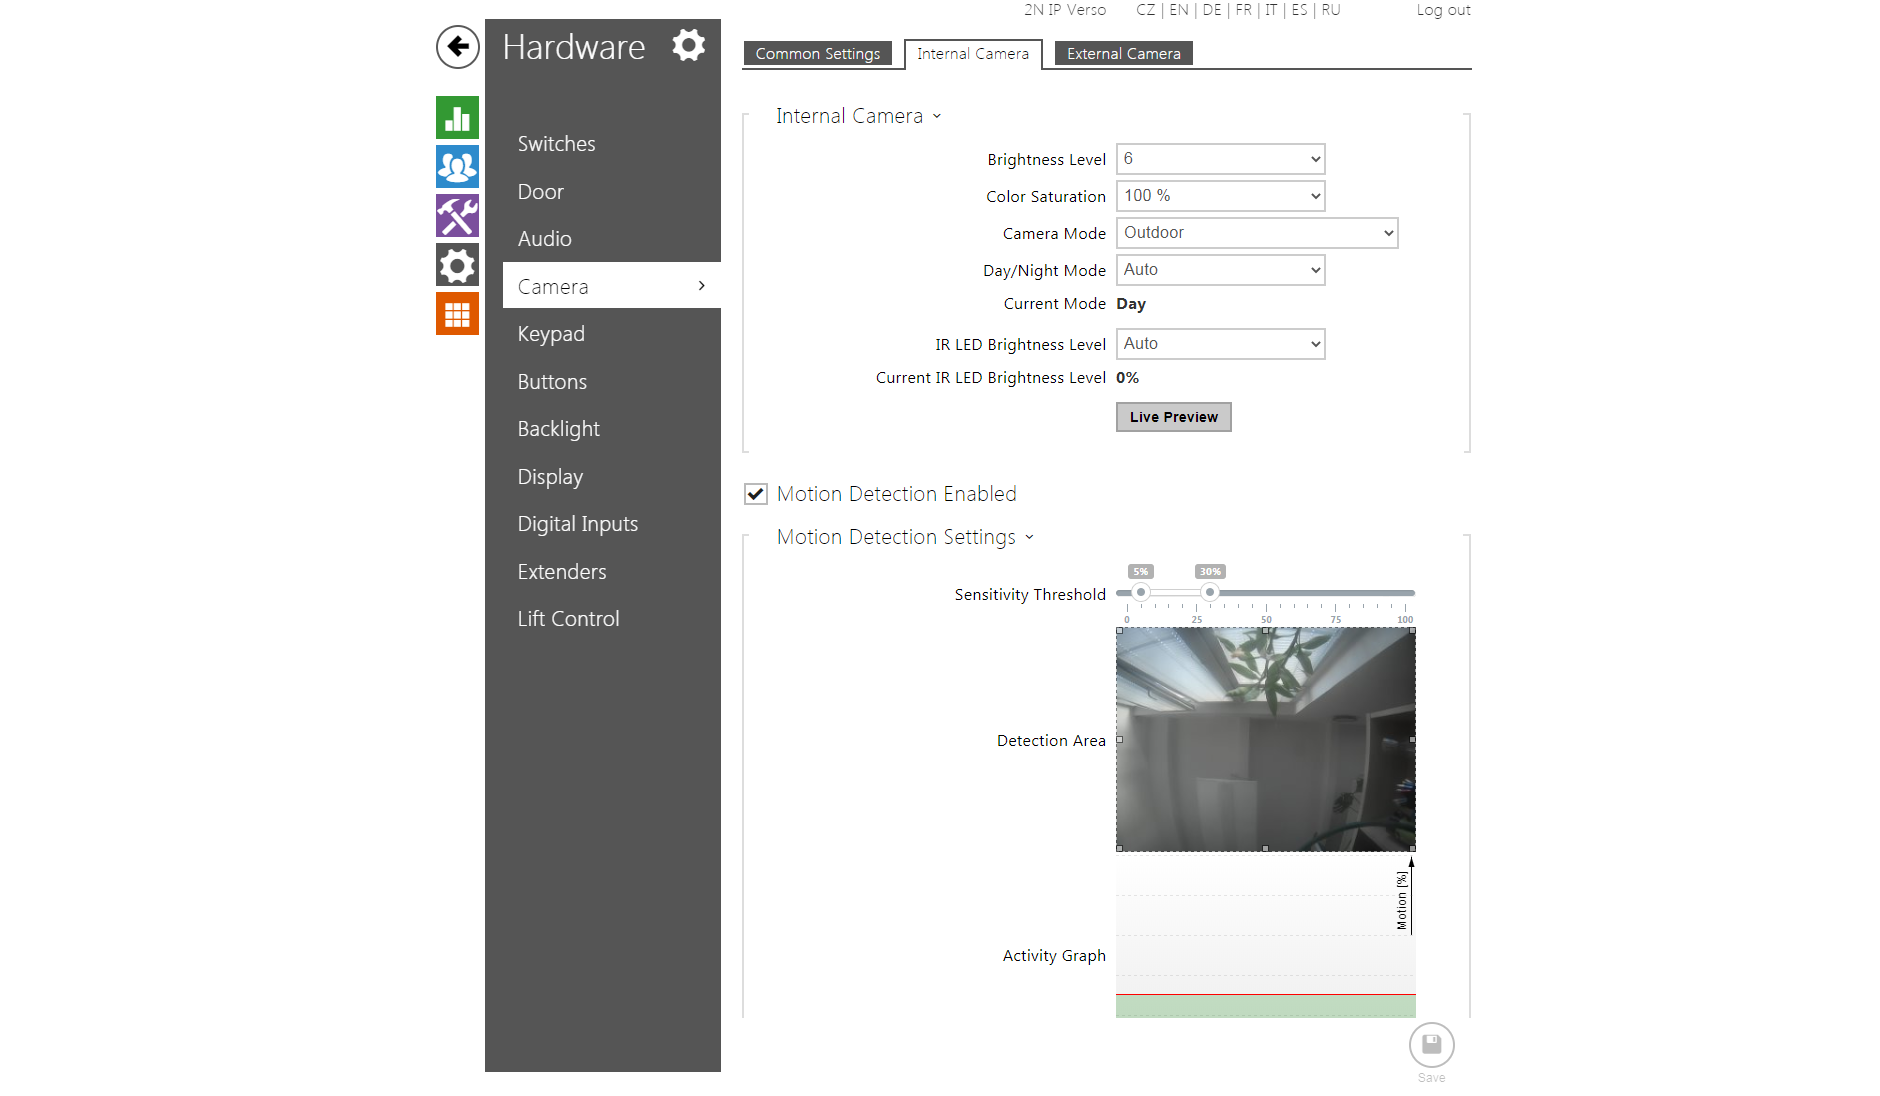
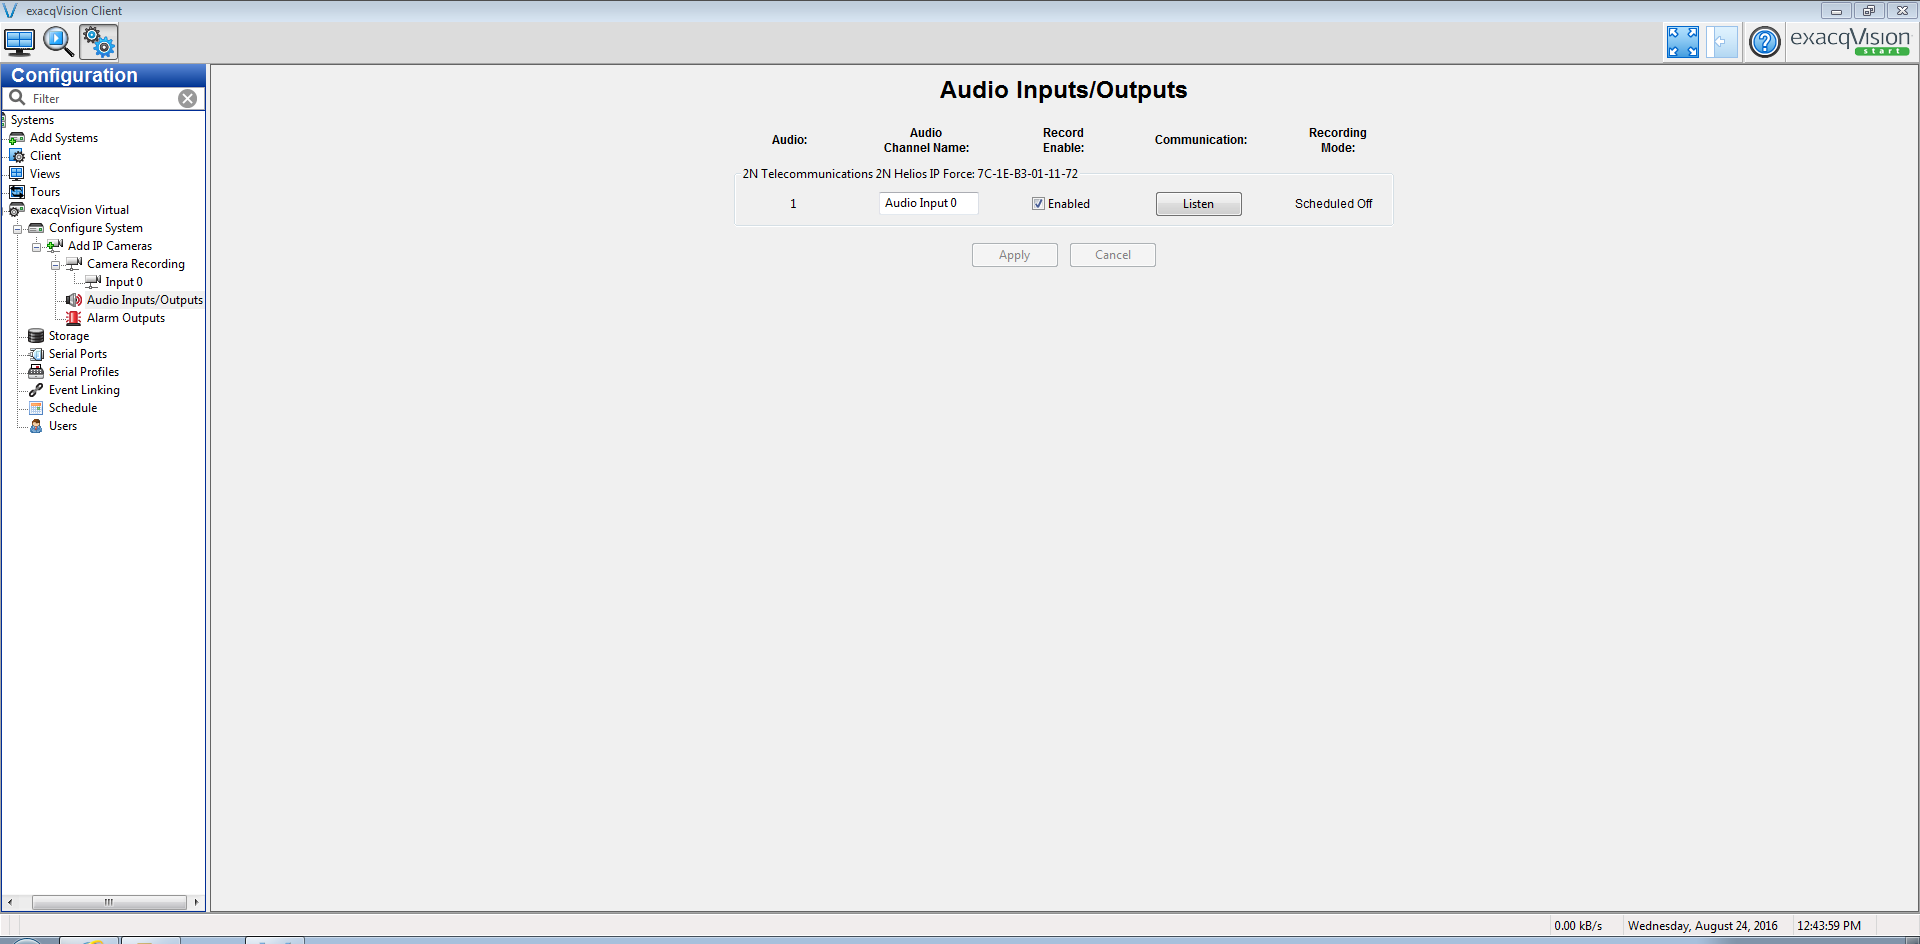
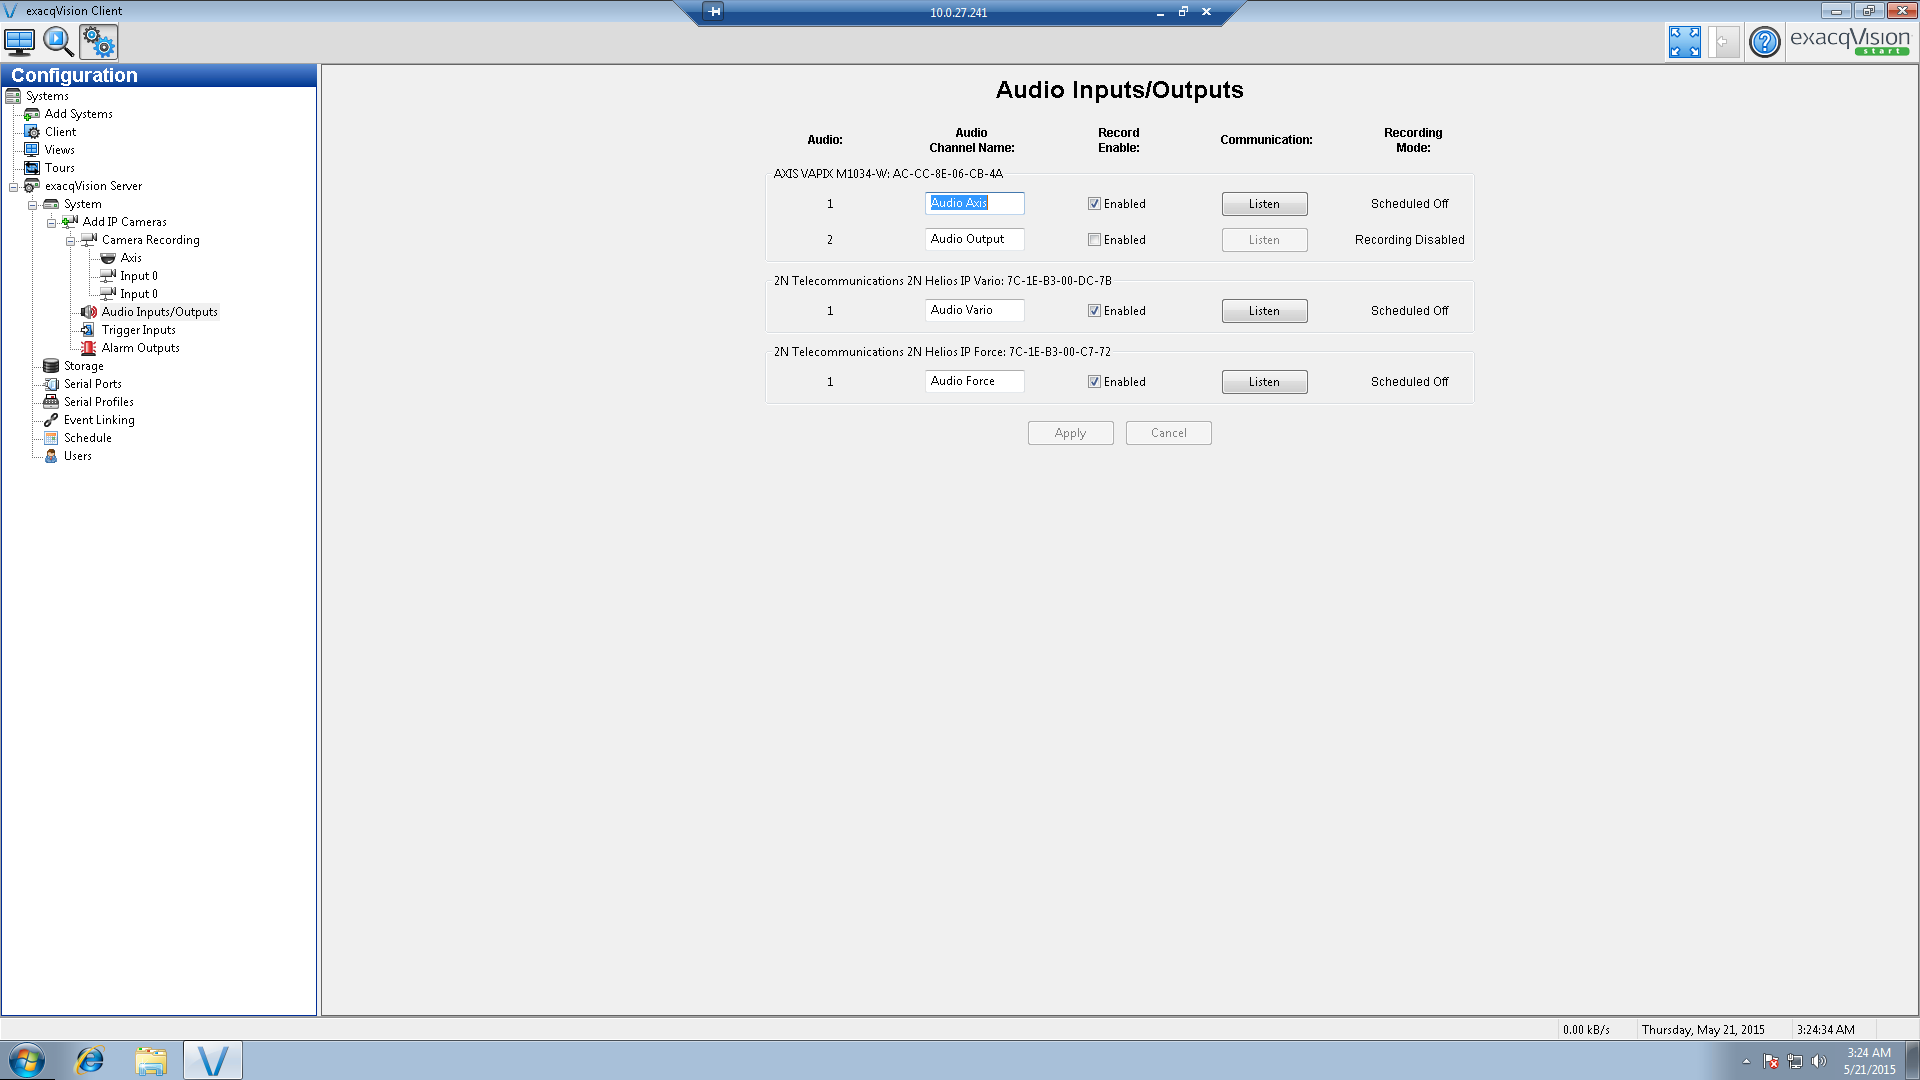
Enable the audio in the Audio Inputs/Outputs section. You can then listen to the audio from the intercom in the Live View.
 |
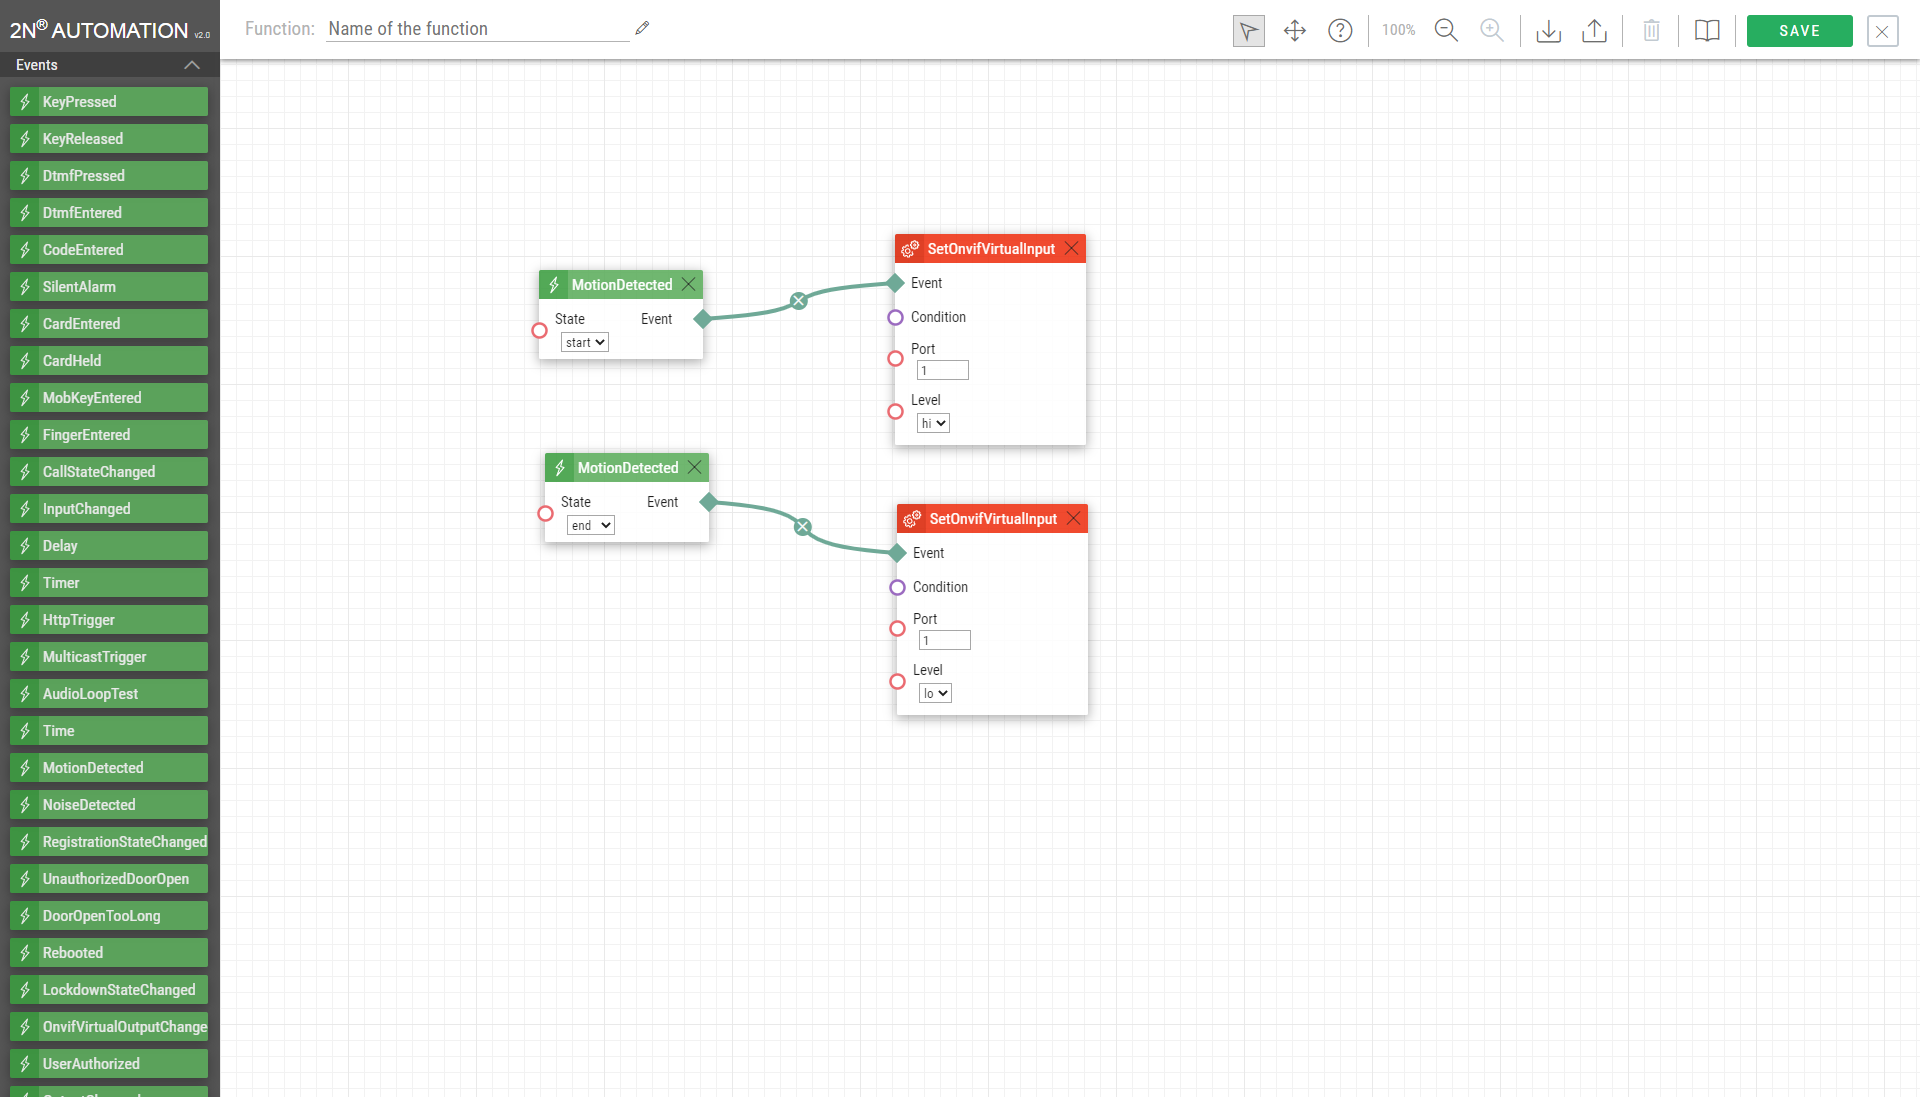
To enable Door lock control you need to create new Event Linking Entry. As Event Type select Soft Trigger, which can be triggered from the client itself. Then select Output Trigger as an Action Type and desired 2N IP intercom output as an Action Target. Initially all 2N IP Intercom outputs have same names in the client sou you have to determine which are outputs and which are relays.
|
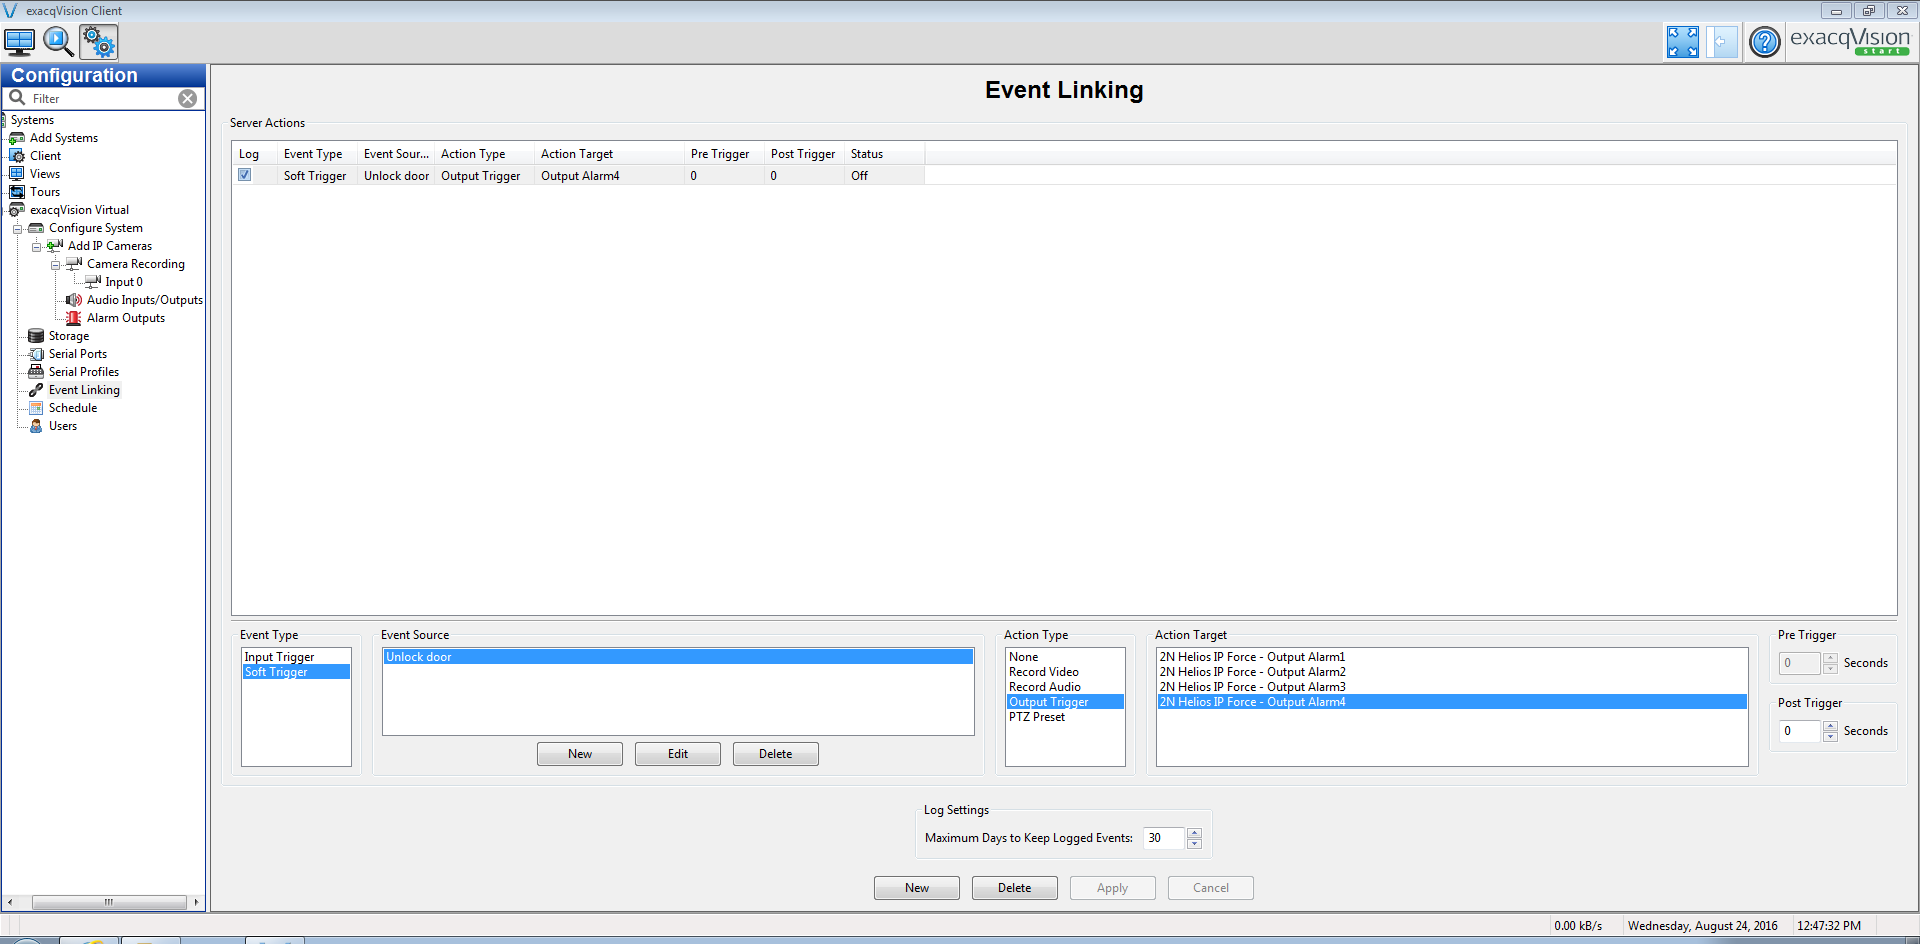
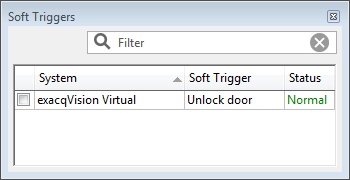
After Event Linking is defined you can control the 2N IP Intercom output or relay from the Live View. To open the trigger selection click following icon ![]() . To open the lock tick the checkbox on the left hand side of the trigger entry. To close the lock untick the checkbox.
. To open the lock tick the checkbox on the left hand side of the trigger entry. To close the lock untick the checkbox.
 |
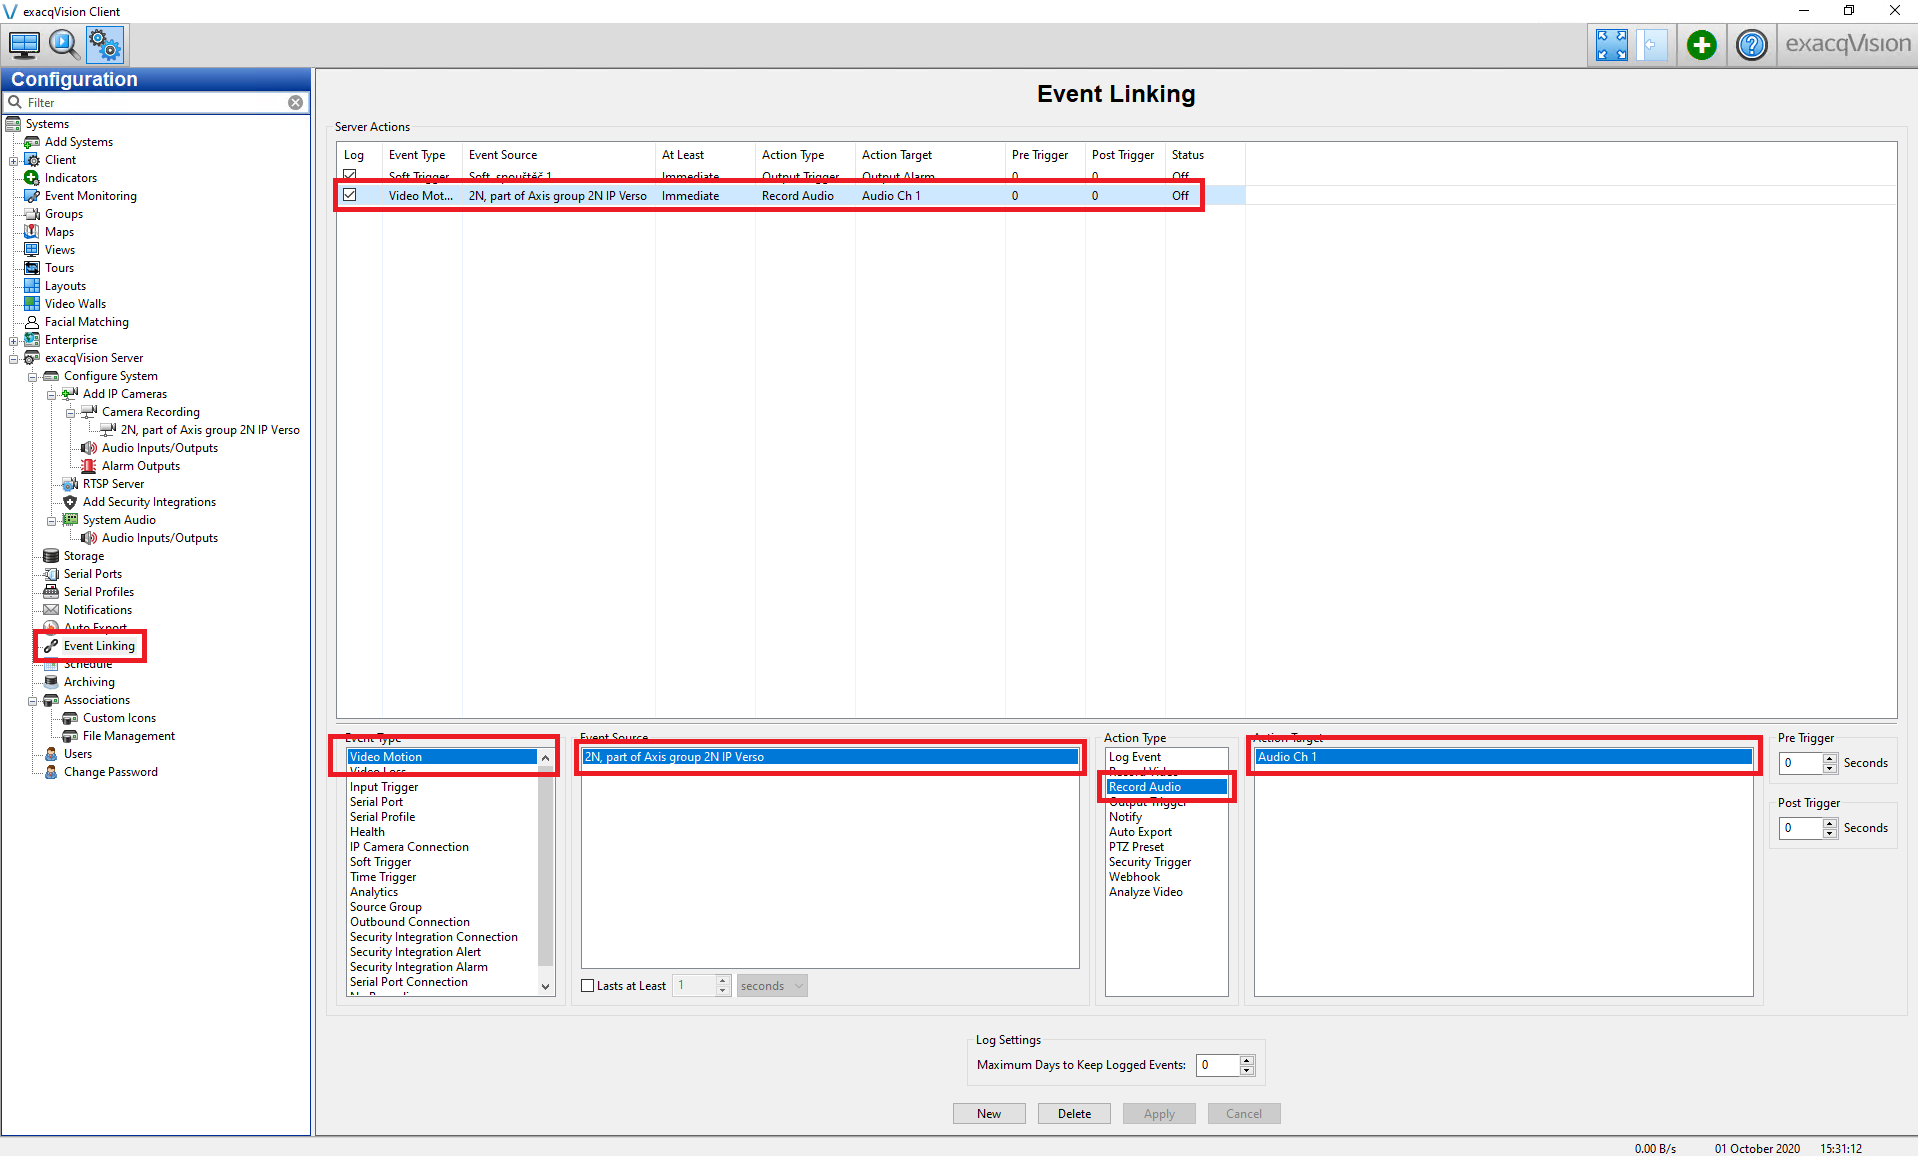
Before to set events from IP intercom, please download this file and replace the existing C:\Program Files\exacqVision\Server\onvifnvcpi.json on the Exacq server.
To allow events from IP intercom you need to create new Event Linking. As Event Source select Video Motion. Then select Record Audio as an Action Type and Audio CH 1 as an Action Target.
|
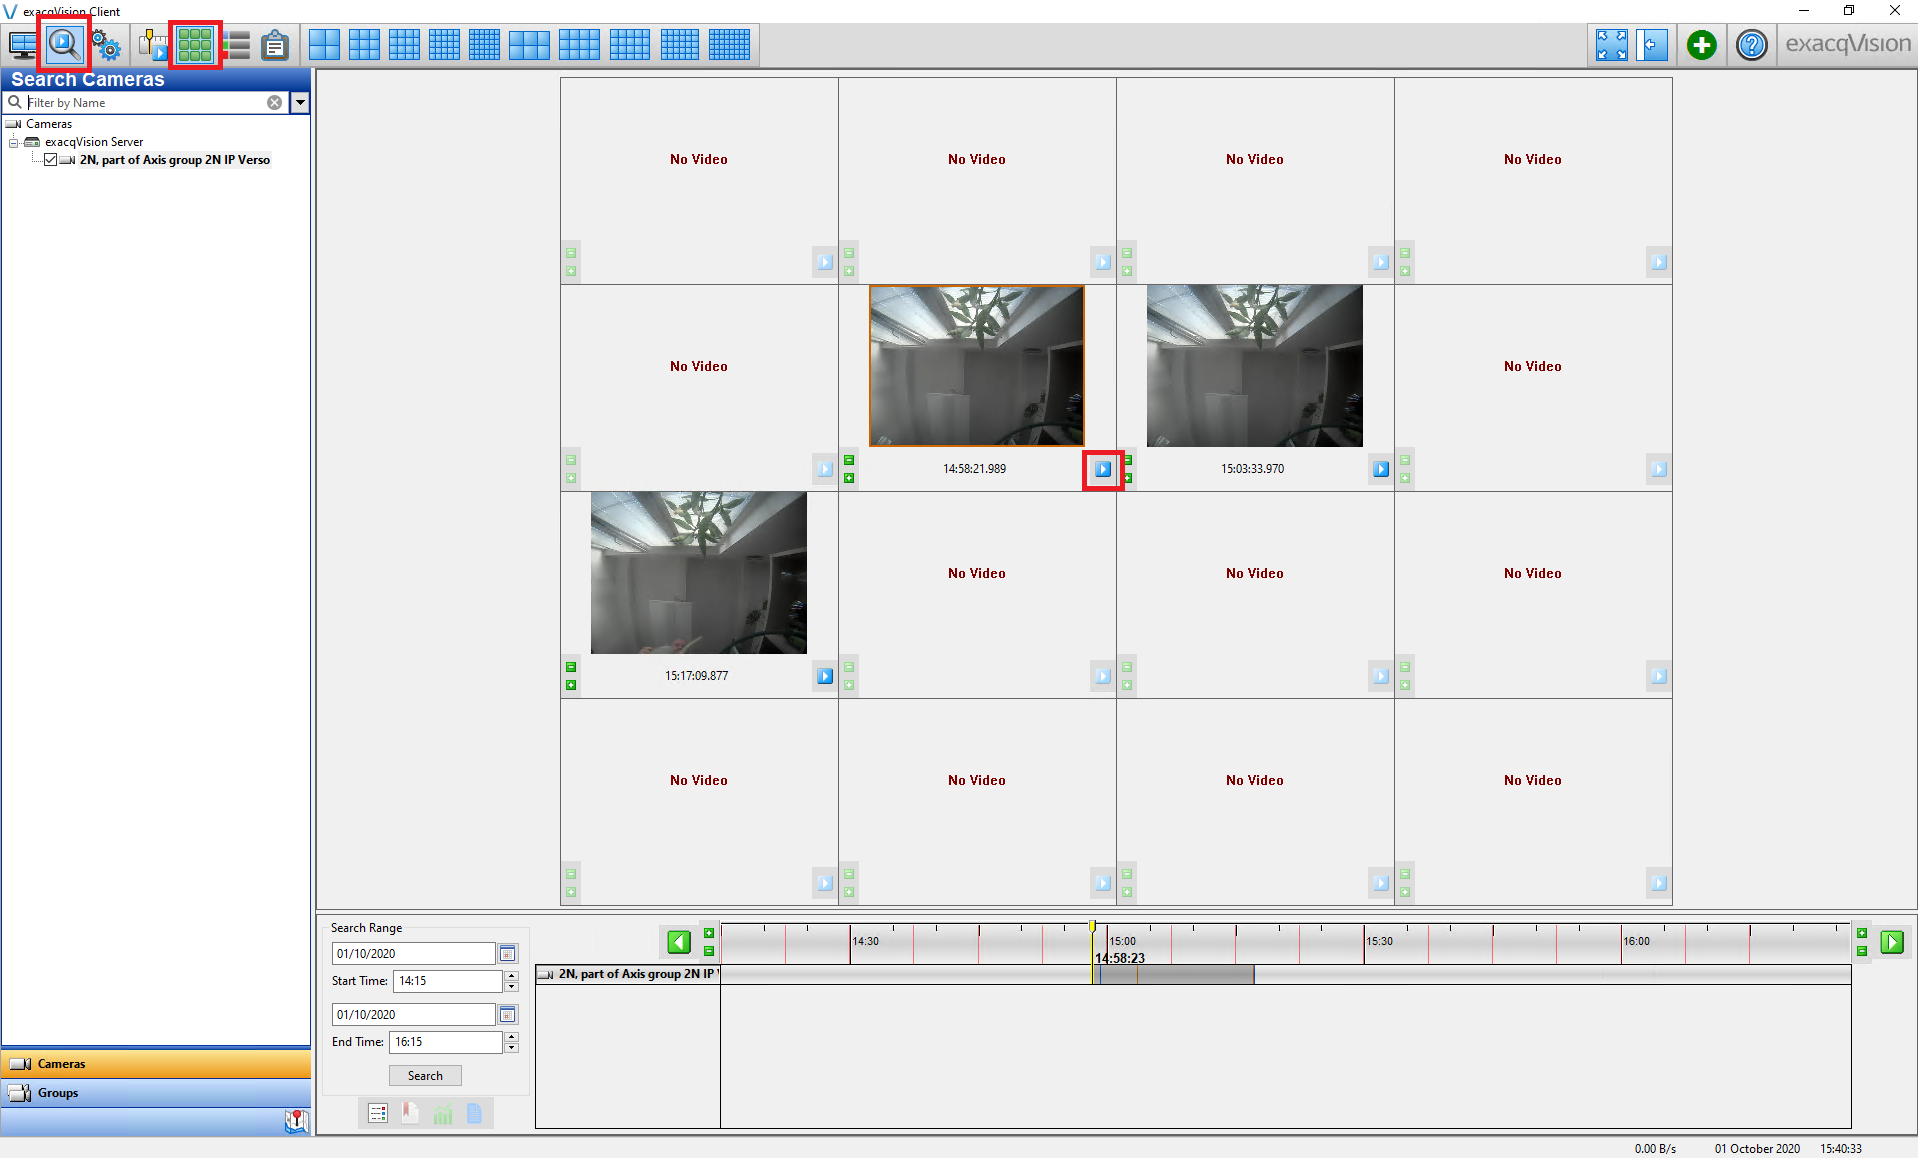
Now if somebody move in front of IP intercom, exacq system records the event. In menu Search Page in exacq system you can play the event from camera. For example select Thumbnail Search Mode and you can choose your event and play it.
 |
Version 19
Tested Functions
| exacqVision | 2N IP Intercom Version | Scan device | Video from 2N IP Intercom | Audio from 2N IP Intercom | Audio to 2N IP Intercom | Switch control | Events from 2N IP Intercom |
|---|---|---|---|---|---|---|---|
19.09.4.0 | 2.28.0.37.5 |
2N IP Intercom Settings
Set ONVIF Service (Enhanced Video license required) to Discoverable mode. Default ONVIF user has username "admin" and password "2n".
|
Enable Streaming service. Make sure you have enabled Audio Streaming if you want to stream audio too.
|
Tested Features
After first login to the server you will be prompted to add the cameras. You can scan your network for the 2N IP Intercoms or you can add them manually. To access the intercoms from exacqVision client use the credentials you set in the ONVIF service configuration.
|
Enable the audio in the Audio Inputs/Outputs section. You can then listen to the audio from the intercom in the Live View.
|
To enable Door lock control you need to create new Event Linking Entry. As Event Type select Soft Trigger, which can be triggered from the client itself. Then select Output Trigger as an Action Type and desired 2N IP intercom output as an Action Target. Initially all 2N IP Intercom outputs have same names in the client sou you have to determine which are outputs and which are relays.
|
After Event Linking is defined you can control the 2N IP Intercom output or relay from the Live View. To open the trigger selection click following icon ![]() . To open the lock tick the checkbox on the left hand side of the trigger entry. To close the lock untick the checkbox.
. To open the lock tick the checkbox on the left hand side of the trigger entry. To close the lock untick the checkbox.
|
Version 8
Tested Functions
| exacqVision | 2N IP Intercom Version | Scan device | Video from 2N IP Intercom | Audio from 2N IP Intercom | Audio to 2N IP Intercom | Switch control | Events from 2N IP Intercom |
|---|---|---|---|---|---|---|---|
8.2.1.41783 | 2.19.0.28.5 |
2N IP Intercom Settings
Set ONVIF Service (Enhanced Video license required) to Discoverable mode. Default ONVIF user has username "admin" and password "2n".
|
Enable Streaming service. Make sure you have enabled Audio Streaming if you want to stream audio too.
|
Tested Features
After first login to the server you will be prompted to add the cameras. You can scan your network for the 2N IP Intercoms or you can add them manually. To access the intercoms from exacqVision client use the credentials you set in the ONVIF service configuration.
|
Enable the audio in the Audio Inputs/Outputs section. You can then listen to the audio from the intercom in the Live View.
|
To enable Door lock control you need to create new Event Linking Entry. As Event Type select Soft Trigger, which can be triggered from the client itself. Then select Output Trigger as an Action Type and desired 2N IP intercom output as an Action Target. Initially all 2N IP Intercom outputs have same names in the client sou you have to determine which are outputs and which are relays.
|
After Event Linking is defined you can control the 2N IP Intercom output or relay from the Live View. To open the trigger selection click following icon ![]() . To open the lock tick the checkbox on the left hand side of the trigger entry. To close the lock untick the checkbox.
. To open the lock tick the checkbox on the left hand side of the trigger entry. To close the lock untick the checkbox.
|
Version 7
Tested Functions
| exacqVision | 2N IP Intercom Version | Scan device | Video from 2N IP Intercom | Audio from 2N IP Intercom | Audio to 2N IP Intercom | Switch control | Events from 2N IP Intercom |
|---|---|---|---|---|---|---|---|
7.9.1.98066 | 2.17.0.26.1 |
2N IP Intercom Settings
Set ONVIF Service (Enhanced Video license required) to Discoverable mode. Default ONVIF user has username "admin" and password "2n".
|
Enable Streaming service. Make sure you have enabled Audio Streaming if you want to stream audio too.
|
Tested Features
After first login to the server you will be prompted to add the cameras. You can scan your network for the 2N IP Intercoms or you can add them manually. To access the intercoms from exacqVision client use the credentials you set in the ONVIF service configuration.
|
Enable the audio in the Audio Inputs/Outputs section. You can then listen to the audio from the intercom in the Live View.
|
To enable Door lock control you need to create new Event Linking Entry. As Event Type select Soft Trigger, which can be triggered from the client itself. Then select Output Trigger as an Action Type and desired 2N IP intercom output as an Action Target. Initially all 2N IP Intercom outputs have same names in the client sou you have to determine which are outputs and which are relays.
|
After Event Linking is defined you can control the 2N IP Intercom output or relay from the Live View. To open the trigger selection click following icon ![]() . To open the lock tick the checkbox on the left hand side of the trigger entry. To close the lock untick the checkbox.
. To open the lock tick the checkbox on the left hand side of the trigger entry. To close the lock untick the checkbox.
|
Version 6
Tested Functions
| exacqVision | 2N IP Intercom Version | Scan device | Video from 2N IP Intercom | Audio from 2N IP Intercom | Audio to 2N IP Intercom | Switch control | Events from 2N IP Intercom |
|---|---|---|---|---|---|---|---|
6.8.6.77374 | 2.12.0.21.1 |
2N IP Intercom Settings
Set ONVIF Service (Enhanced Video license required) to Discoverable mode. Default ONVIF user has username "admin" and password "2n".
|
Enable Streaming service. Make sure you have enabled Audio Streaming if you want to stream audio too.
|
Tested Features
After first login to the server you will be prompted to add the cameras. You can scan your network for the 2N IP Intercoms or you can add them manually. To access the intercoms from exacqVision client use the credentials you set in the ONVIF service configuration.
 |
Enable the audio in the Audio Inputs/Outputs section. You can then listen to the audio from the intercom in the Live View.
 |
To enable Door lock control you need to create new Event Linking Entry. As Event Type select Soft Trigger, which can be triggered from the client itself. Then select Output Trigger as an Action Type and desired 2N IP Intercom output as an Action Target. Initially all 2N IP Intercom outputs have same names in the client sou you have to determine which are outputs and which are relays.
|
After Event Linking is defined you can control the 2N IP Intercom output or relay from the Live View. To open the trigger selection click following icon ![]() . To open the lock tick the checkbox on the left hand side of the trigger entry. To close the lock untick the checkbox.
. To open the lock tick the checkbox on the left hand side of the trigger entry. To close the lock untick the checkbox.
|
Used Symbols
![]() - Compatible
- Compatible
![]() - Work with limitation
- Work with limitation
![]() - Incompatible
- Incompatible