2.4 Button Tags
This subsection describes work with Button Tags in 2N® IP Uni.
Tag Printing
Every 2N® IP Uni delivery includes a sheet of translucent foil, which can be laser-printed. Cut the printed foil and insert the tags in the name plates (template for printing is available in section Downloads).
Every name plate includes a piece of foil, which can be written over manually, using a waterproof permanent marker, if necessary.
Note
- Always use waterproof foil (enclosed or other) for the tags. Never use paper or ink jet printing to avoid damage due to water leakage!
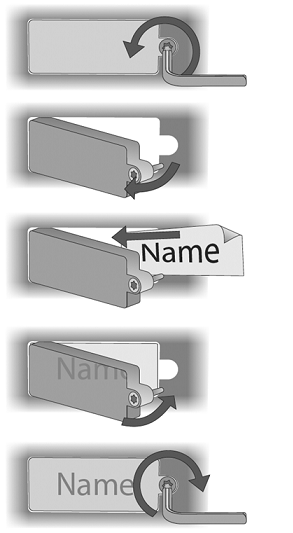
Tag Inserting/Replacing Instructions
2N® IP Uni provides an intuitive, easy access to the name plates. The tags are easy to insert and replace even without a manual. You need not remove the front panel and thus are not exposed to the risk of loss of components while replacing the tags.
- Loosen the name plate screw using the wrench enclosed, for example. You can open the name plate window like a door without losing the tightened screw.
- Remove the used or blank name tag and insert a new tag.
- Close the name plate window and tighten the screw appropriately.
- Check the click effect of the buttons: if the button fails to click properly when pressed (when moved by approx. 0.5 mm), the tag is too thick or thin. Make sure that the button clicks when you press it on either end.
 |