2.3 Electric Installation
- Description of Printed Circuit Board Connectors
- Terminal Block X2 Connection
- Ethernet Connection
- Electric Lock Connection
- External Power Supply Connection
- Configuration Connector Connection
- Display Connector
- Card Reader Connection
- Grounding
- Available switches
2N IP Vario is designed for connection in the Ethernet computer network (10/100BASE-T) using a UTP cable. Use a CAT 5e UTP cable at least for connection.
Caution
- The device must be part of the electrical system of the building.
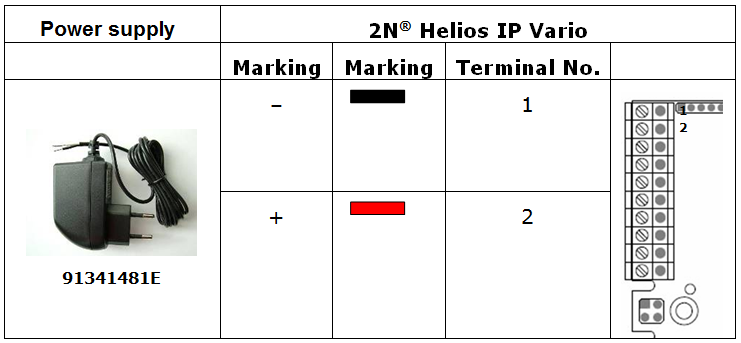
2N IP Vario is fed through the PoE (Power over Ethernet) technology. No additional cabling is therefore necessary. If your Ethernet is not equipped with the PoE technology, it is possible to use a PoE injector, Part No. 91378100. As an alternative, you can use a power adapter, Part No. 91341481E. 2N IP Vario is configured over an integrated administration web server, which can be controlled from any web browser, e.g., Mozilla Firefox.
Tip
- Video Tutorial: Door communication system 2N IP Vario – Electrical Installation.
Description of Printed Circuit Board Connectors
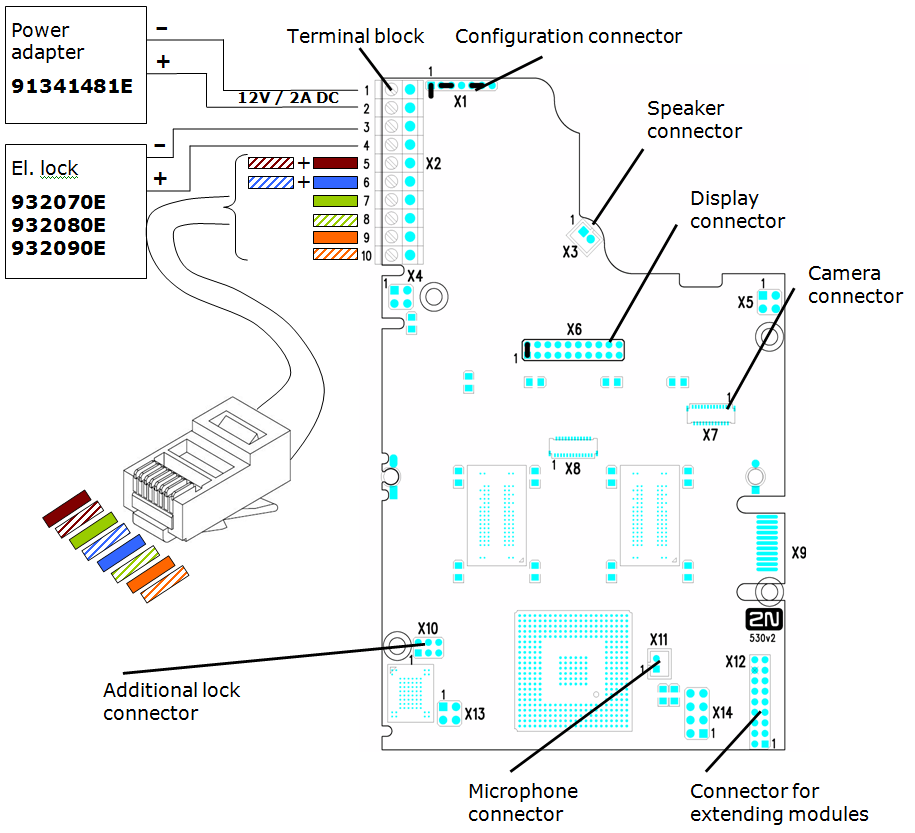
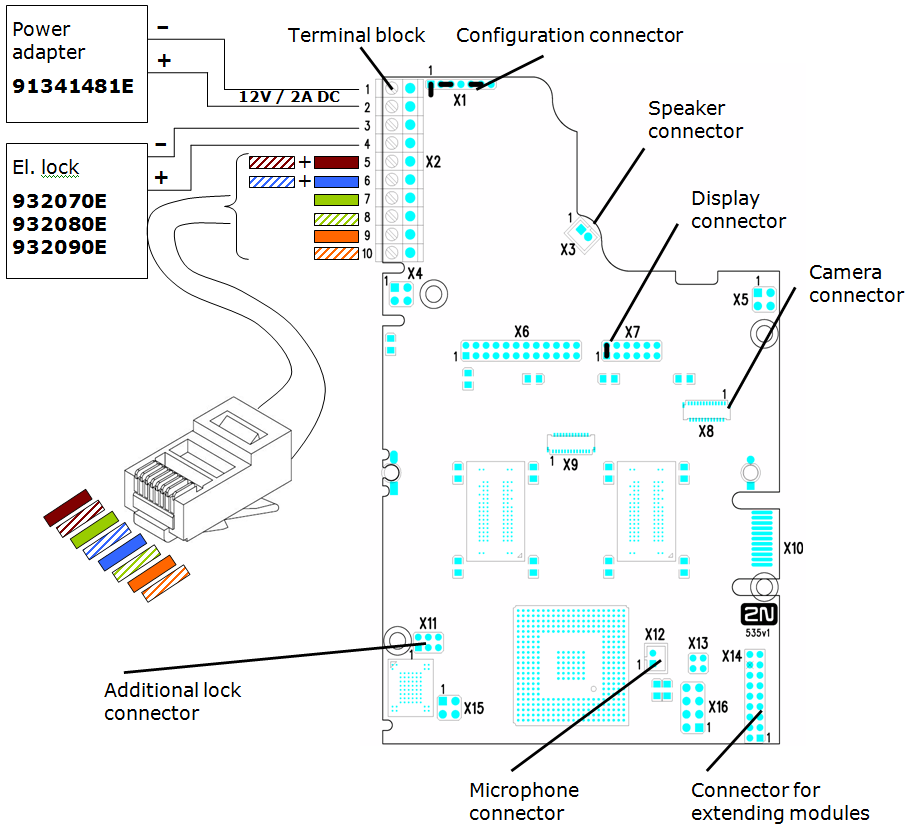
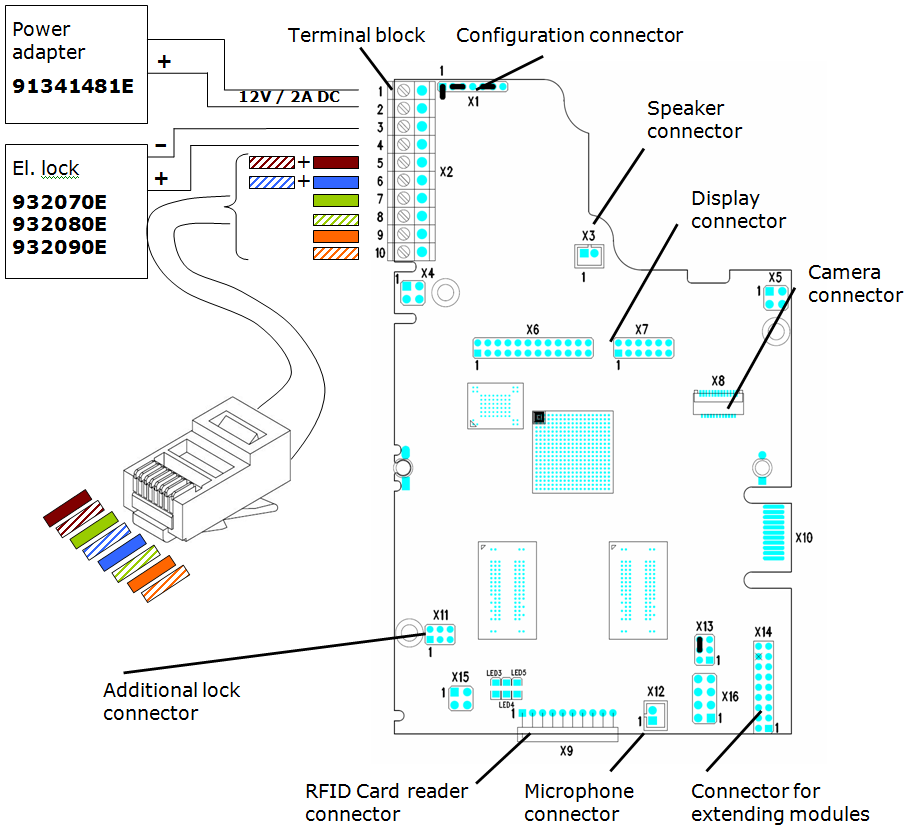
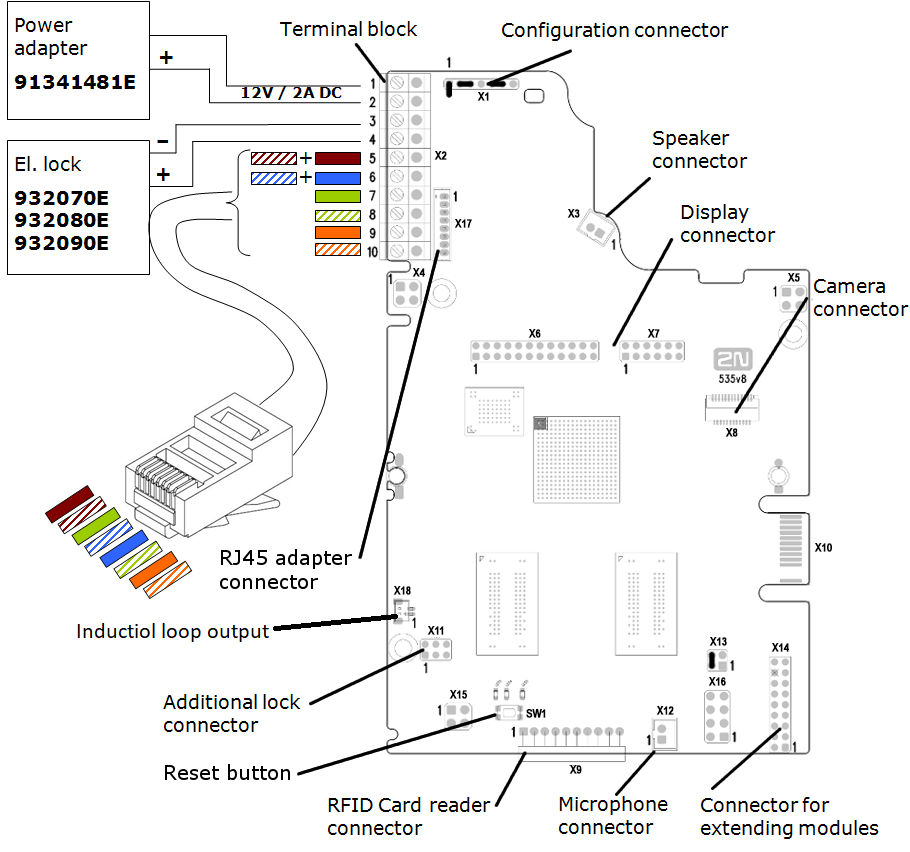
In figure bellow you can see the location of the printed circuit board (PCB) connectors. Connectors to which the accessories can be connected and connectors that serve for configuring 2N IP Vario are indicated on the board. The UTP cable for the Ethernet connection is to be connected to the terminal block X2 as shown in table below. The terminal block can be removed from the PCB. The connection of each of the connectors is described in the subsections below.
Description of Connectors, PCB Version 530v2
Description of Connectors, PCB Versions 535v1, 535v2
Description of Connectors, PCB Versions 535v5
Description of Connectors, PCB Versions 535v8
Tip
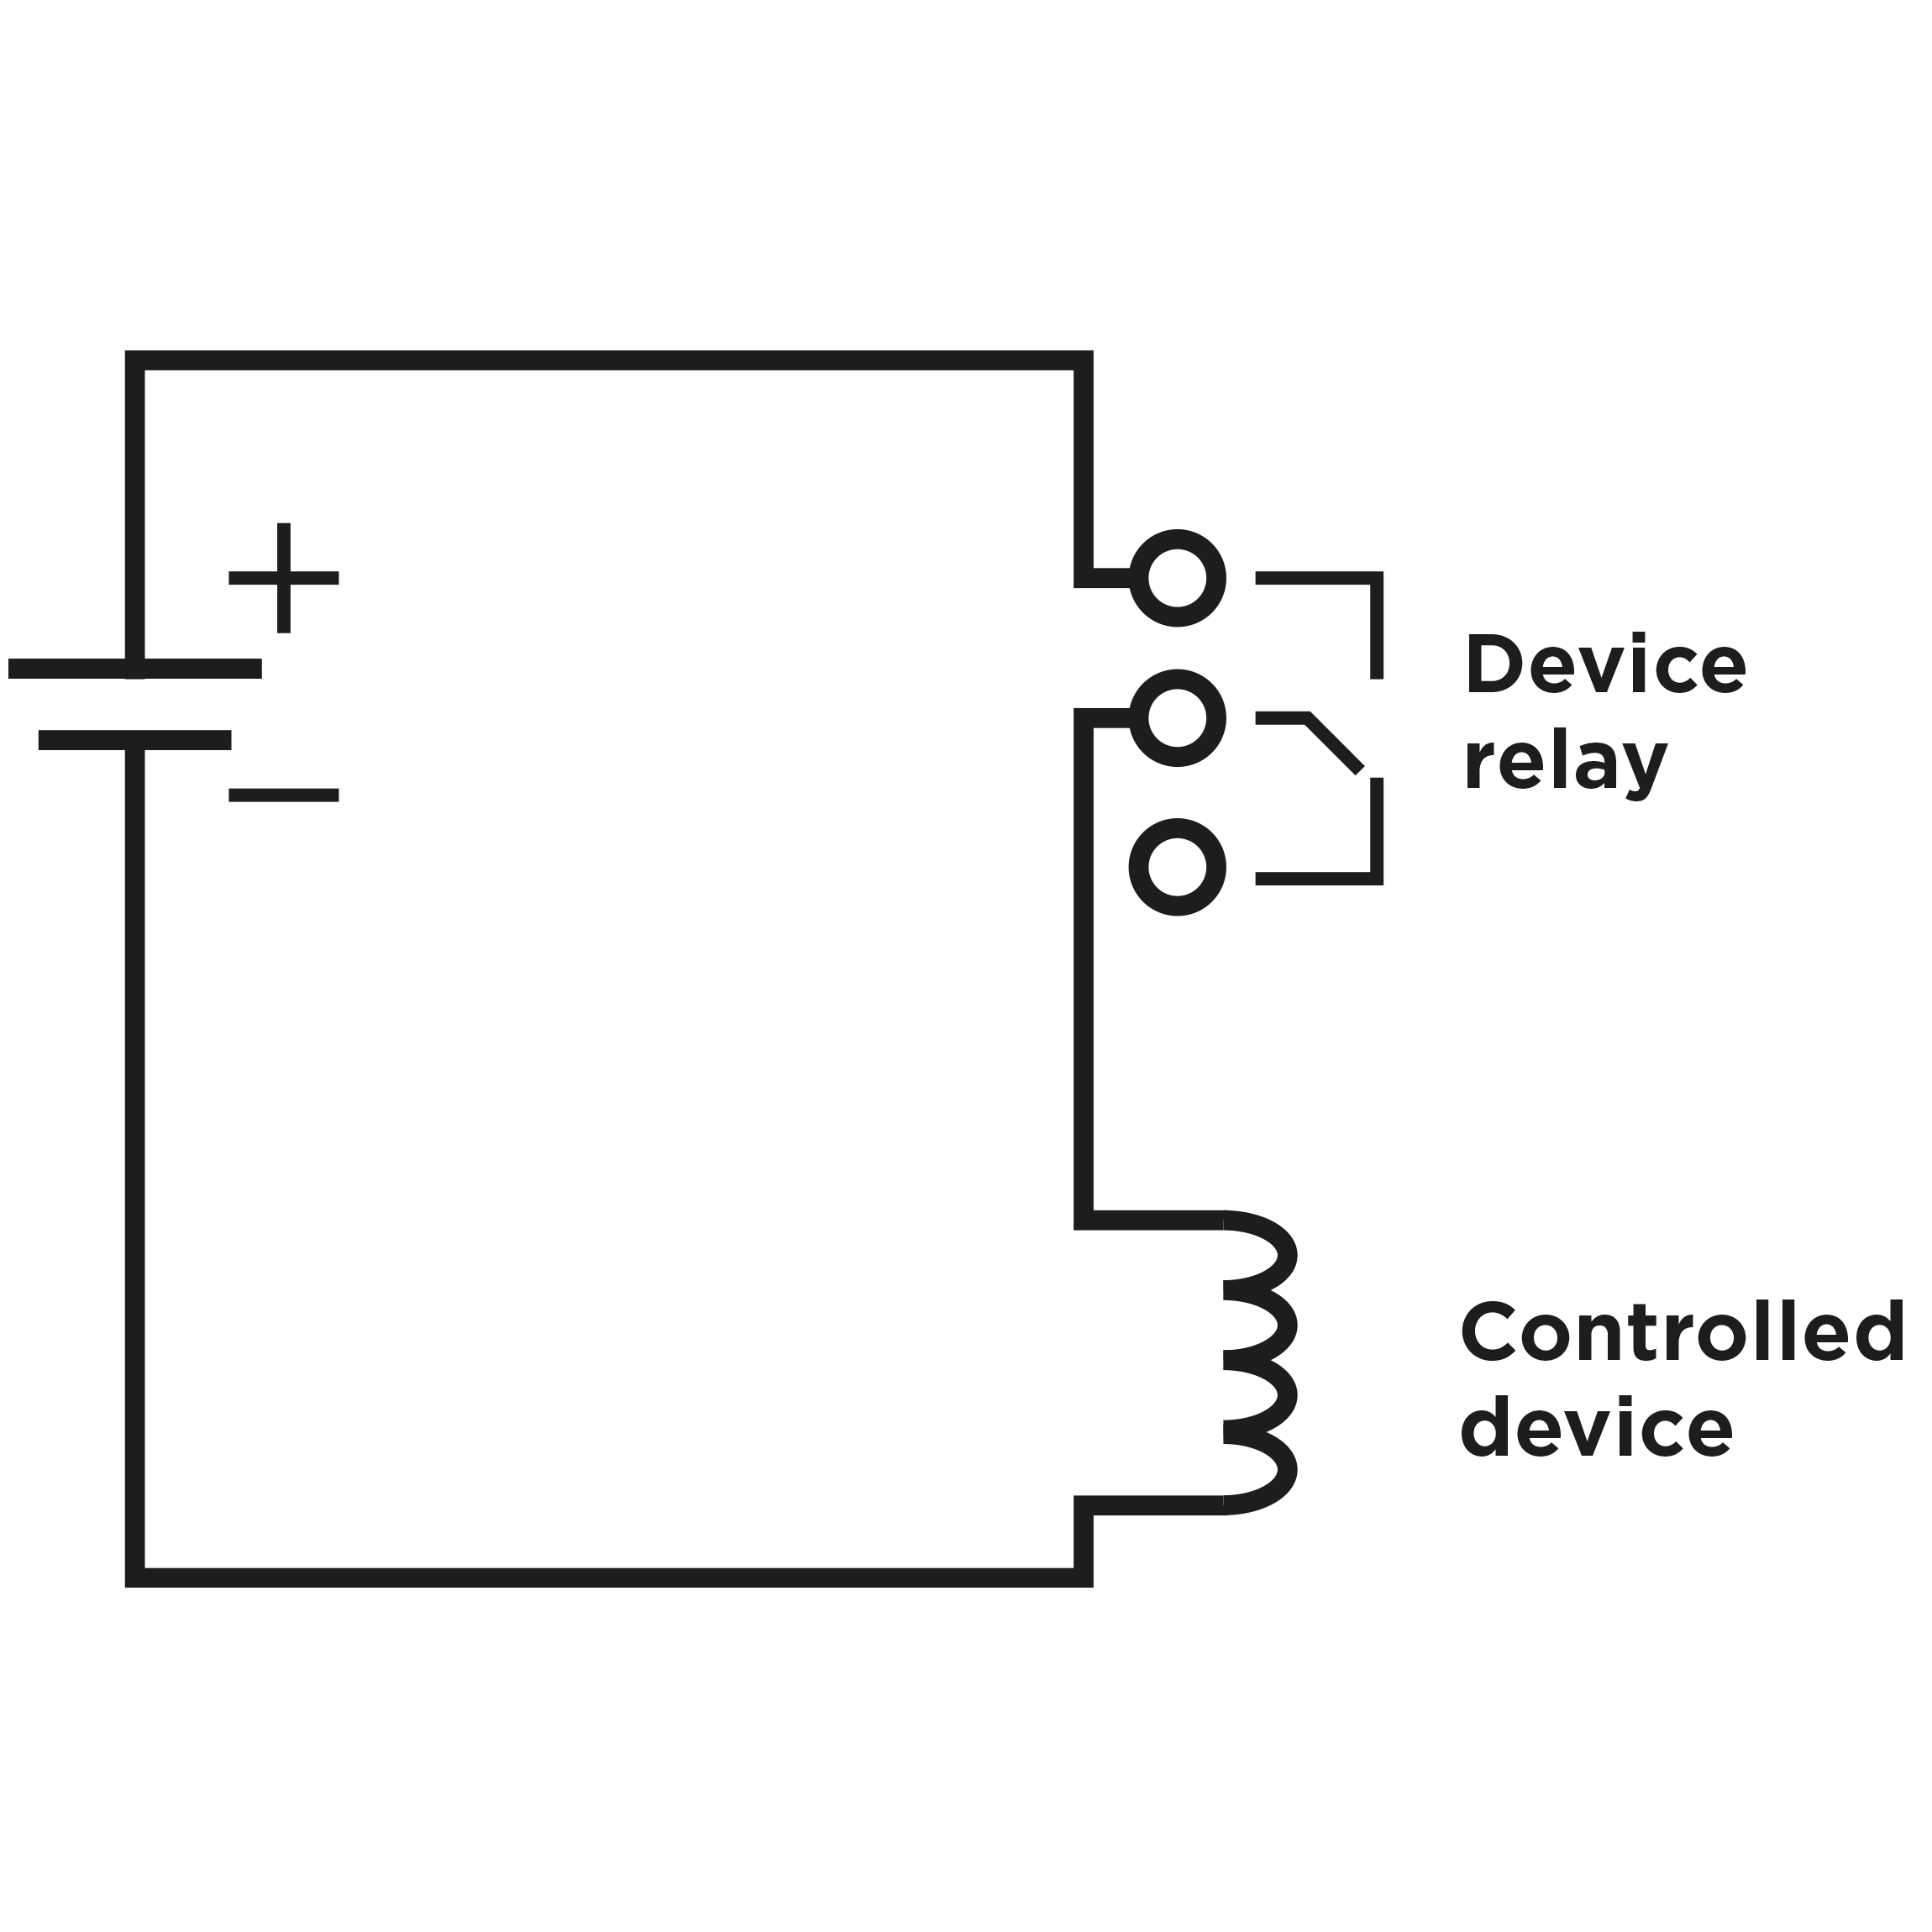
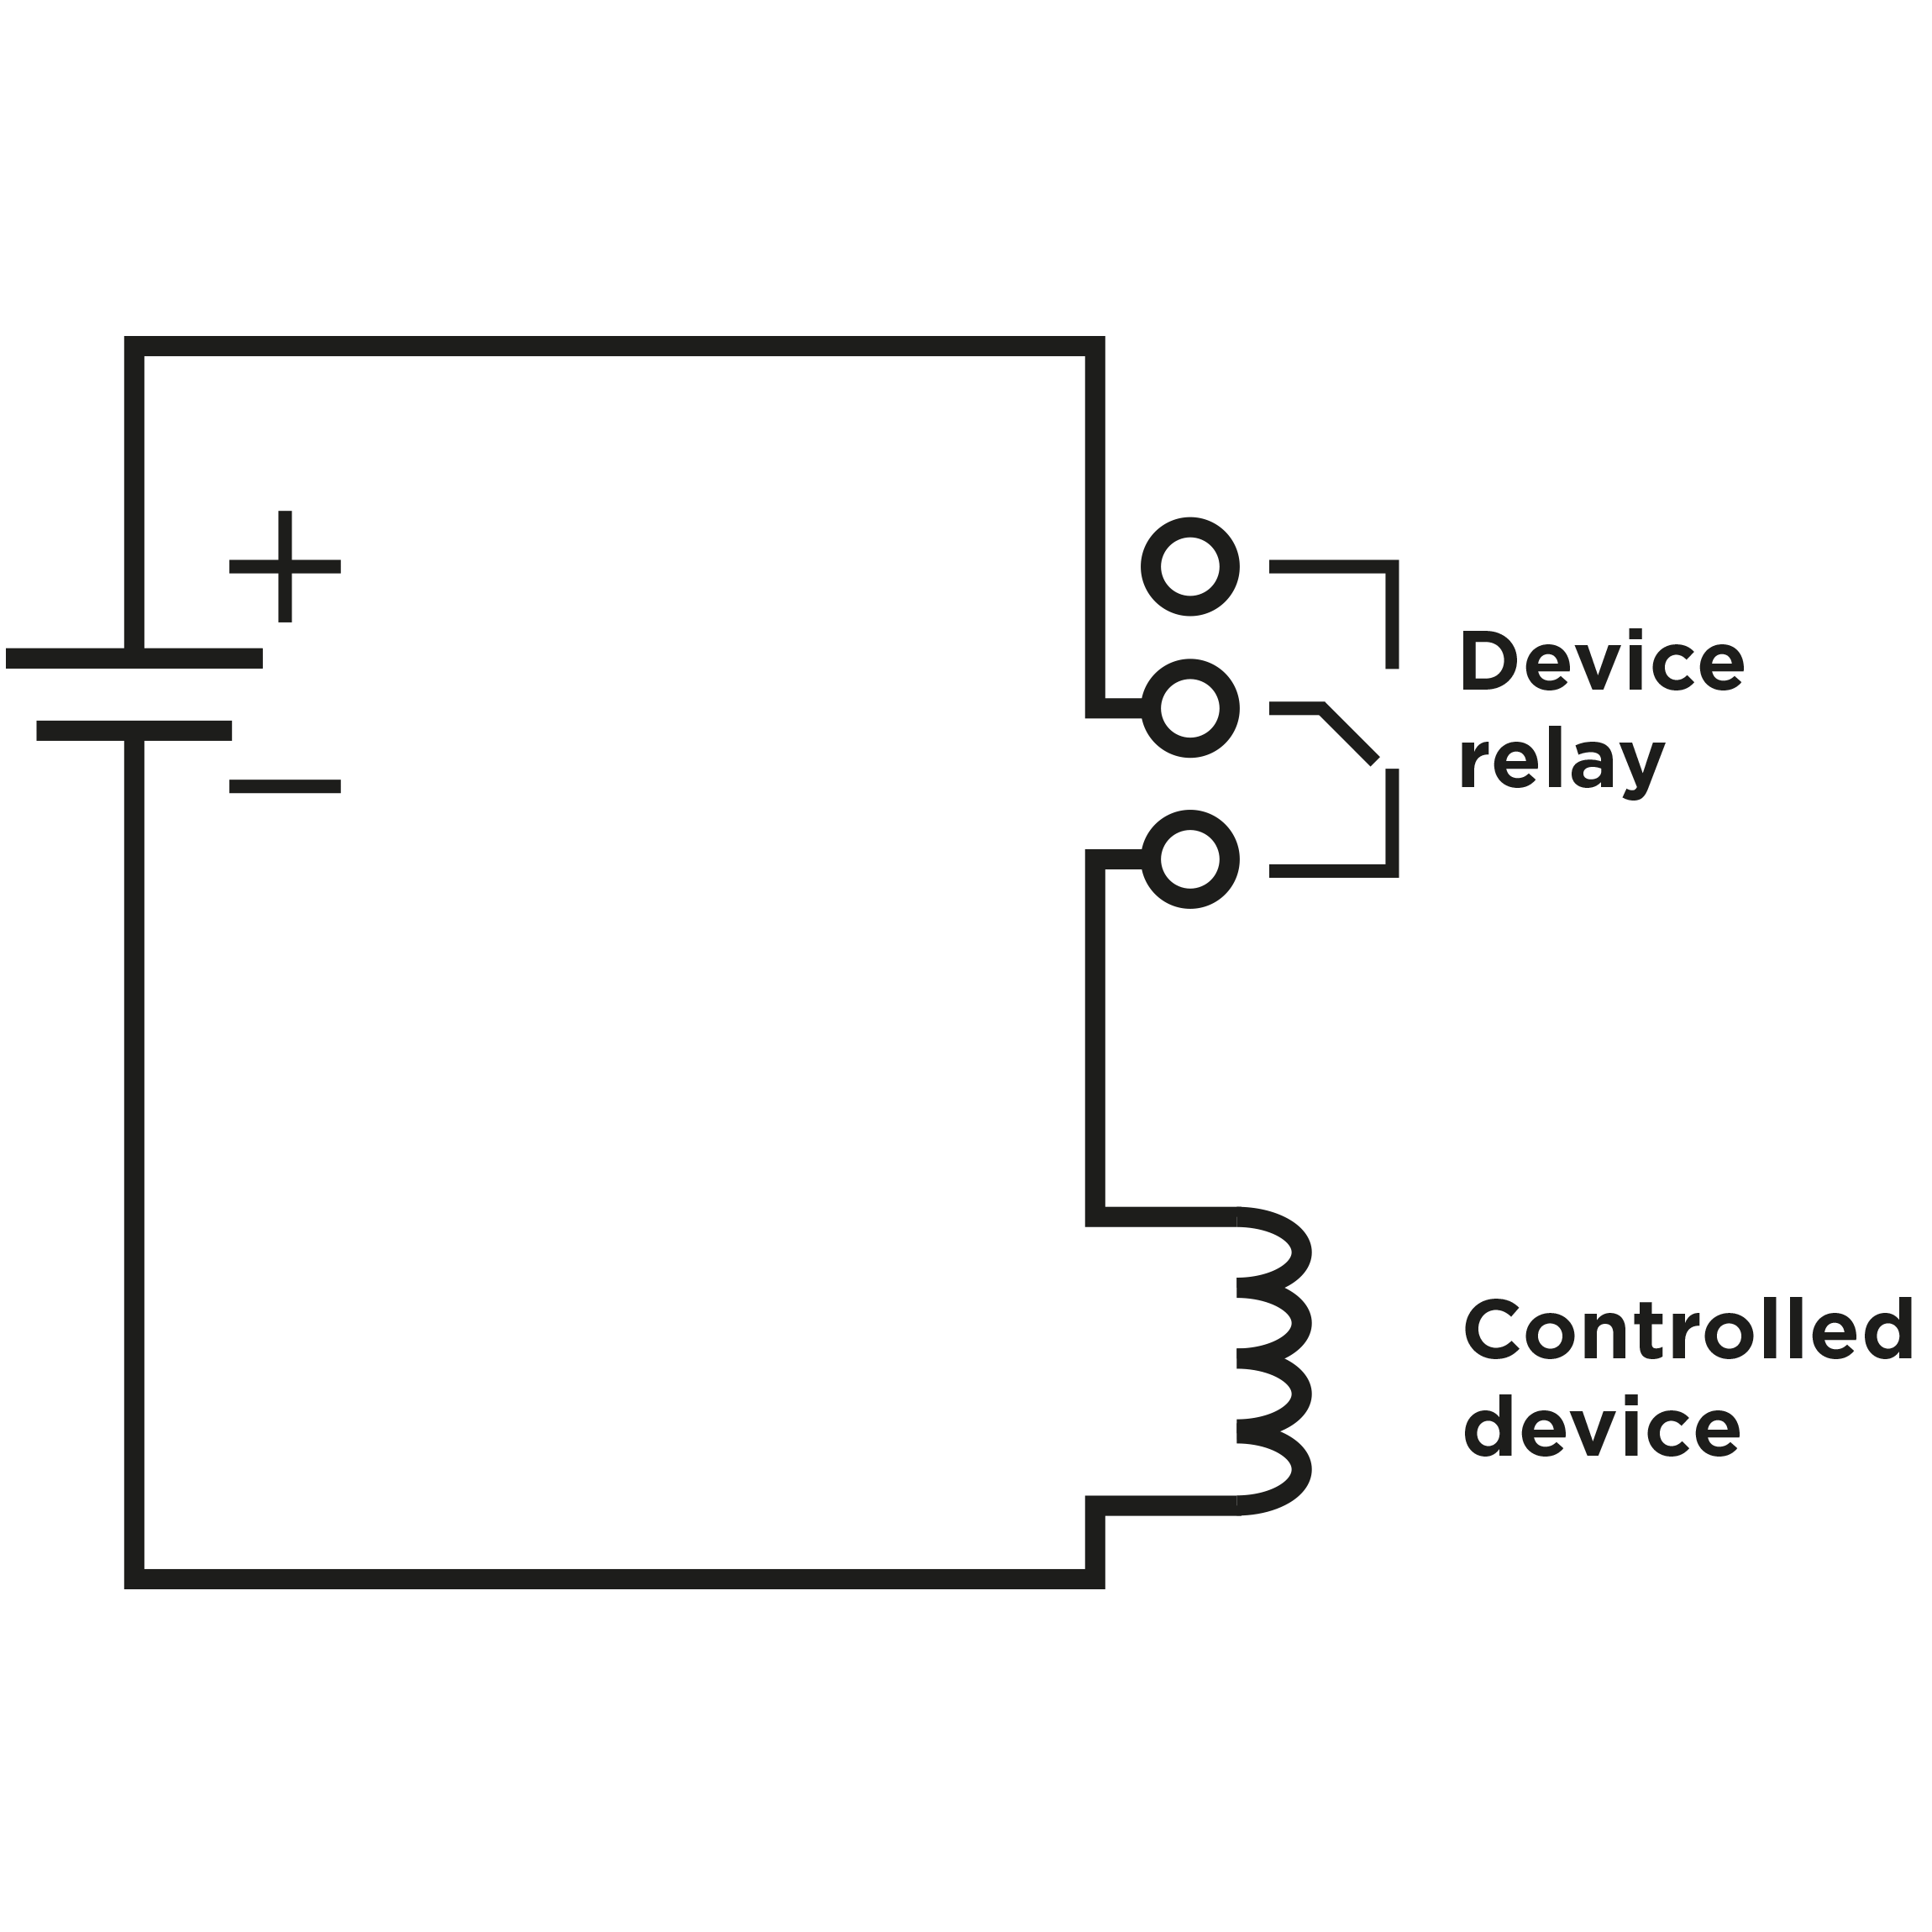
- Output wiring diagram for Relay terminals
Wiring diagram for the controlled device’s electric circuit closing
Wiring diagram for the controlled device’s electric circuit opening
Terminal Block X2 Connection
Terminal block X2 includes 10 terminals whose functions are distinguished by colour. Terminals 5–10 are used for connecting 2N IP Vario to the Ethernet. Terminals 3–4 are designed for connecting the electric lock and terminals 1–2 help connect an external 12 V / 2 A DC power supply if no PoE power supply is available.
- The terminal block is included in the package. To adjust an already installed
2N IP Vario, disconnect it IP from the power supply. Then pull to remove the terminal block from the printed circuit board. - Insert the wires under the respective terminals.
- Tighten the terminals using a flat screwdriver.
- Replace the terminal block to the printed circuit board.
Caution
- Make sure that the cables leading through the 2N IP Vario cover bottom groove are installed properly. For the correct installation of the cables refer to Figure 2.7.
Induction loop connection
The JST SHR-02V-S connector type is required to connect the induction loop output.
Ethernet Connection
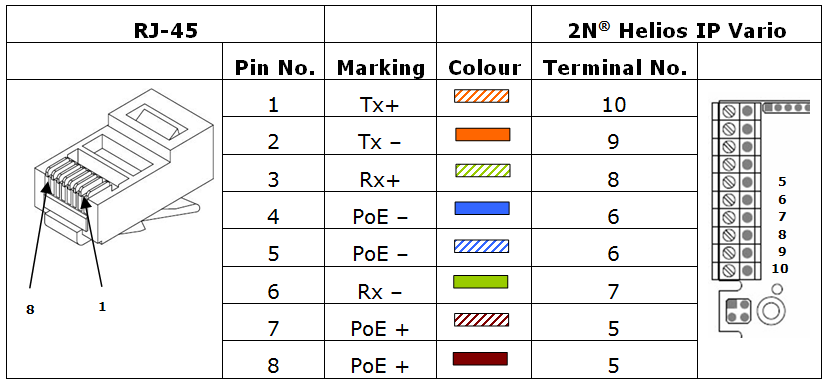
For the connections and meanings of the wires see the table below. Join UTP cable wires 4 (blue) and 5 (white-blue) and attach them under terminal 6 on 2N IP Vario in the same way. Join wires 7 and 8 and place them under terminal 5 of 2N IP Vario.
Terminal Block Connections
Caution
- We recommend the use of a LAN surge protection.
- We recommend the use of a shielded SSTP Ethernet cable.
Electric Lock Connection
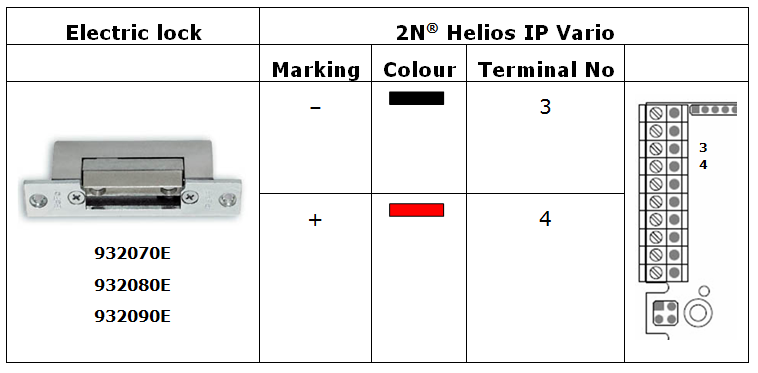
The electric lock can be connected to terminals 3 and 4 of terminal block X2.
Terminal Block Connection for Electric Lock
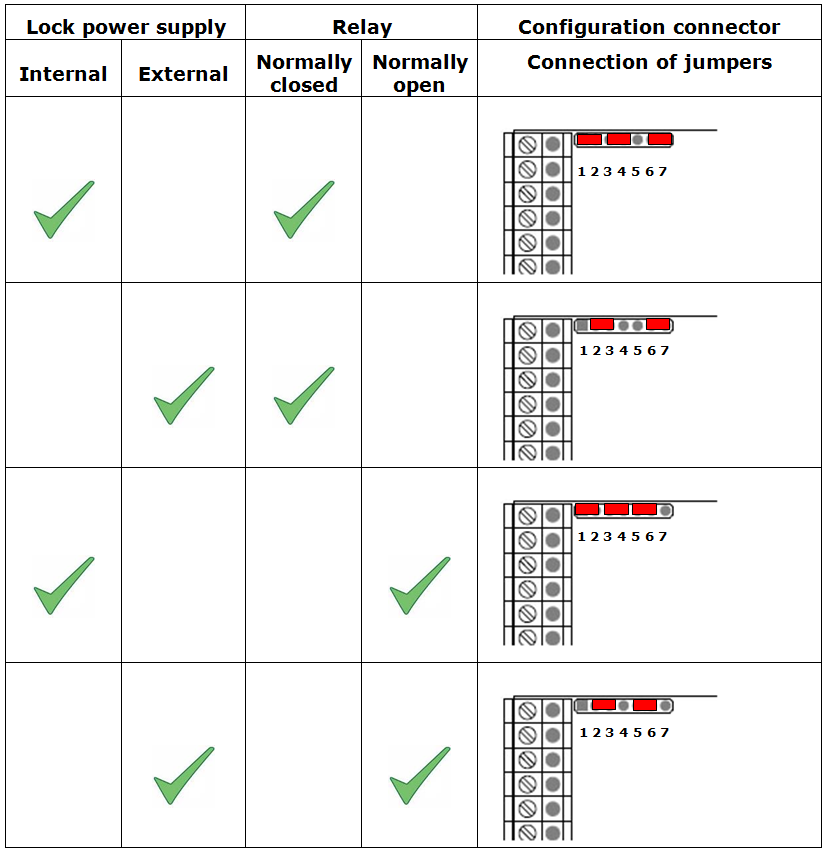
Terminals 3 and 4 are connected to a relay on the 2N IP Vario board. The relay terminals may act as normally open or normally closed contacts. Configuration is performed through the configuration connector X1 as described in the
Configuration Connector Connection subsection. Set on the configuration connector whether the electric lock will be powered from an external or internal power supply.
Warning
When you connect a device containing a coil, such as a relay or an electromagnetic lock, it is necessary to protect the intercom against voltage peak while switching off the induction load. For this way of protection, we recommend a 1 A / 1000 V diode (e.g., 1N4007, 1N5407, 1N5408) connected antiparallel to the device.
External Power Supply Connection
If the Ethernet network is not equipped with the PoE technology, you have two alternative options how to supply power to 2N IP Vario.
- Using a PoE injector, Part No. 91378100. 2N IP Vario is then powered through an Ethernet cable as shown in Tab. 1 above.
- Using a power adapter, Part No. 91341481E.
Varování
- 2N IP Vario cannot be fed from an external power supply and PoE at the same time. A combined supply might result in a device damage.
The external power supply from a power adapter can be connected to terminals 1 and 2.
Terminal Block Connection for Power Adapter
Configuration Connector Connection
The configuration connector is located in the upper part of the printed circuit board. Use the configuration jumpers to set whether the lock control relay should have a normally open or normally closed function and whether it should be powered internally or externally.
Connection of Configuration Connector Jumpers
Display Connector
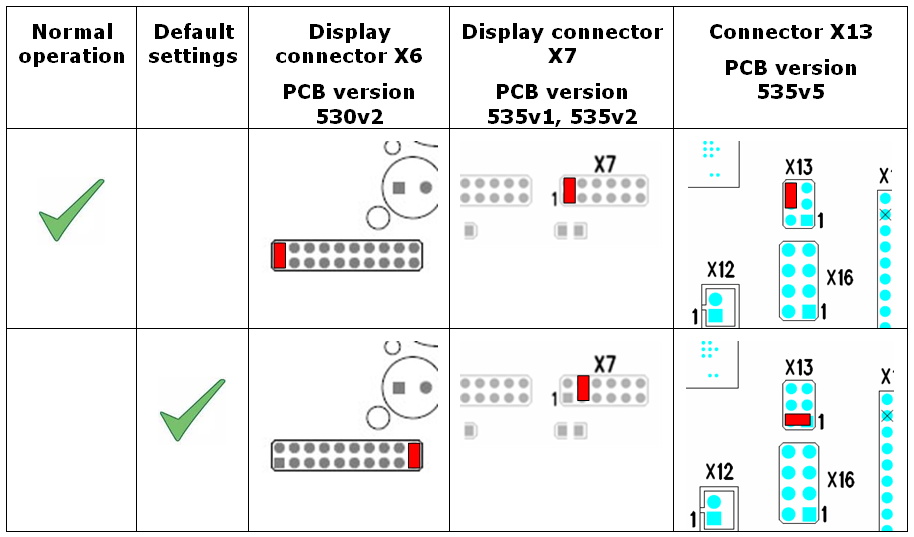
The display connector includes the name plate backlighting ON/OFF switching pins and 2N IP Vario resetting pins. The remaining pins are intended for display connection.
Resetting procedure (version 535v5 and earlier)
- Switch 2N IP Vario off.
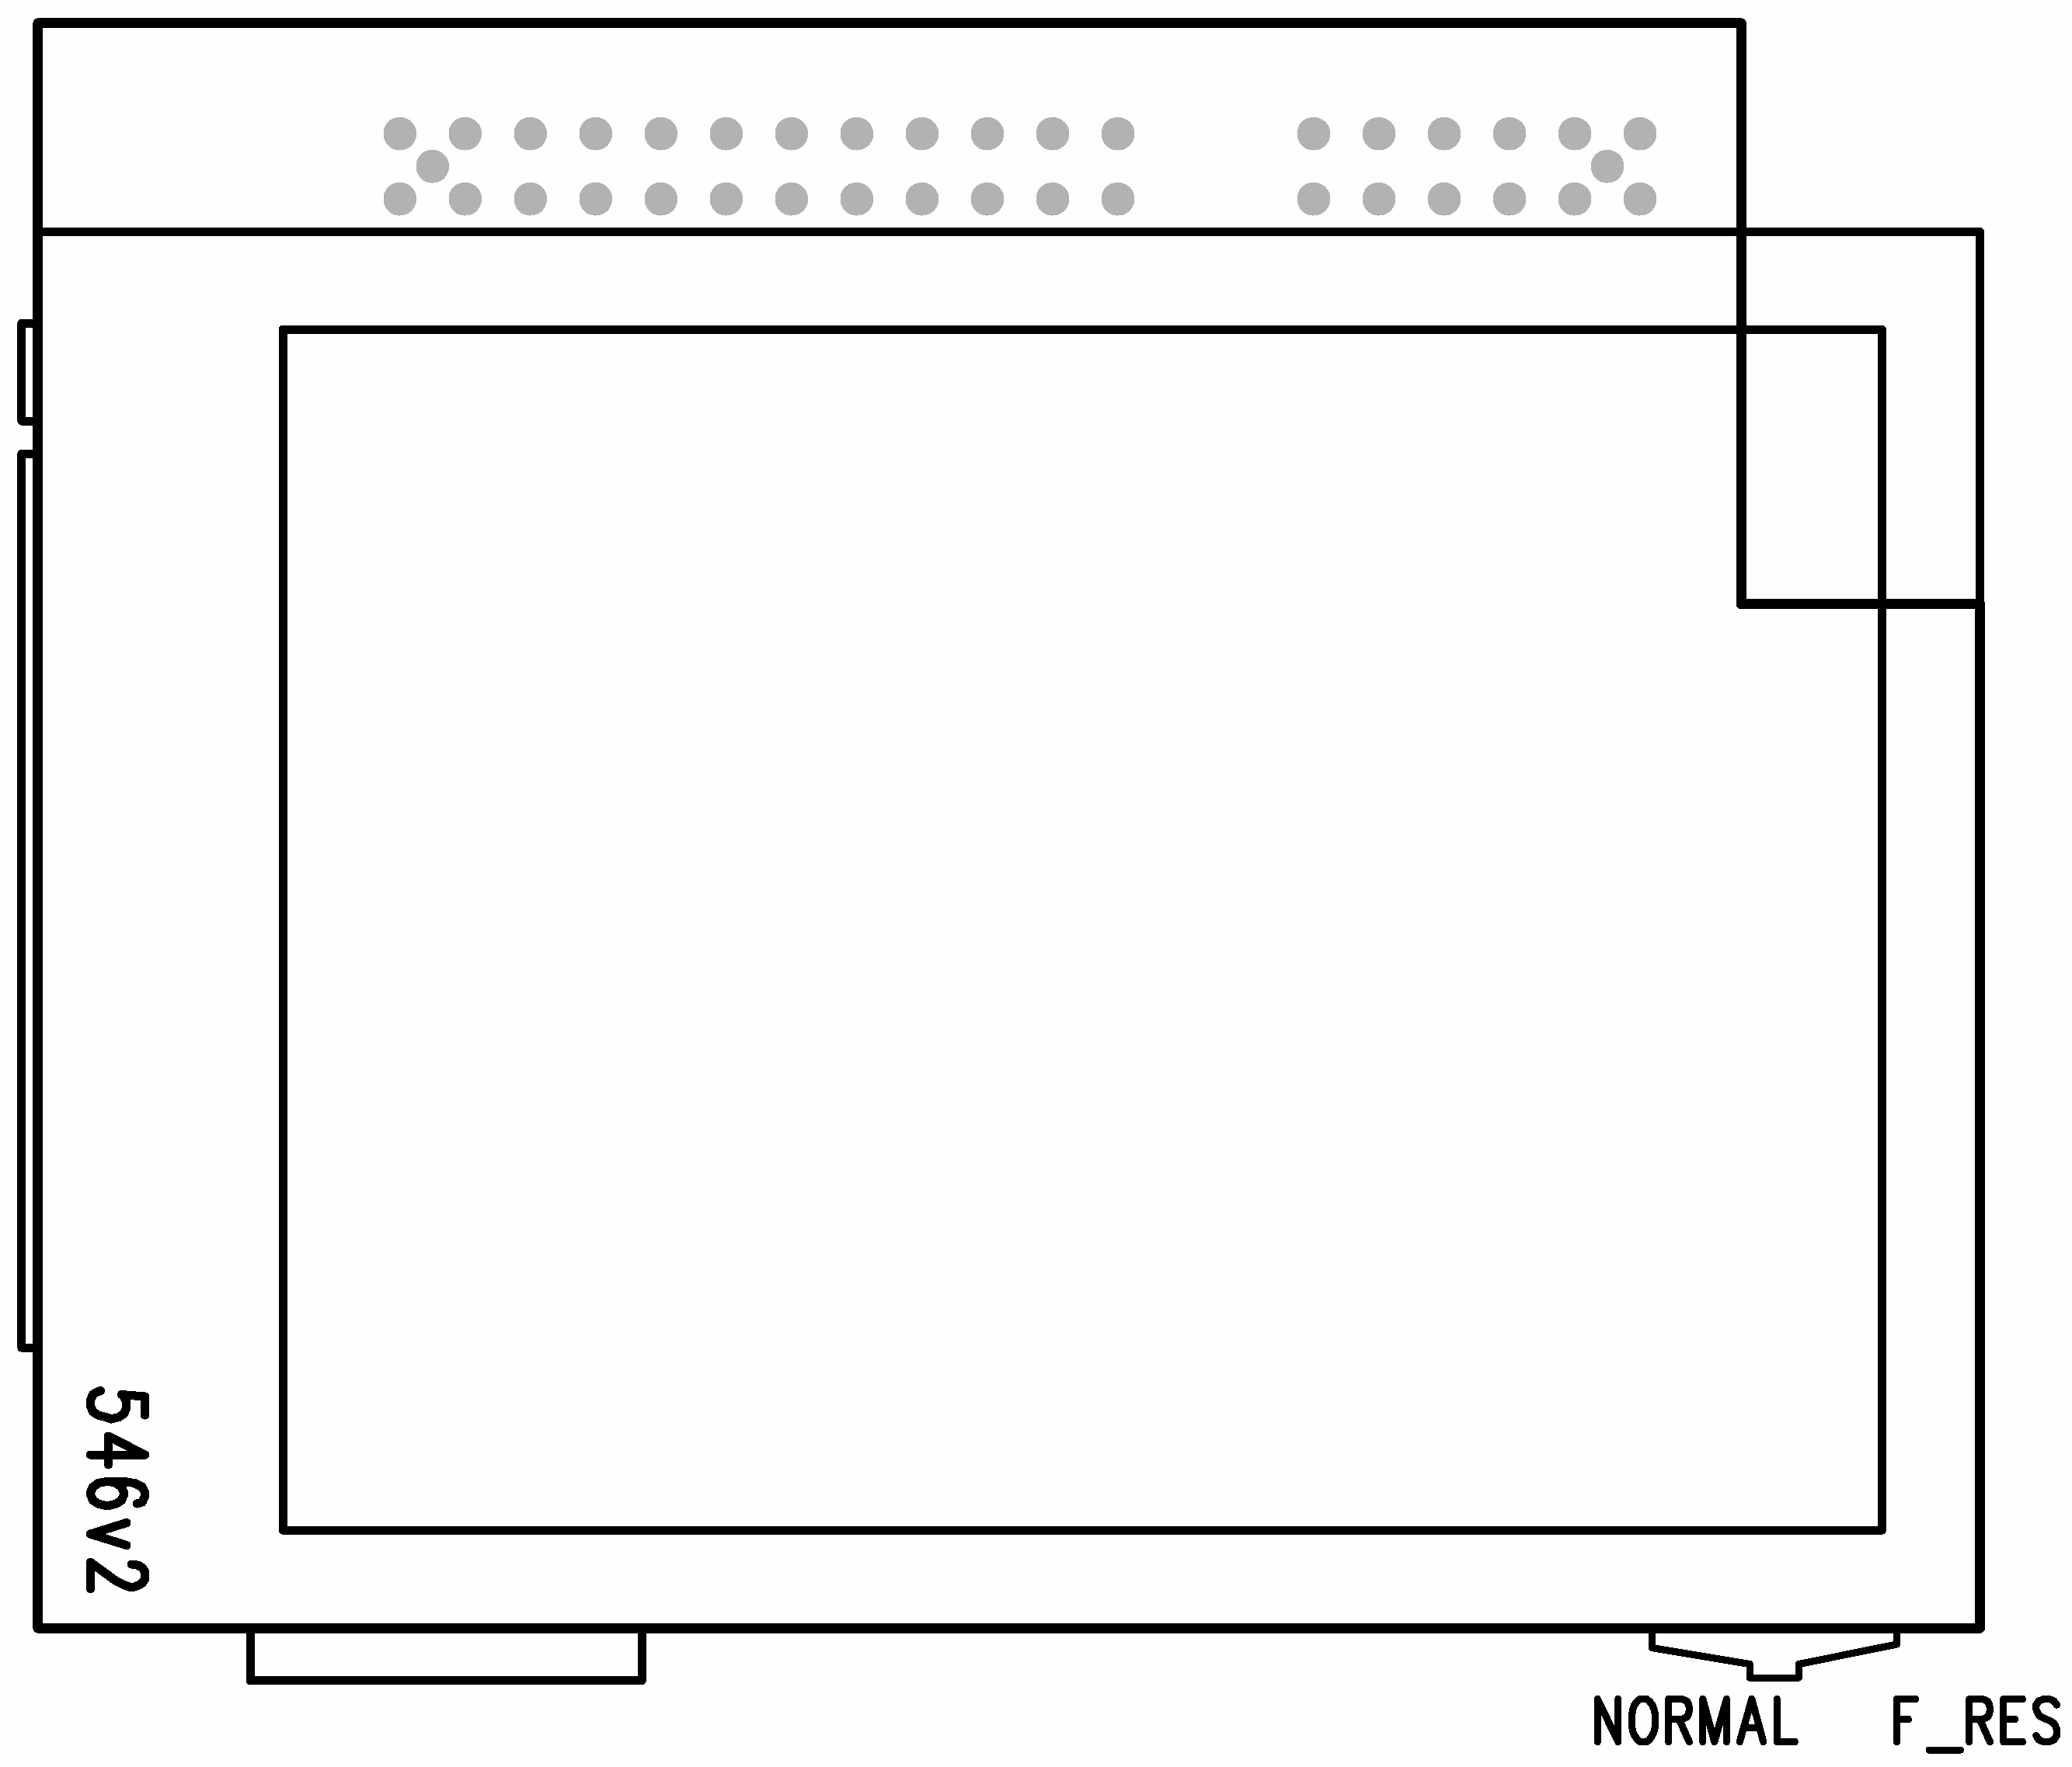
- Connect the jumper into the resetting (default setting) position (put the display switch into the F_RES position in the display-equipped models with 535v1 and 535v2 board versions).
- Switch 2N IP Vario on and wait for the acoustic start signal.
- Switch 2N IP Vario off.
- Remove the jumper from the resetting (default setting) position (put the display switch into the NORMAL position in the display-equipped models with 535v1 and 535v2 board versions).
- Switch 2N IP Vario on.
Configuration Jumpers on Display Connector
Resetting Procedure – Display Model (models with 535v1 and 535v2 board versions)
To reset the default values of a display-equipped 2N IP Vario, put the switch in the display right-hand bottom corner in position F_RES. This applies to modules with board versions 535v1 and 535v2 only. For 535v5 versions, use a jumper at connector X13.
Reset Button
Located among the main unit connectors, the Reset button helps you reset the factory default values, restart the device, find the device IP address and switch the static/dynamic mode.
IP Address Finding
Follow the instructions below to identify the current IP address:
- Press and hold the RESET button.
- Wait until the red and green LEDs go on simultaneously on the device and the acoustic signal can be heard (approx. 15–35 s).
- Release the RESET button.
- The device automatically announces the current IP address.
Note
- The delay after pressing RESET till the first light and sound signalling is set to 15–35 s depending on the 2N IP intercom/answering unit model used.
- 24 s is the valid value for 2N IP Vario HW version 8.
Static IP Address Setting
Follow the instructions below to switch on the Static IP address mode (DHCP OFF):
- Press and hold the RESET button.
- Wait until the red and green LEDs go on simultaneously on the device and the acoustic signal can be heard (approx. 15–35 s).
- Wait until the red LED goes off and the acoustic signal can be heard (approx. for another 3 s).
- Release the RESET button.
The following network parameters will be set after restart:
- IP address: 192.168.1.100
- Network mask: 255.255.255.0
- Default gateway: 192.168.1.1
Dynamic IP Address Setting
Follow the instructions below to switch on the Dynamic IP address mode (DCHP ON):
- Press and hold the RESET button.
- Wait until the red and green LEDs go on simultaneously on the device and the acoustic signal can be heard (approx. 15–35 s).
- Wait until the red LED goes off and the acoustic signal can be heard (approx. for another 3 s).
- Wait until the green LED goes off and the red LED goes on again and the acoustic signal can be heard (approx. for another 3 s).
- Release the RESET button.
Factory Reset (version 535v8 and later)
Follow the instructions below to reset the factory default values:
- Press and hold the RESET button.
- Wait until the red and green LEDs go on simultaneously and the acoustic signal can be heard (approx. 15–35 s).
- Wait until the red LED goes off and the acoustic signal can be heard (approx. for another 3 s).
- Wait until the green LED goes off and the red LED goes on again and the acoustic signal can be heard (approx. for another 3 s).
- Wait until the red LED goes off and the acoustic signal can be heard (approx. for another 3 s).
- Release the RESET button.
Caution
- In case of resetting the factory default settings on a device with a version of firmware 2.18 or higher it is necessary to reprogram the
2N Security Relay using the instructions from section 2.4.
Device Restart
Press the RESET button shortly (< 1 s) to restart the system without changing configuration.
Note
- The time interval between the short press of RESET and reconnection after restart is 25–50 s for 2N IP Vario depending on the HW version.
Card Reader Connection
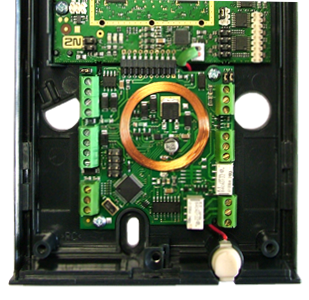
2N IP Vario (Part Nos. 91371…U) can be equipped with an internal multifunction module including an RFID card reader (Part No. 9137430E).
This module enhances the 2N IP Vario functions with an EM41XX RFID card reader, two relays for external load switching, two logical inputs and Wiegand interface. The RS-485 interface is not supported in the current 2N IP Vario software version.
Caution
- The 2N IP Vario modules ending with U (i.e. 91371…U) can only be equipped with the card reader.
Card Reader Mounting
- Power off 2N IP Vario.
- Use a hexagonal wrench to unscrew and remove the metal cover.
- Use a cross-head screwdriver to unscrew and remove the plastic cover.
- Connect the reader module into the2N IP Vario basic unit bottom connector making sure that the microphone cable lies under the module.
- Use the enclosed screws to fix the reader module to the 2N IP Vario plastic base.
- Connect the wires for the reader module interface(s) if necessary.
- Replace and fix the plastic cover using cross-head screws.
- Replace and screw back the metal cover.
Grounding
We recommend you to ground the intercom in order to improve the static electricity resistance. All you need for a proper grounding is a cable of the minimum cross-section of 4 mm2 and a crimp eye.
p |
Push the nut gently at the marked point to slide it downwards. Insert a sufficiently long M3 screw, e.g. Push the screw down to make a gap for the crimp eye.
Insert the crimped cable at the marked point.
Assemble the set and ground the cable.
Available Switches
| Location | Name | Description |
|---|---|---|
| Basic Unit | Relay 1 | Passive switch: NO and NC contacts, up to 30 V / 1 A AC/DC. Used for connection of non-critical devices only (lights, e.g.). Active switch output: 12 V DC, max 600 mA |
Additional Switch (Part No. 9137310 E) | Relay 2 | Passive switch: NO and NC contacts, up to 30 V / 1 A AC/DC. Used for connection of non-critical devices only (lights, e.g.). |
Internal RFID Card Reader 125 kHz (Part No. 9137430 E) | Relay 1 (Card Reader) | Passive switch: NO and NC contacts, up to 30 V / 1 A AC/DC |
| Relay 2 (Card Reader) | Passive switch: NO and NC contacts, up to 30 V / 1 A AC/DC |

