Scheduler
What you should know
- If the Create actions for session activation and deactivation automatically option is enabled, session activation/deactivation is set together with the first action for the session.
- If you power up the server while the event 'is in progress', the actions will not be performed. The server must always be activated before the beginning of the event.
- The session activation action automatically enables all playlists in the session.
Scheduler
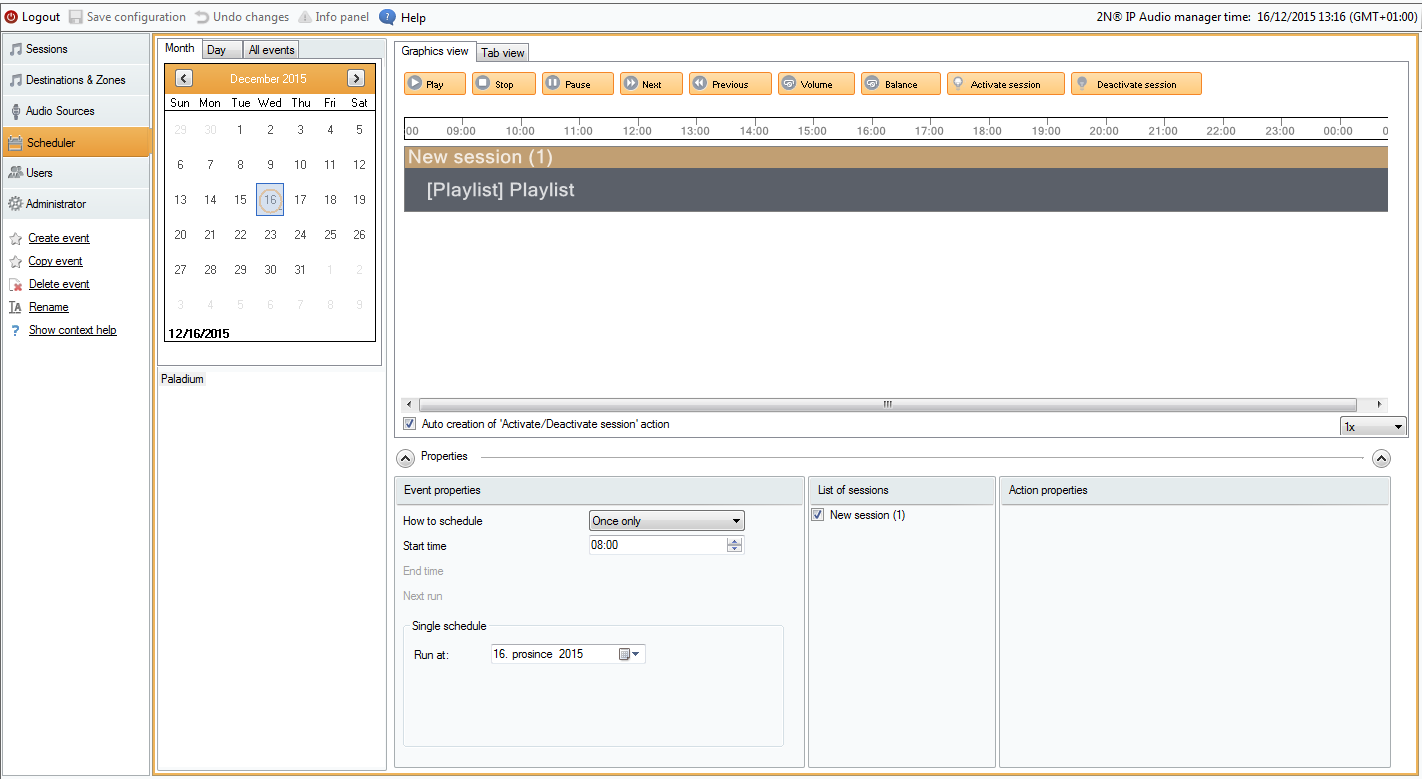
Scheduler is used for creating actions used for control of playlists or sessions. You can schedule various actions for the playlists and assign them to time. A set of actions for playlists is called Event and you can control multiple playlists in multiple sessions within one event. Fig.1 shows an example of event with two sessions. One contains a playlist, the other is without a playlist.
Event Creation
As mentioned above, the event is a set of actions that are executed over playlists or other sources included in sessions. Therefore, prepare a session including the required playlists before creating an event. Only then you can start creating an event as follows:
Procedure:
Create a new event – use one of the following methods: click the Scheduler tab and then Create event, or use the floating menu. Also, you can assign an event to a date before creation by clicking the required day and then Create event.
 |
Scheduler Tab
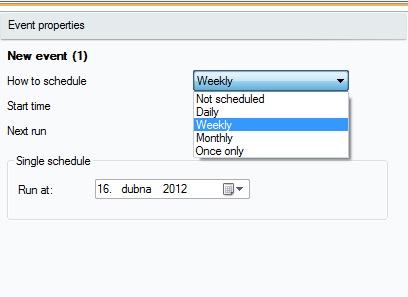
Set event start – click Event to display the event setting option to the left. Set the type, starting time and repeating intervals. The setting options depend on the action type: Action setting options:
- Not scheduled – this event will never be performed.
- Daily – the event will start at the set time every day (or Every xth day).
- Weekly – the event will start at the set time of the set days every week or Every xth week.
- Monthly – select a day in the month for the action start and also in which months the action shall occur Once only.
 |
Event Settings
Action Setting
Having created an event according to section above, specify the contents of the event, i.e. what shall be played and when.
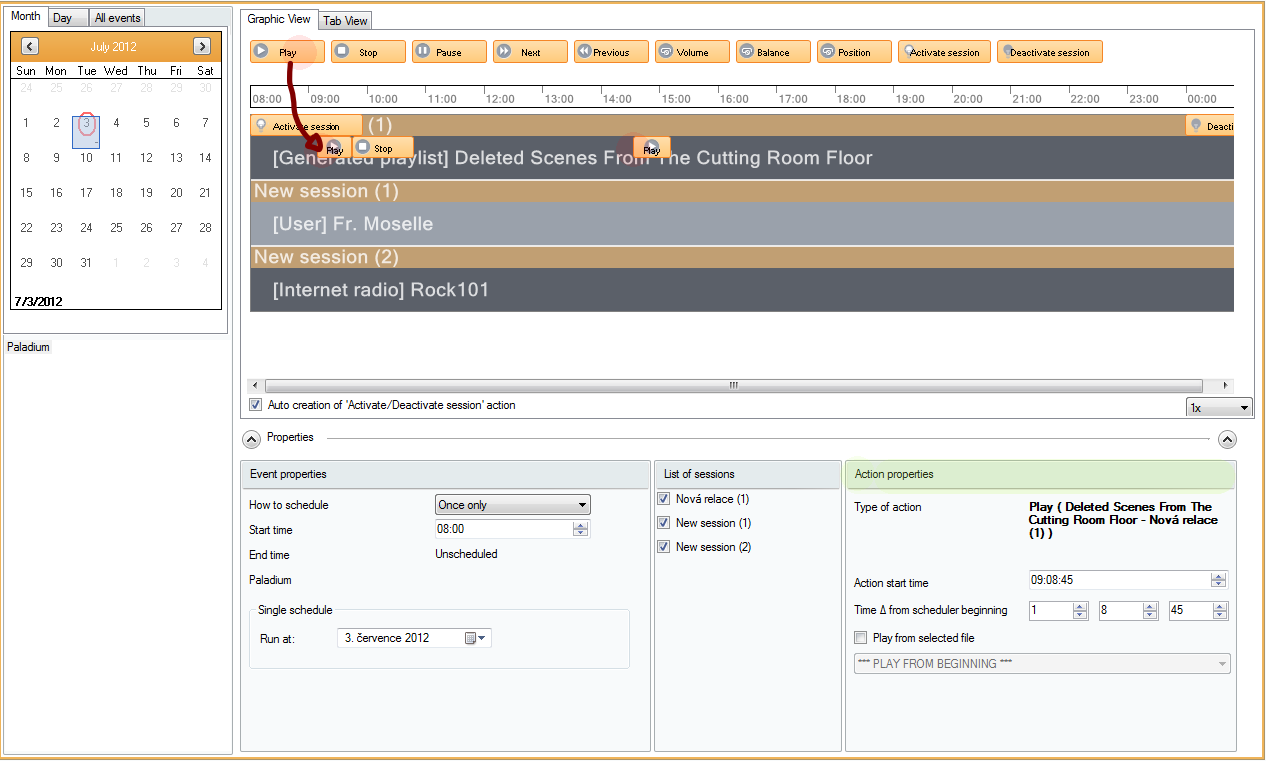 |
Action Setting and Display
The Action Setting and Display figure above shows an example of a scheduled action. The Activate/Deactivate session actions are added automatically to the beginning and end of each event. If you disable this property, however, the scheduled actions will not start running in an inactive session. Also, all playlists are switched on automatically in a session that moves into the active state. Therefore, assign the STOP action to the beginning of the playlists that are not to be played.
Drag&drop the required action above the time axis of the event from the offer of actions in the time axis header (see the figure). Always move the action to the playlist to be controlled within one session. A session can contain multiple playlists and all the playlists can be administered.
You can modify the actions created as mentioned above according to the requirements of the given event. Click an action and edit its parameters in the Action setting window. Refer to the Action Setting and Display figure for details on the Play action.
You can set other parameters than as shown in Fig. 3 for different types of actions. You can set the start time only for most action types and other properties for some of them:
- Play, Stop, Others, Previous and Activate/Deactivate session – set the start time only.
- Volume – set the playlist volume – the volume level plus a smooth volume change.
- Balance – set the playlist balance – in addition to start time, set a smooth balance change via the Change duration time option.
In the List of sessions it is possible to choose the sessions that shall be used for the event.
Event Display
There is an event list in the left part of the Scheduler tab. Display the list in any of the following views: Month, Day or All events by selecting a card.
- Month view – select this card to display a calendar for navigation. Click a date to run the events associated with the selected date.
- Day view – having selected a date in the Month view, click the Day card to display the required day details. Like with the Month card, you can only see the actions assigned to the selected date.
- All events – select this card to display all the events available.