3.1 Web Browser Configuration
Web Browser Access
While the serial console interface enables you to change the basic gateway parameters only, the web browser gives you access to all parameter settings and services available in the 2N® OfficeRoute gateway. To establish connection with the gateway, enter the gateway IP address into the Internet address setting line in the browser, e.g. Mozilla Firefox or Internet Explorer.
If you have connected all parts properly and set the correct gateway and PC IP addresses, the configuration wizard should get displayed.
Configuration Wizard
If you are connecting to the 2N® OfficeRoute gateway the first time or after a factory reset, the configuration wizard should appear. The configuration wizard will lead you through the 2N® OfficeRoute setting. After entering the required information you will be able to use a high speed data Internet connection, make outgoing and incoming calls to GSM and UMTS networks and benefit from the PBX features.
 |
Figure 3.1: Configuration Wizard - Introduction
1. Administrator Password
Enter a new administrator password for login to the web interface. It is important to change the password to ensure your data security. The administrator username is Admin. Store your password (default = 2n) by clicking on the icon in the navigation bar.
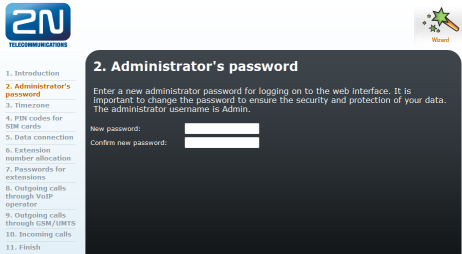 |
Figure 3.2: Configuration Wizard - Administrator Password
2. Time Zone
Select the applicable time zone. A correct time zone setting is important for a proper working of the time-related features and call records. It also ensures a due switching of the daylight-saving time.
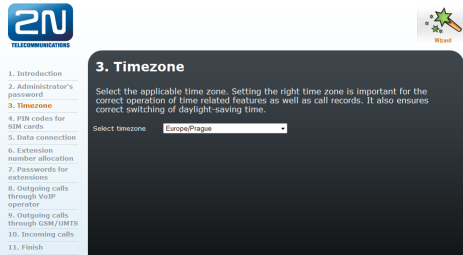 |
Figure 3.3: Configuration Wizard - Time Zone
3. PIN Codes for SIM Cards
The following table lists the inserted SIM cards. If a SIM card requires a PIN code, it cannot be read until the PIN code has been entered. You will find the PIN code in the SIM card package that you received from your GSM provider. If no PIN code prompt appears for a SIM card, it is unnecessary to enter the PIN. After setting the PIN codes the gateway will restart. Please wait for the restart to complete and once again retrieve the set-up wizard page.
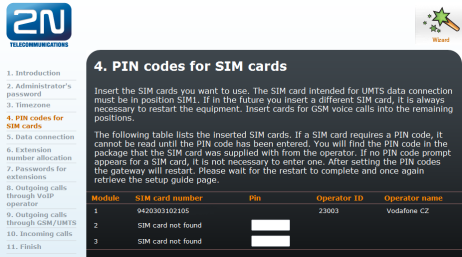 |
Figure 3.4: Configuration Wizard - PIN Codes
4. Data Connection
In this step you can set the data connection through the UMTS SIM card. Enter the APN, username and password for data connection if prompted by the network (you will find this information in the SIM card package, or call the provider's information line). If you cross the 'Automatic connection activation' checkbox, the Internet connection will always be active, even after a restart or temporary loss of power.
Caution
- The SIM card intended for UMTS data connection must be in the SIM1 position. If, in the future, you insert a different SIM card, it is always necessary to restart the equipment. Insert the cards for GSM voice calls in the remaining positions.
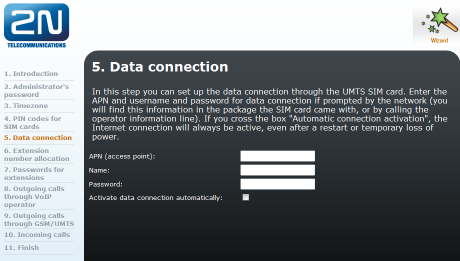 |
Figure 3.5: Configuration Wizard - Data Connection
5. Extension Number Allocation
IP extensions can now be configured. Enter the number of the IP extensions that you want to establish automatically. The extensions will be assigned numbers 100, 101, 102... If you have the 2N® OfficeRoute version with an analogue line, it will have an analogue phone with number 199. After closing the wizard, you can still change the settings any time by going into 'User management'.
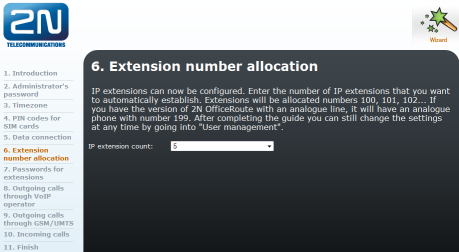 |
Figure 3.6: Configuration Wizard - Extension Number Allocation
6. Passwords for Extensions
When creating IP extensions remember to define a password to be used for IP phone configuring. The password will be displayed on the screen, so please take care to ensure the password security. After closing the wizard, you can change the password any time by entering User management.
Caution
- Every active extension must have a password for security reasons. Do not leave the Password field empty.
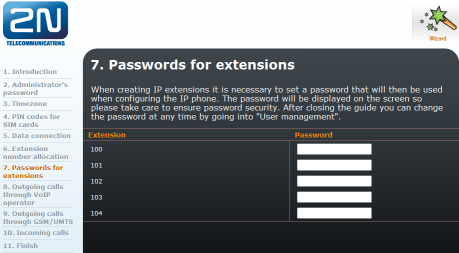 |
Figure 3.7: Configuration Wizard - Passwords for Extensions
7. Outgoing Calls through VoIP Provider
To use 2N® OfficeRoute – for outgoing calls through a VoIP provider (it is necessary to have an allocated user account), enter the requested information as follows:
SIP server address – domain or IP address of the provider's SIP server;
SIP name – allocated phone number or account name;
User name – name for authentication (it can be the same as the SIP name);
Password – assigned password.
It is also necessary to specify the prefix for the call to be routed through the VoIP provider.
Caution
- '0' is added automatically before the prefix entered to make the Least Cost Router (LCR) work properly.
Note
- Even if you fail to fill in the SIP line parameters, the line will be added to configuration for later use.
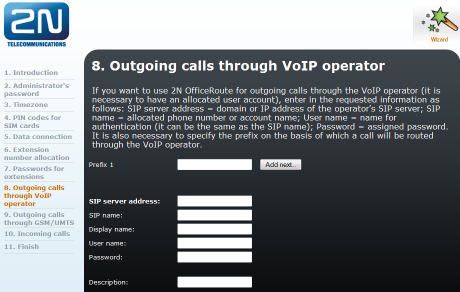 |
Figure 3.8: Configuration Wizard - SIP Provider
8. Outgoing Calls through GSM/UMTS
When making outgoing calls outside the office always start by dialling zero. If you have set the VoIP provider in the previous step, calls to numbers with no prefix will be routed through VoIP; all the other calls will be routed through the first vacant UMTS/GSM module.
 |
Figure 3.9: Configuration Wizard - Outgoing Calls through GSM/UMTS
9. Incoming Calls
Select where incoming calls should be routed. If you select To DISA line, a welcome note will be played and the caller can choose an extension number. If you select To extension, incoming calls will be directed to the extension you have selected.
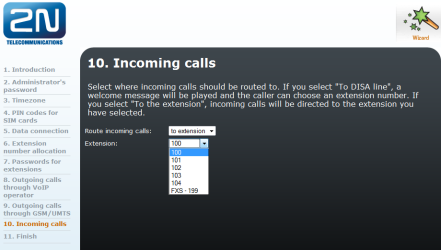 |
Figure 3.10: Copnfiguration Wizard - Incoming Calls
10. Finish
2N® OfficeRoute is now ready for use.
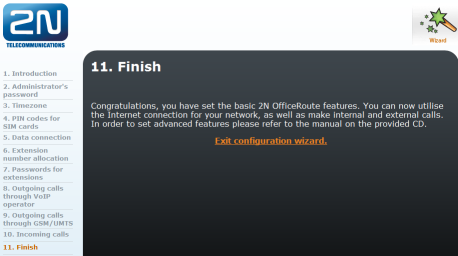 |
Figure 3.11: Configuration Wizard - Finish
Note
- If you want to use the wizard again, you have to perform the 2N® OfficeRoute factory reset (see chapter 4.3).