5.1 SC Server Application
2N® SmartCOM Server (Server) is an application necessary for the2N® SmartCOM Control Panel (Control Panel) operation, providing communication between the Control Panel and the terminal.
Caution
- The 2N® SmartCOM Server must be installed on a PC accessible from a public Internet. Or, a NAT rule has to be defined to provide access to such PC. Otherwise, the terminals cannot be connected to the Server. You can select the ports to be forwarded to your LAN via the NAT during installation.
Installation
Once launched, the installation program will scan your PC. If it finds another
2N® SmartCOM Server version, it will ask you whether to uninstall it. If you select No, the wizard will be terminated. If you select Yes, the original version will be removed. Then you will be asked whether or not to remove the configuration files. If you select No, the current configuration will be retained and the application will only be updated. Now the 2N® SmartCOM Server Setup Wizard is launched. Follow the wizard instructions. Select the directory for the 2N® SmartCOM Server to be installed. By default, C:\Program Files\2N TELEKOMUNIKACE\2N SmartCOM\SC Server is used.
Also select the port for the application to communicate with the terminals and other 2N® SmartCOM Control Panel applications. Make sure that the port is accessible from the Internet (see above) and properly configured in all the terminals and applications. Http accessibility is necessary as the selected port provides a listing of LOG files and can be used for firmware downloading to terminals. Firmware is downloaded whenever upgrade is initiated by the Control Panel or the address is entered into the terminal.
Here you can also set the port for the AT API; refer to Subs. 5.4 for details. Now the wizard is ready to install the 2N® SmartCOM Server. It displays the list of settings. Check the set parameters carefully as the values cannot be changed without reinstallation when the installation has been completed! If you find an error, push the Back button to return to the respective window. If all the settings are OK, click Install to continue. The wizard now installs the 2N® SmartCOM Server. The 2N® SmartCOM Server service is launched automatically after installation. If the automatic launch fails for any reason, launch the service manually. Now the 2N® SmartCOM Server is ready for use.
Note
- The 2N® SmartCOM Server requires 500 MB of free disk space at least for installation.
- Use the 2N® SmartCom Control Panel application to make changes in the 2N® SmartCom Server settings.
Licensing
All the 2N® SmartCOM Server functions are subject to licence. For your first installation of the application onto your PC, you will receive the trial licence for 800 h operation and connection of 2 users and 2 terminals.
Caution
- The clock counter is increased by 1 by every 2N® SmartCOM Server restart.
The 2N® SmartCOM Licence Tool is installed together with the Server. Having launched the application, you can see the Server version, ID, status and other service settings. There is also information on the currently installed licence and the count of exhausted licence hours. See the figure below.
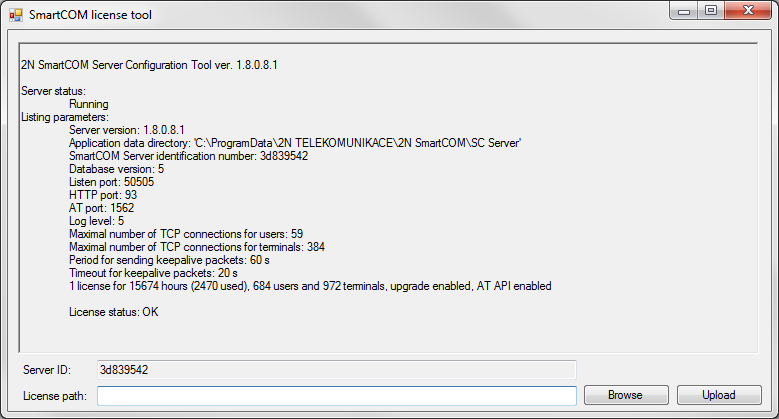 |
Figure: Licence Tool
A unique ID is generated for your Server during installation. To extend your licence send this code including your licence requirements to sales@2n.cz.
Having received the licence file, launch the Licence Tool application and enter the path to this file into the Licence path parameter. Click Upload to add the licence to the Server directory and restart the Server to update the licence data. The licence status will change into OK. Now, the last row of the Listing parameters includes all the licensed server properties: count of users, count of terminals and AT API and terminal upgrade enable/disable.
Management
SC_config is an administrator program launched in the 2N® SmartCOM Server control row. This application can help you configure all the server parameters: start/stop the Server or export/import the Server database.
Caution
- Use this program to export and import databases safely.
- You are not advised to copy the sc_config.db database files between the Servers to avoid data loss.
Tip
- The application is launched in the command row. The common path to the program is identical for all WINDOWS XP, Vista and 7 versions:
- c:\Program Files\2N TELEKOMUNIKACE\2N SmartCOM\SC Server\sc_config.exe
If sc_config.exe is launched without any parameter, the program will list all available information on the Server. A typical listing is as follows.
 |
Figure: sc_config.exe
Database Export and Import
You can export the database under normal operation. When the program is launched, a copy of the current database is generated for export purposes so that the database cannot be changed during export.
Launch sc_config with the –cExportDatabase parameter to initiate exporting.
The command is as follows:
C:\Program Files\2N TELEKOMUNIKACE\2N SmartCOM\SC Server\sc_config.exe –cExportDatabase
The program now creates a new file called, e.g., db–20120221095921–export.xml. The number in the filename consists of the current database export date and time in the YYYYMMDDhhmmss format.
The database is saved into a user data folder and so can be different for different systems.
Note
- A typical storage for WINDOWS XP is C:\Documents and Settings\All Users\Application Data\2N TELEKOMUNIKACE\2N SmartCOM\SC Server\db–20120221095921–export.xml.
- A typical storage for WINDOWS Vista and 7 is C:\ProgramData\2N TELEKOMUNIKACE\ 2N SmartCOM\SC Server\db–20120221095921–export.xml.
You may import the database with the Server switched off only. If the Server is running, the database cannot be imported and the program signals an error. Stop the Server using the following command:
C:\Program Files\2N TELEKOMUNIKACE\ 2N SmartCOM\SC Server\sc_config.exe –cStopServer
To import the database, enter the –cImportDatabase parameter and set the absolute path to the file.
C:\Program Files\2N TELEKOMUNIKACE\ 2N SmartCOM\SC Server\sc_config.exe –cImportDatabase "C:\ProgramData\2N TELEKOMUNIKACE\ 2N SmartCOM\SC Server\db–20120221095921–export.xml”
When you enter this command, all the database tables will be imported one after another. A successful import of each table is always confirmed after completion.
Caution
- The path to the file with the exported database must always be given in brackets. If no path is found, the current database will be deleted and replaced with a new blank one.
Note
- If the database contains a high number of users and terminals, the import of tables will take a rather long time, typically a few minutes.
Restart the Server upon successful import. Enter the following command:
C:\Program Files\2N TELEKOMUNIKACE\ 2N SmartCOM\SC Server\sc_config.exe –cStartServer
Setting Options
The sc_config program offers further server parameter settings. See below for the long list.
Tip
- These parameters are set as program parameters, i.e. program name<space>;program parameter.
General commands
-l
- The command writes out all the parameters.
--help or -h
- The command displays Help.
--version or -V
- The command writes out the program version.
-d <data directory>;
- The command sets the Server data folder.
Parameter get commands
-gListenPort
- The command writes out the Server listening port.
-gHttpPort
- The command writes out the HTTP port.
-gAtPort
- The command Writes out the AT API port.
-gTerminalPV1url
- The command displays URL for terminal upgrade via protocol version 1.
-gEncryptionKey
- The command displays the configured encryption key.
-gEncryptionMode
- The command displays the configured encryption mode (0: disabled, 1: optional, 2: forced).
Parameter set commands
-sListenPort <listen_port>;
- The command sets the Server listening port.
-sHttpPort <http_port>;
- The command sets the Server HTTP port.
-sAtPort <at_port>;
- The command sets the AT API port.
-sLogLevel <log_level>;
- The command sets the Server log level (1–5).
-sMaxUser <max_user_tcp_conn>;
- The command sets the maximum count of users to be connected to the Server at one time. The maximum value is determined by the licence.
-sMaxTerm <max_terminal_tcp_conn>;
- The command sets the maximum count of terminals to be connected to the Server at one time. The maximum value is determined by the licence.
-sKeepAliveTimeout <keepalive_timeout>;
- The command sets the timeout for the client (user/terminal) to respond to a KeepAlive packet before disconnection.
-sKeepAlivePeriod <keepalive_period>;
- The command sets the KeepAlive packet sending interval. This value must be greater than the KEEP_ALIVE_TIMEOUT.
-sResetAdmin
- The command resets the user password Admin to default 2n.
-sTerminalPV1url pv1_url
- The command sets the URL address for update of terminals with the SmartCOM protocol version 1 1 (the oldest one).Use the "-reset" parameter to reset the address to the default value. ('http://star.2n.cz/~fejfar/SC_1-3-1-3-2.bin').
-sEncryptionKey
- The command sets the encryption key of the length of 32 hexa characters.
-sEncryptionMode
- The parameter sets the encryption mode (0: disabled, 1: optional, 2: forced).
Server commands
-cStartServer
- The command starts the SC Server.
-cStopServer
- The command stops the SC Server.
-cRestartServer
- The command restarts the SC Server.
-cExportDatabase
- The command exports the databse to an XML file.
-cImportDatabase <XML_file>;
- The command imports the database from an XML file. Make sure that the Server is stopped to make the operation successful.