5.2 Control Panel Application
The 2N® SmartCom Control Panel provides a comfortable administration of terminals and users/user groups and assigns users relevant terminal communication and administration rights. Also, it can create virtual TCPs and serial ports and connect terminals to them.
Caution
- The 2N® SmartCom Control Paneluses the English language version only.
Installation and Login
Once launched, the installation program will scan your PC. If it finds another
2N® SmartCom Control Panel version, it will ask you whether to uninstall or modify it. If you select Uninstall, the original version will be uninstalled.
Now the 2N® SmartCom Control Panel Setup Wizard is launched. Follow the wizard instructions. Select the directory for the 2N® SmartCom Control Panel to be installed. By default, C:\Program Files\2N TELEKOMUNIKACE\2N SmartCOM\ is used. Also, select whether the application shall be installed for the currently signed-in user or all PC users.
Now the wizard is ready to install the 2N® SmartCom Control Panel. It automatically adds an item to the Start menu and the application icon to the desktop.
Note
- 2N® SmartCom Control Panel requires 150 MB of free disk space at least for installation.
Now the 2N® SmartCom Control Panel is ready for use. Click the shortcut item on the desktop (see the figure below) or select the Start item to start the application.
Upon the first launch, you will be asked to enter the username and password and then the server and server listening port. After you do so, use the Sign in item.
 |
Figure: 2N® SmartCOM Control Panel
Application Icon
Caution
- Important! A default user with the Administrator login was created during the 2N® SmartCom Server installation to make it possible to connect to the server and configure all the other users. The default user login data are as follows:
- Name: Admin
- Password: 2n
If you use one and the same PC for the 2N® SmartCom Control Panel and the Server, you can enter the local loop address 127.0.0.1 or the local host text as the server address. To log in to another server, enter its local or public IP address. Or, use the DNS names if you use DNS. Enter the listening port into the Port item as selected during your 2N® SmartCom Server installation. Contact you network administrator for correct settings. See the figure for an example.
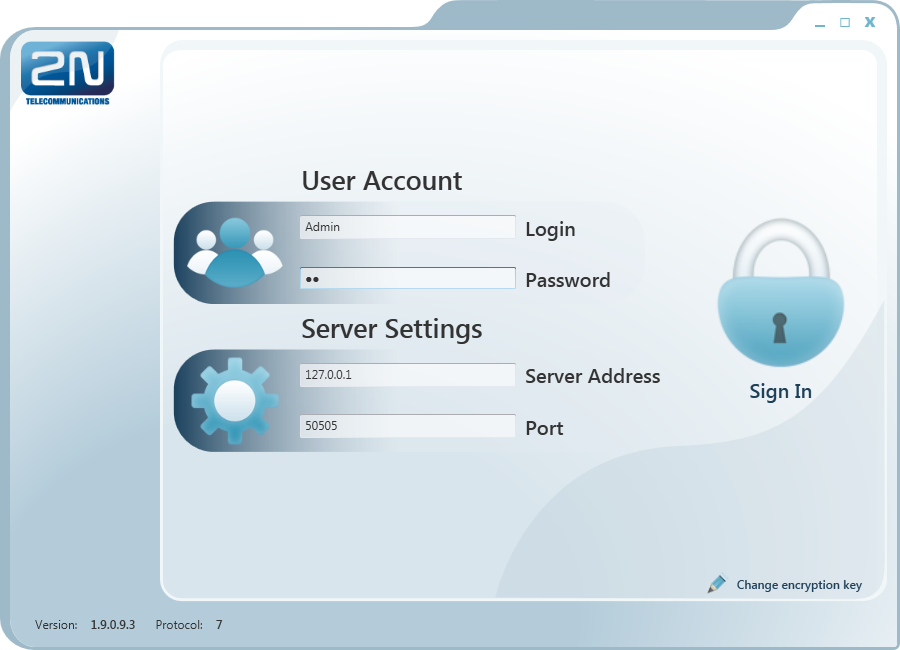 |
Figure: Sign-In Window
The encryption settings are in the right-hand bottom corner. Click the Change encryption key to display the encryption setting window. If the server requires so, enable packet encryption and set the key. Enter the key either in the ASCII format, where HEX is completed automatically with the translated characters, or enter the HEXA key. The key length is 16 ASCII / 32 HEXA characters. Press OK to sign in with applied encryption. A message will notify key or encryption errors if any if supported by the server.
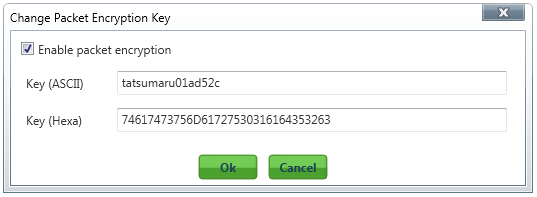 |
Encryption Settings
Introduction to Application
You will be shown the application layout and main controls in this subsection. The application can be viewed in two ways: the User mode and the Admin mode. The User may see the menus necessary for its work with terminals only. The Administrator also views the user/user group managing and server setting menus.
The Status line displays the following information. From the left: application version, currently signed-in user, count of configured terminals, count of on-line terminals, count of configured virtual ports, current server address, server listening port and application status.
Find the Sign-out button in the bottom part.
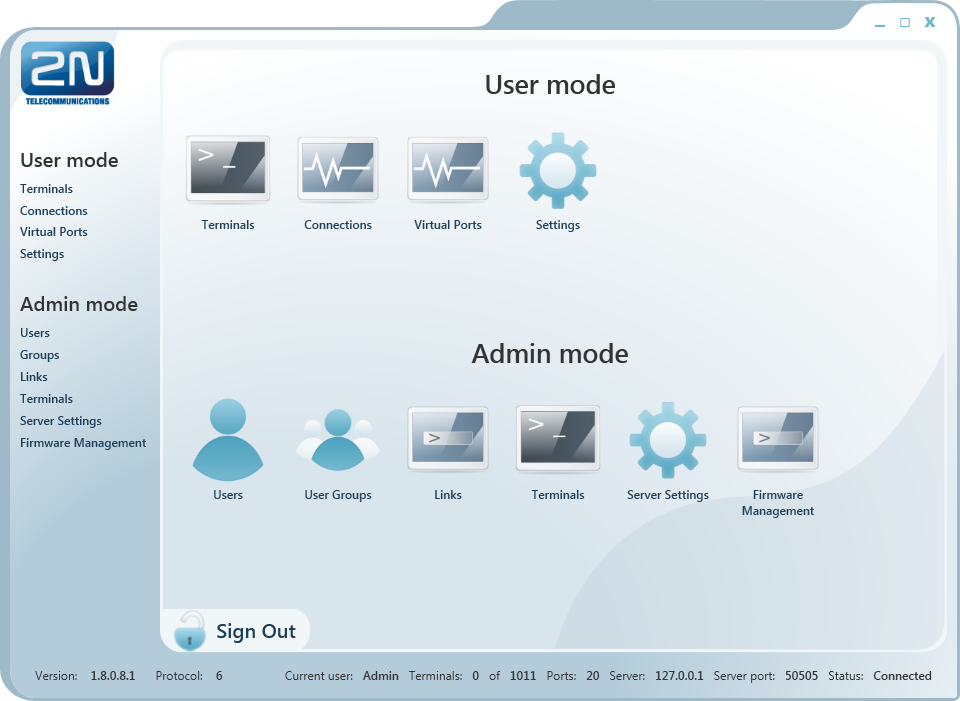 |
Figure: Application Window
Basic Controls | ||
|---|---|---|
| Push Home to return to the main menu. | |
| Click Refresh to update the object statuses in the selected menu. The button is used, e.g., for updating terminal statuses in the Terminals or Connections menu. | |
| Push the action buttons to Start/Stop communication with the terminal. | |
| Push Add User to add a user. | |
| Click Add group to add a user group. | |
| Use the generic Add button to add objects to groups and create new virtual ports and terminals. | |
| Click Change to modify the parameters already configured. | |
| Click Remove to remove objects from configuration. | |
| The button changes the user password and may be used by the Administrator only. | |
| Push Create to create new objects. | |
| Click Cancel to cancel the currently made changes. | |
| Click Save to save the currently made changes and send them to the Server configuration. | |
| Push this button to install a virtual serial port driver. | |
| Push the button to log out the currently signed-in user. | |
| Use Search for searching relevant table columns. | |
| Use the button to control the relay contacts. | |
| Use the button to display details on the terminal. | |
| Click Update to upgrade firmware of selected terminals. | |
| Click Default to reset the factory default values for all parameters. | |