Lift control – configure 2N systems to control lift access
Lift control – configure 2N systems to control lift access
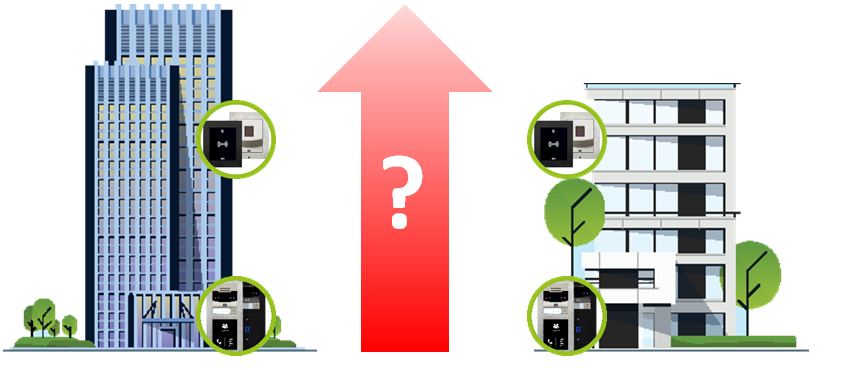
You can setup 2N RFID/Keypad/Bluetooth/Fingerprint equipped IP units to control which floors authorized user can access.
The whole scenario allows interconnection of 2N IP units with AXIS A9188 I/O Relay Modules, which tells the lift which floor can be accessed after a person authorizes using the 2N IP unit as shown on the following image:
Types of most typical scenarios are:
- A 3rd party RFID card reader in the lift cabin is connected over Wiegand to a 2N Access Unit or located at the top of the shaft or in the Machine room. The 2N Access unit communicates over IP with the Axis A9188, which is connected to the Lift Controller. The Lift Controller uses CANbus (or similar) to control the buttons in the Lift Car.
- A 2N Access Unit or supported intercom is installed in the lift cabin requiring an Ethernet cable connection from the machine room. This is the most convenient scenario. The 2N device communicates again over IP with the AXIS A9188 in the same way as above.
- A 2N Access Unit or supported intercom is installed in the lift cabin, which does not have an Ethernet connection. 2N® 2Wire converters are used to bring IP connectivity and PoE through the Lift car’s traveling cable over available 2 wires. This provides IP connectivity for communication between the 2N device and the Axis A9188, which is linked with the Lift Controller.
Requirements
Lift control solution requires:
- (Optional) 2N® Access Commander 1.13 and later. Starting with 2N® Access Commander 2.0 you need at least an Advanced license for lift control.
- 2N OS 2.27 and later. 2N® Access Commander 2.0 requires firmware 2.32 for compatibility.
- Lift license (part of the Gold license - 9137909) for IP intercoms.
The license is available for the following models: 2N® IP Style, 2N® IP Verso, 2N® IP Force, 2N® IP Safety, 2N® IP Vario. - AXIS A9188 I/O Relay Module (2N order no. 9160501, AXIS order no. SKU 0820-001) firmware 1.65.0.2 or newer
Technical parameters
- AXIS A9188 communicates with lift I/O Relay Module using its relays wired to lift system
- 2N devices communicate with AXIS A9188 via IP protocol HTTPS
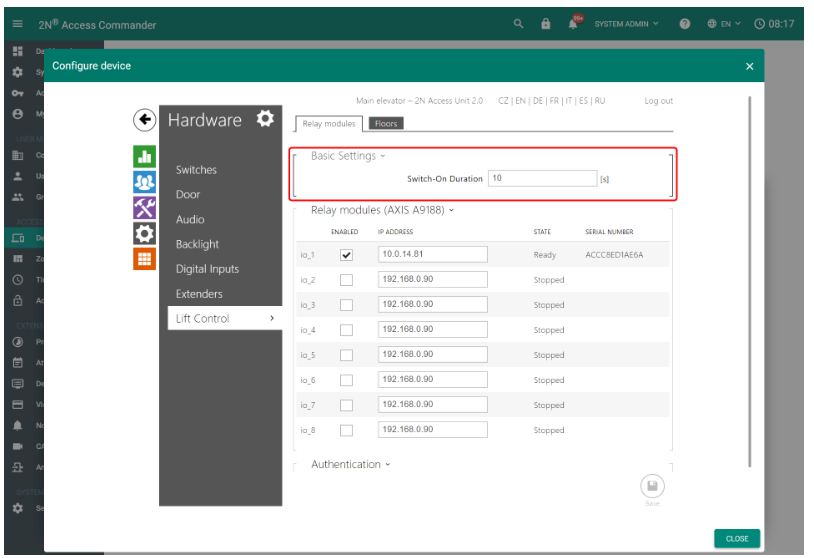
- Time for relays open/close time is set by 2N IP unit to 10s (can be changed) which directly corresponds with time person have after his/her authorization on 2N IP unit to push floor button in the lift
- One 2N device can connect to up to 8 AXIS A9188 I/O Relay Modules
- Multiple 2N devices are not recommended to connect to same AXIS A9188 I/O Relay Module
The following guide will explain, how to set the whole scenario to allow a person access to certain floors in the lift using their credentials (RFID, Code, Bluetooth or Fingerprint).
Setting up AXIS A9188
Physically connect the relay wires on the AXIS A9188 to the inputs on the Elevator Controller.
Documentation for the AXIS A9188 I/O Relay Module is available at the following address: https://www.axis.com/en-us/products/axis-a9188/support-and-documentation
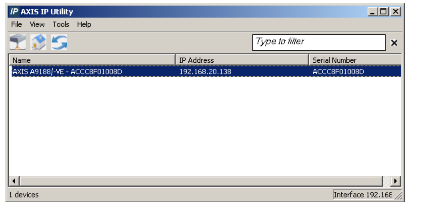
Connect the AXIS A9188 I/O Relay Module to the IP network using an Ethernet cable to set up the AXIS A9188. AXIS A9188 I/O Relay Module supports PoE and DHCP, to locate it on the network use AXIS IP Utility which can be downloaded here: AXIS IP Utility
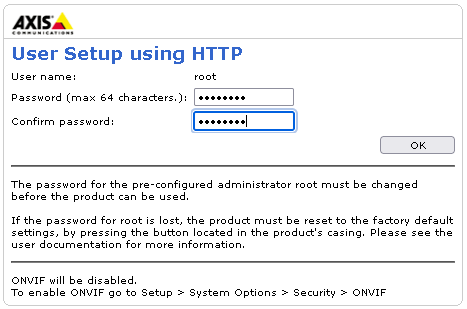
Use a web browser to access the AXIS A9188 I/O Relay Module configuration.
Create a root password of your choice:
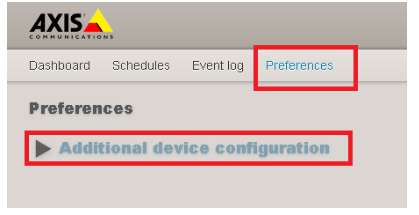
Go click on Preferences -> Additional configuration.
Select System Options -> Security -> Certificates and check the default self-signed certificate is available.
(optionally you can create new self-signed certificate or upload own certificate)
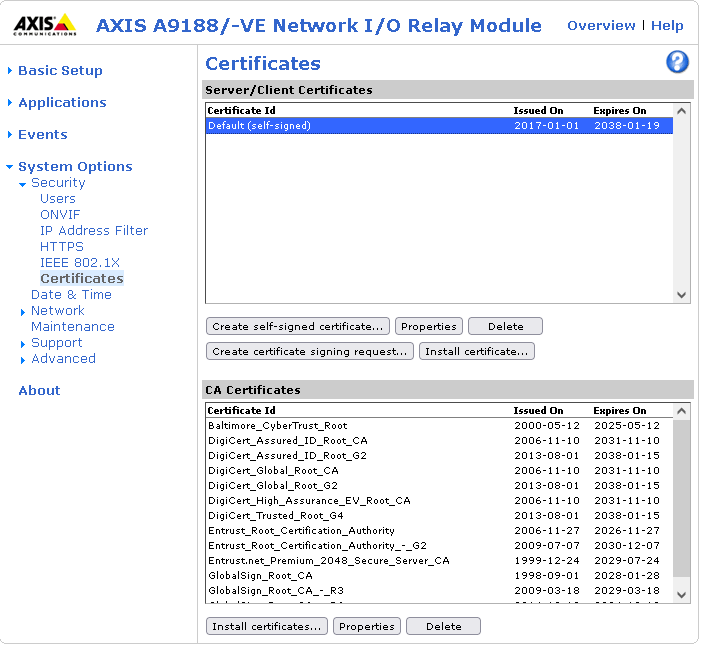
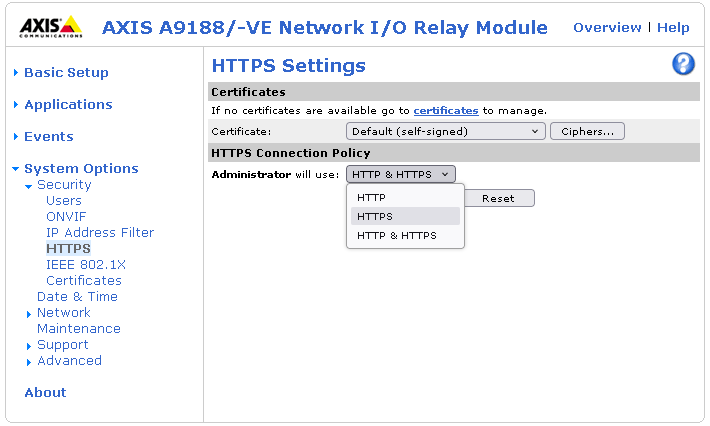
In System Options -> Security -> HTTPS set one of certificate to allow communication with AXIS A9188 using HTTPS or keep the default certificate in use.
(You can also leave the default setting to HTTP & HTTPS).
Configure the 2N unit to communicate with the AXIS 9188 I/O Relay Module
- Make sure the 2N device has Gold license (Lift feature included) installed and firmware 2.27 or newer is used.
Connect the 2N unit to the AXIS A9188 I/O Relay Module in section Hardware - Lift Control by specifying the IP address of AXIS A9188.
Make sure you fill in the authentication as well (admin credentials for the AXIS relay module - root/root by default).
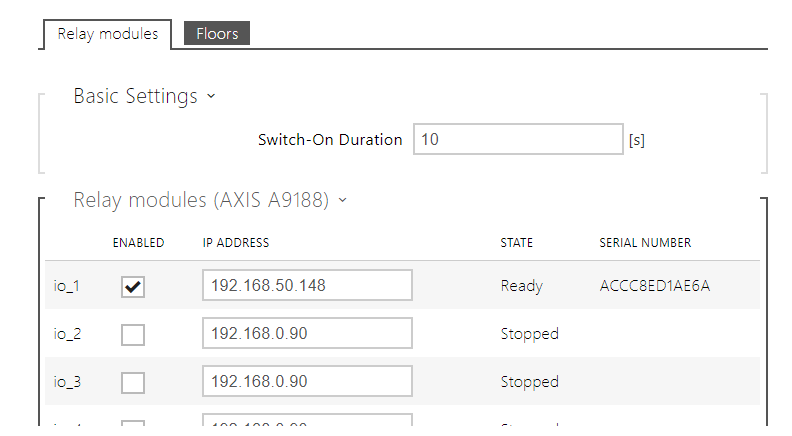
All AXIS A9188 I/O Relay Modules connected to the same 2N unit needs to have same administrator user with the same password (root for example) - maximum of 8 AXIS A9188 I/O Relay Modules can be connected to one 2N unit allowing for a maximum of 64 floors
2N® Access Commander
Version 3.0+
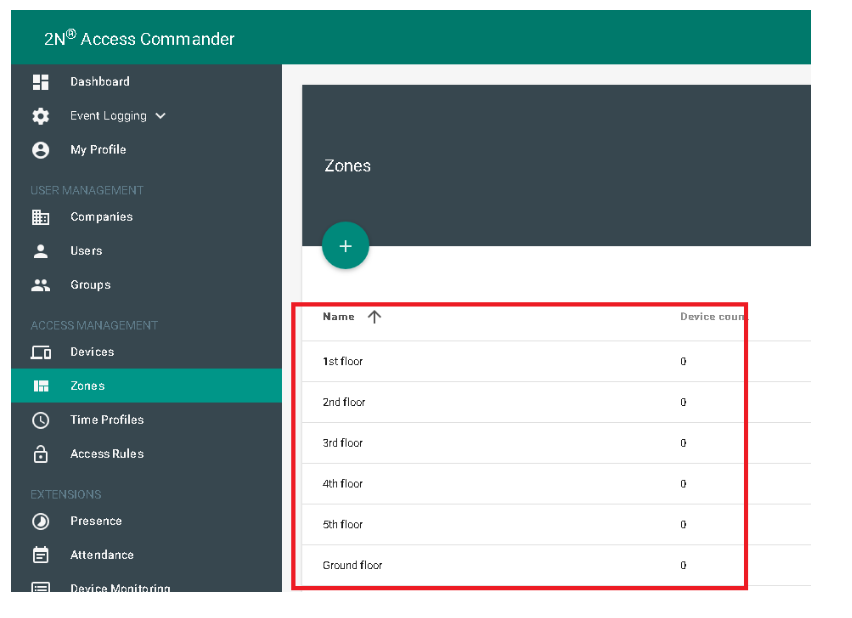
- Create a Zone for each Floor in the section Zones. It is correct that these Zones will not have any device assigned, since lift enabled devices cannot be added to any Zone.
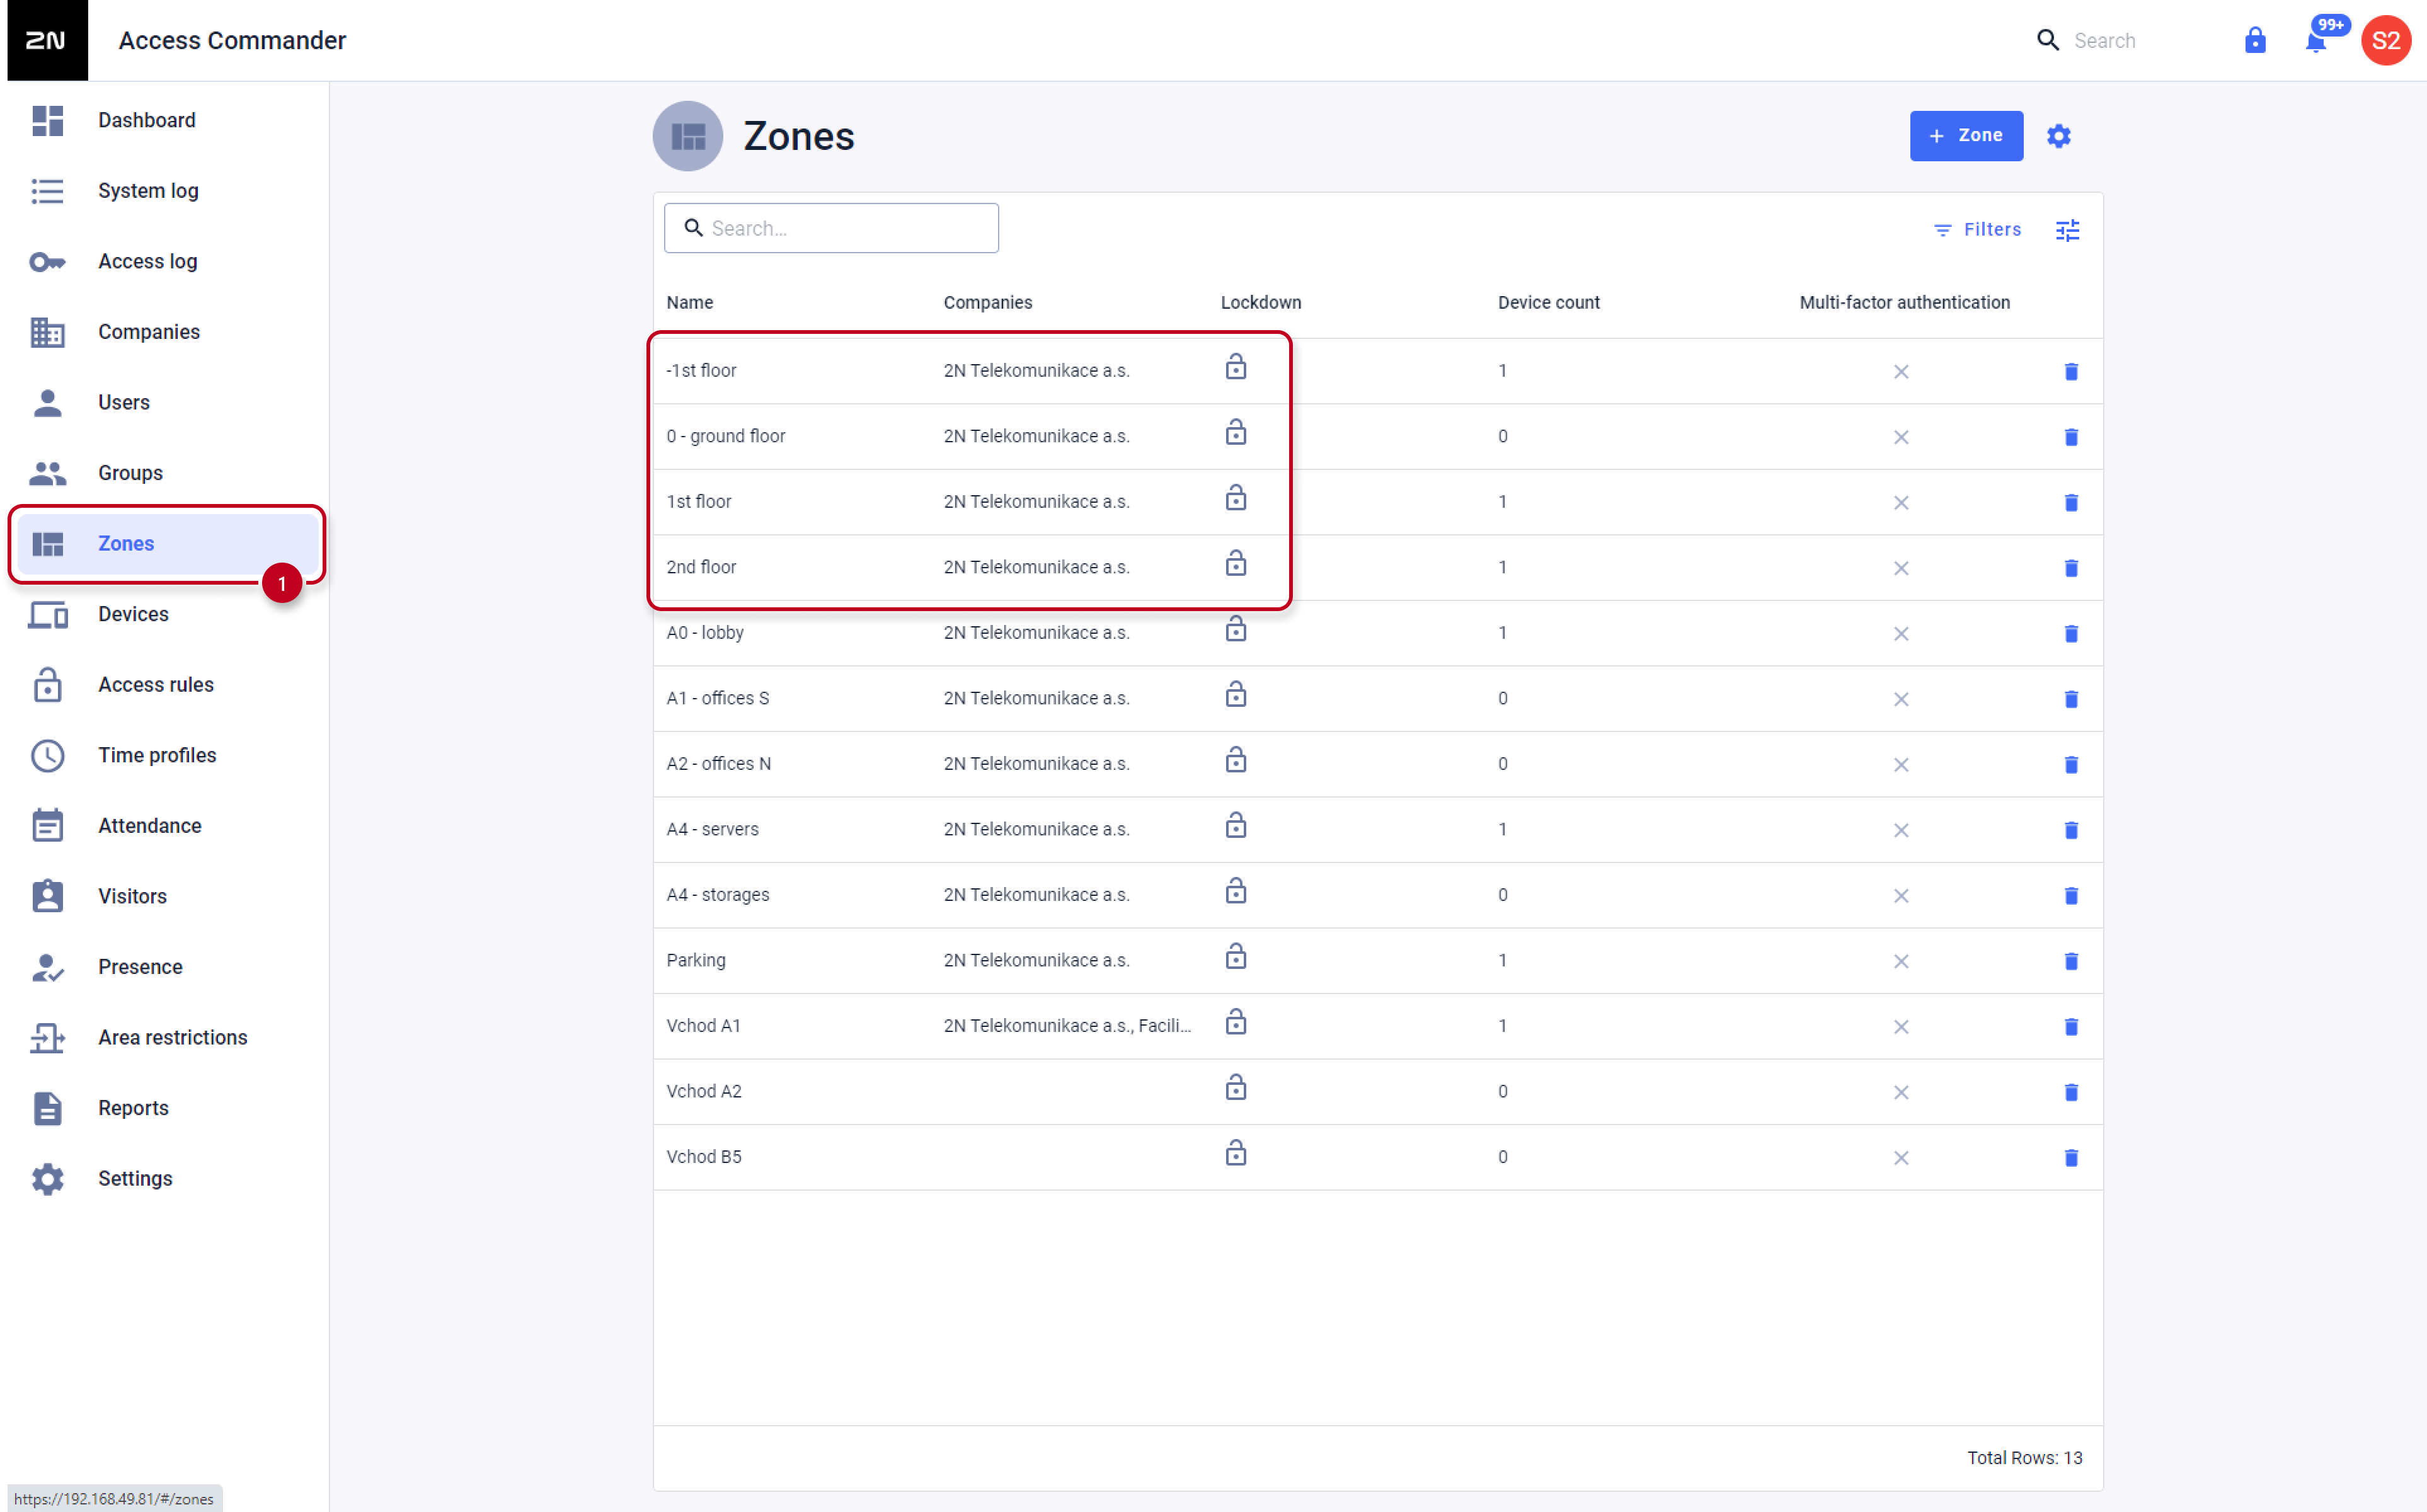
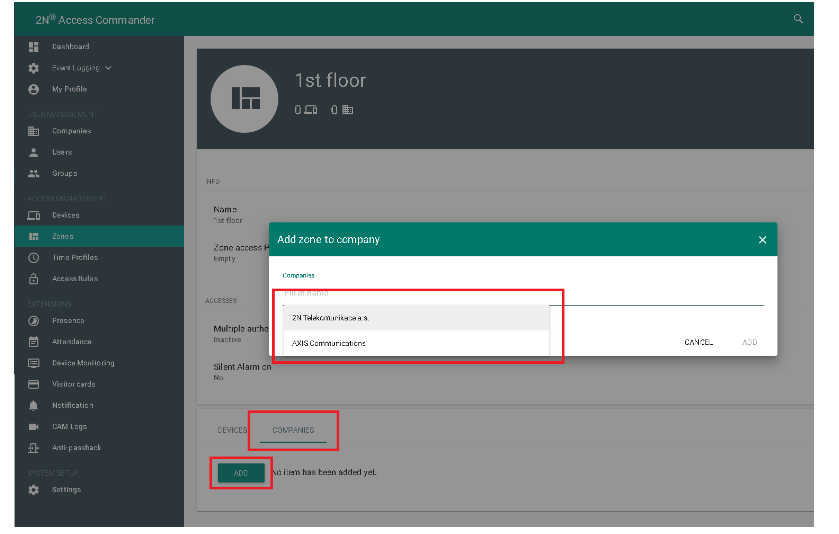
- Assign each zone to the Company which contains users who are allowed access to that particular floor (multiple Companies can be selected if needed).
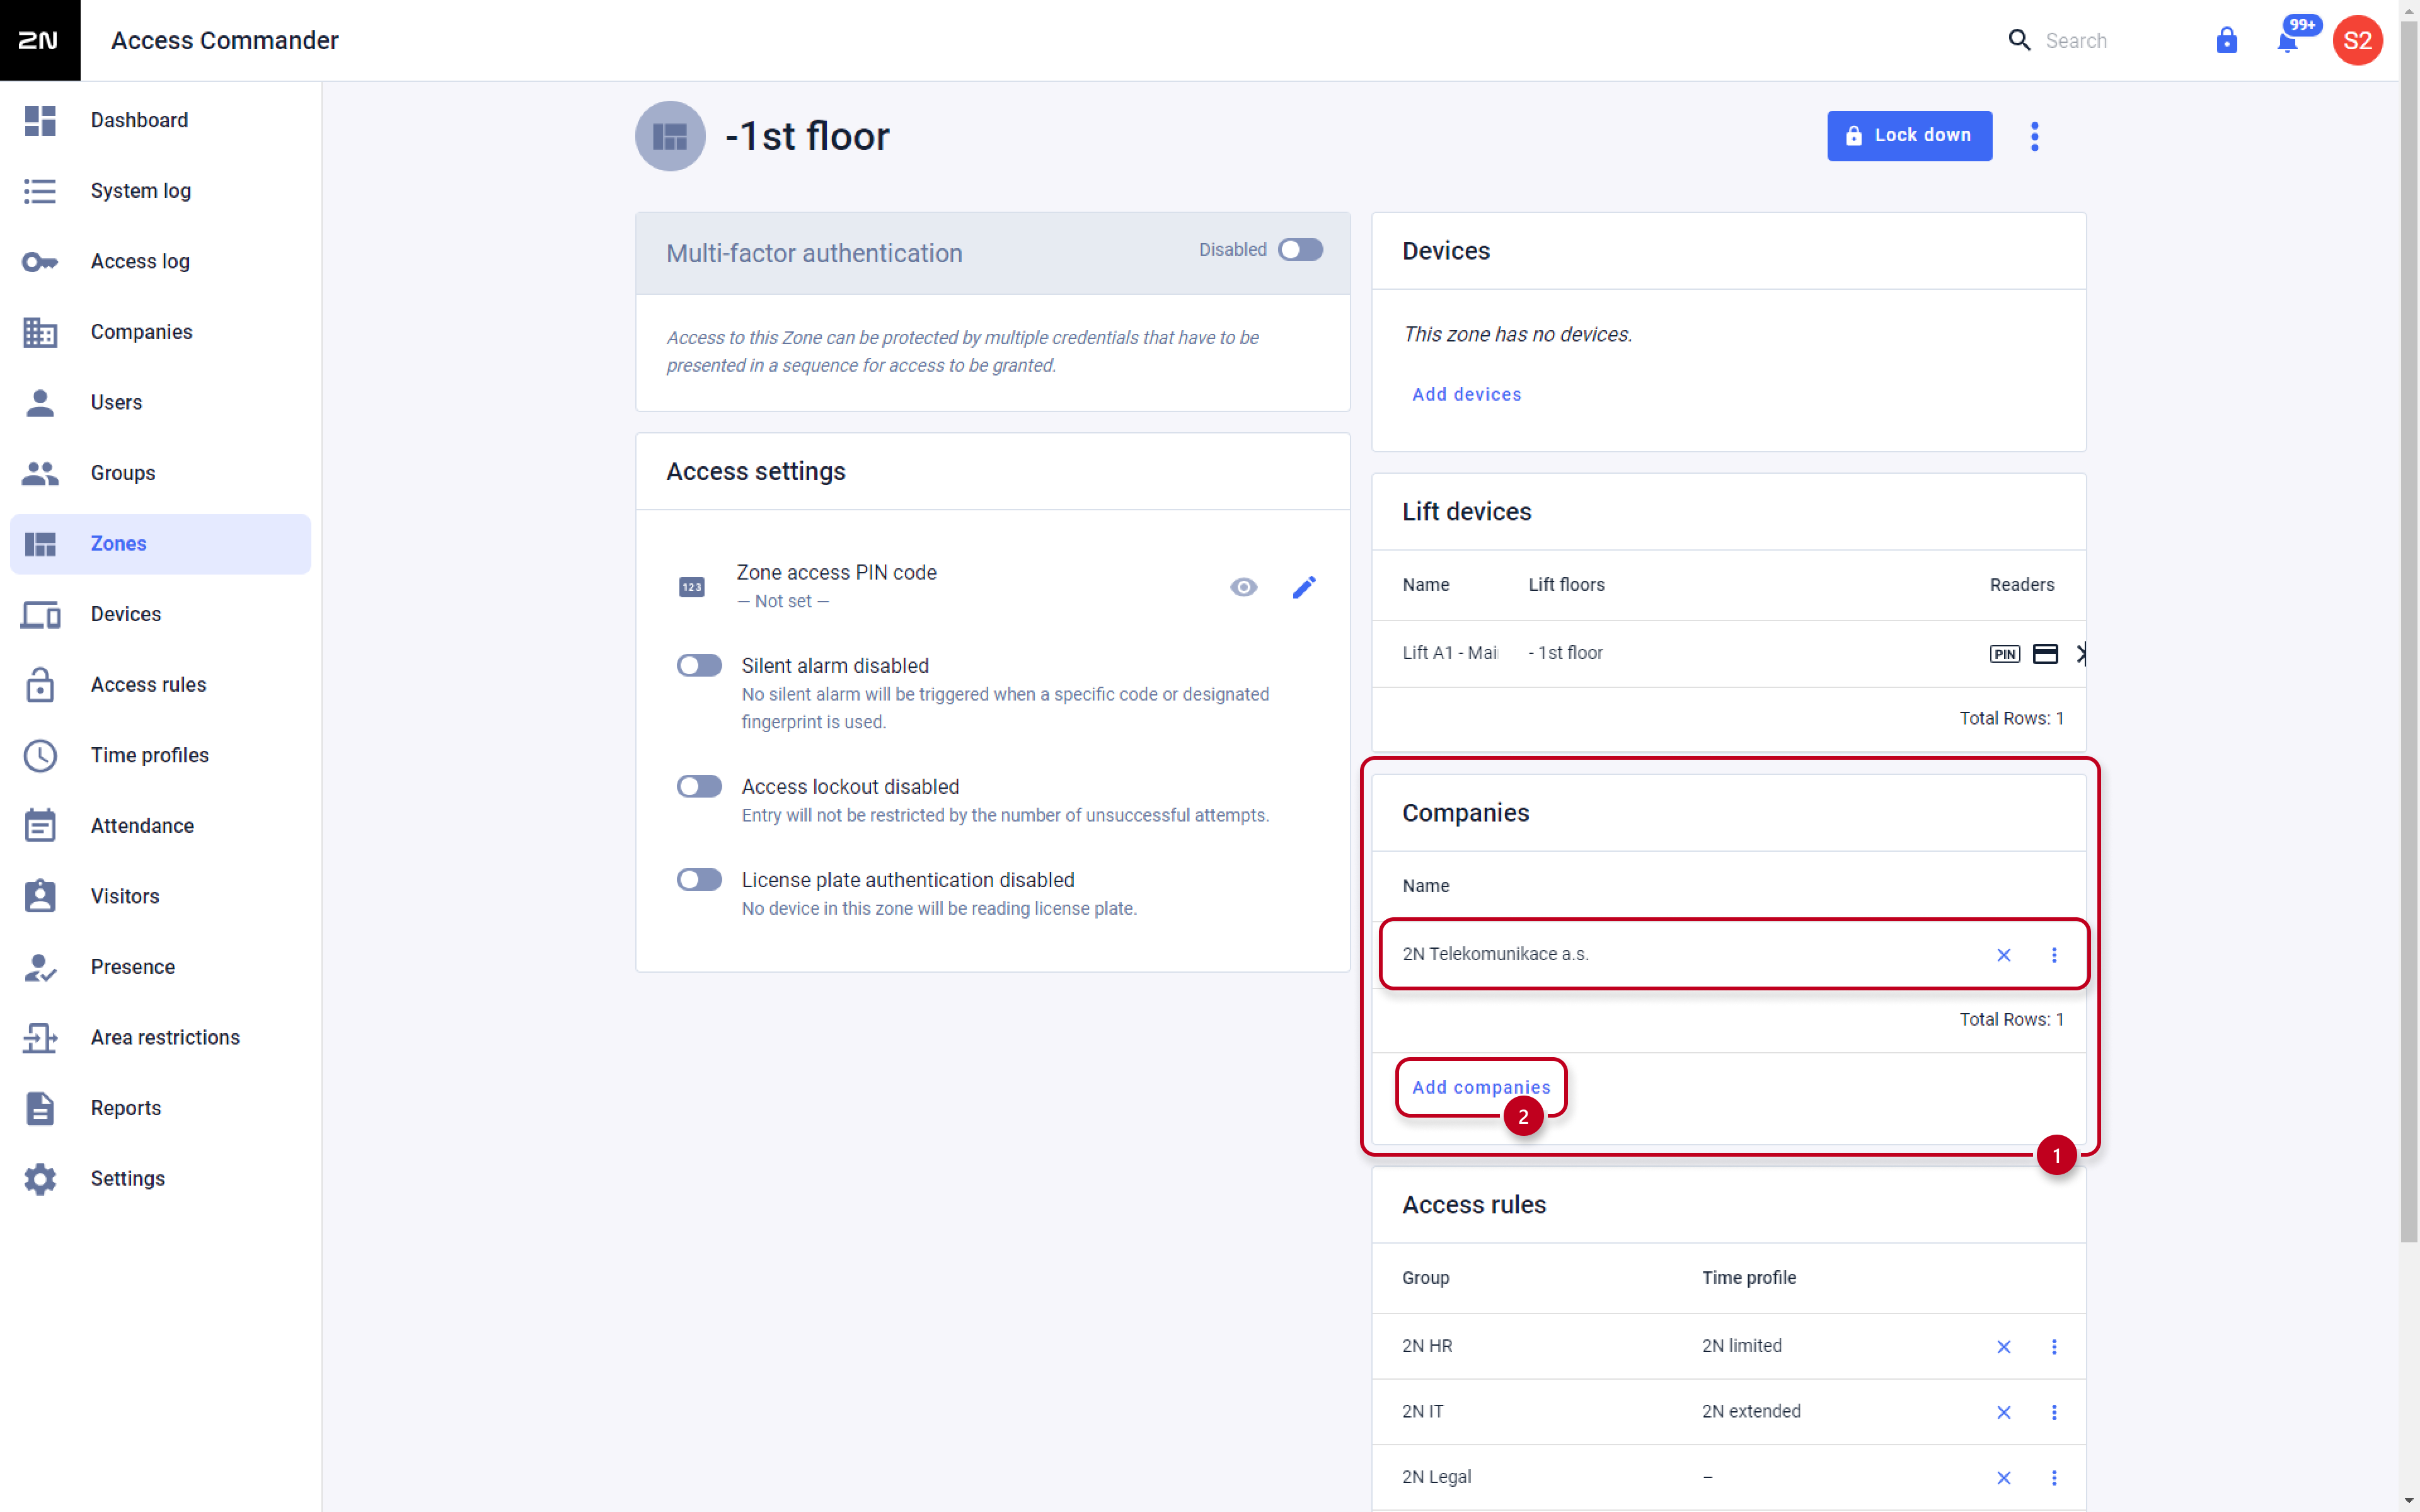
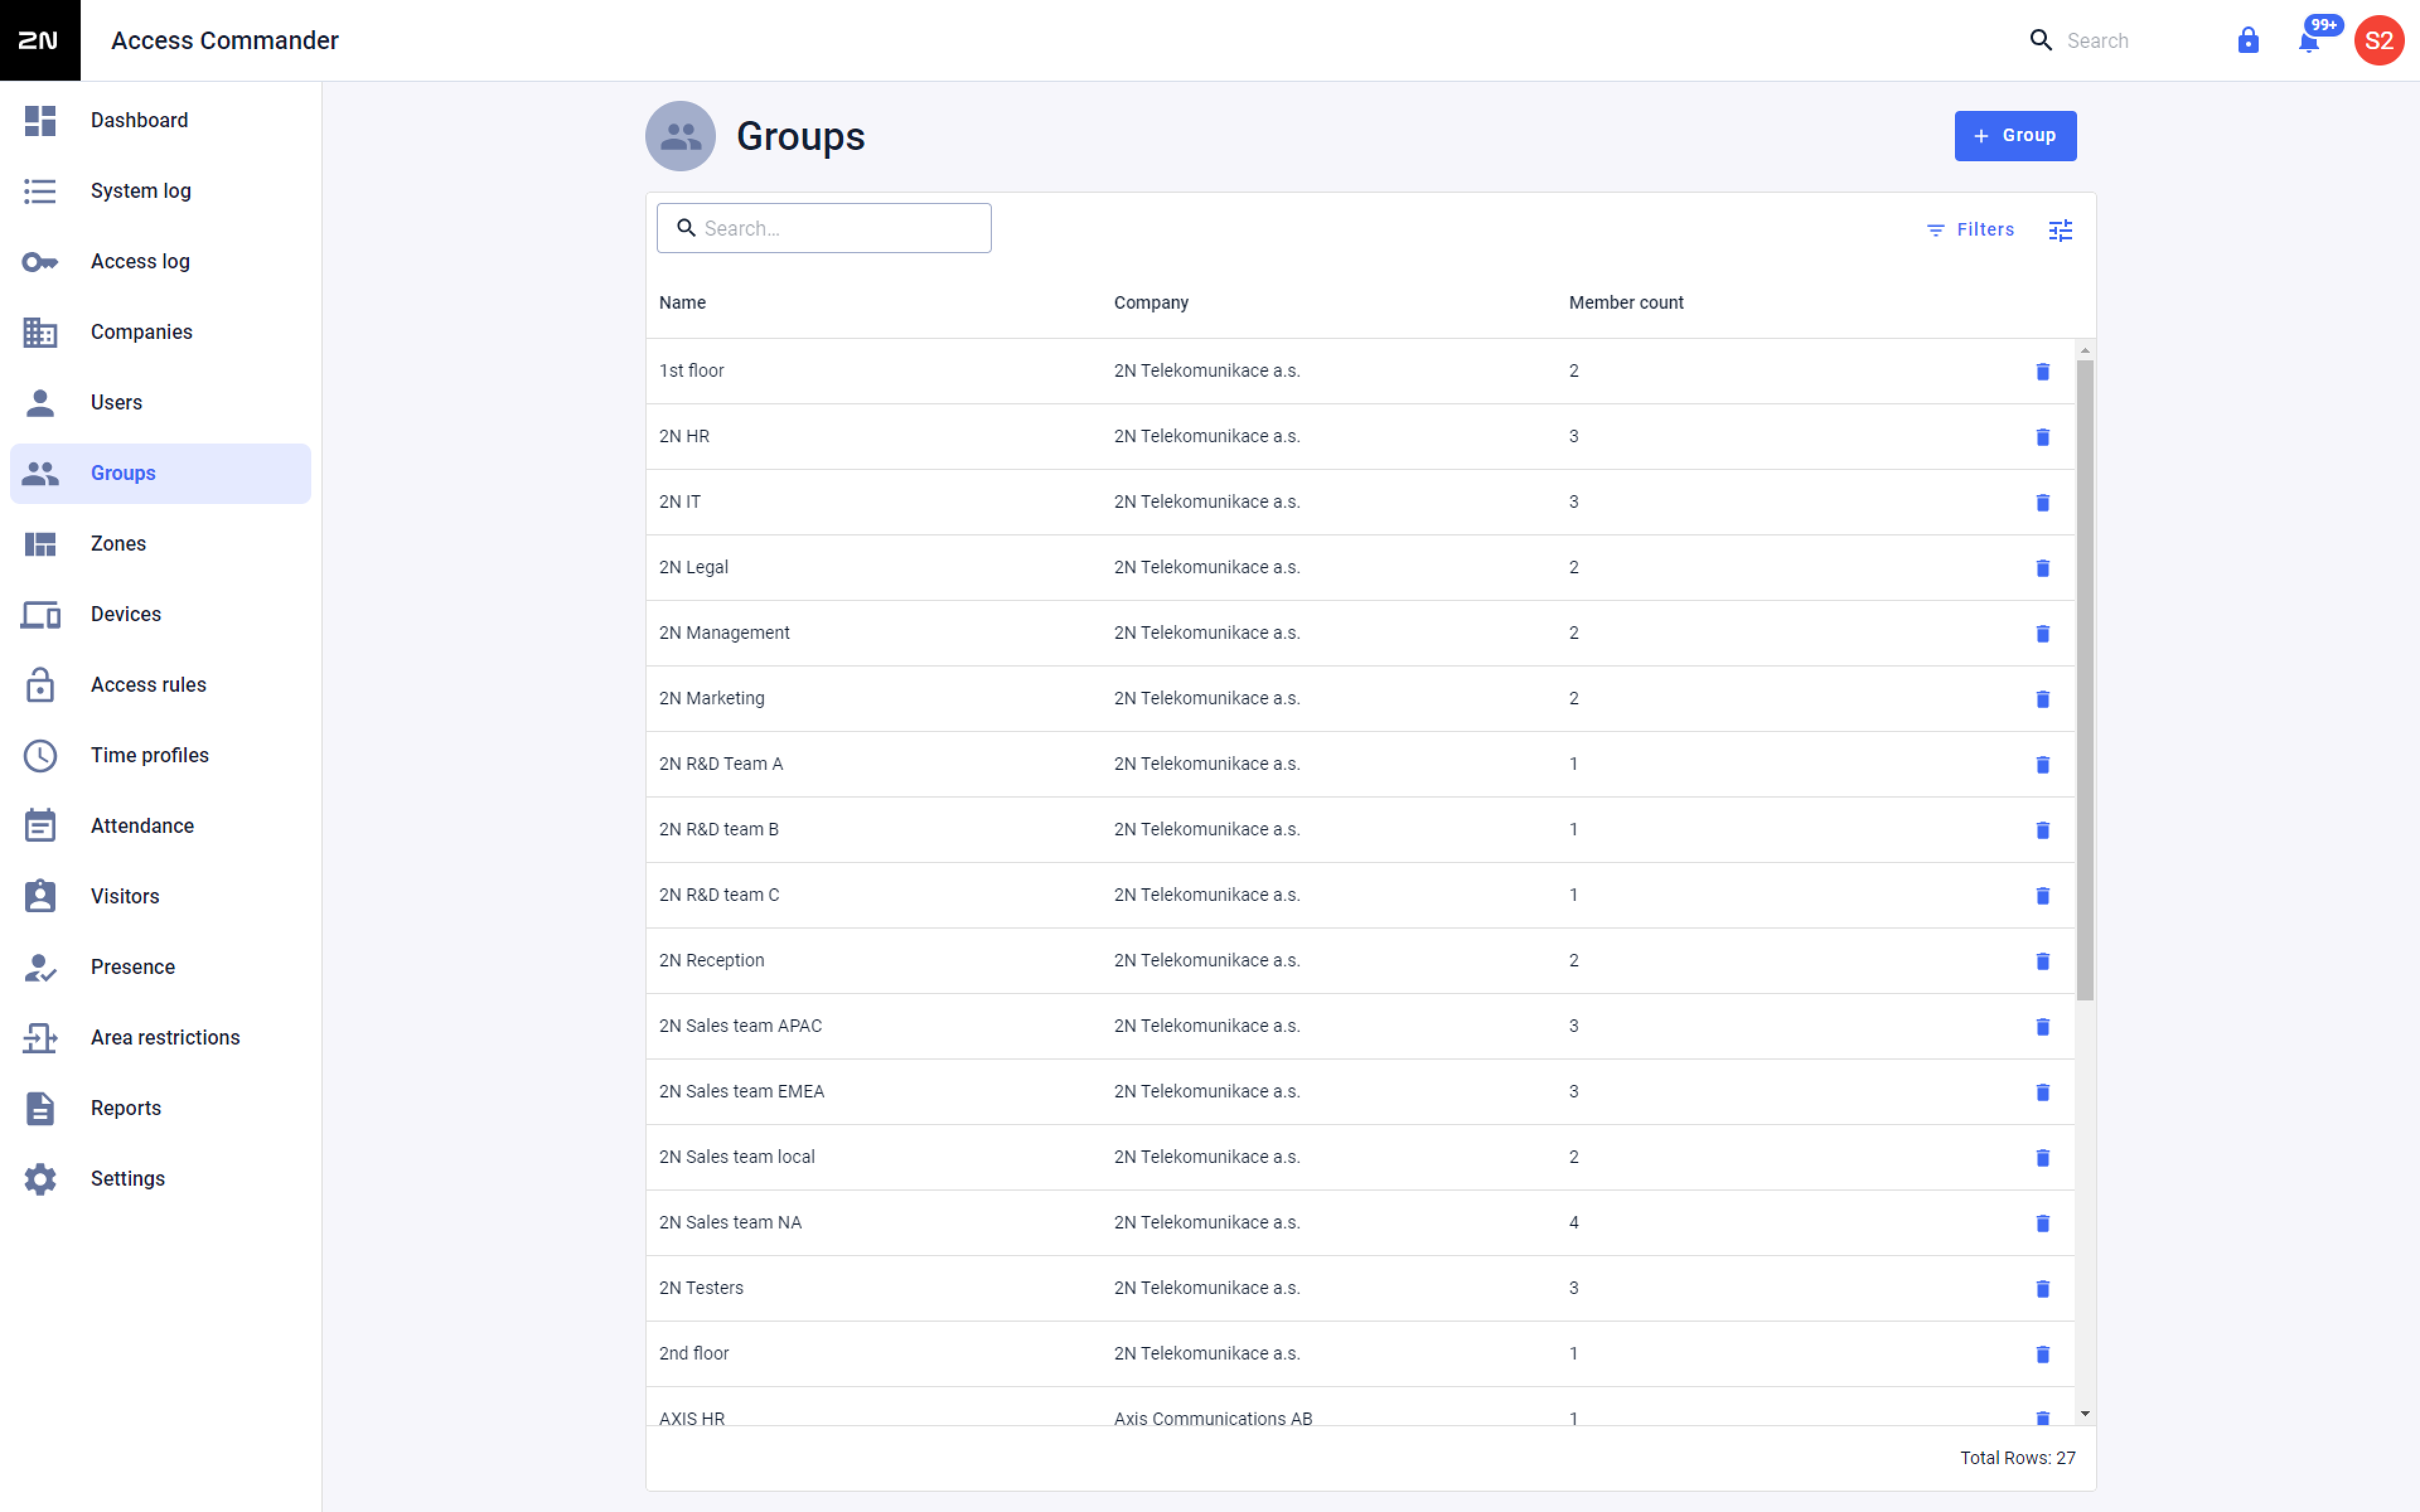
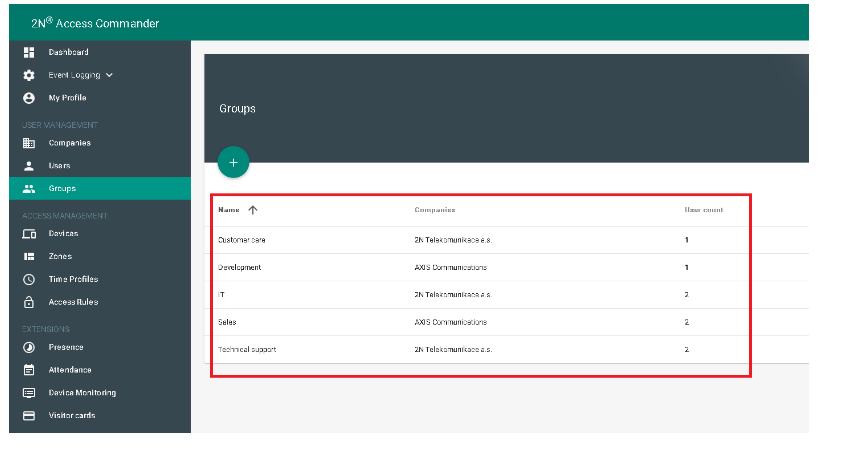
- Users should be placed in groups which will later be granted access to particular floors.
Navigate to Access Rules and begin creating rules to define which zones or floors each group may access. For example, the group ‘Company A Sales Team’ can be paired with the zone ‘first floor’ to allow the users of that group access to the first floor.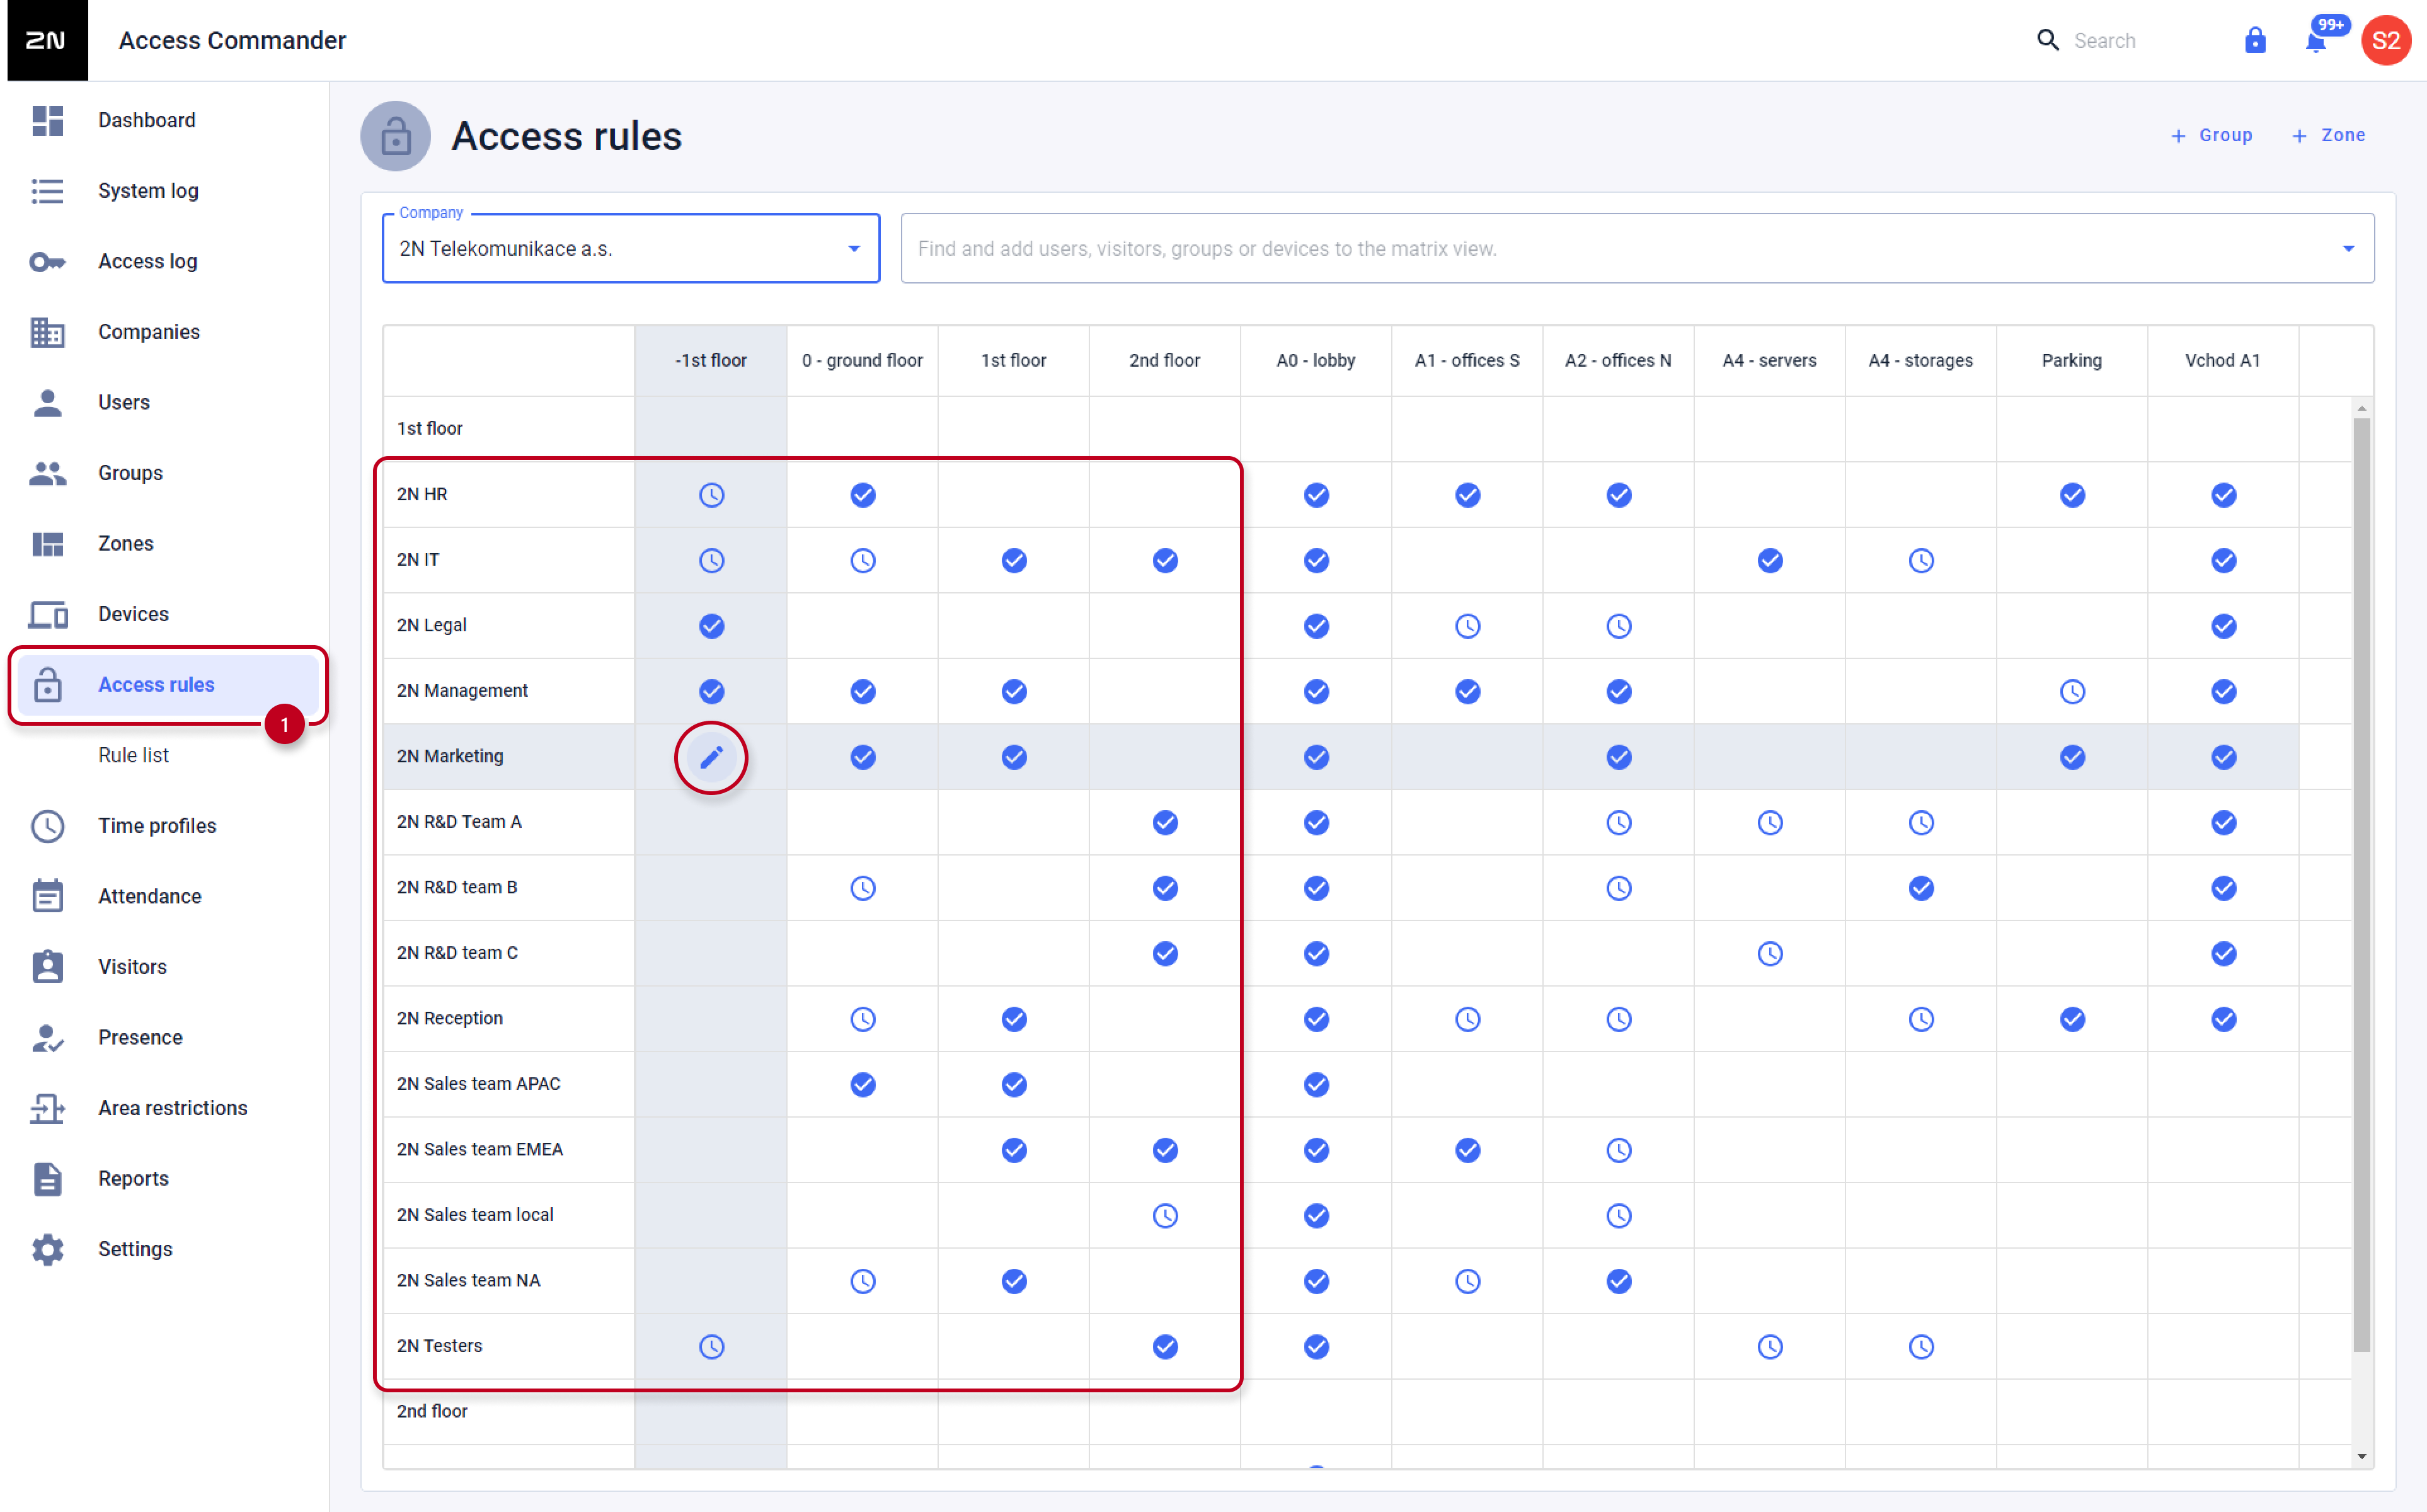
Optionally, Time profiles can be set within Access rules which will restrict access to that floor within desired time frames.
If none or Empty Time profile is used it means access will be allowed 24/7.
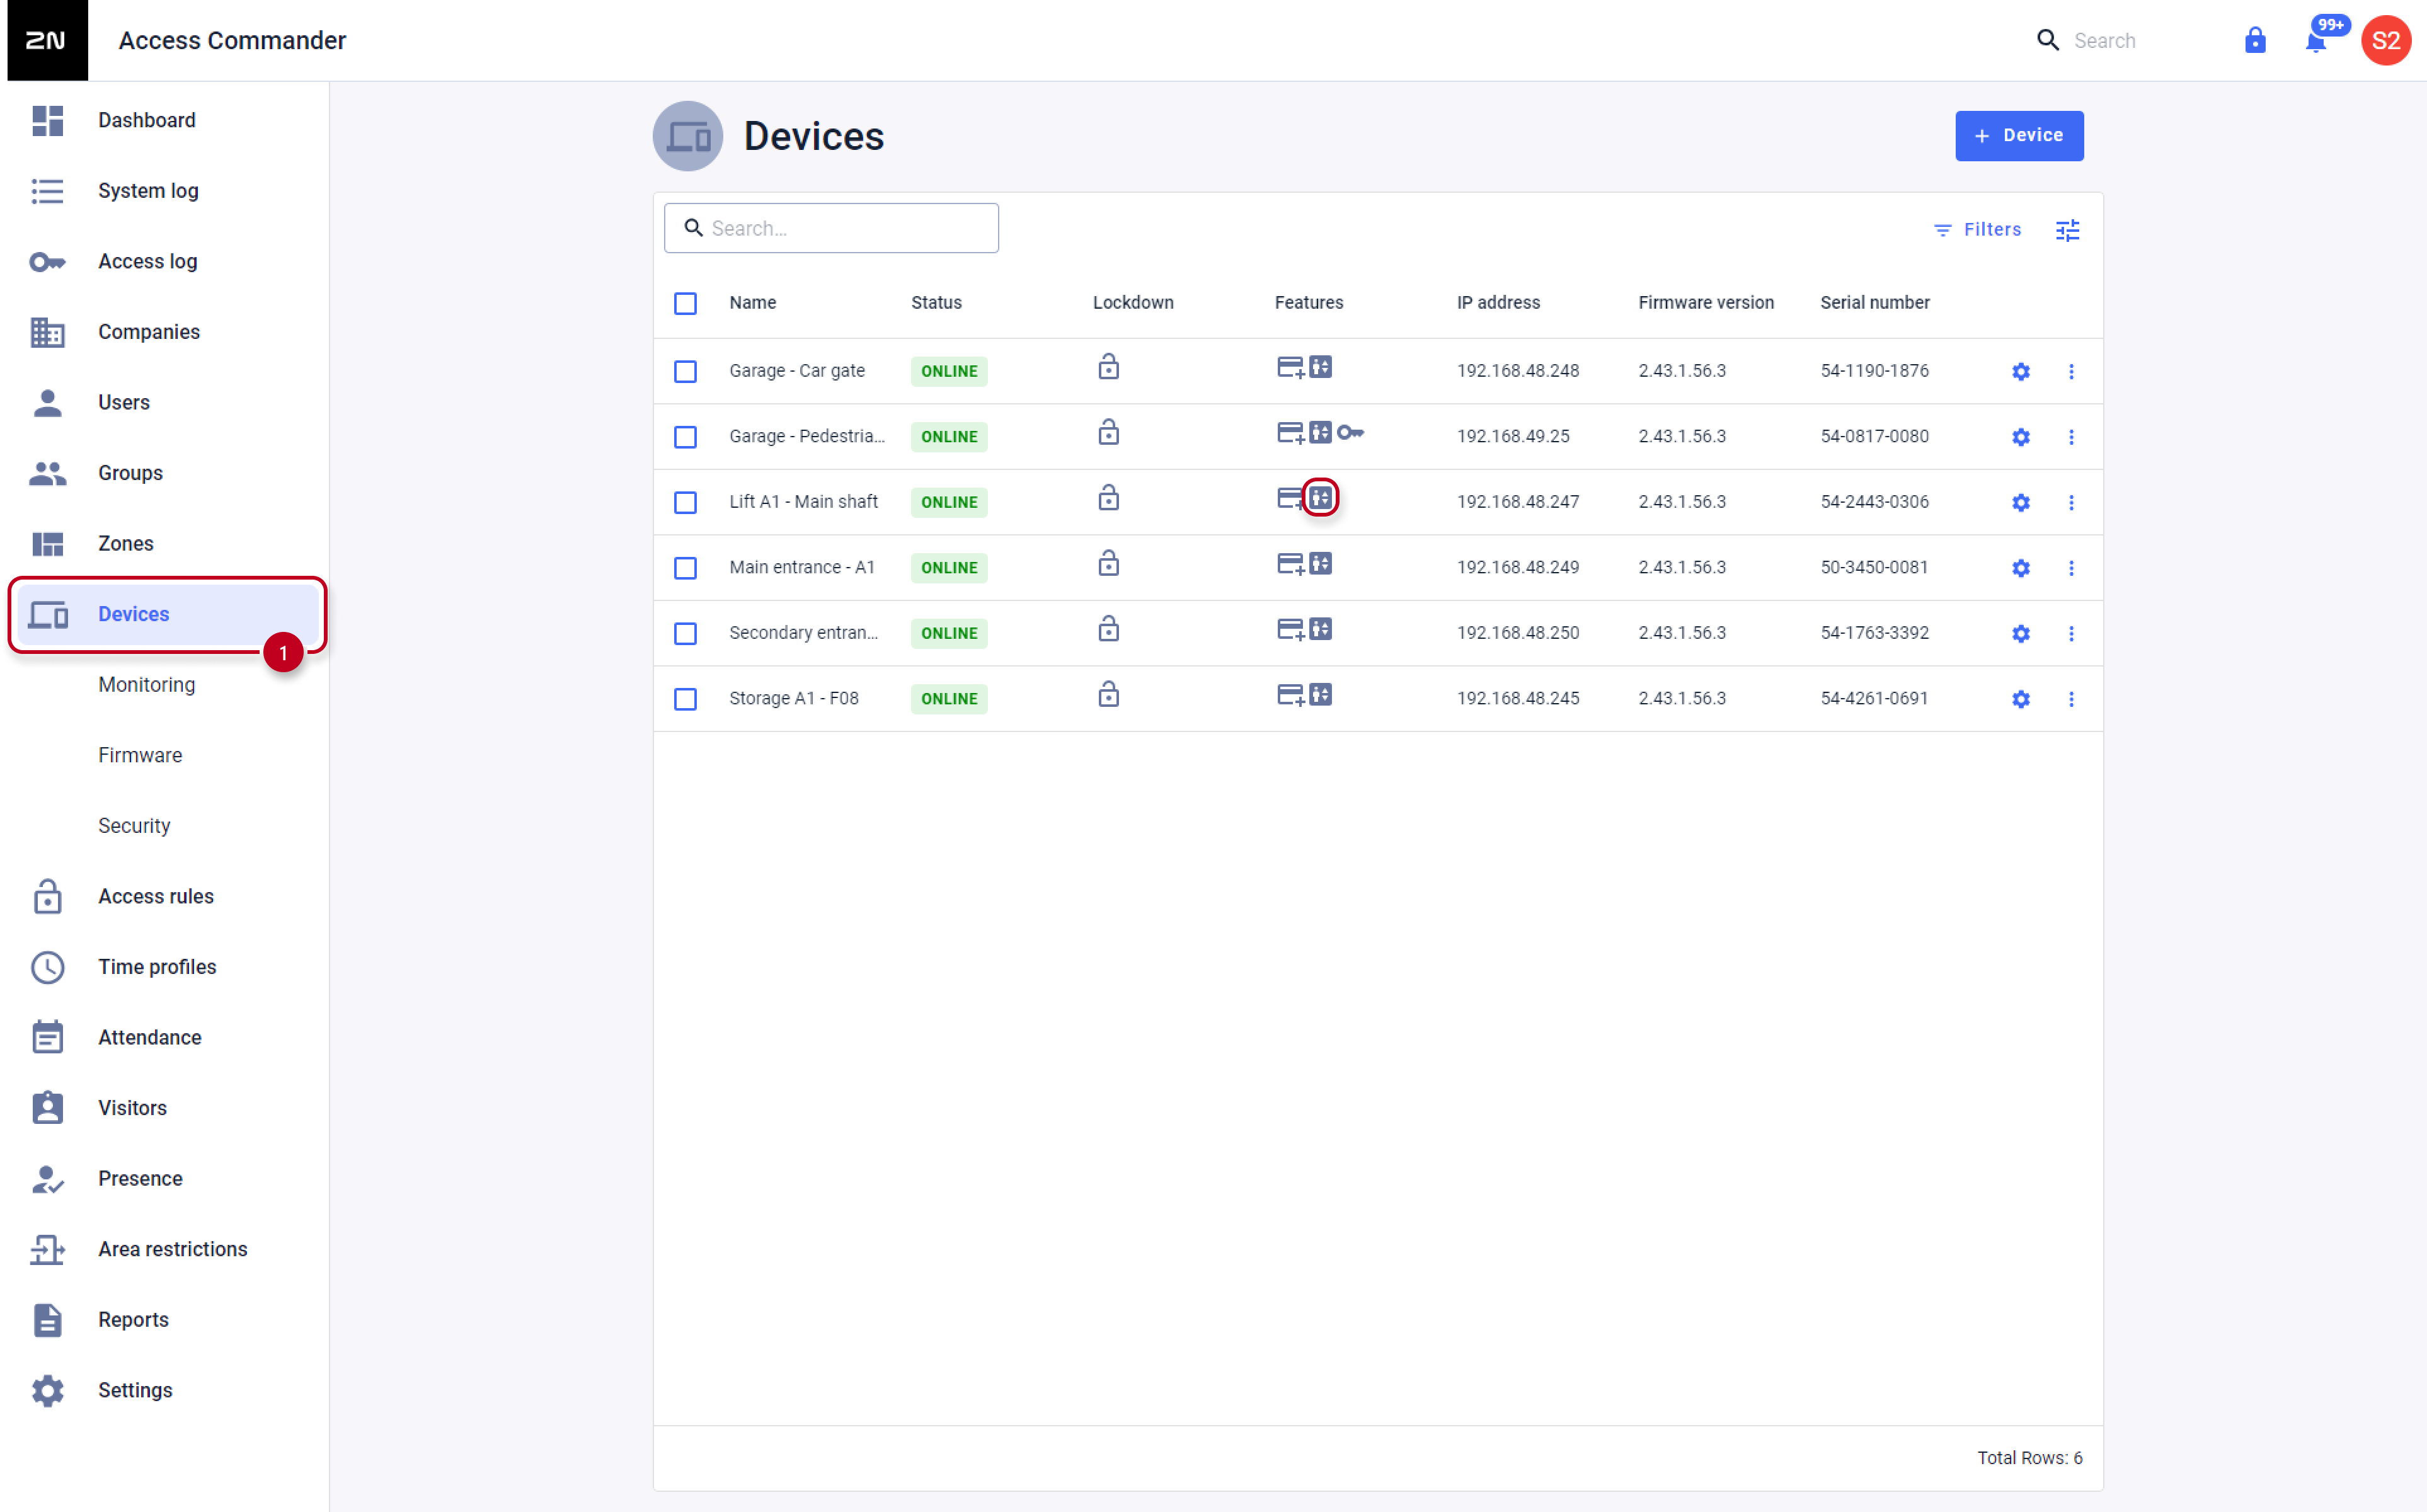
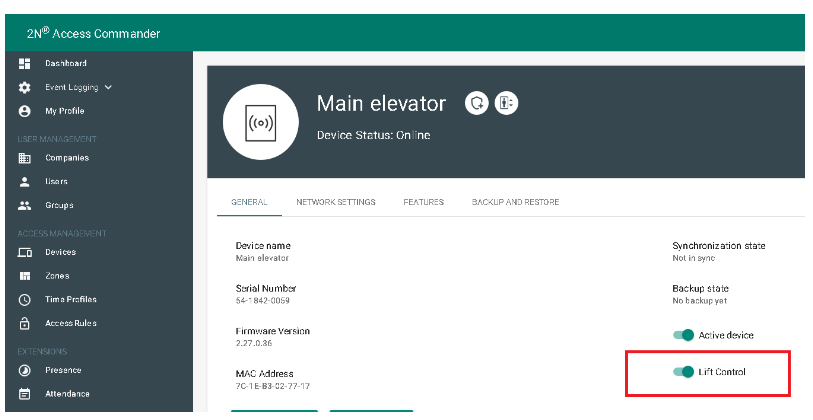
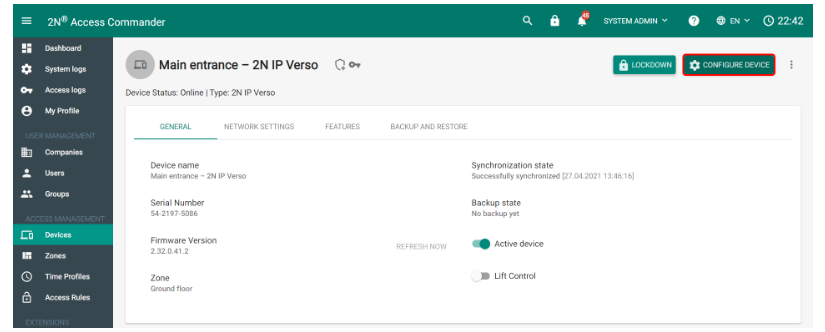
Enable lift control usage in added devices in the device details page in Access Commander.
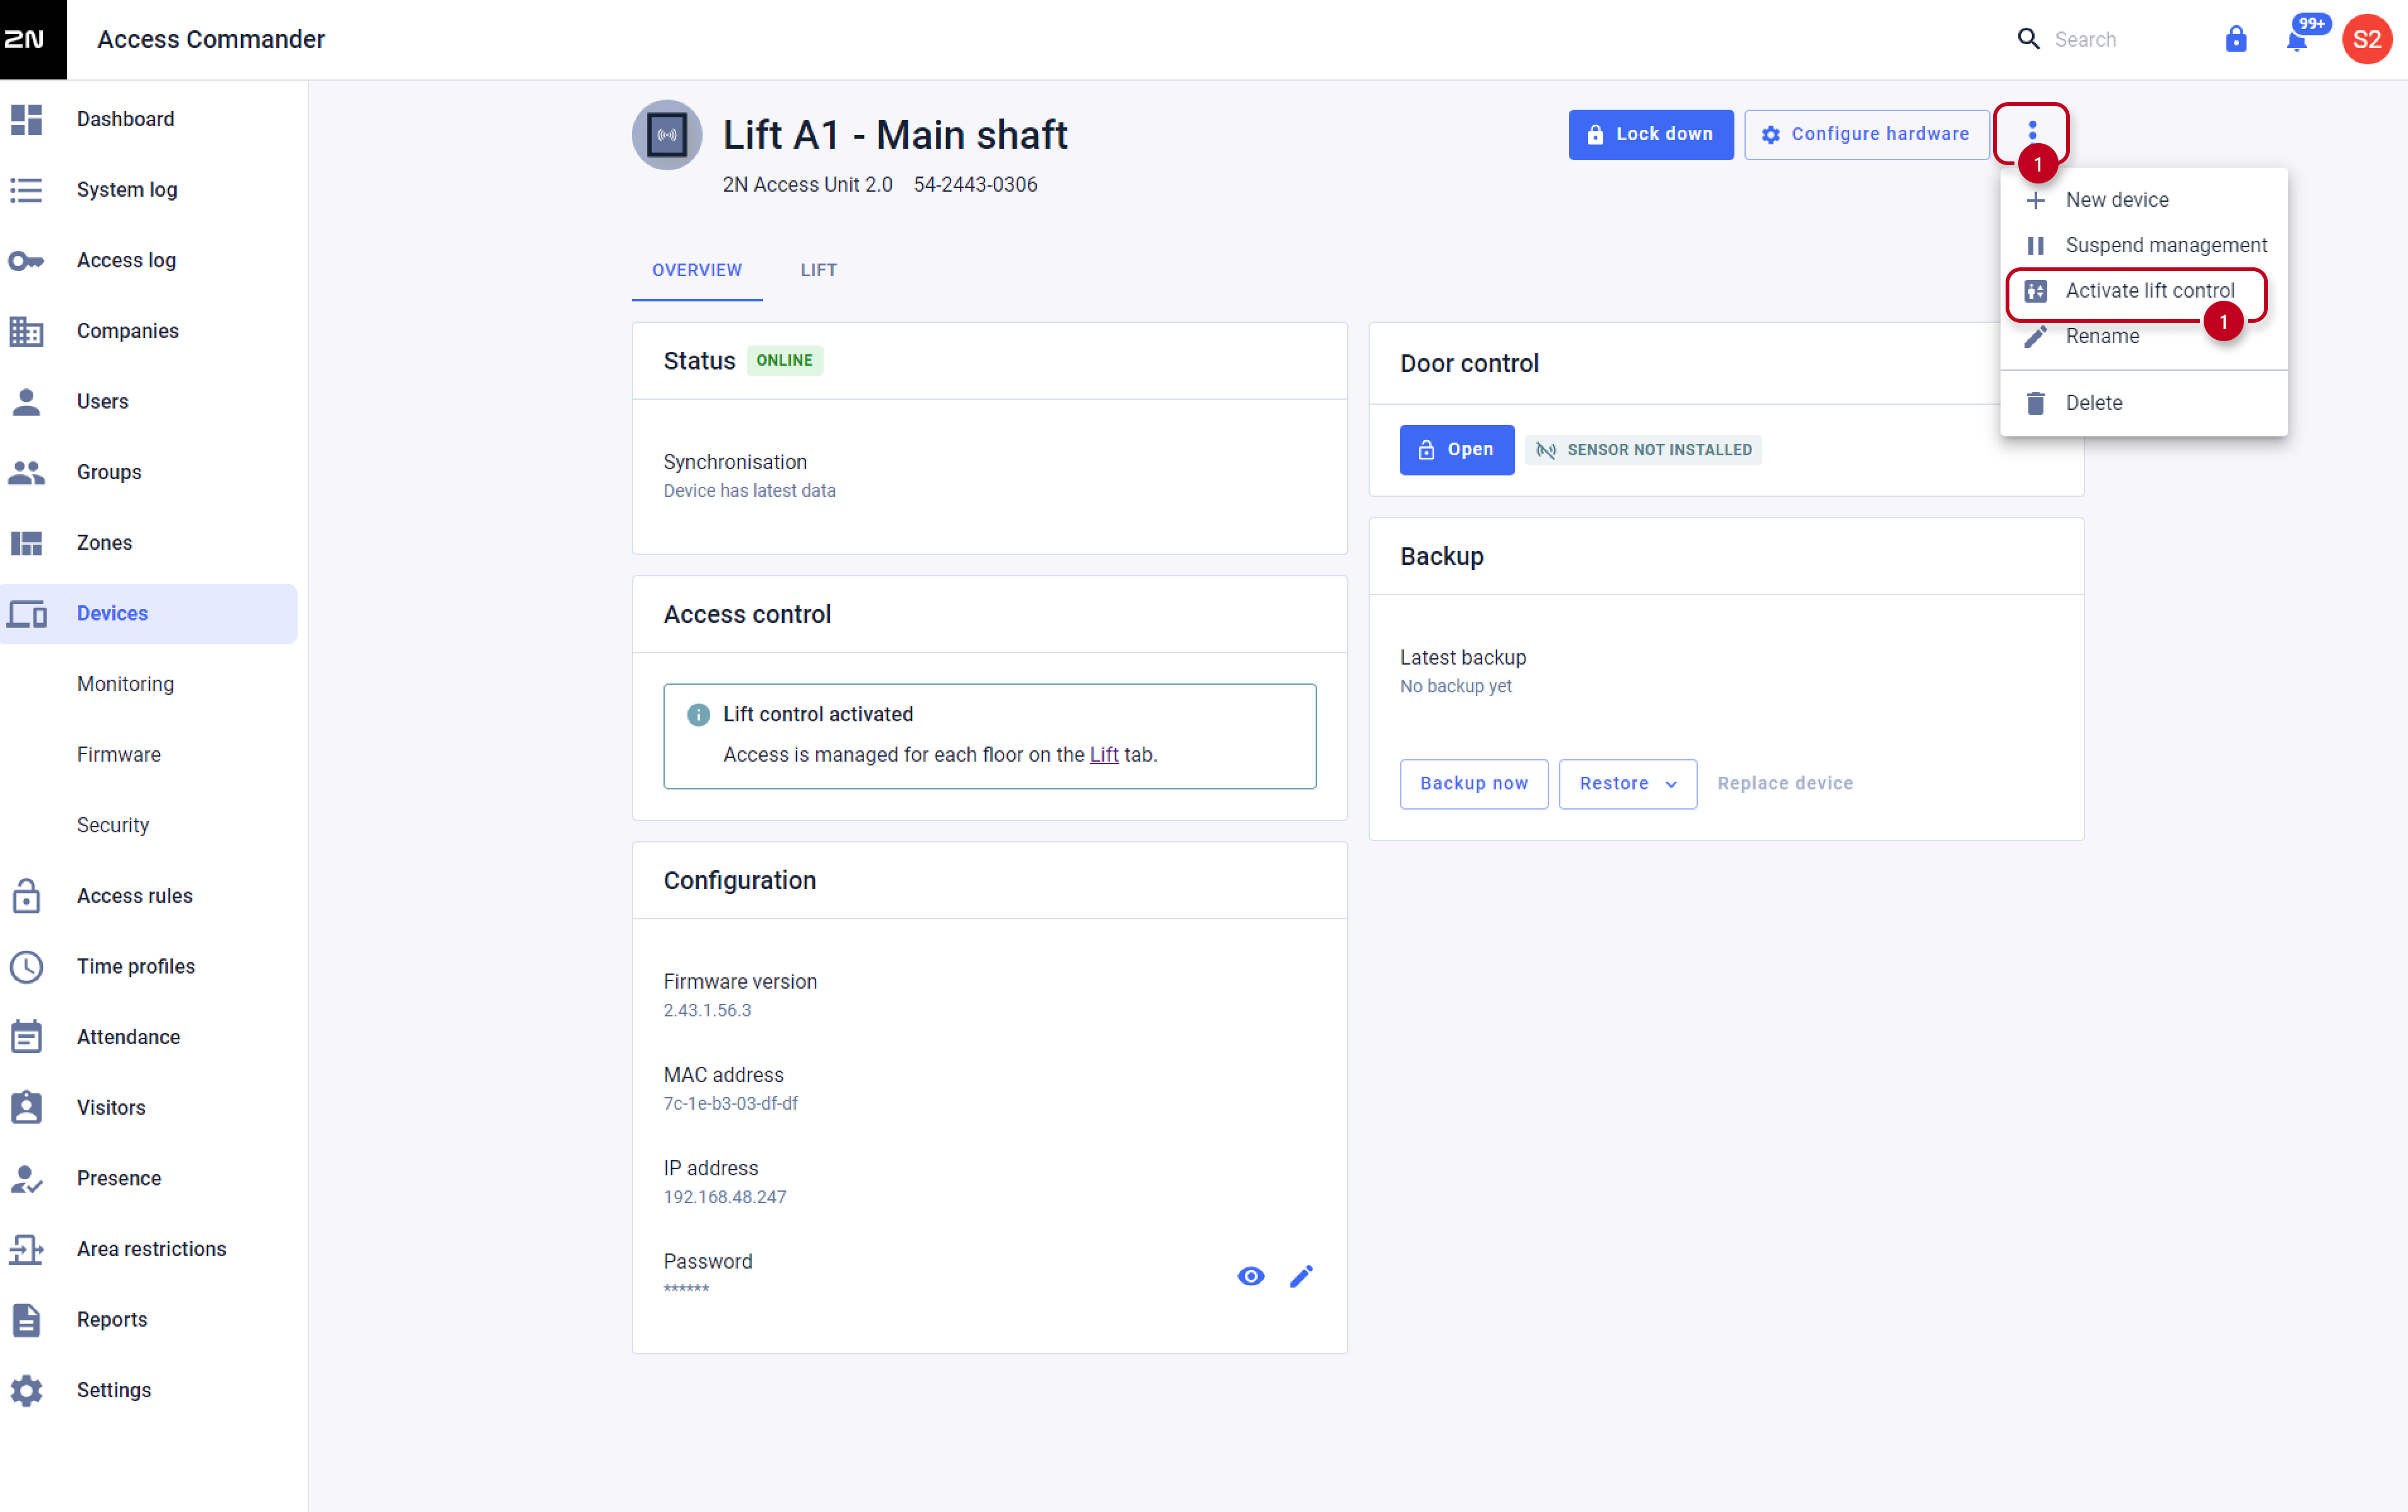
If you add to Access Commander device with lift control license, it will become automatically enabled for Lift Control)
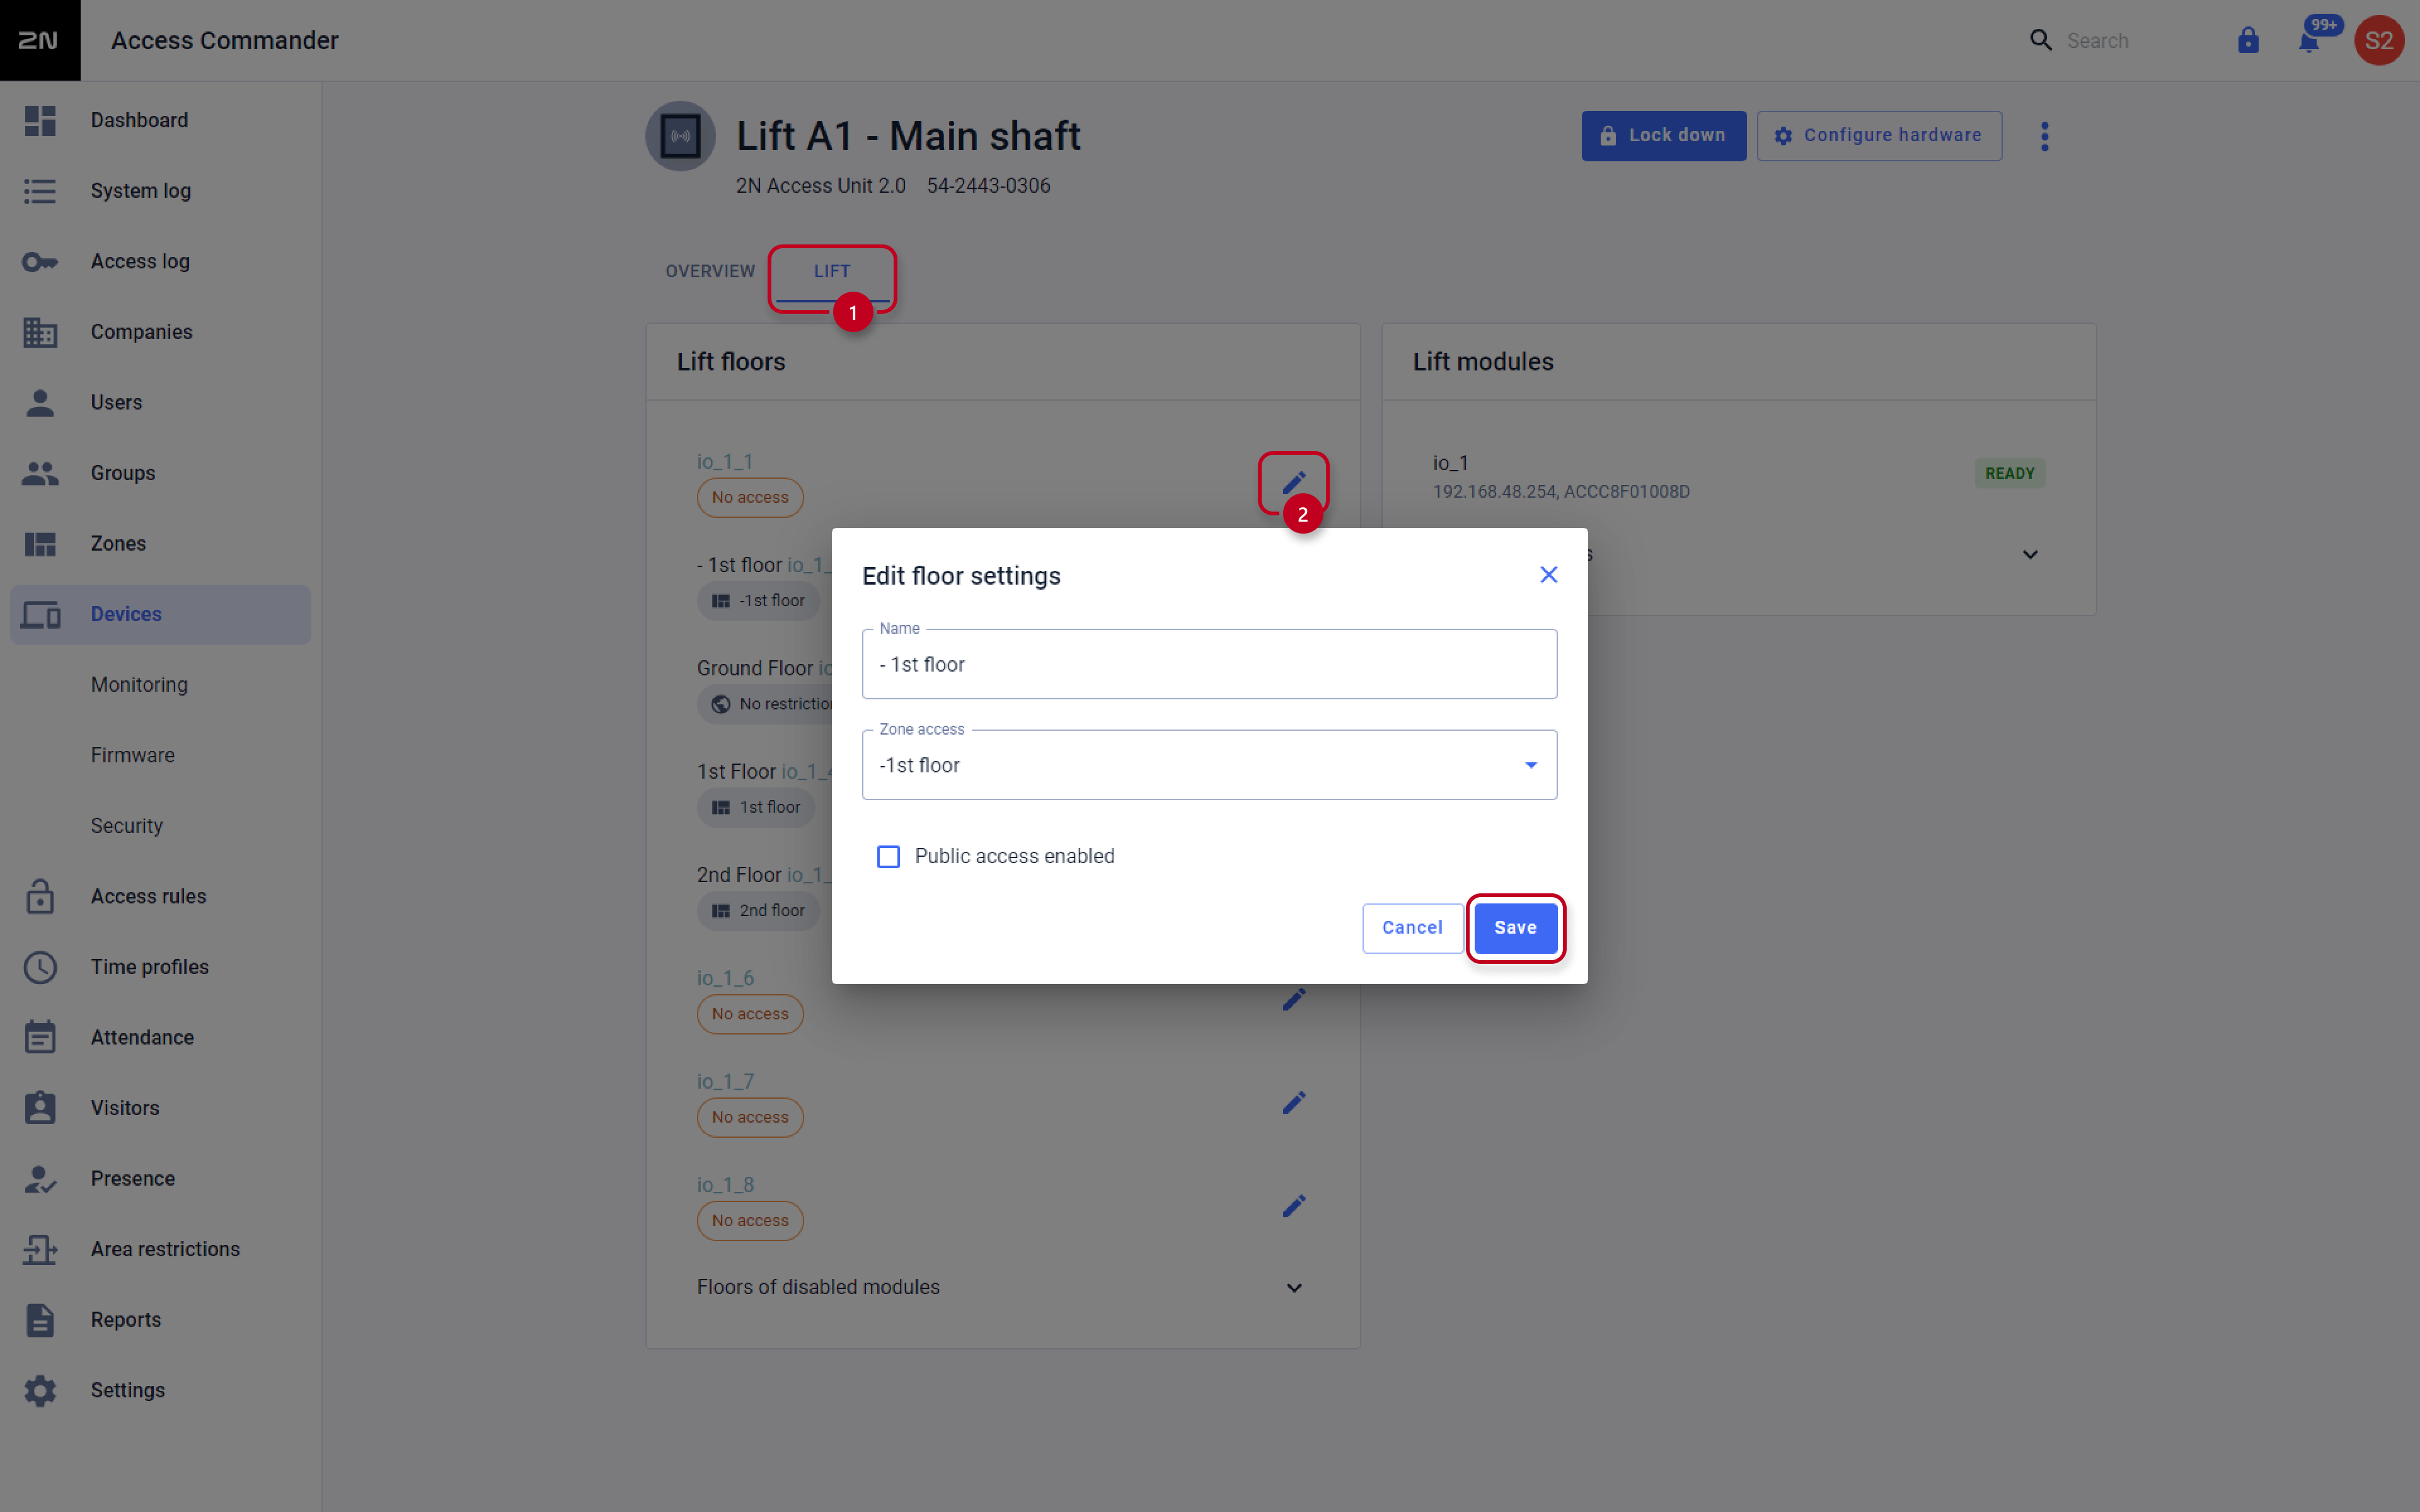
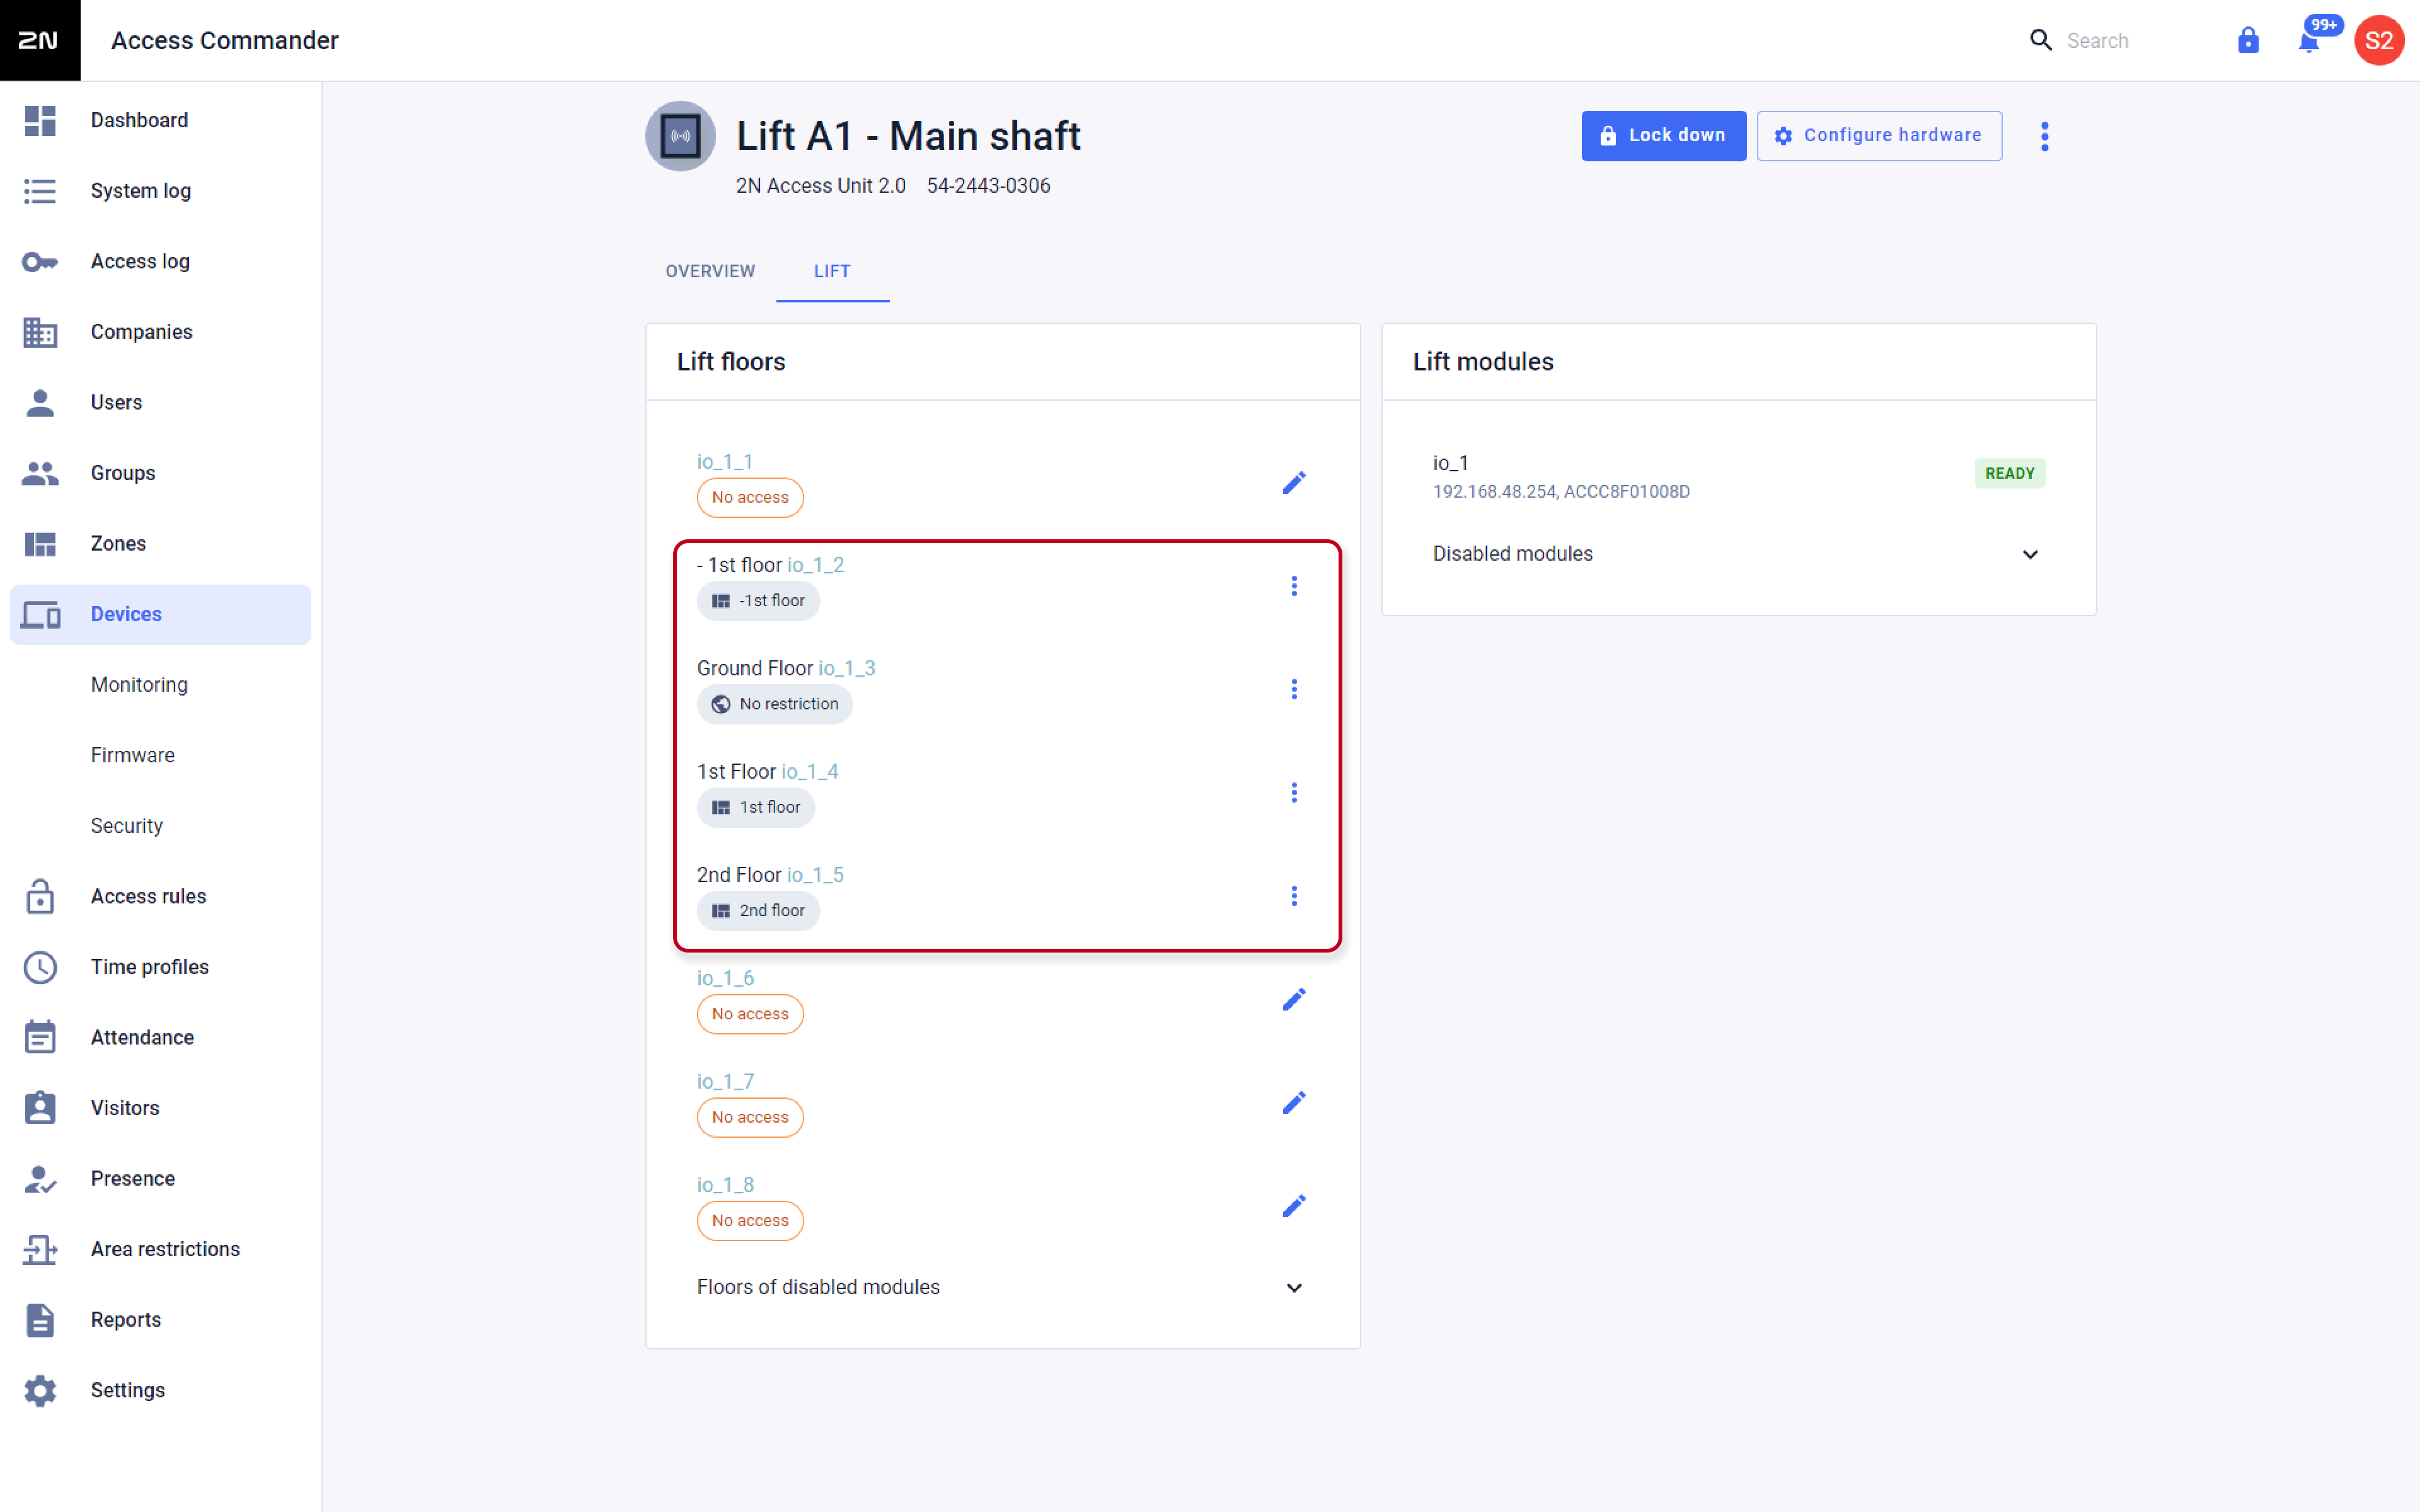
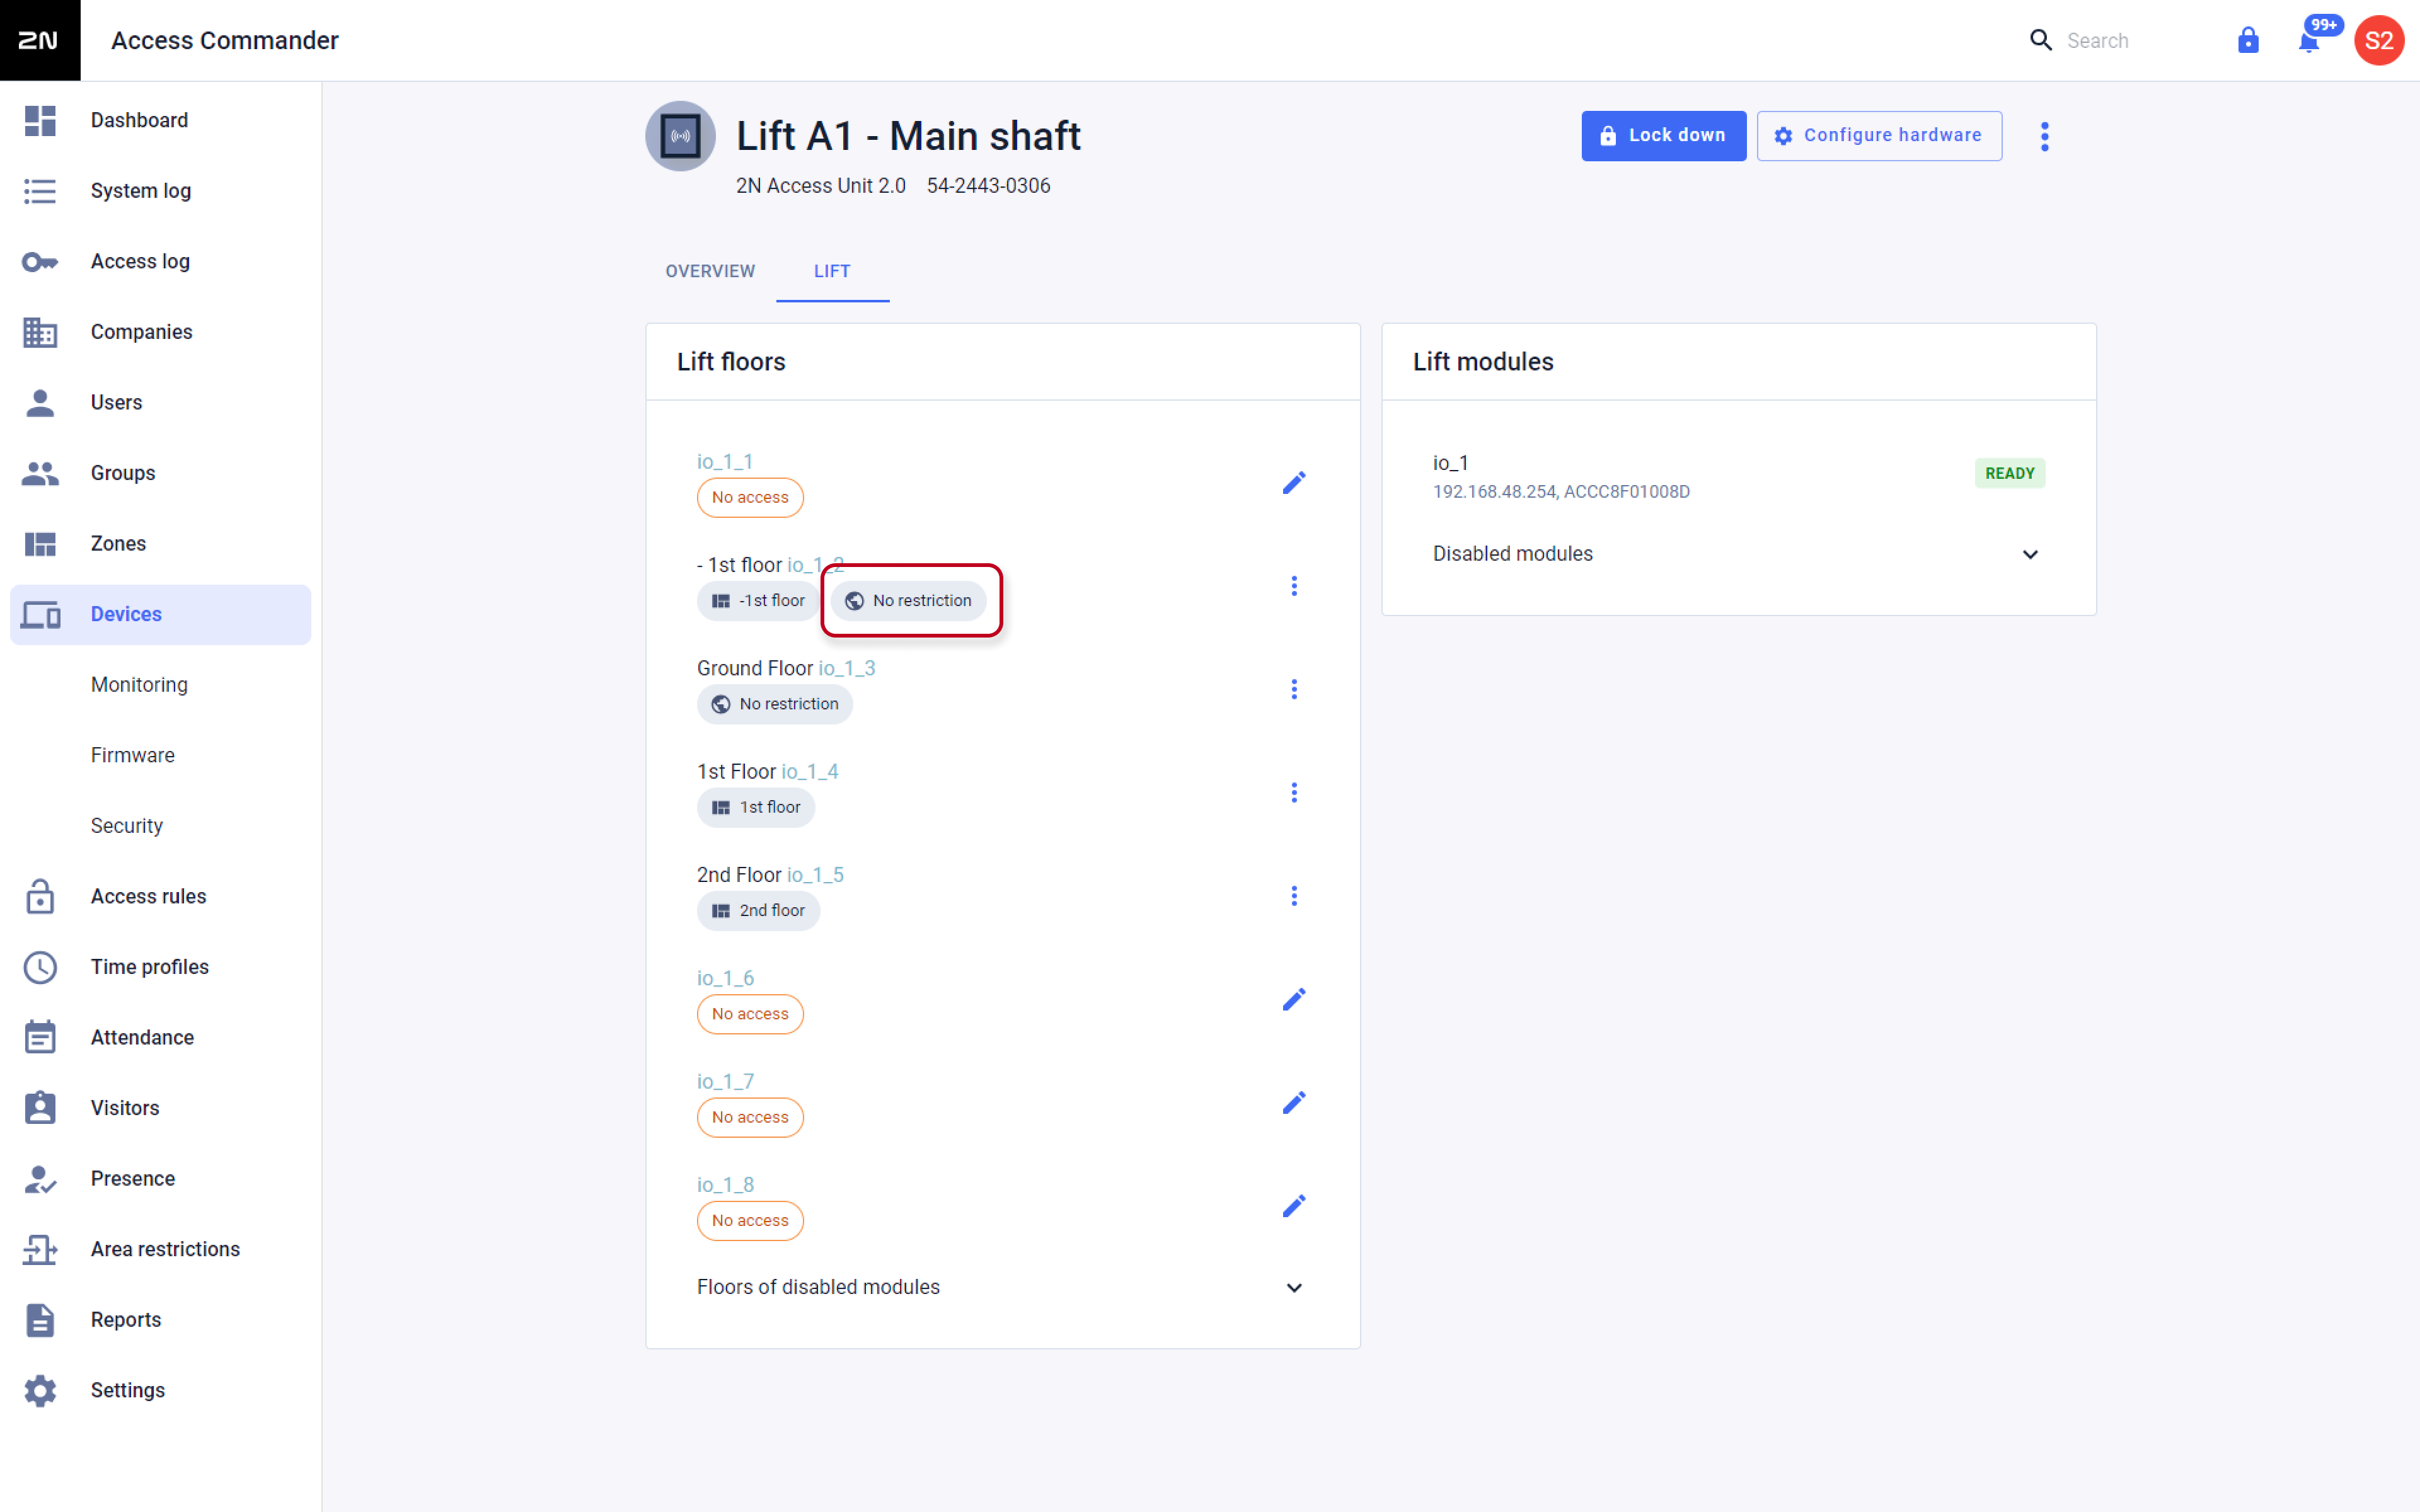
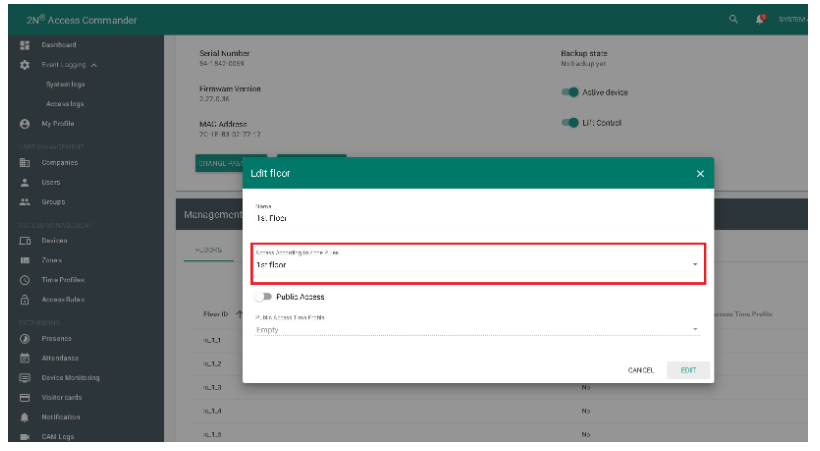
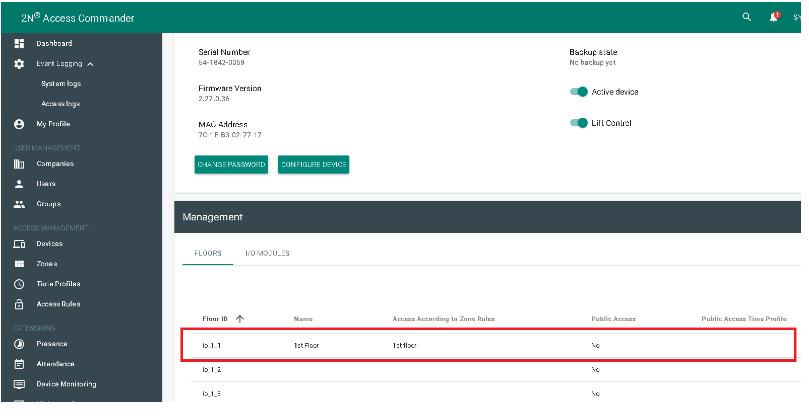
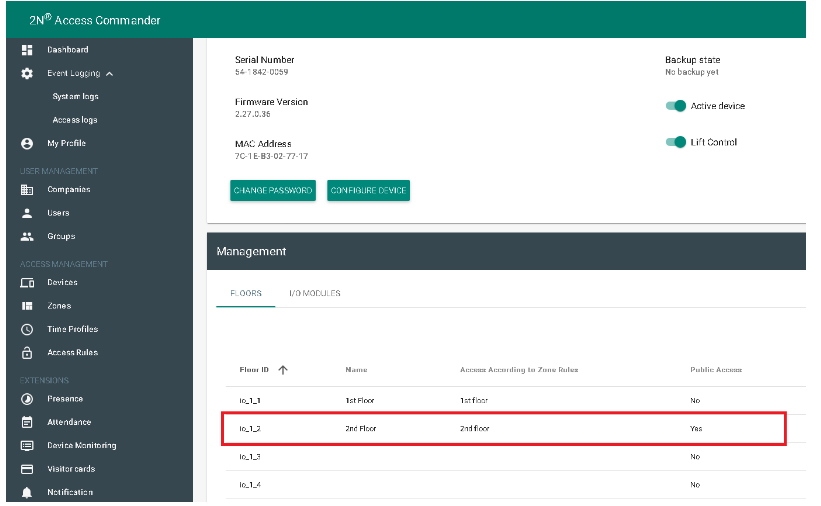
- To finally setup which users can access which floor, in device details go to Management and create Floor assignment according to the physical connection of relays between AXIS A9188 and the lift itself (for example relay io_1_1 on AXIS A9188 is physically connected to lift that 1st floor will become available for Groups of users which have in Access rules defined rules for Zone 1st floor).
Since up to 8 AXIS A9188 can be connected, you need to know which relay belongs to which AXIS A9188 I/O Relay Module:
io_1_1 in Floor list stands for first connected AXIS A9188 to 2N unit and its first relay
io_1_2 in Floor list stands for first connected AXIS A9188 to 2N unit and its second relay
io_2_1 in Floor list stands for second connected AXIS A9188 to 2N unit and its first relay
etc...
From now all users, which are part of Groups associated in Access rules with Zone 1st floor and have valid credentials, when they authorize on 2N IP unit in lift cabin will be able to use lift button for 1st floor.
(Optional) Setup floor to allow access to anyone who presses the lift floor button
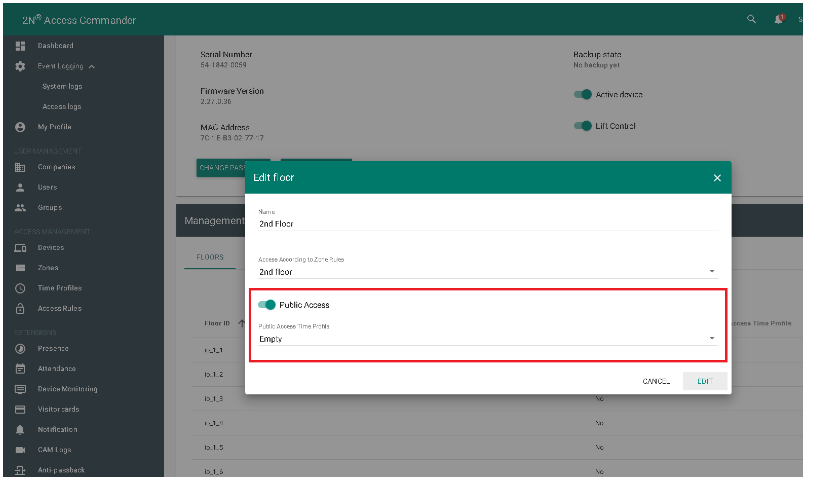
In order to allow access to floor without the need to authorize person using an RFID card, in device details go to Management and create Floor assignment according to the physical connection of relay between AXIS A9188 and lift itself (for example relay io_1_2 on AXIS A9188 is physically connected to lift which 2nd floor will become available for anyone who just presses a 2nd-floor button in the lift).
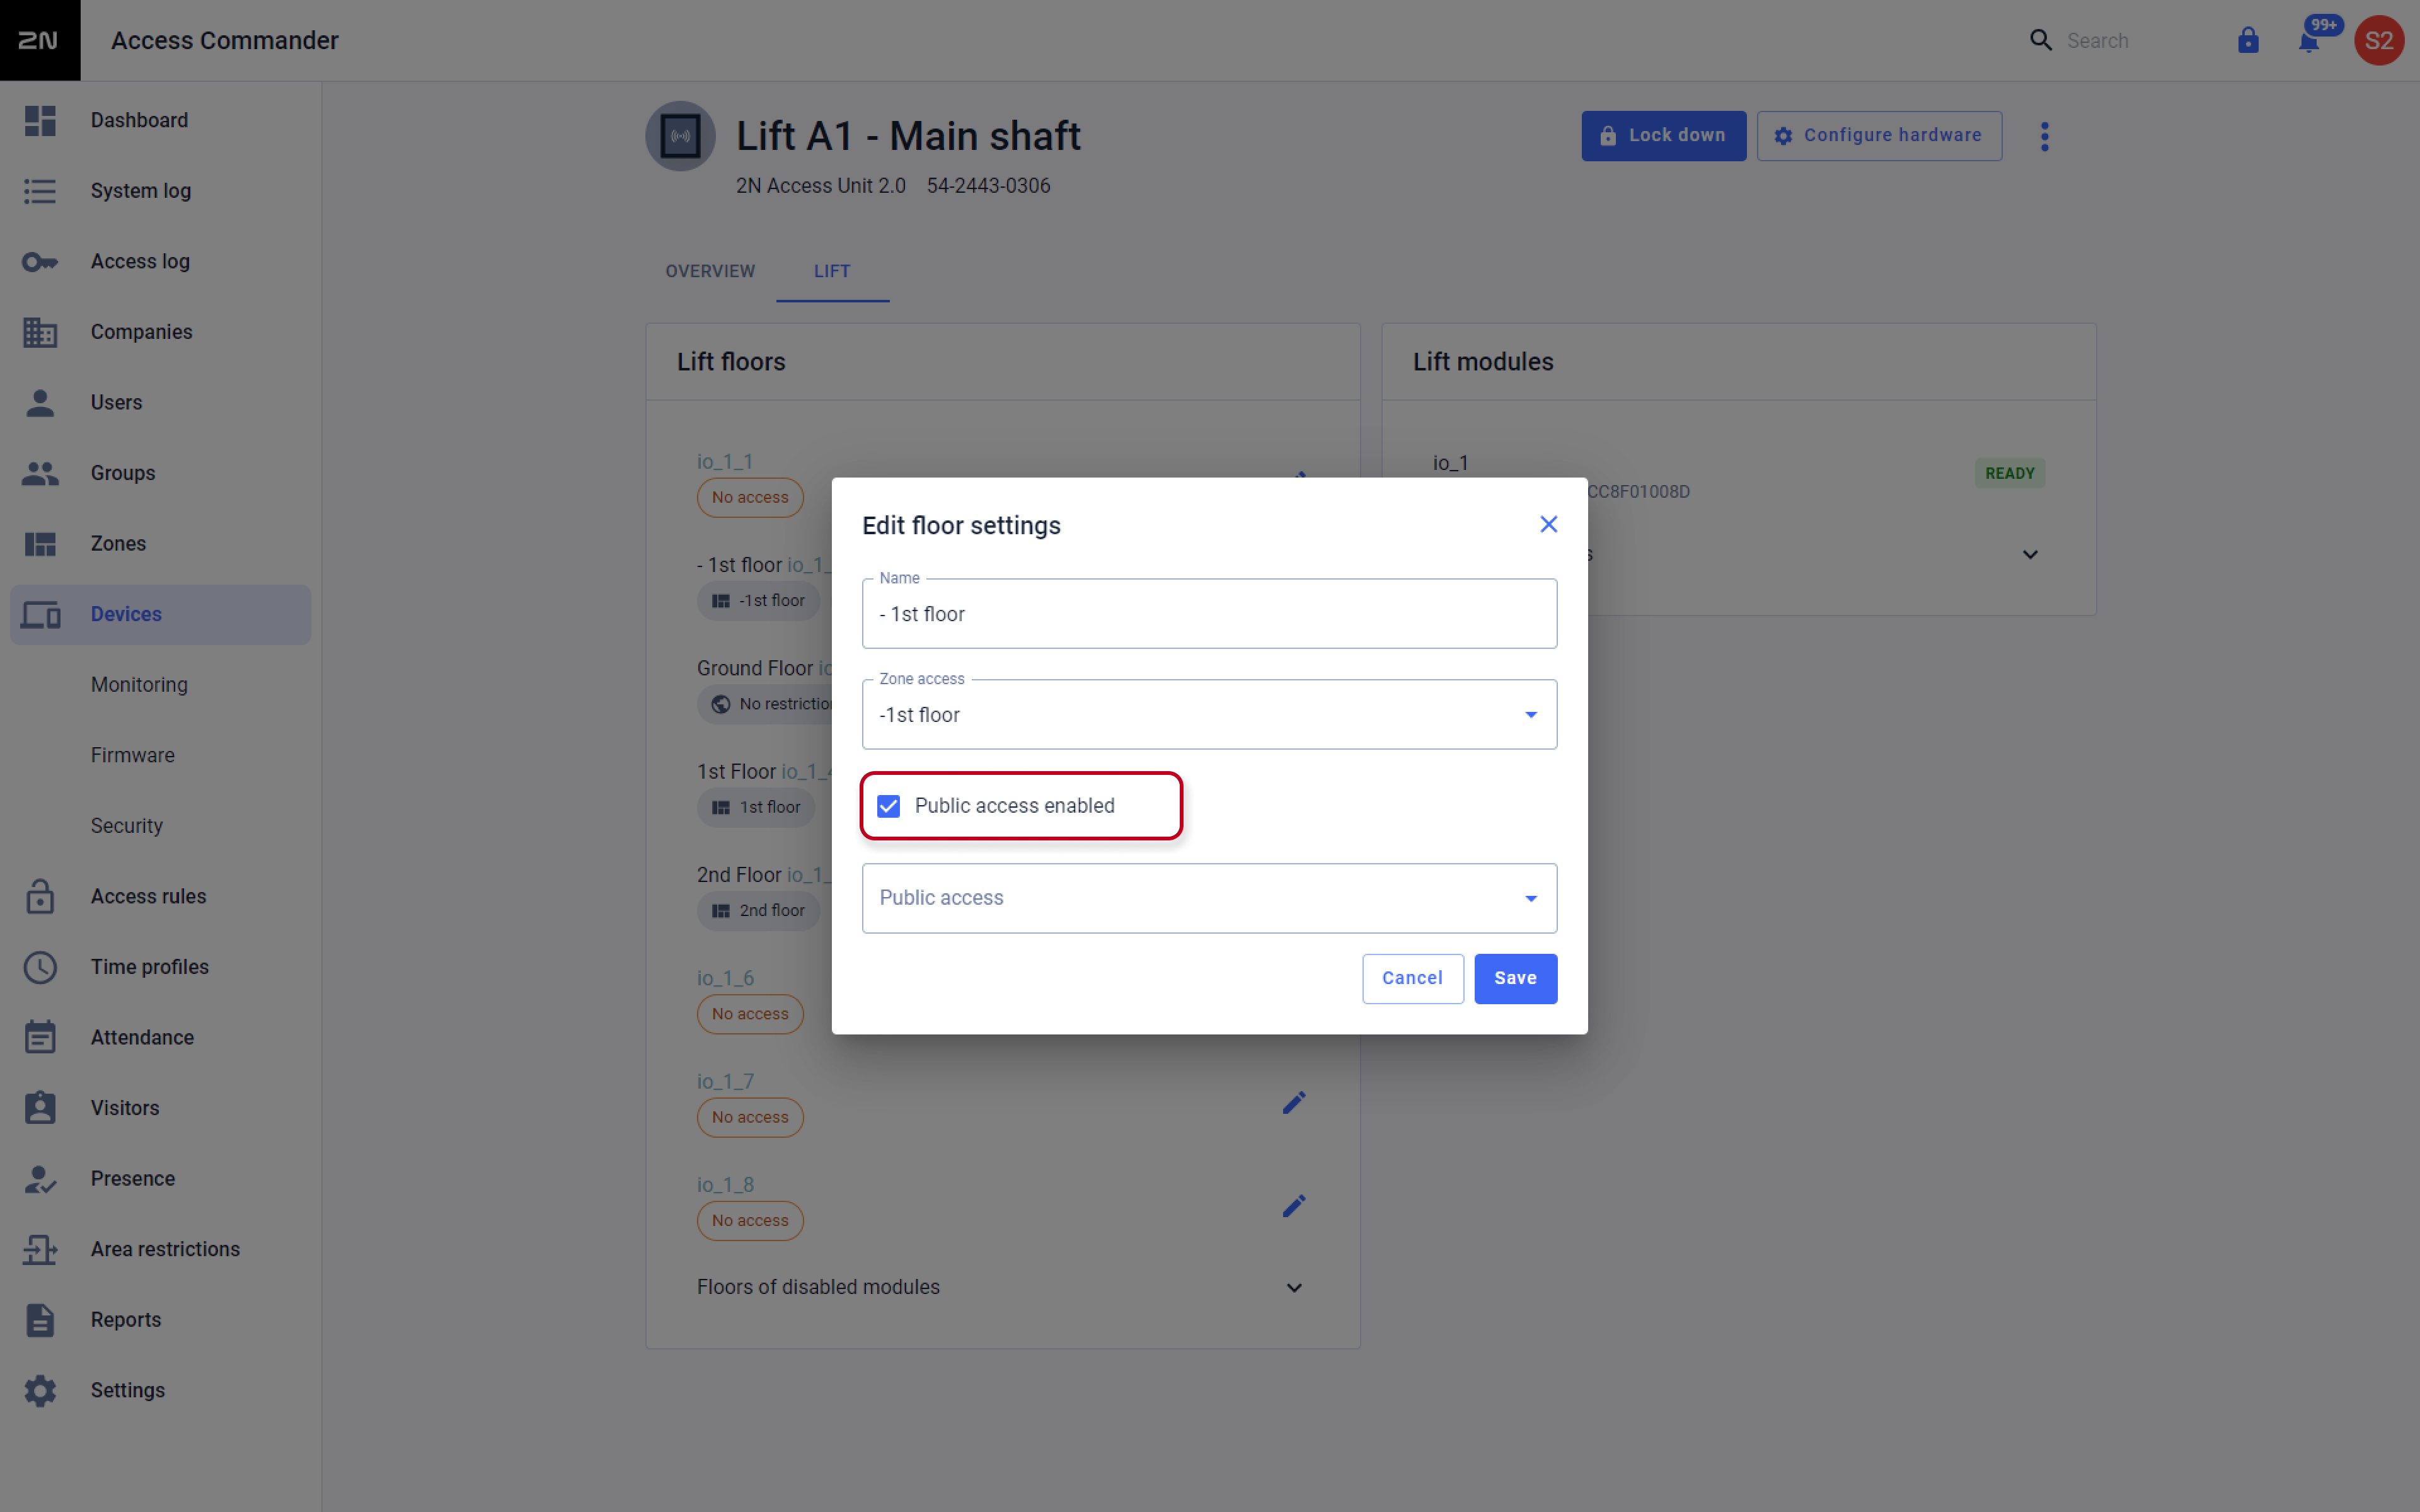
From now, anyone who presses the button for 2nd floor will be able to access that floor.Optionally, Time profile can be set, which will restrict access to that floor for desired time frames.
If none of the Time profiles is used it means 24/7 allowed access.
IP Intercom/Answering unit lift setup
Requirements
Lift control from 2N OS answering units requires:
- 2N® Access Commander 2.0 and later (optional)
- 2N OS 2.32 and later
The setup is quite easy once you finished all the previous steps in this guide.
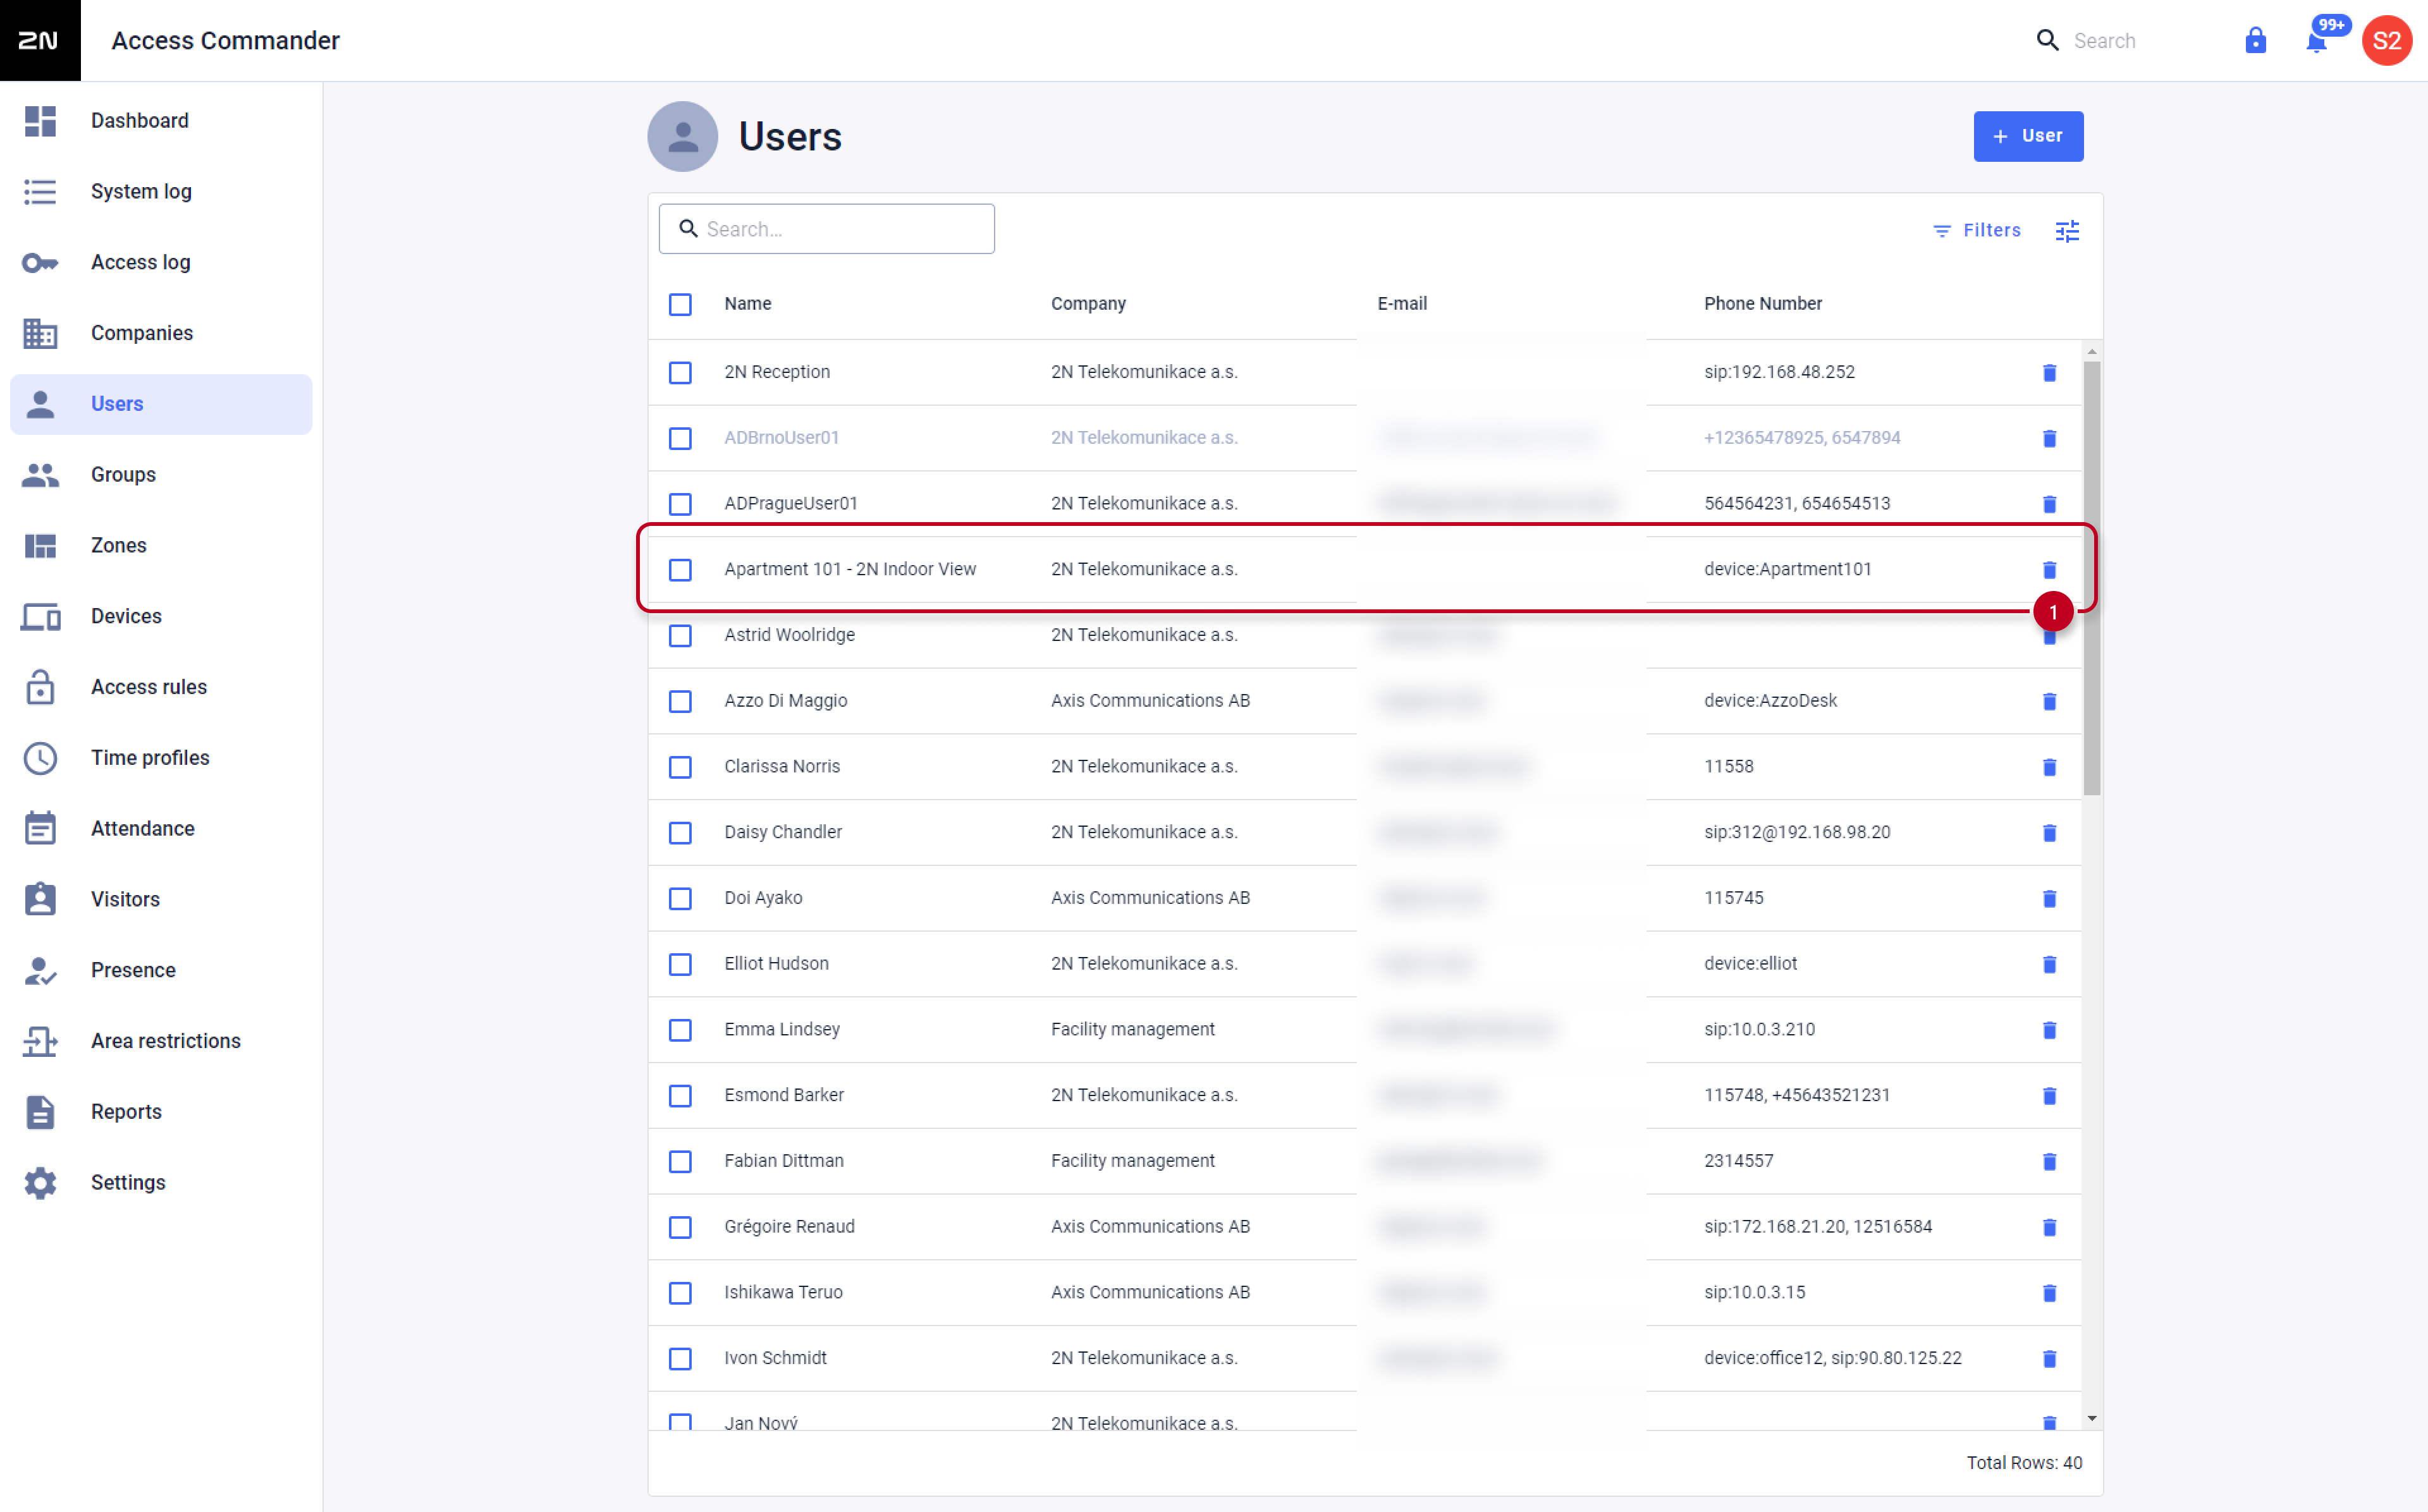
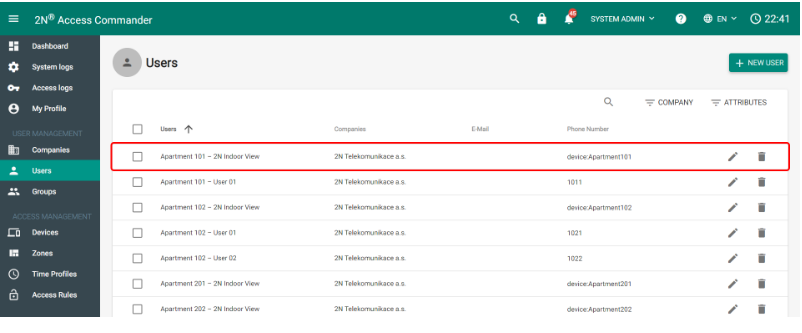
You can create a user that will stand in for your 2N OS based answering unit – in this example, we’re using several 2N® Indoor View units. Name these users according to your preferences, we named them Apartment 101 – 2N Indoor View etc.
Calling more devices at the same time
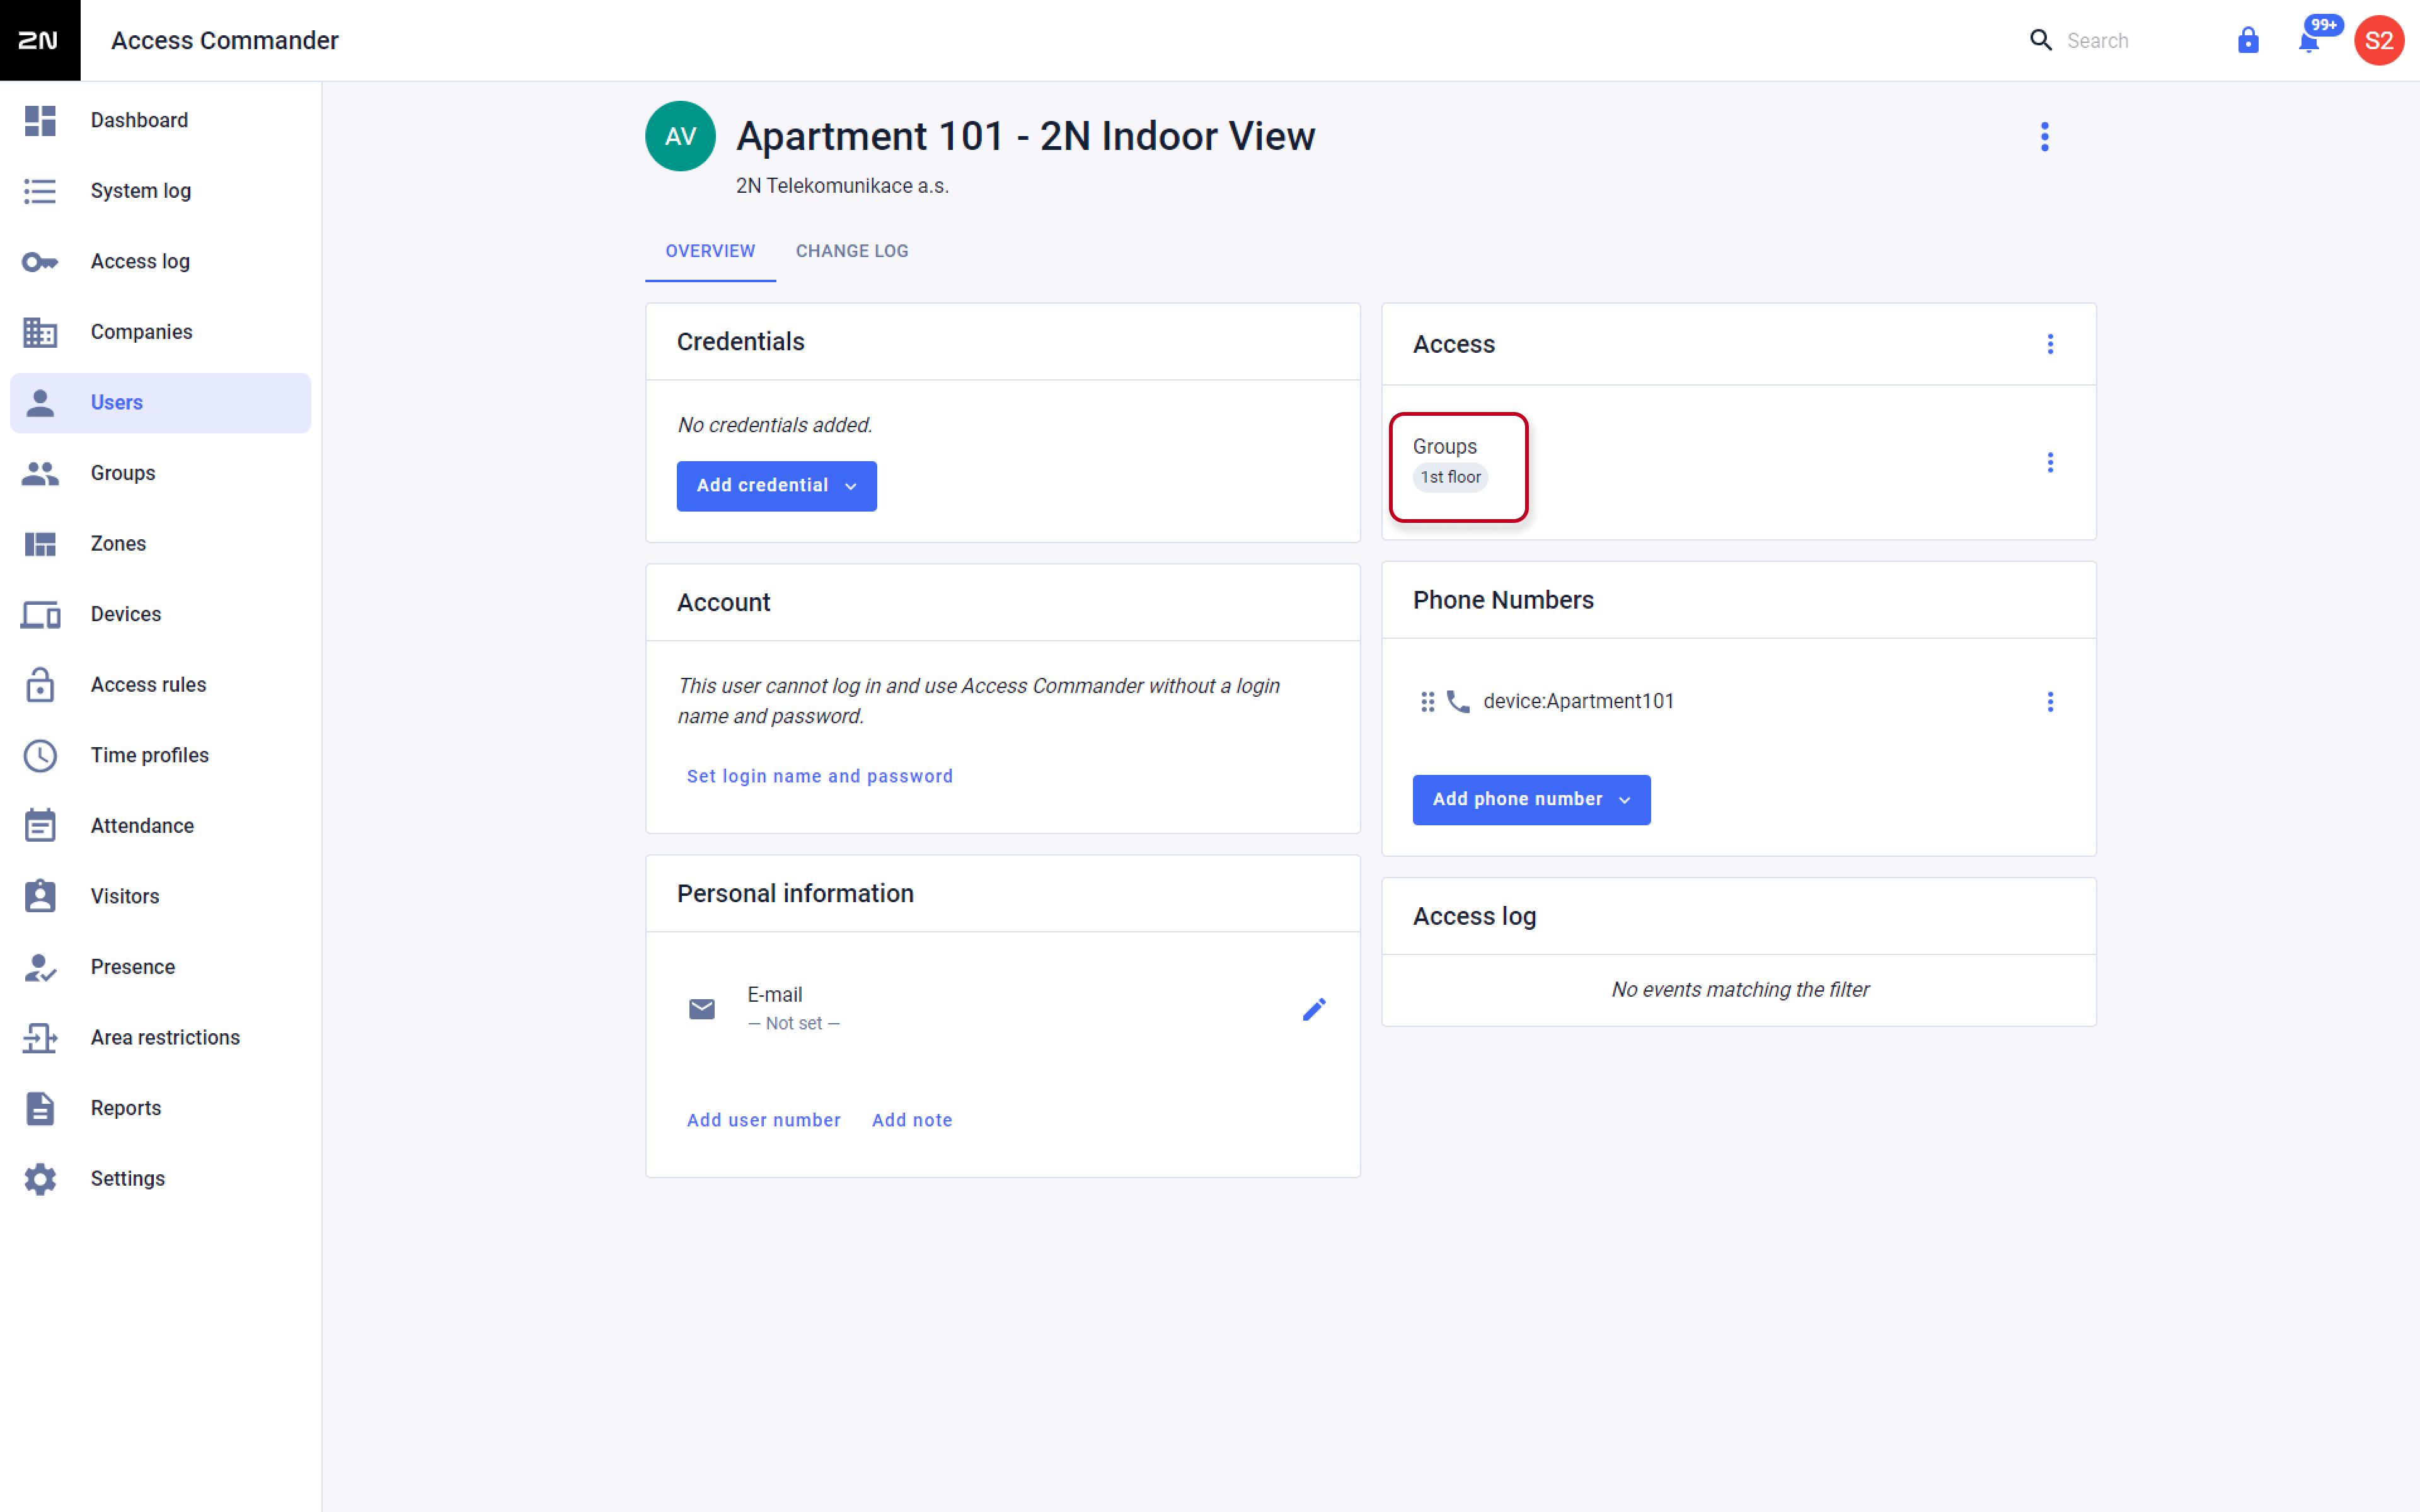
- Make sure each user residing on the 1st floor is assigned to a group that has access to this floor – in our case, it’s 1st floor group as shown a few steps before in Access Rules.
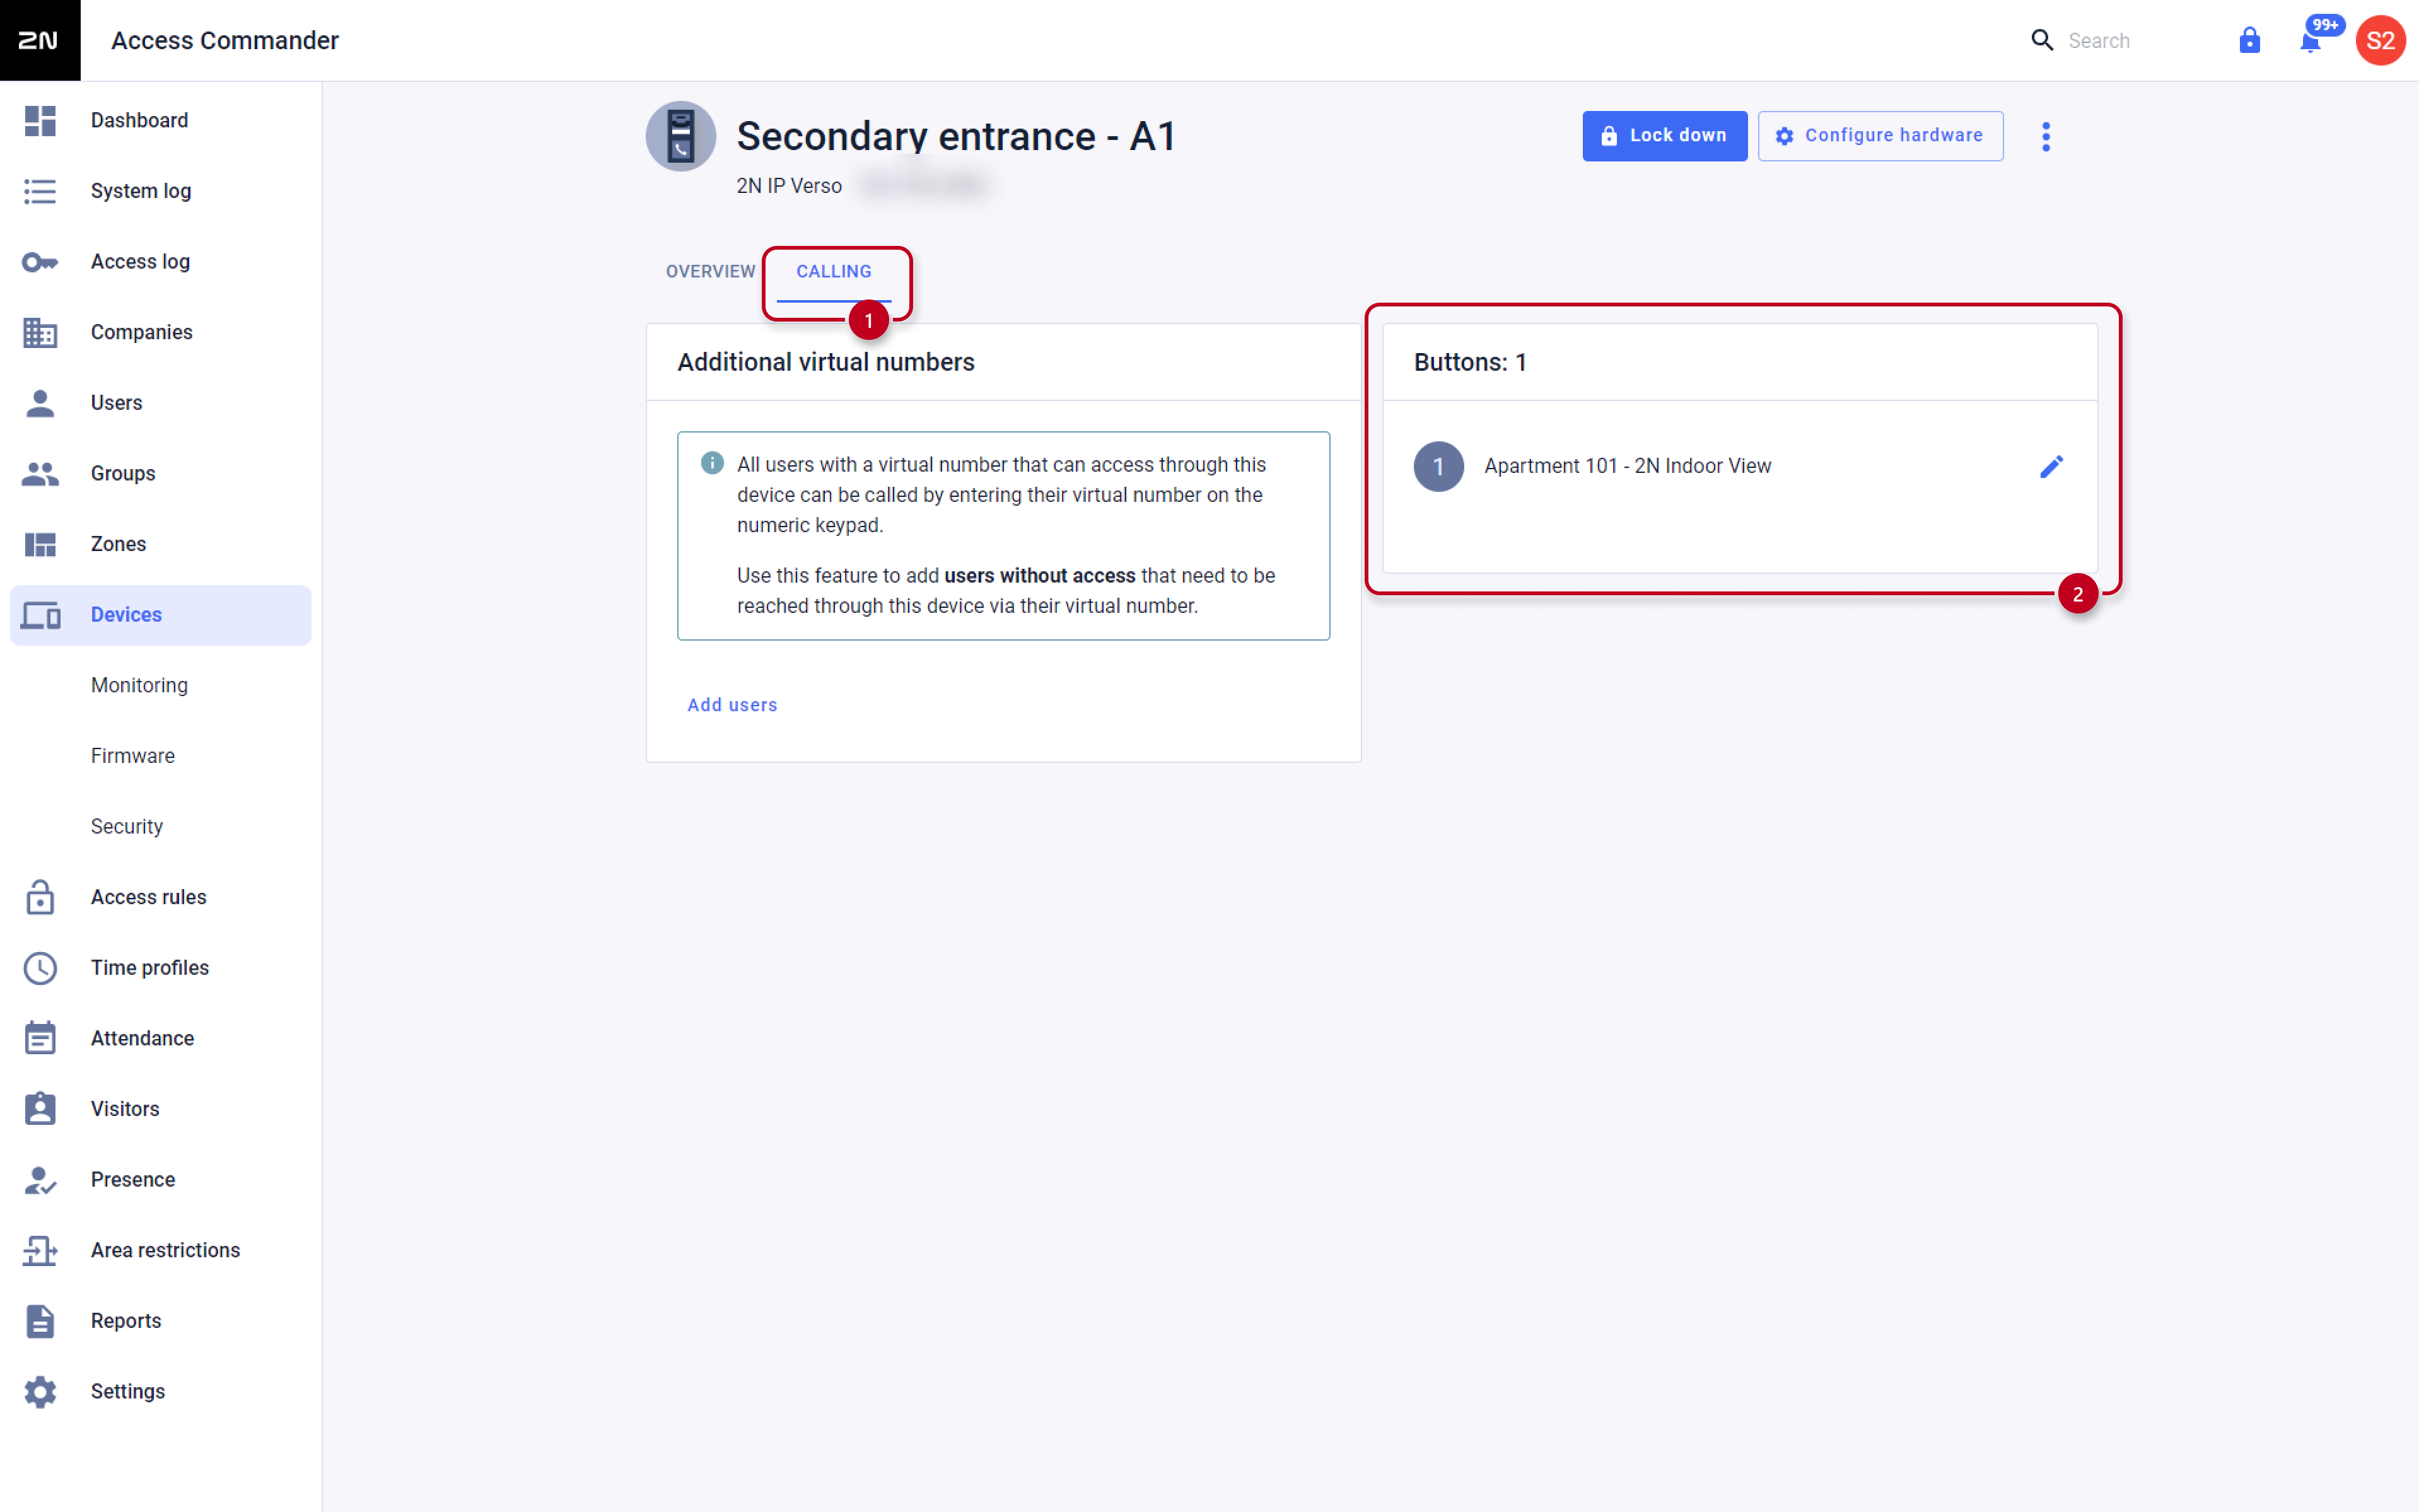
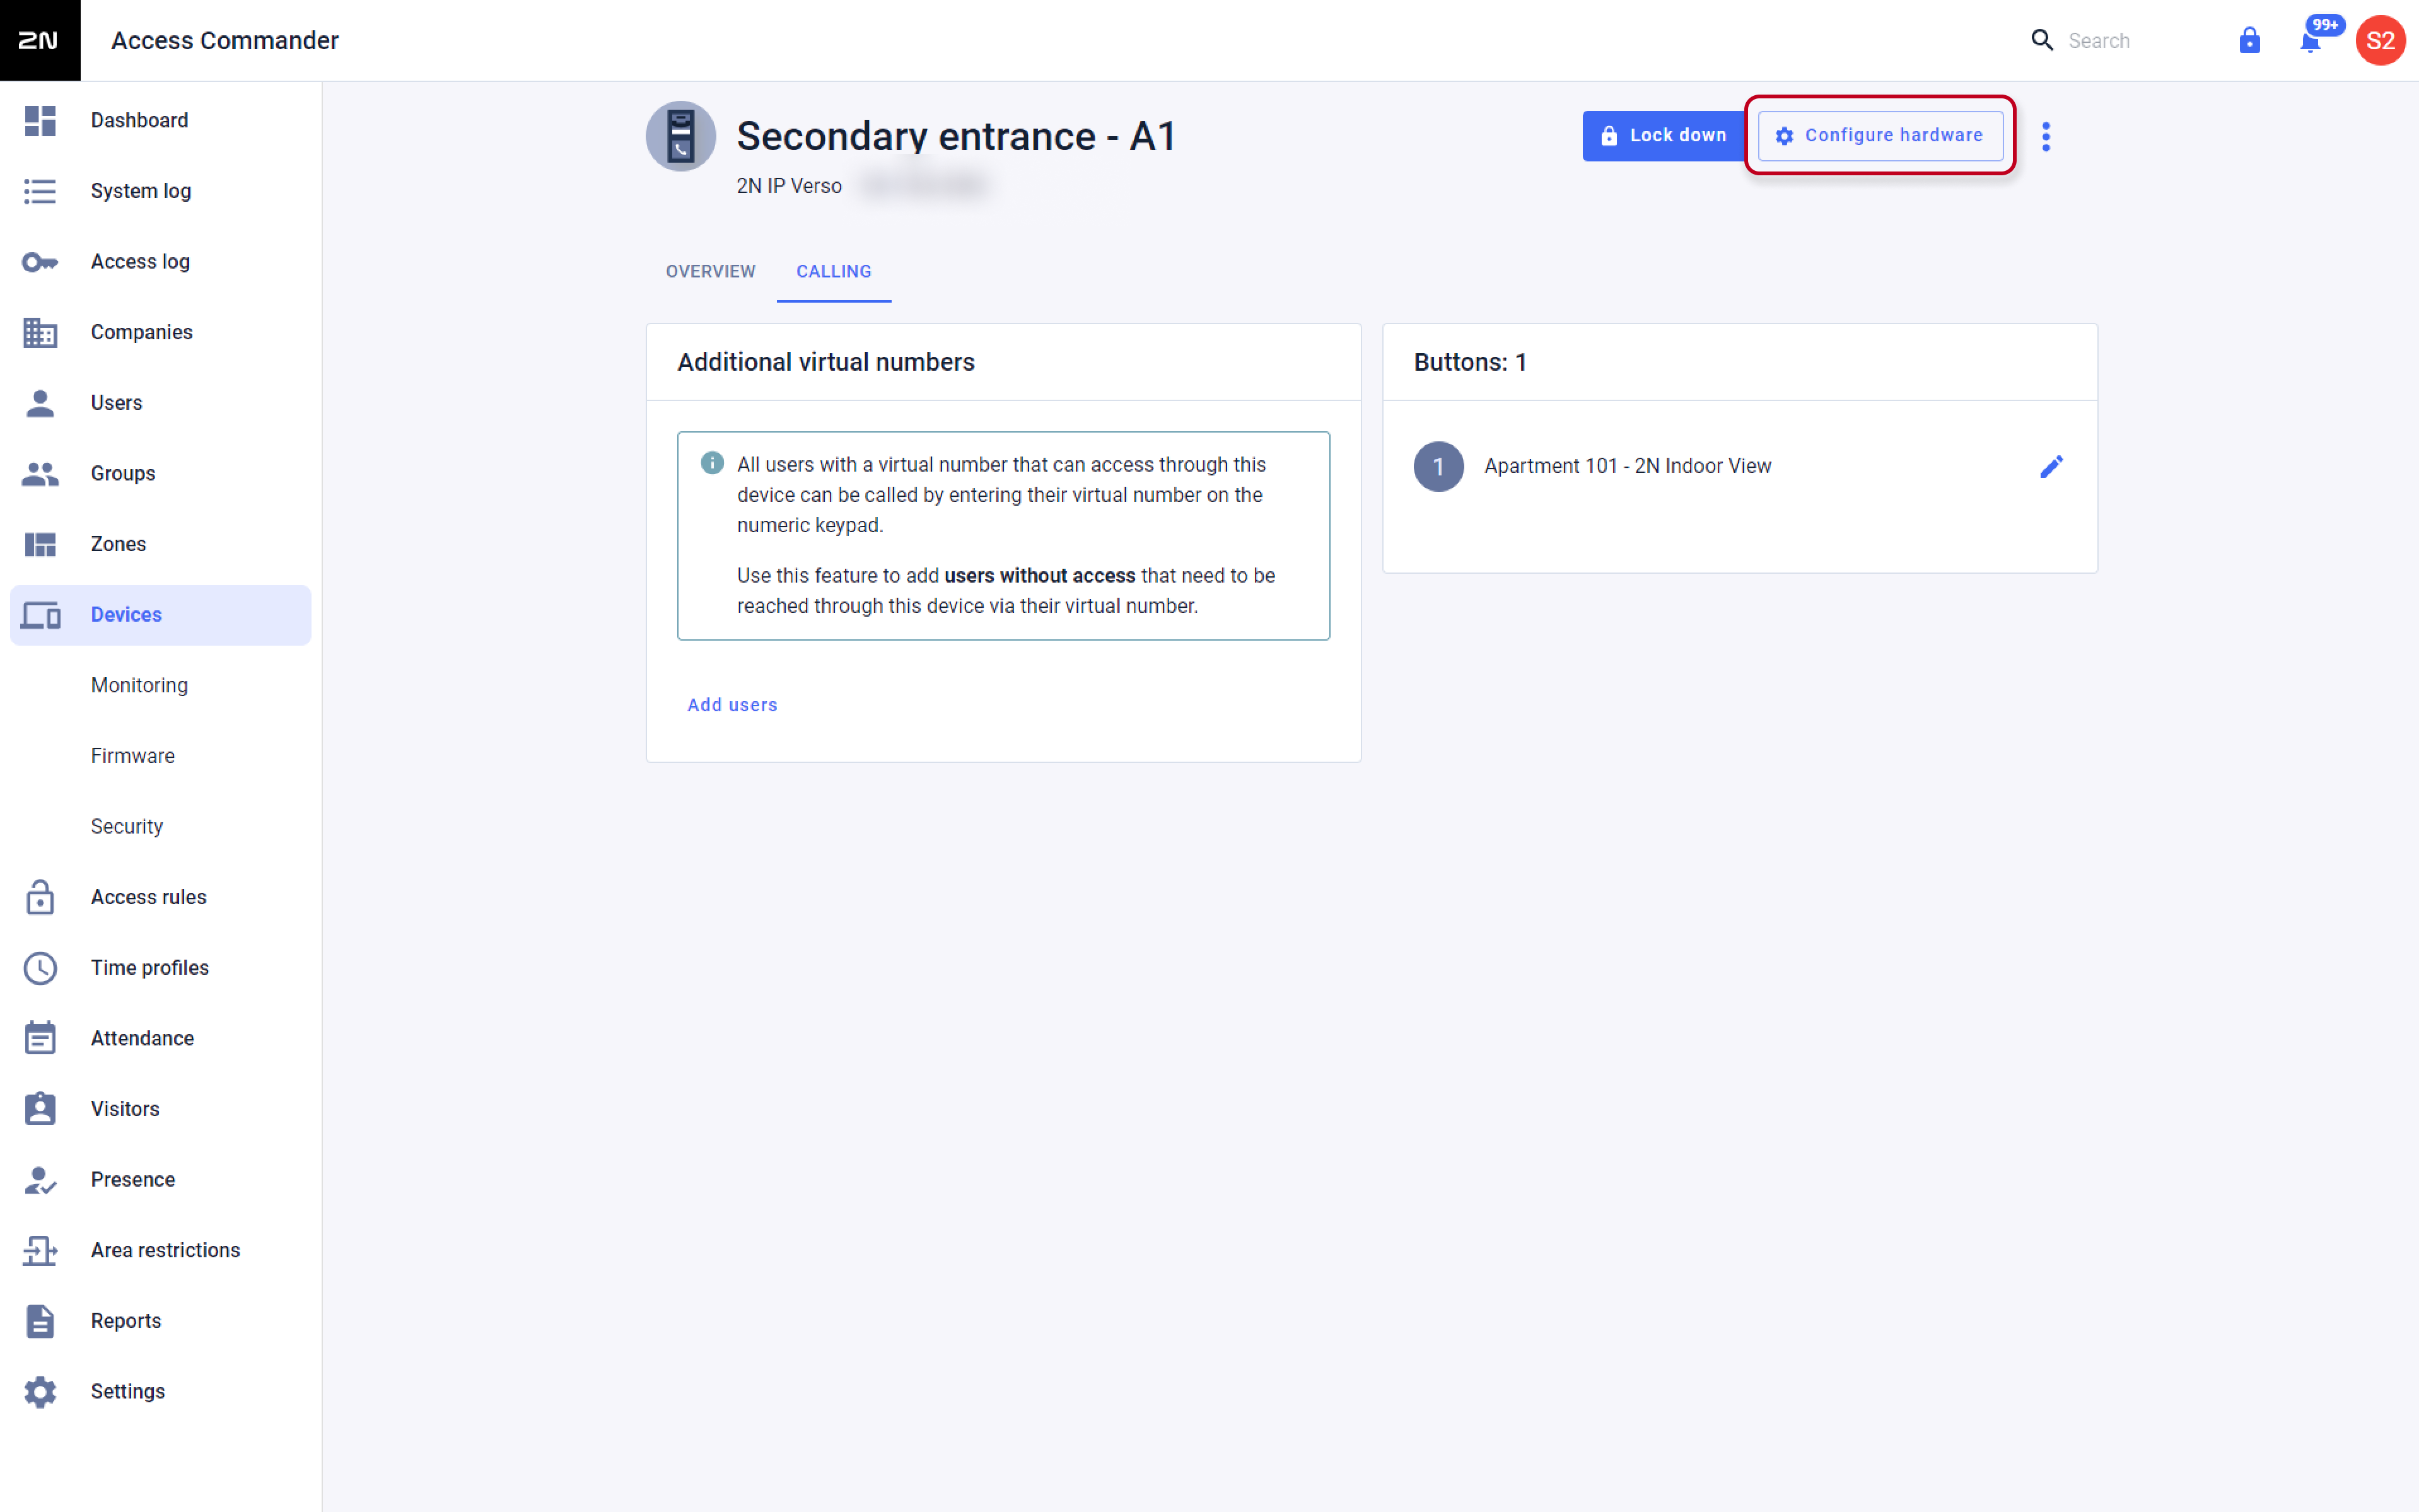
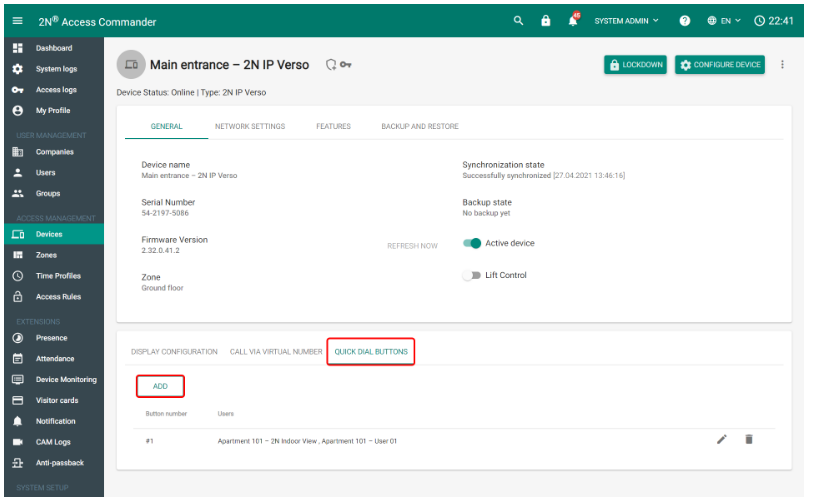
- Now go to devices and open device detail of an intercom and configure its quick dial buttons or touch display to call all users and devices in e.g. Apartment 101:
- Now that this is ready, go to the intercom’s web interface via Configure Device.
Version 2.7 or older
- Create a Zone for each Floor in the section Zones. It is correct that these Zones will not have any device assigned, since lift enabled devices cannot be added to any Zone.
- Assign each zone to the Company which contains users who are allowed access to that particular floor (multiple Companies can be selected if needed).
- Users should be placed in groups which will later be granted access to particular floors.
Navigate to Access Rules and begin creating rules to define which zones or floors each group may access. For example, the group ‘Company A Sales Team’ can be paired with the zone ‘first floor’ to allow the users of that group access to the first floor.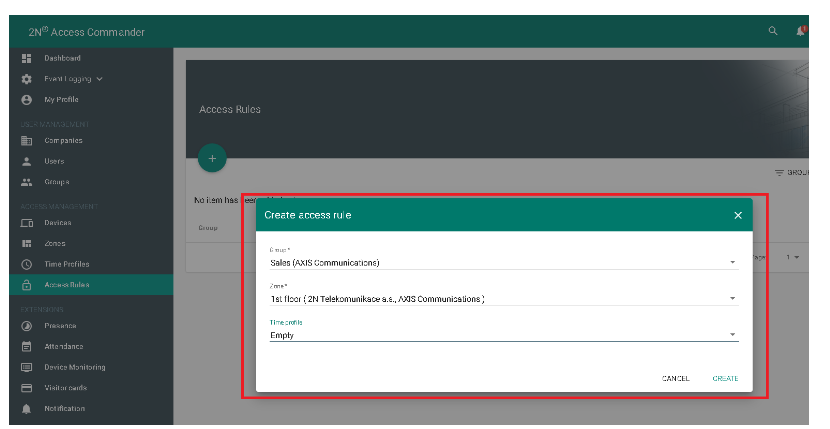
Optionally, Time profiles can be set within Access rules which will restrict access to that floor within desired time frames.
If none or Empty Time profile is used it means access will be allowed 24/7.
Enable lift control usage in added devices in the device details page in Access Commander.
If you add to Access Commander device with lift control license, it will become automatically enabled for Lift Control)
- To finally setup which users can access which floor, in device details go to Management and create Floor assignment according to the physical connection of relays between AXIS A9188 and the lift itself (for example relay io_1_1 on AXIS A9188 is physically connected to lift that 1st floor will become available for Groups of users which have in Access rules defined rules for Zone 1st floor).
Since up to 8 AXIS A9188 can be connected, you need to know which relay belongs to which AXIS A9188 I/O Relay Module:
io_1_1 in Floor list stands for first connected AXIS A9188 to 2N unit and its first relay
io_1_2 in Floor list stands for first connected AXIS A9188 to 2N unit and its second relay
io_2_1 in Floor list stands for second connected AXIS A9188 to 2N unit and its first relay
etc...
From now all users, which are part of Groups associated in Access rules with Zone 1st floor and have valid credentials, when they authorize on 2N IP unit in lift cabin will be able to use lift button for 1st floor.
(Optional) Setup floor to allow access to anyone who presses the lift floor button
In order to allow access to floor without the need to authorize person using an RFID card, in device details go to Management and create Floor assignment according to the physical connection of relay between AXIS A9188 and lift itself (for example relay io_1_2 on AXIS A9188 is physically connected to lift which 2nd floor will become available for anyone who just presses a 2nd-floor button in the lift).
From now, anyone who presses the button for 2nd floor will be able to access that floor.Optionally, Time profile can be set, which will restrict access to that floor for desired time frames.
If none of the Time profiles is used it means 24/7 allowed access.
IP Intercom/Answering unit lift setup
Requirements
Lift control from 2N OS answering units requires:
- 2N® Access Commander 2.0 and later (optional)
- 2N OS 2.32 and later
The setup is quite easy once you finished all the previous steps in this guide.
You can create a user that will stand in for your 2N OS based answering unit – in this example, we’re using several 2N® Indoor View units. Name these users according to your preferences, we named them Apartment 101 – 2N Indoor View etc.
Calling more devices at the same time
- Make sure each user residing on the 1st floor is assigned to a group that has access to this floor – in our case, it’s 1st floor group as shown a few steps before in Access Rules.

- Now go to devices and open device detail of an intercom and configure its quick dial buttons or touch display to call all users and devices in e.g. Apartment 101:
- Now that this is ready, go to the intercom’s web interface via Configure Device.
Door and lift control
Switch for lift control
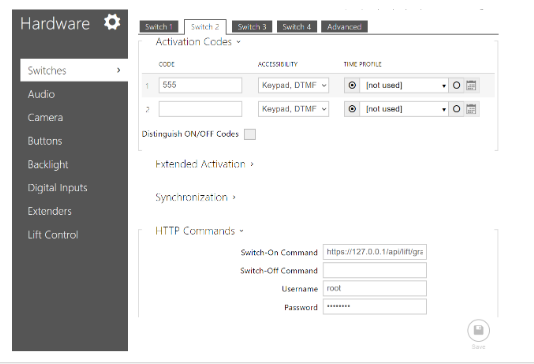
Activate the switch by entering DTMF (activation code) and therefore send the following HTTP request. Replace the values in red with your own values:
https://LiftDeviceIP/api/lift/grantaccess?user=$CallUuid$&duration=seconds
https://127.0.0.1/api/lift/grantaccess?user=$CallUuid$&duration=5 (example)
*LiftDevice = either 127.0.0.1 (if the very same device is controlling the lift) or some other device (where the Axis relay is connected)
Optional parameter duration
Please note that &duration=seconds in the HTTP request is optional. You may specify it to keep the lift buttons activated longer than specified in the image below – this value is used by all other credentials or when duration isn't specified in the HTTP request.
The HTTP request uses LIFT API that’s part of I/O API of the 2N device in the lift that controls the Axis A9188 relay module.
IP Intercom
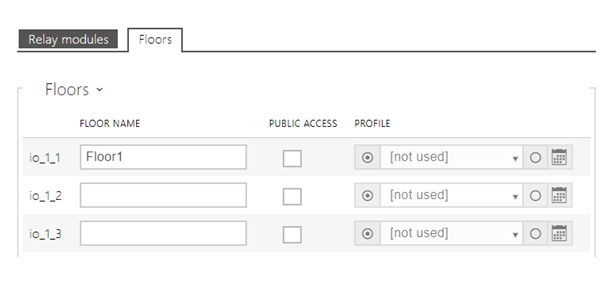
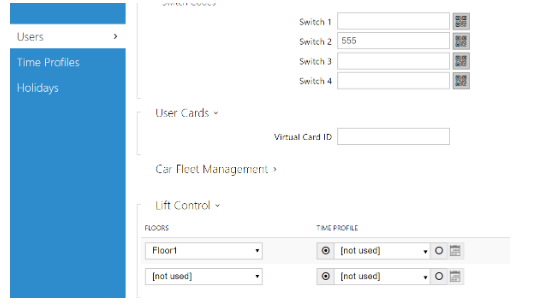
- Create a floor by giving it a name (for better orientation)
- Choose wheter or not the floor should be publicly accessible and if any time profile should be applied
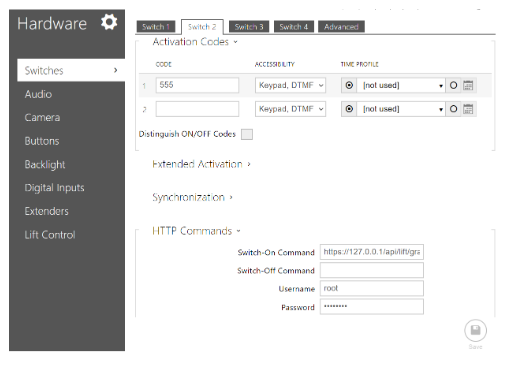
- Fill in the API command in the switch-on (127.0.0.1 is used because the AXIS relay is connected to this Verso, if it was a different device, then you would fill in the IP address of that device instead).
Authentication matches HTTP API authentication (see below).
https://LiftDeviceIP/api/lift/grantaccess?user=$CallUuid$&duration=seconds
https://127.0.0.1/api/lift/grantaccess?user=$CallUuid$&duration=5 (example)
*LiftDevice = either 127.0.0.1 (if the very same device is controlling the lift) or some other device (where the Axis relay is connected)
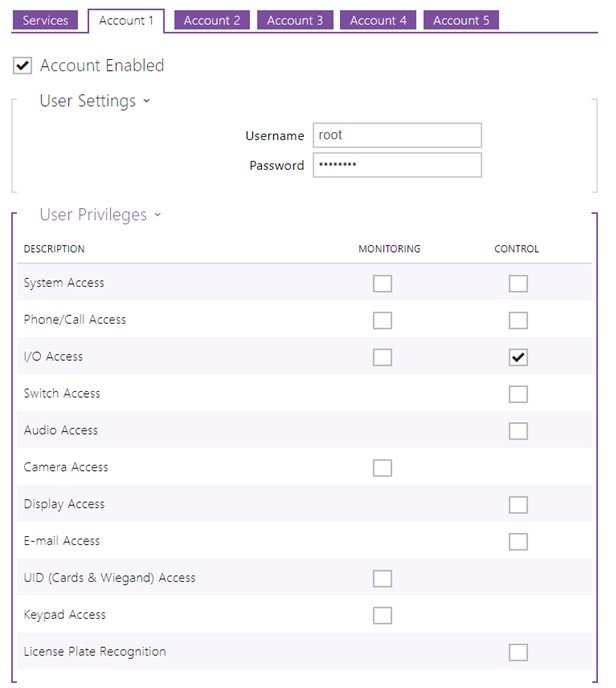
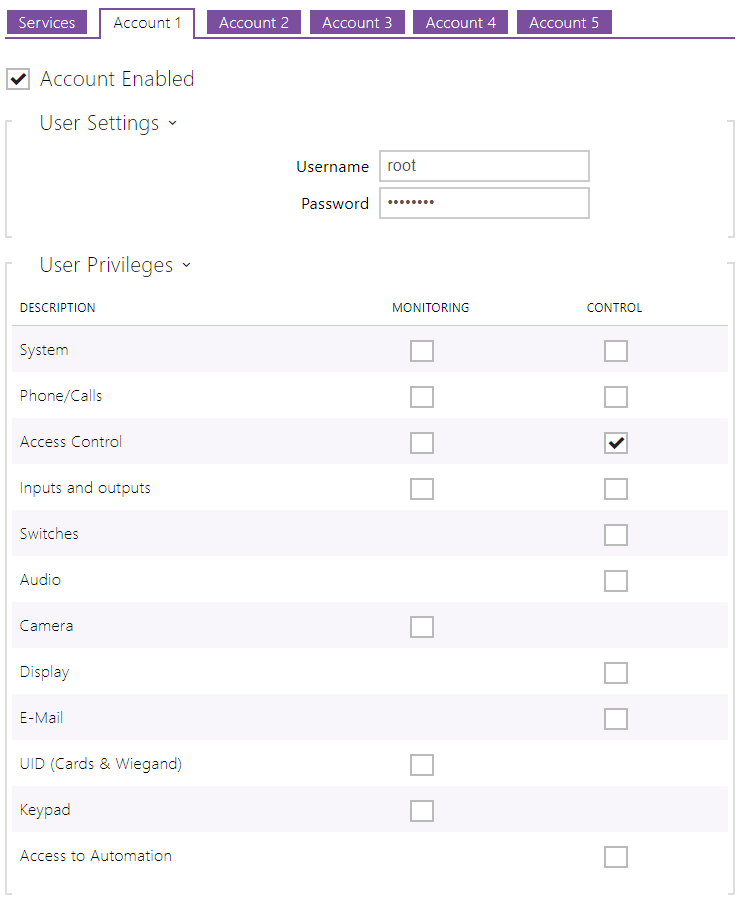
- Set up an HTTP API account for Access Control API and fill in the authentication (matching the authentication in the switch HTTP command).
- Create a user to be called (Indoor View in our case)
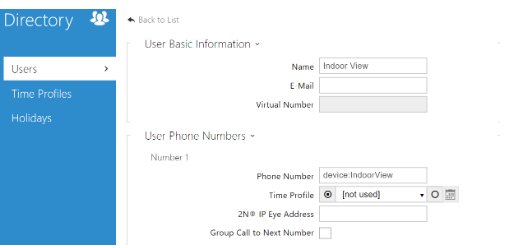
- Lastly, give the user a PIN code for the LIFT control switch (switch 2 in our case) and assign it a floor
2N OS answering unit setup
2N answering unit support
All 2N answering units may be used for lift control, this includes even our most basic units such as 2N® Indoor Talk and 2N® IP Handset. More advanced answering units, such as 2N® Indoor View and 2N® Indoor Compact have an optional LIFT icon checkbox to make the lift button easier to identify; 2N® Indoor Touch 2.0 and 2N® Mobile Video will receive the LIFT icon functionality in the upcoming updates.
Basically, any device that can send DTMF may be used for lift control.
This setting is identical for 2NOS only and Access Commander included.
To configure a 2N OS answering unit, access the web interface of the unit. This unit needs to have devices corresponding with phone numbers of intercoms that are going to call it, in this example we’re using device:Verso, but you can use other syntaxes depending on network setup. Add a new device or edit an existing one.

The last step is to set up Unlock Buttons – as you can see, we set up separate ones for door control and lift control. If LIFT is checked, its icon will change to make it easier to differentiate between the two.
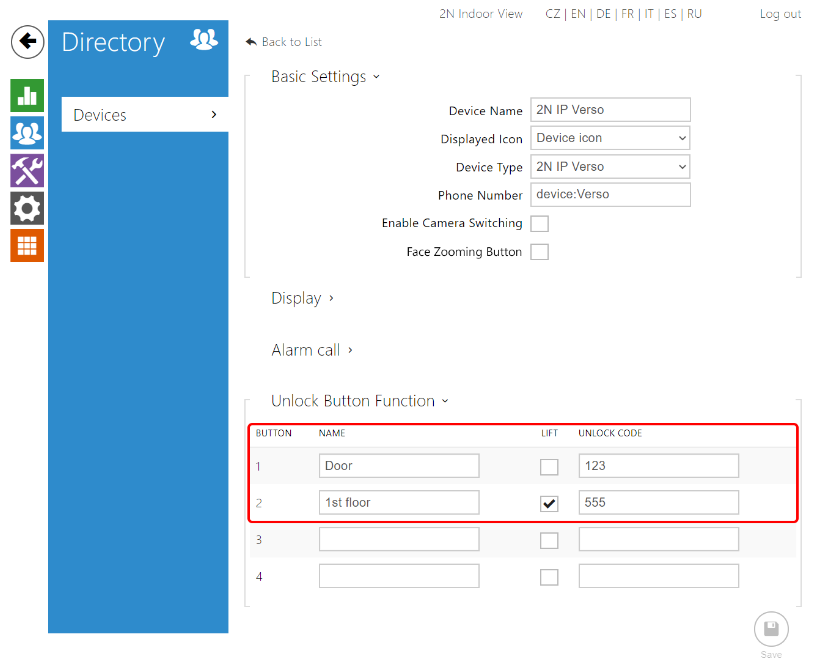
Once this Main entrance – 2N IP Verso device (whose device name is Verso) calls the Apartment 101 – 2N Indoor View user, the 2N® Indoor View recognizes it and shows the appropriate unlock buttons.
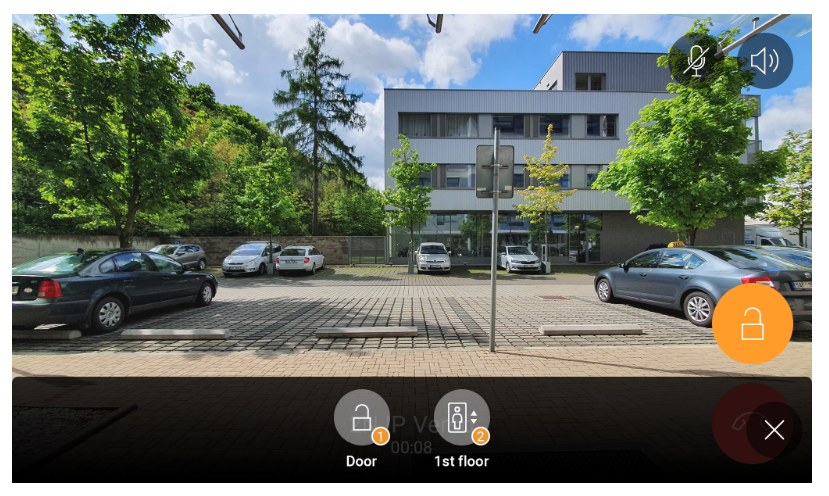
Tapping either of these will either open the door or start the lift action and send the HTTP request to the 2N device in the lift which then enables the appropriate buttons on the lift control panel via the Axis A9188.
It’s important to note that 2N® Access Commander serves as a synchronization server to make sure that the $CallUuid$ of the called user/device corresponds with the Uuid of a user in the 2N device that manages the lift. As this is an additional feature, you may still use this 2N device to enable lift buttons directly e.g. via Bluetooth or RFID.
2N® Mobile Video setup
Configuration of 2N® Mobile Video is described in this Video – 2N® Mobile Video: registration and setup or here: Switch codes – How to unlock the door?
2N® IP Handset setup
Configuration of 2N® IP Handset's call features and switch codes is described here: Direct call – How to set up a 2N® IP Handset for a direct SIP call (without PBX) and how to open door
2N® Indoor Touch 2.0 setup
Configuration of 2N® Indoor Touch 2.0 is described in this Video – Setting up calls between 2N® Indoor Touch 2.0 and 2N IP intercoms or here: How to set up calls from/to 2N IP intercoms?
Last update
- 2022-10-24
Devices used
- 2N® IP Verso
- 2N Access Unit 2.0
- 2N® Indoor View
- AXIS A9188-VE Network I/O Relay Module
Licenses required
- Gold license (For IP intercoms)
- Lift Module – only for the device that controls the lift
Compatible 2N intercoms for calls and lift control
- 2N® IP Style
- 2N® IP Verso
- 2N® IP Force
- 2N® IP Safety
- 2N® IP Vario
Compatible 2N devices for lift control
- 2N® IP Style
- 2N® IP Verso
- 2N® IP Force
- 2N® IP Safety
- 2N® IP Vario
- 2N Access Unit 1.0
- 2N Access Unit 2.0
- 2N Access Unit M
Compatible 2N answering units
- 2N® Indoor View
- 2N® Indoor Compact
- 2N® Indoor Talk
- 2N® Mobile Video
- 2N® IP Handset
- 2N® Indoor Touch
- 2N® Indoor Touch 2.0