How to make a call between 2N® LiftIP and IP Phone
Info
This FAQ describes how to setup simple call between 2N® LiftIP and IP Phone.
- Always keep your device with the latest FW - How to make a firmware upgrade on 2N® LiftIP
* This parameter can be set via the voice menu (incoming call to 2N® LiftIP).
** This parameter can only be set via the Service Tool.
List of all parameters that can be configured can be seen in the manual - Programming Function Survey
Please keep on mind that if you will disable confirmation for alarm calls, then you are doing this at your own risk as there is no human interaction!
Direct call to IP Phone - without PBX
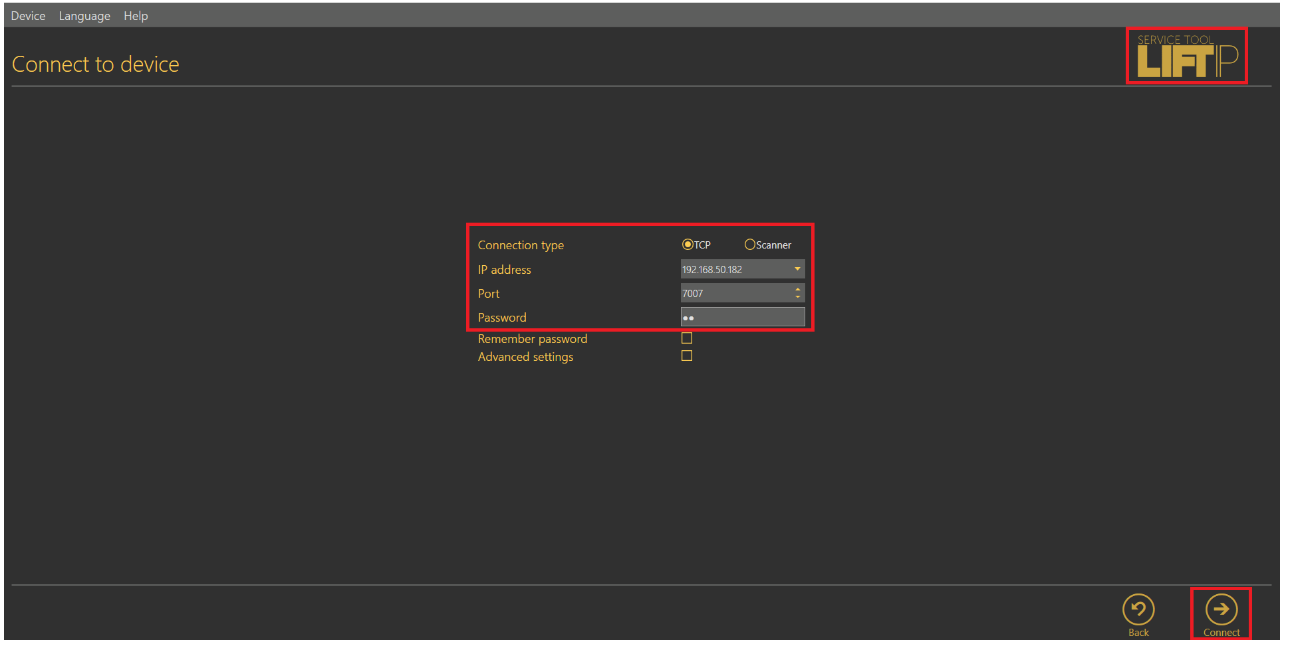
Connect to 2N® LiftIP
Connect to your 2N® LiftIP using 2N® LiftIP Service Tool which you can download - here
- It is necessary to use the 2N® Lift IP Service Tool as VoIP parameters can't be set via the voice (incoming call to 2N® LiftIP)
You can connect directly by choosing TCP and filling the correct IP address, Port and Password
If you don't know the IP address please use the FAQ - How to get IP address of lift communicator 2N® LiftIP.
If you need to set Static IP addres or DHCP please use this FAQ - Static IP address - How to set up static IP address on 2N® LiftIP
Press Connect
How to set the call destination
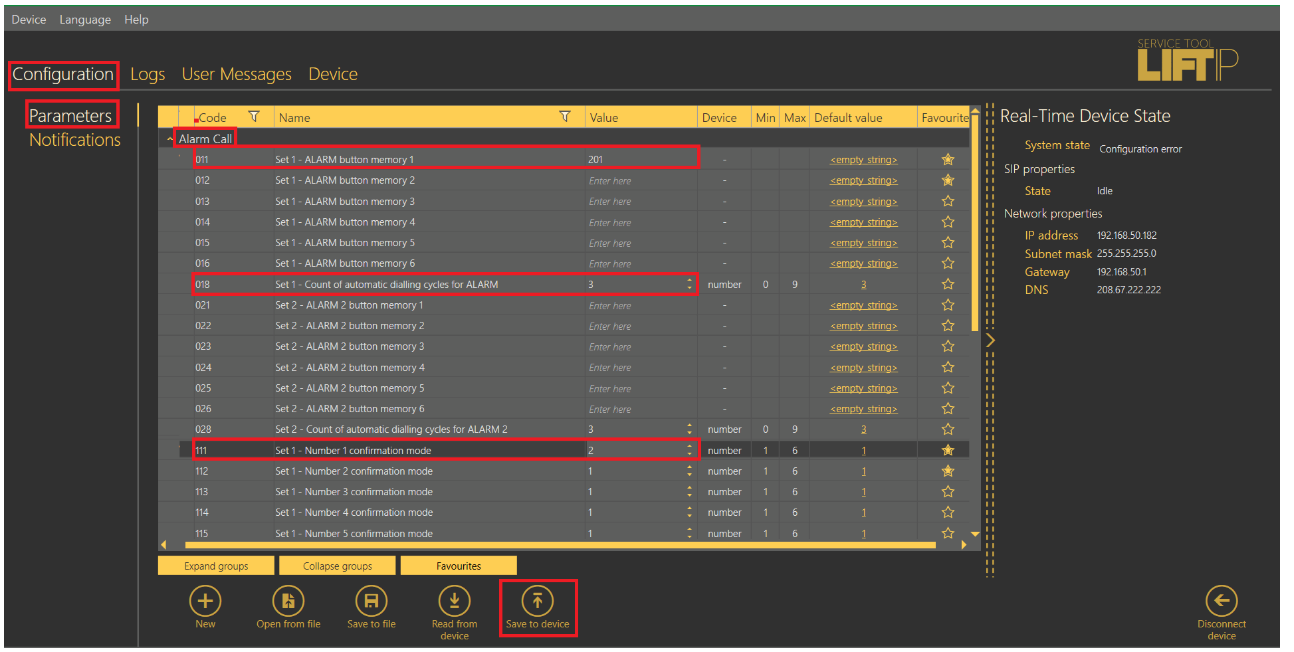
Go to Configuration - Parameters - Alarm Call -> and set following parameters:
011 =* IP address of your IP Phone, in our example we use "192.168.50.160"
018 =* Count of automatic dialing cycles for ALARM (011-016) * - when the destination doesn't pickup it calls again depending on the count of cycles you set
111 =* Alarm call memory confirmation mode - defines how the call is confirmated after pick-up
x1x = Alarm button (1-6)
xx1 = Type of confirmation
- 1 = with DTMF confirmation (1)
- 2 = with pick-up confirmation (for GSM/UMTS/VoIP only) - no confirmation, just pick-up the handset
- 3 = CPC Antenna
- 4 = CPC Kone
- 5 = P100
- 6 = DTMF auto detection (CPC Antenna/P100)
- 7 = CPC Antenna 2N ext
- 8 = CPC Kone 2N ext
- 9 = P100 2N ext
You can find all parameters in the Programming Function Survey
Don't forget to click on Save to device

Now your 2N® LiftIP is ready to make a call to IP phone.
Call via SIP Proxy - How to register 2N® LiftIP to SIP Proxy
Connect to a SIP Proxy server
Go to Configuration - Parameters - VoIP settings -> set following parameters
1105 =** IP Addres of the SIP Proxy server
1106 =** Username
1107 =** Password
1109 =** SIP registrar port - usually 5060 is used for SIP communication
1112 =** Display name - this will appear on the display of the party you are calling to
Don't forget to click on Save to device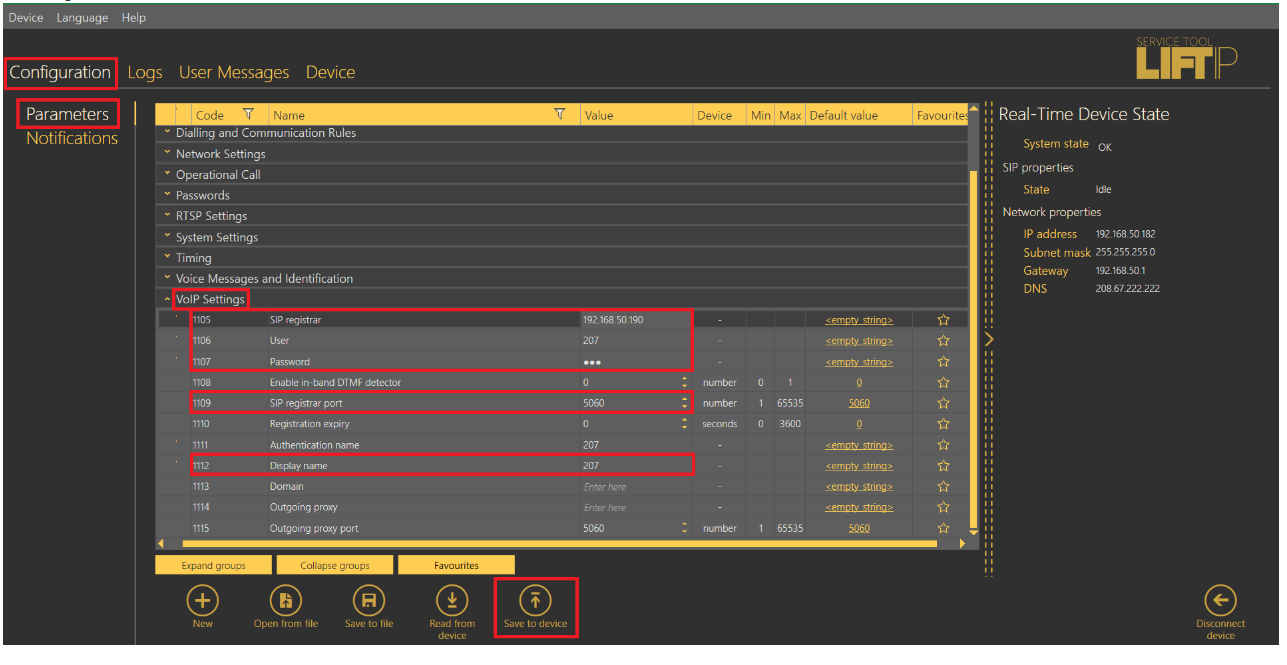
How to set the call destination
Go to Configuration - Parameters - Alarm Call -> set following parameters
011 =* URI number of the device you want to call, in our example we use "201"
018 =* Count of automatic dialing cycles for ALARM (011-016) - when the destination doesn't pickup it calls again depending on the count of cycles you set
111 =* Alarm call memory confirmation mode - defines how the call is confirmated after pick-up
x1x = Alarm button (1-6)
xx1 = Type of confirmation
- 1 = with DTMF confirmation (1)
- 2 = with pick-up confirmation (for GSM/UMTS/VoIP only) - no confirmation, just pick-up the handset
Don't forget to click on Save to device
Now your 2N® LiftIP is ready to make a call to IP phone via SIP Proxy.