!Starting manual for integration with 2N IP Intercoms
Info
This document serves for easier integration of 2N IP Intercoms with 3rd party systems. Typical examples of integration are described here for better orientation in intercoms configuration and their manuals. Document has been made for FW version v2.13, however, it refers to chapters from manuals which stays same when the new versions are released. Current versions of the manuals are always available here. Apart from the installation manuals, which are describing physical connection of a particular models, their inputs/outputs, installation etc., all manuals are common for all models of 2N IP Intercoms. For the most common scenarios we have created FAQ section with manuals, where we describe configuration of different functions and scenarios step by step. This FAQ section can be found here.
 1. Description of 2N IP Intercoms
All 2N IP Intercoms are based on SIP protocol therefore they offer all advantages of VOIP services similarly as classical SIP phones. Configuration is made via web interface directly from a web browser. Comparison of offered models can be found in common configuration manual in chapter 3. Model Differences and Function Licensing (here).
All basic features are available without any additional licences, if some feature is licensed, then it won't be possible to edit it and it will be grey in the web interface. List of licences and table, which describes, which functions are enabled by which licence, can be found in common configuration manual in chapter 3. Model Differences and Function Licensing (here). How to get those licences is described in this FAQ. Which licences are currently active can be simply verified in section System->Licences in web interface. For each of licensed features it is possible to buy separate licence. For all features, which are described below, there is always stated which licences has to be purchased for particular feature. However, it is also possible to purchase licence Gold (Part No. 9137909), which makes most of the features available, see the table mentioned above.
2. Configuration of 2N IP Intercoms
As already mentioned, all SW configuration is made via web interface and it is described in common configuration manual here. In default intercoms are configured to DHCP mode and credentials are admin/2n. Address from DHCP can be discovered simply directly with button on intercom. How to do that is described in this FAQ.
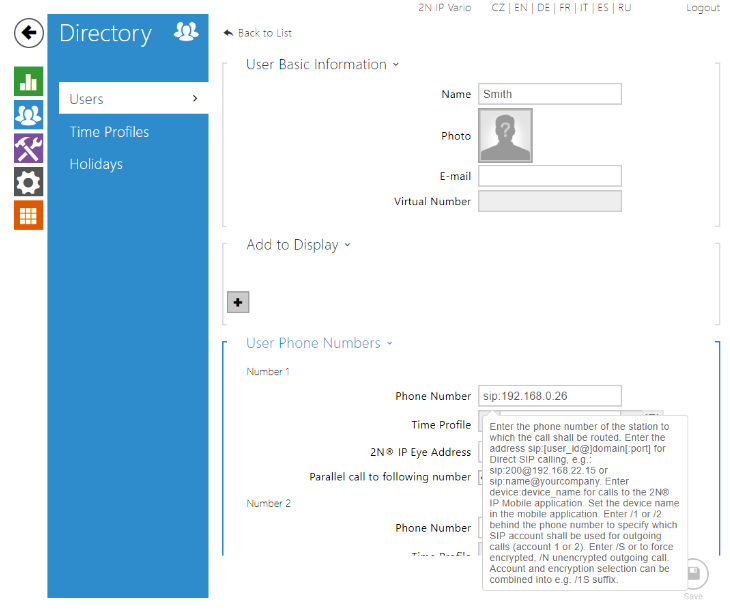
Every editable parameter is described in manual mentioned above. For parameters, where is available to choose from more options, all these options are described. If you will stay on some parameter with cursor of your mouse for a while, then a Pop Up help will appear. This help briefly describe what this particular parameter do and in which format you have to fill it. See picture below.
firmware v2.23.1 and older:

firmware v2.24.0 and later:
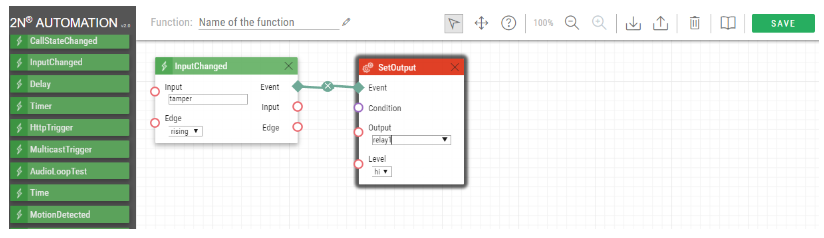
If native features of intercom are not enough to make your scenario functional, then it is possible to purchase Enhanced Integration (Part No. 9137907) to make Automation section available. This section allows you to program your own functions. Logic of this feature recognizes three basic variables:
- Event
- Action
- Condition
Event is for example pressed button, received HTTP command, particular time, change of output status etc., by this Events Actions are triggered. Action is for example send HTTP command, send mail with picture from integrated camera, switch activation etc.
So for example when 1st quick dial button is pressed (Event), intercom will send mail to predefined address with photo of person standing in front of the intercom (Action). Meeting of this actions can be dependent on Condition, which can be status of time profile, call status, status of one of the inputs etc.
If we apply this on our example with sending mail after button press, then we can put there Condition with time profile. So the mail will be send only when the button is pressed and the time profile is active (for example only during bussines days), see picture below. All available Events, Actions and Conditions are described in detail including all possible parameters in common Automation manual here.

3. Streaming of audio and video from 2N IP Intercoms via RTSP and HTTP access to camera
2N® IP Intercoms allows watching of stream directly from camera including audio. To make this function available, it is necessary to buy Enhanced Video (Part No. 9137906) licence. This function is described more in detail in common configuration manual in chapter 5.4.02 Streaming (here). Example of how it is possible to display this stream is described in this FAQ, which describes how to set VLC player for receiving video. Where to configure streaming can be seen in picture below. You can use 4 different URL's for stream:
- rtsp://ip_address_of_intercom/ - this will show stream based on parameters configured in RTSP fold
- rtsp://ip_address_of_intercom/h264_stream - this will show stream with H.264 codec
- rtsp://ip_address_of_intercom/mpeg4_stream - this will show stream with MPEG-4 codec
- rtsp://ip_address_of_intercom/mjpeg_stream - this will show stream with MJPEG codec
Access to camera HTTP API is secured in default. So if you won't set this security on device, which will get the stream from intercom, then you have to disable this function in section Services->HTTP API. For Camera API set Unsecured for Connection Type and None for Authentication.

In fold JPEG you can configure the easiest way of streaming with aid of JPEG/HTTP and MJPEG/HTTP methods. For download of JPEG please use this URL:
- http://ip_address_of_intercom/api/camera/snapshot?width=W&height=H
For MJPEG this URL:
- http://ip_address_of_intercom/api/camera/snapshot?width=W&height=H&fps=N
Values W a H specify resolution of image (supported resolutions are 160x120, 320x240, 640x480, 176x144, 322x272, 352x288, 1280x960 - only for models equipped with 1MPix camera) Value N specify number number of pictures per second (you can choose from 1 up to 10). For sections Services->HTTP API is applied same configuration as above.
4. Configuration of Onvif on 2N IP Intercoms
2N IP Intercoms support international standard ONVIF, which makes them fully compatible with other ONVIF systems. To enable this function you have to purchase licence Enhanced Video (Part. No. 9137906). Configuration of ONVIF is described in detail in common configuration manual in chapter 5.4.03 ONVIF (here).
5. HTTP API on 2N IP Intercoms
2N® IP Intercoms offers application interface HTTP API which enables control some of the features with HTTP protocol.This interface is described in common IP HTTP API manual (here). It enables even closer integration with third party systems like security systems, home automation systems, monitoring systems etc. For enabling HTTP API you have to purchase licence Enhanced Integration (Part. No. 9137907). HTTP API offers this services:
- System API – Enables changes of configuration, tracking of intercom status and upgrade of intercom.
- Switch API – Enables control and status tracking of switches, for example opening the door locks etc.
- I/O API – Enables control and status tracking of logical inputs and outputs of intercoms.
- Camera API – Enables control of camera and watching of video from it (This service is available without licence).
- Display API – Enables control of display and showing of user information on display
- Phone/Call API – Enables control and tracking of incoming and outgoing calls.
For trial of HTTP API you can use integrated tool on address http(s)://ip_address_of_intercom/apitest.html.
HTTP API also can be used for downloading logs from the intercom. 500 event can be stored in memory of log for example key presed, numeric code entered, RFID card detection, call status changed etc. RFID card detection can be used for integration with 3rd party attendance system. Logging including all messages in HTML is described in common Event Logging manual (here).
6. Integration of 2N IP Intercoms with security systems
Thanks to inputs/outputs, which can be found on 2N IP Intercoms, it is possible to integrate the with 3rd party security systems. Typical example is Tamper switch. It is module, which detects opening of body of the intercom. This allows to create function in Automation (which is described above) which defines what will happen in case of unauthorized access to intercom. Example of this for 2N® IP Force is described in this FAQ. In this case intercoms is configured to play alarm sound from user sounds after unauthorized access to scare off the burglar. However for integration with security system it is possible to connect input of security system to one of the intercom outputs and create function, which will ensure that after unauthorized access, logical 1 will appear on this output and alarm will be triggered. Example of such function is in picture below.
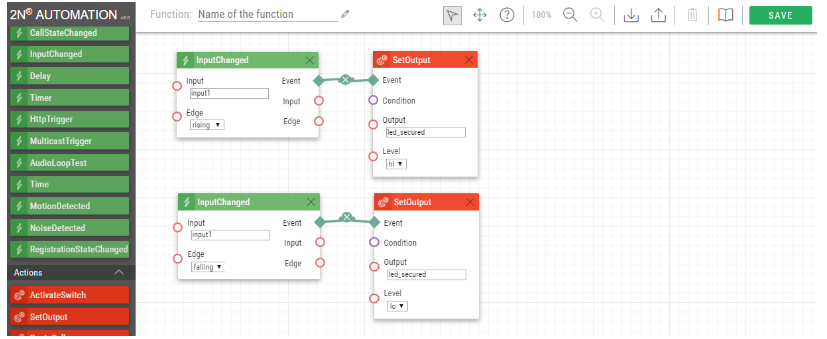
Another example of integration with security system is signalization of secured/unsecured. Output of security system is connected to input of the intercom. When the system is secured then there is logical 1 on input of the intercom and pictogram of lock on the intercom is shining. If the system is unsecured then there is logical 0 on the input of the intercom and pictogram is not shining. Example of such function created for 2N® IP Verso is in picture below.
7. Installation of 2N IP Intercoms
As already mentioned in this document, the installation manuals are different for each model of 2N IP Intercom. For download of these manuals you have to choose the right model on the guidepost page here and then download an installation manual. Whole installation is always described in this manuals starting with attaching to wall and ending with connection of additional modules. Very important chapter in all of these manuals is chapter Electric installation where all the inputs/outputs of the intercoms are described, also connection of the jumpers for different functions of inputs/outputs etc..
8. Solving of issues on 2N IP Intercoms
It is possible that despite all your effort you won't be able to make the intercom work. So if you will report issue, then please follow instructions described in this FAQ.