AXIS Camera Station
About Company
Axis provides intelligent security solutions that help create a smarter, safer world. As the global leader in network video, Axis drives the industry forward by consistently introducing innovative network products built on an open platform — delivering exceptional value to customers through a worldwide partner network. The company builds long-term relationships with its partners, equipping them with expertise and cutting-edge network products for both established and emerging markets. Today, Axis employs more than 4,500 dedicated professionals across 50+ countries, supported by a global ecosystem of over 90,000 partners.
About Axis Camera Station
AXIS Camera Station (ACS) is Axis’ intuitive video management software for small to medium installations, providing live monitoring, playback, incident management, and integration with Axis intercoms and access control devices. It supports features such as video motion detection, rapid search, and simple evidence export, making it a reliable and user-friendly solution tailored to Axis hardware. For larger or more advanced projects, ACS PRO extends these capabilities with higher scalability, enhanced performance, and enterprise-grade features for complex multi-site deployments. Together, ACS and ACS PRO offer a flexible, scalable VMS portfolio covering both straightforward and advanced security needs.
Website:
https://www.axis.com/products/axis-camera-station-5
https://www.axis.com/products/axis-camera-station-pro
Key features:
- A proven video management system
- Optimized for Axis’ network video products
- Quick system setup and intuitive operation
- Efficient investigation and high definition identification in up to 4K Ultra HD
- Extensive support organization
Supported features:
- Stream, watch and record video and audio from the 2N intercoms in Axis Camera Station
- Quick addition of intercoms to the software - onboarding of devices right out of the box
- Automatically begin intercom call based on an event in ACS
- Core license needed for 2N Intercoms thanks to the VAPIX integration
- Pop-up window when a call or alarm triggered
- Receive an email with snapshots from 2N devices with an event in AXIS Camera Station
- Receive and initiate calls within ACS software
- Remote door control with a single touch of button
- Support of bi-directional audio
- “root” account used instead of Admin
- See 2N device status
- Restart and factory reset of the device from the ACS
- Time synchronisation with ACS NTP server
Tested versions:
- AXIS Camera Station 5: 5.56+
- AXIS Camera Station Pro: 6.2+
- 2N OS FW: 2.49+
Note
For more details see in the "Manual" section below.
Supported devices:
All 2N IP intercoms with camera support (internal camera or external camera connection capability)
Required Licenses:
Axis Licence: ACS - core license per device needed
Manual:
Note
Before adding the 2N IP Intercom to AXIS Camera Station Pro, ensure the device is running firmware 2.49+. If your device has an older firmware version, please upgrade it first following the instructions in the "Configure 2N IP Intercom" section below.
Warning
If you updated the device from an older version, you must first login to the device's web interface at least once before you can use "admin" or "root" credentials in ACS.
Configuring factory default devices
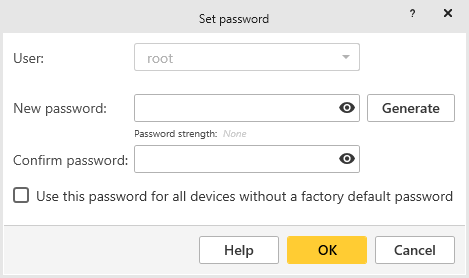
For new devices that have not been previously configured, the initial setup requires creating the device credentials. Here’s how to do it:
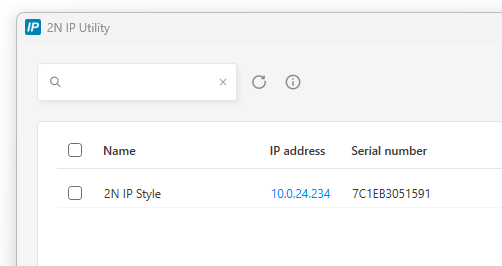
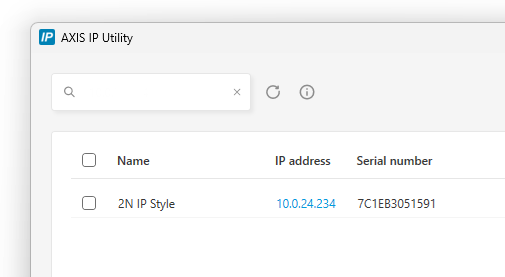
Open AXIS Camera Station Pro and navigate to Devices > Add Devices. If your device doesn't appear in the auto-discovery list, use manual search by entering the device's IP address. If you don’t know the IP and the device isn’t found automatically, use AXIS IP Utility or 2N IP Utility to locate it (the device must be on the same network segment as the ACS). See "Configure 2N IP Intercom" below for further instructions. Once the device appears in the list, locate the "Set password" button in the Status column and click directly on it.
 |
 |
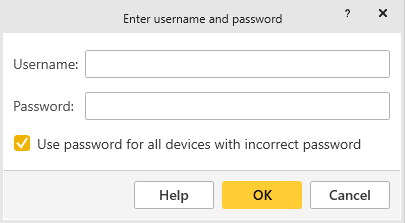
For devices that have been previously configured, you have two authentication options when adding them to AXIS Camera Station Pro.
Open AXIS Camera Station Pro and navigate to Devices > Add Devices. If your device doesn't appear in the auto-discovery list, use manual search by entering the device's IP address. If you don’t know the IP and the device isn’t found automatically, use AXIS IP Utility or 2N IP Utility to locate it (the device must be on the same network segment as the ACS). See "Configure 2N IP Intercom" below for further instructions. Once the device appears in the list, locate the "Enter password" button in the Status column and click directly on it.
 |
When prompted for credentials, use the standard administrator credentials (admin/root with the administrator password) - the same way you would add native AXIS devices.
Note
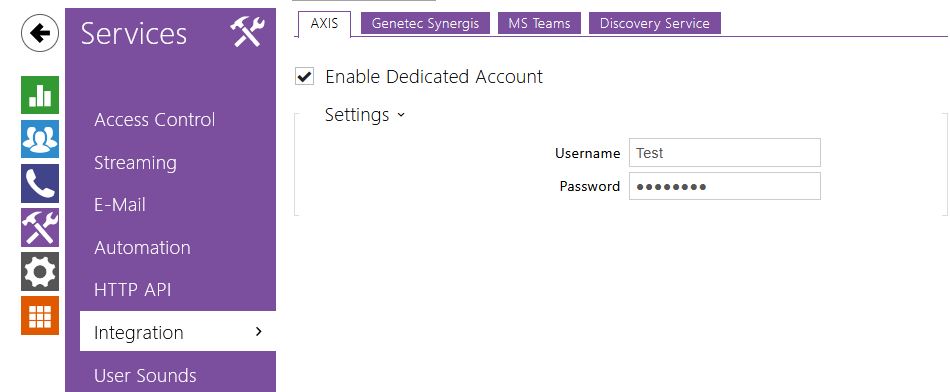
Alternatively, you can use a dedicated account if you have configured one. To set up a dedicated account, in the 2N device web interface go to Services > Integration > AXIS, check "Enable Dedicated Account" and enter your custom username and password. However, using the standard admin credentials is the recommended and most straightforward approach.
 |
After entering your credentials, click OK and then click Add and the device will be integrated into your system.
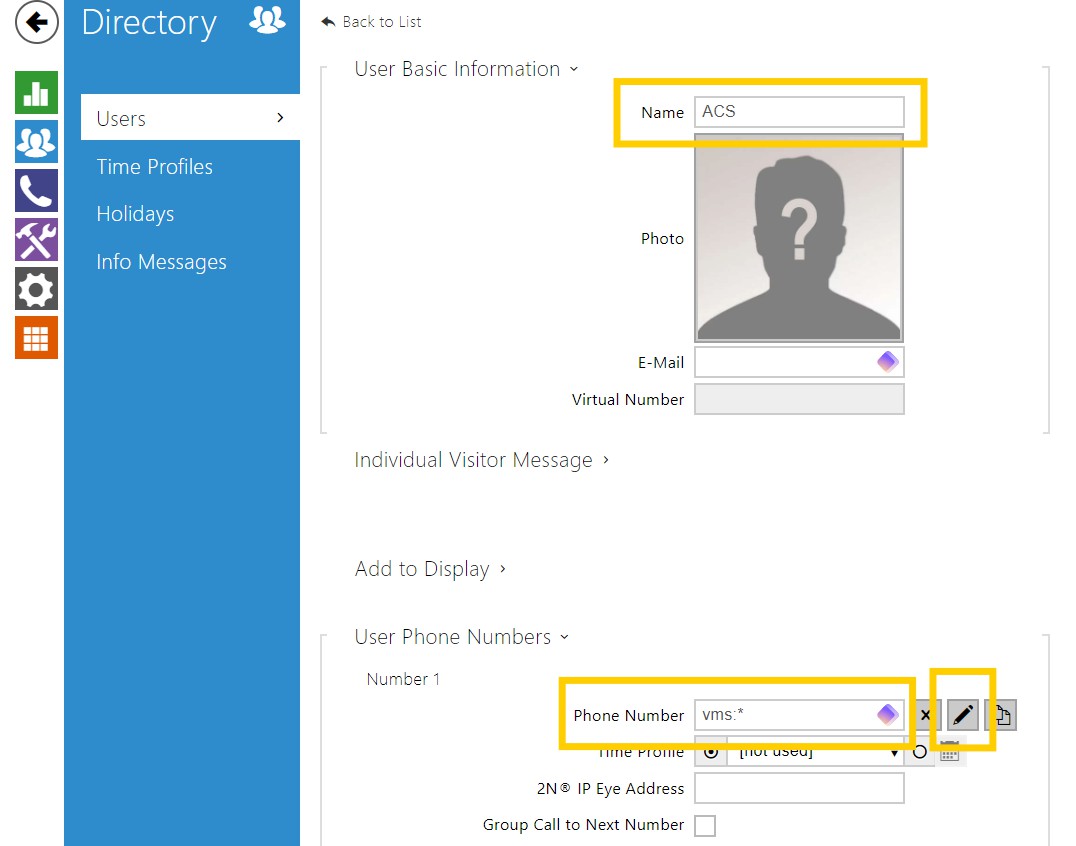
Your device will then show in the Cameras tab.
 |
After the device has been added, the device interface can be accessed by selecting its IP address in the Cameras tab.
To check the IP address of the device download the 2N IP Utility or AXIS IP Utility.
  |
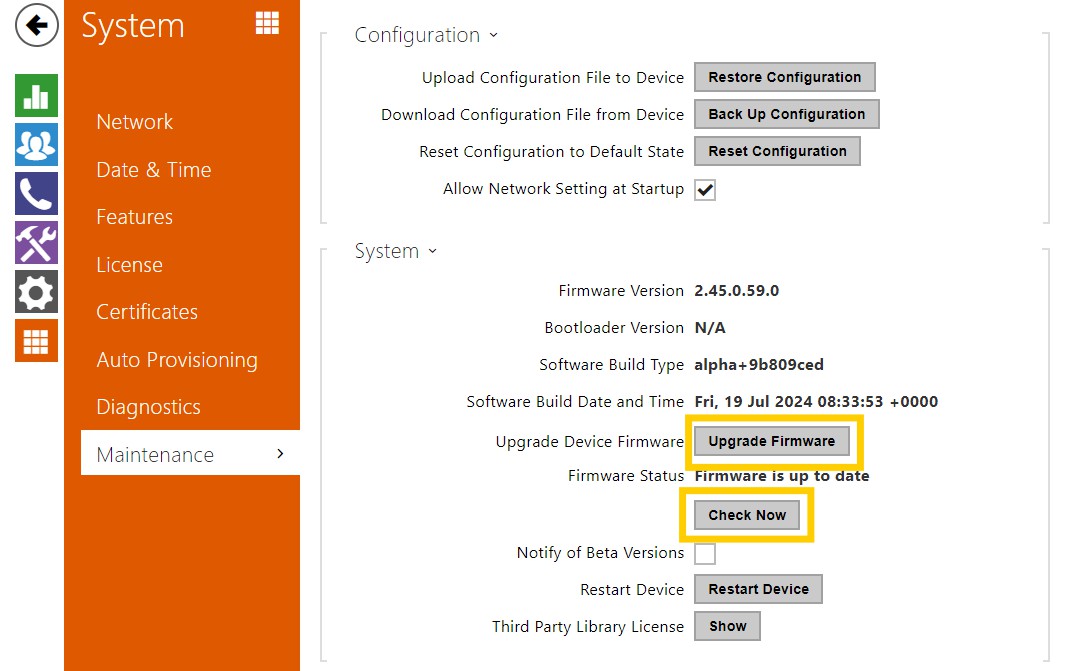
Ensure the device is running firmware 2.49+ by checking the Firmware Version in System > Maintenance. If the version is older, upgrade using the Upgrade Firmware section and the Check Now / Upgrade Now buttons.
 |
 |
 |
 |
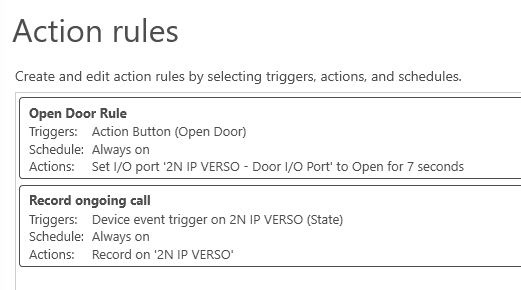
When adding a 2N Intercom to AXIS Camera Station Pro two action rules are created. One for the Action button that can open the door, but also one action to record an ongoing call.
By default, the action is to activate the I/O port in the 2N IP Intercom. This can be changed to, for example, grant access on an AXIS Door Controller.
 |
 |
Note
The number of seconds for Door IO port to be open needs to be configured in 2N IP Intercom. Changing the value from within AXIS Camera Station will have no
Action rules in AXIS Camera Station Pro are applicable also for 2N intercoms. Device events can be set up on the 2N Intercom and used as triggers in any action rules configured in AXIS Camera Station Pro and any appropriate action can be chosen. Examples on how to configure action rules for more 2N specific scenarios is provided below. For more details on different 2N Intercom alarms and events refer to the 2N documentation.
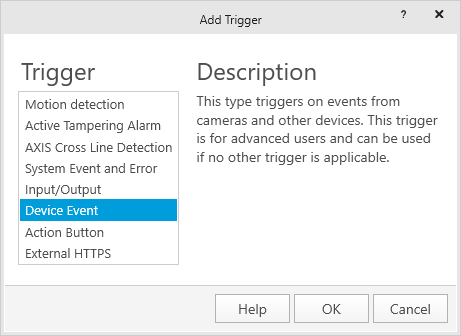
In AXIS Camera Station Pro, go to Configuration > Recordings and Event > Action rules. To trigger on 2N devices create action rules with Device Event as Trigger.
 |
Configuration in 2N Intercom
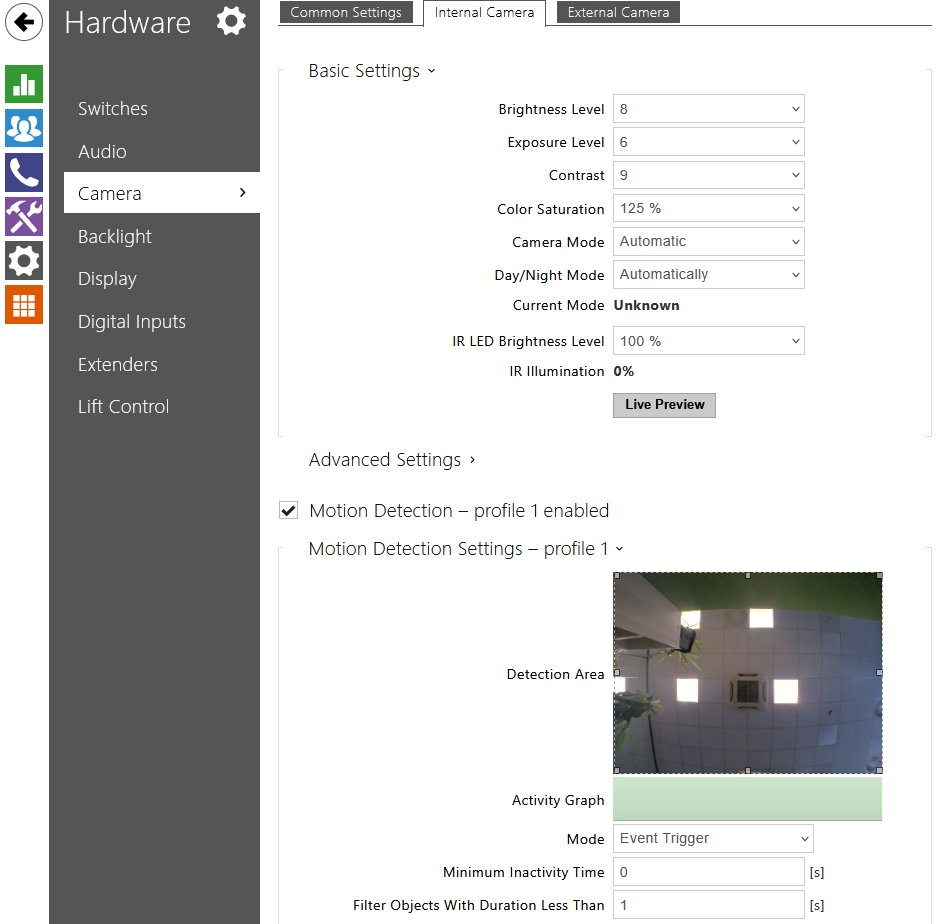
Go to Hardware > Camera > Internal Camera and select Motion Detection Enabled. Set sensitivity thresholds and detection area. You can test the motion detection function by observing the Activity Graph that shows when the motion detection eve nt triggered.
 |
Note
Motion Detection requires 2N Intercom Gold License.
Configuration in AXIS Camera Station Pro
When creating the action rule, in the Create Device Event Trigger dialogue, select the 2N Intercom device and the event VideoSource > MotionAlarm.
This event is tied to the MotionDetected event in the 2N device.
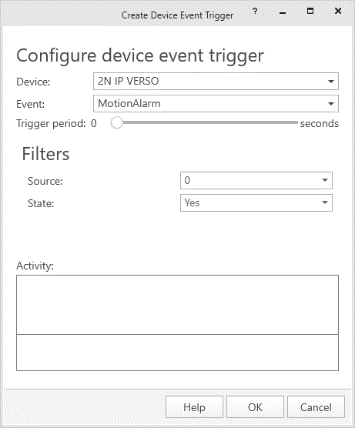 |
Select OK and then Next to add an action to record (or other preferred action). You can add more than one action
Configuration in 2N Intercom
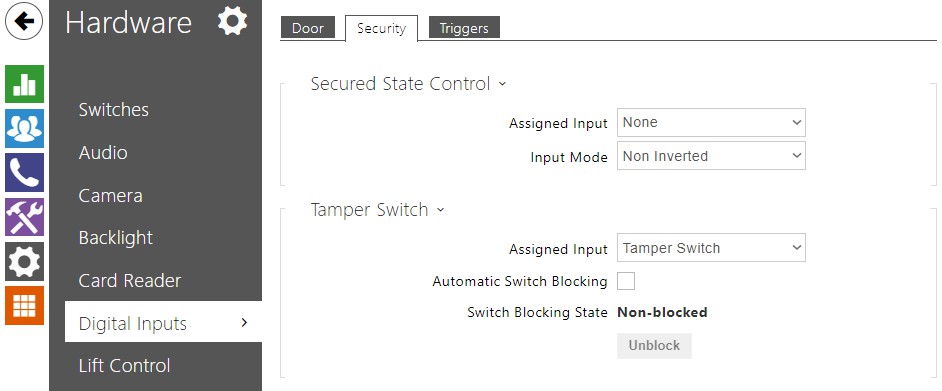
Go to Hardware > Digital Inputs and set Assigned Input to an available tamper input.
 |
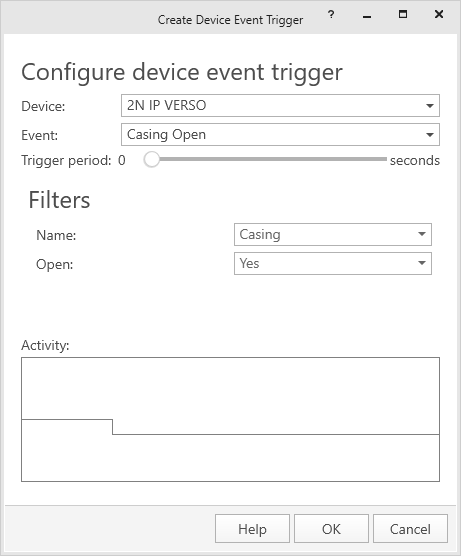
When creating the action rule, in the Create Device Event Trigger dialogue, select the 2N Intercom device and the event Casing > CasingOpen.
This event is tied to TamperSwitchActivated event in the 2N device.
 |
Configuration in 2N Intercom
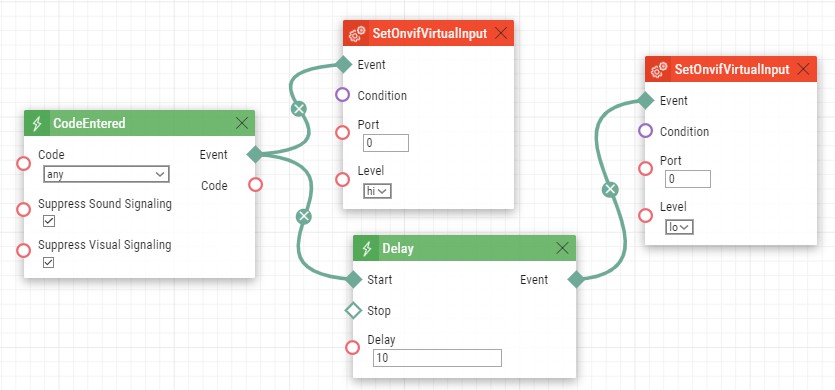
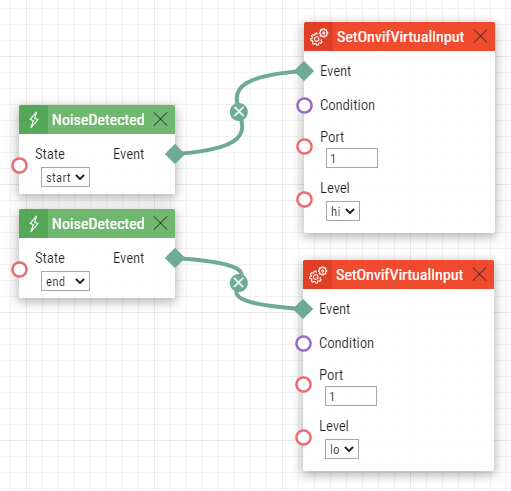
You can use any events from 2N Automation as triggers in AXIS Camera Station Pro. Go to Services > Automation and edit any available function by selecting the pencil icon.
Select the desired Event block from the Events section in the left-hand side menu. Scroll down in the left-hand side bar and in the section Actions, select SetOnvifVirtualInput block. Configure the Action block with appropriate Port number and switching Level when the block is triggered:
- hi for setting the input to logical 1
- lo for setting the input to logical 0
Connect the Event and Action blocks. Add and configure additional blocks as needed.
Save the function and exit the Automation configuration. See the examples below.
Note
- Automation requires 2N Intercom Gold License.
- 2N and AXIS Camera Station Pro use different Virtual inputs indexing. 0 in 2N is 1 in AXIS Camera Station Pro.
Examples:
This is a simple configuration for 10 s activation of virtual input 0 (1 in AXIS Camera Station Pro) when a code is entered.
 |
 |
Configuration in AXIS Camera Station Pro
In the Create Device Event Trigger dialogue, select the 2N Intercom device and the event Input ports > Virtual input.
This event is tied to VirtualInput event in 2N devices.
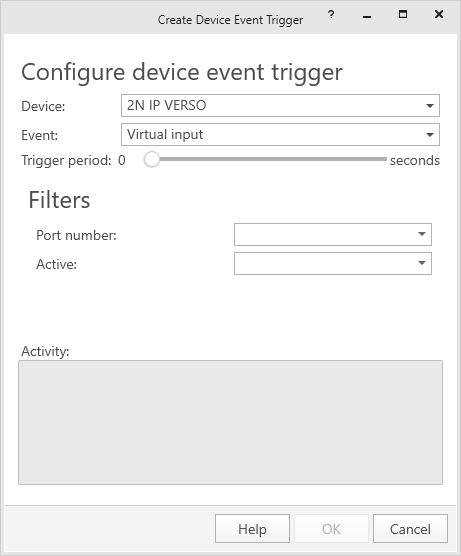 |
Adjust Port number to a port that is used for your desired function (port numbers are indexed from 1 in AXIS Camera Station Pro and from 0 in 2N devices). Adjust Active to Yes or No according to the desired trigger activation.
Select OK and then Next to add your action of interest. You can add more than one action.