9.4. Functionality Tests according to EN 81-28
This subsection describes the procedures necessary for testing the functionality of the ALARM emergency signaling in 2N Lift8 elevators according to the EN 81-28 standard requirements. Make sure that the tests are carried out before the elevator is put in operation and periodically as a maintenance task.
Preparation
Connect the Central Unit to the 2N Lift8 Service Tool in your PC and record the following settings:
| Code / Parameter | Name | Allowed values |
|---|---|---|
| 914 | Delayed call | ≥ 1 s |
962 | Min. time of pressing ALARM button for the cabin audio unit | < 3000 ms |
| 963 | Min. time of pressing button to trigger forced/test alarm | 30 s |
| 966 | Rescue mode | 1 = end the rescue process with button 2, 2 = end the rescue process with password, 3 = end the rescue process with button 2 or password |
| 992 | Rescue password | up to 16 digits 0–9 |
Tip
Check the parameter values via DTMF, refer to Subs. 3.1 Lift8 Programming.
Also, get the shaft number where the elevator under test is located. The shaft number defines addressing on the splitter. Address 1 is reserved for the shaft connected directly to the Central Unit.
6.2.2 ALARM Emergency Signaling Information (4.1.2)
- Press and hold the ALARM button with a bell symbol for a period of time necessary for triggering the test alarm (min. 30 s).
- Make sure that the yellow LED goes on and the sound signal is heard. Verify the signals according to the Visual and Acoustic Signals in Elevator Car table.
- Once a call is set up with the rescue service, make sure that the green LED starts flashing.
- Verify the two-way communication with the rescue service.
6.2.3 ALARM Emergency Signaling End (4.1.3)
- Perform the Alarm Emergency Signaling Information test procedure.
- Ask the rescue service to end the call.
- Make sure that the green LED goes off when the call is ended. The yellow LED keeps shining.
- End the rescue process.
- With button 2
- Press and hold button 2 for 3 s.
Button 2 is an external button connected into the audio unit ALARM 2 connector; its location is determined by the installation company.
- Press and hold button 2 for 3 s.
- With password
- Call the Central Unit: dial the Lift8 CU number or press and hold the asterisk symbol
 (for 2 s at least).
 - Press DTMF 9 to enter administration.
- Press DTMF 2 to end the rescue process.
- Press the number of the shaft (1–8) in which the audio unit is located.
- Enter the rescue password and press
- Call the Central Unit: dial the Lift8 CU number or press and hold the asterisk symbol
- With button 2
- Make sure that the yellow LED goes off.
6.2.4 Emergency Power Supply (CU) (4.1.4)
- Disconnect the Central Unit (CU) power cable from the 230 V socket.
- Test the ALARM signaling functionality as instructed in ALARM Emergency Signaling Information and ALARM Emergency Signaling End.
Make sure that the ALARM function works correctly even if the Central Unit is powered from an emergency supply. - Disconnect the device from the emergency power supply (battery pack in the CU).
- Loosen the three screws on the CU top cover.
- Move the CU top cover for removal.
- Be careful while removing the cover, pay attention to the grounding cable connecting the cover with the CU bottom part. Do not disconnect the cable if possible!
- Disconnect the FASTON cable from the motherboard.
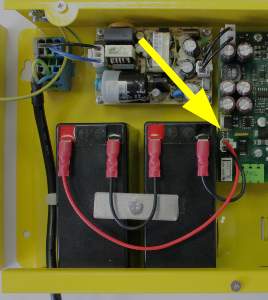
Reconnect the CU power cable to the 230 V socket.
- Check the LED indicators on the Central Unit – the POWER/BATTERY LED should shine red when the emergency supply is disconnected.
- Reconnect the battery pack with the motherboard using the FASTON cable after the test. Maintain the wiring polarity.
- Replace the top cover on the CU and fasten the fitting screws. Make sure while replacing the cover that the grounding cable is connected to the cover!
- Make sure that the red BATTERY/POWER LED is not shining.
6.2.5 Visual and Acoustic Signals in Elevator Car (4.1.5)
In some audio units, the external LEDs are brought into the elevator cabin. The installation company is responsible for their locations. Make sure that the external LEDs have been brought into the elevator cabin.
The table below only shows the signals that are directly on the devices (inside and outside the car).
| Audio Unit | Call Connection | Active Call | Active Rescue Mode | Rescue Mode End |
|---|---|---|---|---|
918618BE 2N Lift8 – Audio Unit Flush, With button | Yellow LED | Yellow LED | Yellow LED | no LED shining |
918618E 2N Lift8 – Audio Unit Flush, Without button | Yellow LED | Yellow LED | Yellow LED | no LED shining |
918618BE 2N Lift8 – Audio Unit Compact, With button | Yellow LED | Yellow LED | Yellow LED | no LED shining |
918613WBE 2N Lift8 – Audio Unit Compact, Without button | Yellow LED | Yellow LED | Yellow LED | no LED shining |
918611E 2N Lift8 – Machine room audio unit – machine room/control room | Yellow LED | Yellow LED | Yellow LED (hour-glass) | no LED shining |
| 918612E 2N Lift8 – Audio Unit Shaft – shaft | Yellow LED | Yellow LED | n/a | n/a |
918618EE 2N Lift8 Audio Unit, Landing (Evac.), for flush mount 2N Lift8 MEEF (Evac.), for flush mount | Yellow LED | Green LED flashing | n/a | n/a |
918615E 2N Lift8 – Audio Unit Fireman, Key & PT | No signaling | Blue button backlight | n/a | n/a |
6.2.6 Communication (4.1.8), ALARM Emergency Signaling Verification (4.1.6), Identification (4.1.7)
Communication Response
- Make sure that the elevator door is not fully open.
- Press the ALARM button with a bell symbol for the ALARM pressing time (parameter 962).
- Make sure that the yellow LED goes on and the sound signal is heard.
- Once a call is set up with the rescue service, make sure that the green LED starts flashing.
- Verify the two-way communication with the rescue service.
ALARM Verification and Retriggering
- Make sure that the elevator door is not fully open.
- Press the ALARM button with a bell symbol for the ALARM pressing time (parameter 962).
- Make sure that the yellow LED goes on and the sound signal is heard.
- Once a call is set up with the rescue service, make sure that the green LED starts flashing.
- Verify the two-way communication with the rescue service.
- Ask the rescue service to end the call.
- Make sure that the green LED goes off when the call is ended. The yellow LED keeps shining.
- Press the ALARM button shortly.
- Make sure that the call establishing sound signal is heard. The system must establish connection immediately after the short press.
- Once a call is set up with the rescue service, make sure that the green LED starts flashing.
Identification
Verify on the receiving device that the device is correctly identified on the receiving device. The receiving device is not in the 2N Lift8 portfolio.
Accessibility and Reliability
It is necessary to verify the main receiving device accessibility and automatic test records (operational calls) on the receiving device. The receiving device is not in the 2N Lift8 portfolio.