5.5.6 Display
 |
Some intercom models (2N IP Vario, 2N IP Verso) can be equipped with a color LCD display. The device state is displayed (call progress, door opening, etc.) and the following modes are available:
Display – enable the display and language settings for 2N IP Vario and basic and language settings for 2N IP Verso.
Slideshow – display a slideshow showing a set of recorded images after a defined idle time. The automatic switching time can be configured.
Display (for 2N IP Vario only)
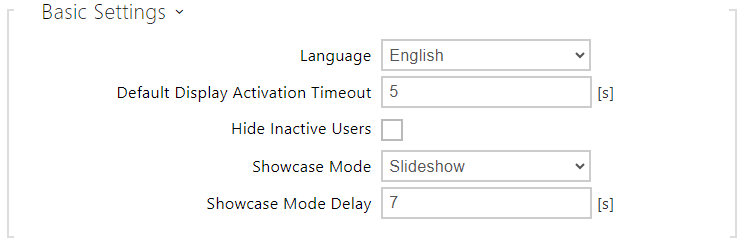 |
- Language – set the language of the texts displayed on the screen. You can choose from predefined languages or a user-defined language.
- Default Display Activation Timeout – set the maximum display idle time (i.e. during which the display is not controlled via the buttons or numeric keypad) in which the Phonebook mode is switched to the Name tag display if configured. Or, the 2N logo default window is displayed.
- Hide Inactive Users – select this to automatically hide the user on the display whose active time profile disables contacting.
- Showcase Mode – set whether the device shall go into the showcase mode when idle. Choose various options in the showcase mode (OFF, Slideshow).
- Showcase Mode Delay – set the idle timeout in the range of 1 to 600 seconds after which the device goes into the Showcase Mode. There is always a fixed 15-second timeout for the device to return to the homescreen.
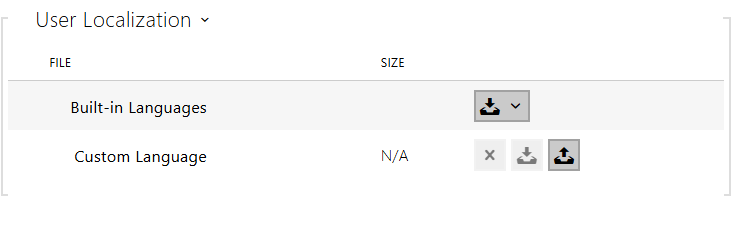 |
- Built-in Languages – download a preset XML file with all the texts to be displayed.
User Language – record, remove and load a localization file of your own.
User Font – record, remove and load a font of your own for the texts to be displayed. Keep the TTF format and make sure that the file does not exceed 4 MB.
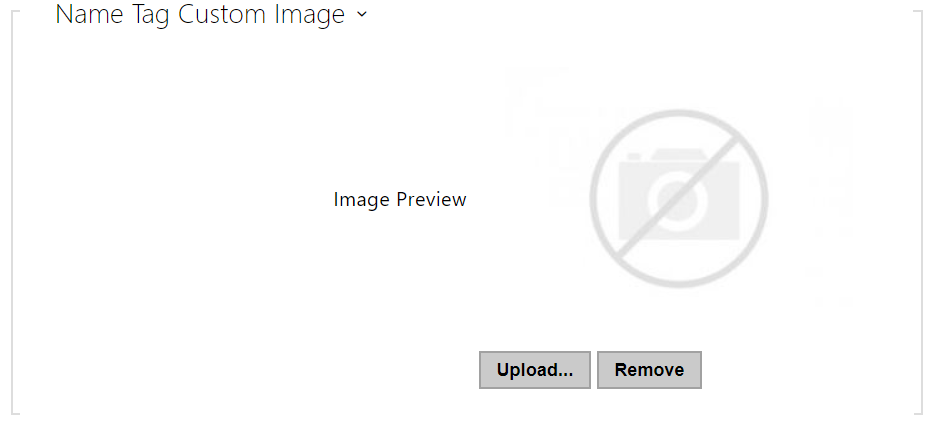
If you do not like the default graphic appearance of the name tags, upload a background of your own to the intercom. Make sure that the image resolution is 320 x 240 pixels. Upload your name tags to the intercom to replace the original name tags. The original user assignments, however, remain the same.
 |
Display (for 2N IP Verso only)
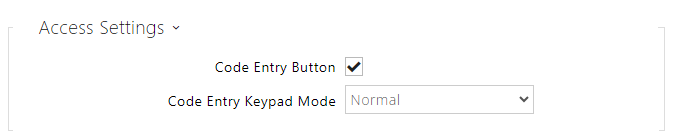 |
- Code Entry Button – set whether the Enter PIN button to open the numeric keypad is visible on the home screen.
- Code Entry Keypad Mode – select between a normal and scrambled layout for the numeric keypad, where the position of numbers changes after each confirmation for enhanced security. This setting also applies to multifactor authentication.
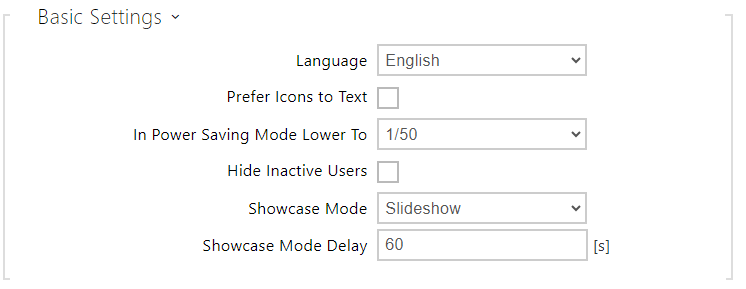 |
- Language – set the language for the texts to be displayed. Choose one of the predefined languages: English, Czech, German, Italian, French, Spanish, Russian, Finnish, Danish, Polish, Dutch, Portuguese, Turkish, Norwegian, Swedish or a custom language.
- Prefer Icons to Text – the icons on the display will be preferred to the text.
- In Power Saving Mode – activate the power saving mode in which the display brightness is reduced. If no event occurs during two Slideshow screen activation timeouts, the power saving mode activation has been successful. Set 0 in the Slideshow screen activation timeout to disable the power saving mode. Any movement in front of the intercom camera or any display event (such as door lock activation or display touch) restores the full brightness of the display.
- Hide Inactive Users – select this to automatically hide the user on the display whose active time profile disables contacting.
- Showcase Mode – set whether the device shall go into the showcase mode when idle. Choose various options in the showcase mode (OFF, Slideshow).
- Showcase Mode Delay – set the idle timeout in the range of 1 to 600 seconds after which the device goes into the Showcase Mode. There is always a fixed 15-second timeout for the device to return to the homescreen.
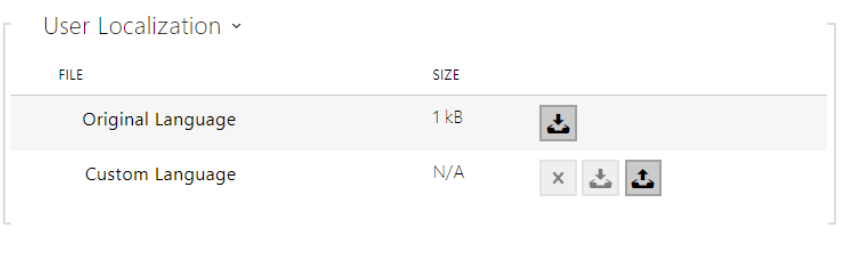 |
- Built-in Languages – download the localization file template for own translation. It is an XML file with all the texts to be displayed.
- Custom Language – remove, download and upload a localization file of your own.
Slideshow for 2N IP Verso
This tab helps you set the image and video list for the Slideshow mode. Up to 8 images and videos can be uploaded for the Slideshow to be switched with a predefined delay.
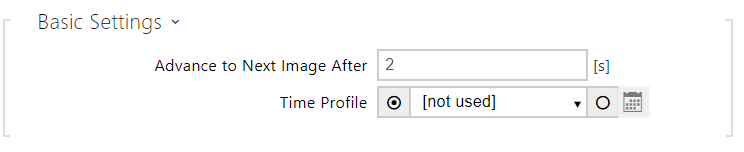 |
- Advance to Next Image After – set the image transition time in a Slideshow.
- Time Profile – choose one or more time profiles to be applied. Set the time profiles in Directory / Time profiles.
 – select one of the pre-defined profiles or set the time profile for the given element manually.
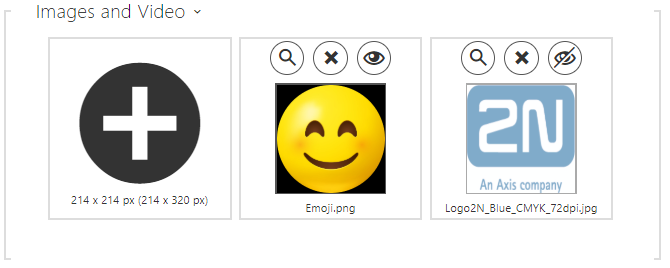 |
Click the magnifier icon ![]() to view the uploaded image, press
to view the uploaded image, press ![]() to delete an image and click
to delete an image and click ![]() to hide a selected image/video on the device display. Click the variable image/video icon
to hide a selected image/video on the device display. Click the variable image/video icon ![]() to set a time profile
to set a time profile ![]() for the display. If no time profile is active, the slideshow will have no time profile conditioned content. In the same case, the slideshow will always have a content that is not conditioned by a time profile.
for the display. If no time profile is active, the slideshow will have no time profile conditioned content. In the same case, the slideshow will always have a content that is not conditioned by a time profile.
If no image is uploaded, the Slideshow mode will never be activated.
Tip
- To hide the "Start with touch" display on the 2N IP Verso model display, upload an image of the resolution of 214 x 320 pixels.
Caution
- Video with a 214 x 320 resolution cannot be uploaded in FW versions lower than 2.35.
Slideshow for 2N IP Vario
This tab helps you configure a list of images for the Slideshow mode. Up to 8 images can be uploaded for the Slideshow to be switched with a predefined delay.
 |
- Advance to Next Image After – set the image transition time in a slideshow.
 |
Make sure that the image resolution is 320 x 240 pixels for 2N IP Vario. Other sizes will be adjusted to the display resolution automatically.
Click the magnifier icon ![]() to view the uploaded image, press
to view the uploaded image, press ![]() to delete an image and click
to delete an image and click ![]() to hide a selected image/video on the device display.
to hide a selected image/video on the device display.
If no image is uploaded, the Slideshow mode will never be activated.
Caution
- 2N IP Vario only supports image display.